Device Maintenance > Stations
Stations define how the software interacts with various type of client devices running the Microsoft® Windows® operating system or a Remote Desktop application that emulates Windows from another OS (operating system). For information about installing the client software, please see the topic Client Installation. We recommend you work with your ECI Implementation or Support team when you are adding or changing devices that access the software to ensure compatibility. You can also consult the General System Requirements document for your software version to learn more about devices with verified application support. You can get this document from the Customer Portal.
![]()
Defining Stations and your NetworkA network is a collection of computers and other devices, such as printers, that communicate together. This communication can be done via both wired and wireless connections. Network hardware typically includes a router connecting the network to the Internet as well as switches and/or hubs. In order for an address to be identified on the network allowing communication, an address is used. The address identifies the device for network purposes. Addresses can be either static or dynamic. Static addresses stay the same even if the network or device is reset. Dynamic addresses are assigned as devices connect to the network and can change. Dynamic addressing is referred to as DHCP (Dynamic Host Configuration Protocol). Addresses cannot be shared, so each device linked to the network must have its own unique address. In a typical network configuration, ranges of address are defined for static use vs. dynamic (DHCP) use. Ranges are defined for the network using either a browser or other software to access the network hardware device settings. There are a few different types of IP (Internet Protocol) addresses. IPV4 is the older numeric format that consists of four sets of integers with values between 0 and 255 separated by decimals (.). An example of an IPV4 address would be 123.0.0.123. The newer format, IPV6, has a more complex structure providing a much greater number of possible combinations. Devices also have a MAC address which isn't assigned by the network, but may be used for identifying or validating devices that connect. Since a single computer can have more than one network card and multiple connections (as well as virtual connections), there can be more than one address involved. For example, one client computer might have both a wired network and also a wireless adapter address. The Log Me In Hamachi software that we use for support connections creates a virtual network adapter and address. A "station" is defined in the software for each client computer or device that will run the The IP Address field's value for a station record is matched with the client computer's current IP address when the software is run. When a user attempts to sign-on, we attempt to determine the IP address of the client. This is more difficult or impossible when the software is being accessed via a remote connection (such as remote desktop or over a VPN (Virtual Private Network) connection). If a match is found and there is no command line station override (see below), that station is used; otherwise, the software won't permit access. If you do use an IP address for identifying a station, the address must be within the defined range of static addresses for the network. Additionally, the address should be set as the preferred address for the device (don't choose "Obtain an IP Address Automatically"). Use of a static IP address is not necessarily the best choice for certain computer and mobile device connections. Static addressing is required for printers, signature pads, and other network devices that interface with stations, however. For instructions on how to set a Windows computer's preferred IP address, click Command Line OverrideAs an alternative to using the device's IP address, you can come up with your own identifiers or use the Windows user account for identity. The identifier would be saved in the "IP Address" field for the station record just as an actual IP address would, but would be some value determined by your company or network administrator. When using your own identifiers, the desktop shortcut or station ID on mobile devices must reference the identifier used. This is done by adding a command argument after the "target" path when modifying the shortcut's properties. See the example below: \\192.168.1.123\SpruceDeploy\SpruceWareStart.exe STNID=MYSTATIONID In the example above, the word "MYSTATIONID" would be replaced with your unique identifier. This would be different for each computer or device connecting as a station. It is best to not use any spaces or special characters in the identifier unless instructed otherwise by support. Command line overrides work best when DHCP addresses are being used with client computers or you are using the software over a remote type connection (remote desktop, terminal services, remote app, etc.) or VPN type connection. In the case of hosted systems, the Windows user is typically used as the identifier. |


Device Name
This is a four-character code that is assigned to identify the station on documents and the application window. Use the longer description area to better describe the physical location of the station. We suggest using a naming scheme that helps identify the station by users at your company such as POS1, OFF2, YARD, or TOMG, for example.
Temporarily Disabled
If this check box is checked (selected), the station will not allow users to log-on until the check box is cleared and the station record re-saved using the Process (F12) function.
Location
The station's location is a text description that may be useful for describing a physical location. A useful description is strongly suggested in larger companies where the physical location may not be easily identified by just the station name.
IP Address
This must be either a unique station identifier your company determines ("REGISTER1," for example) or the "static" network IP (Internet Protocol) Address assigned to the device being used.
We suggest assign a unique name in place of an IP address and to specify a command line argument in the desktop shortcut that indicates which station "name" to use (add STNID=MYSTATIONID after the desktop shortcut's target in Properties). This is often necessary in cases of remote connections. If you choose to use IP addresses, stations should only be assigned to IP addresses that are within the designated range of static addresses, and not those in the DHCP range (which are assigned randomly when a connection is made). Static IP addresses can be set by adjusting via the device's Network Adapter settings from the Microsoft Windows operating system. Most devices being used with the station must be assigned to use "static" addresses as well.
To find the current IP address (often addresses) for a PC, type ipconfig from the command prompt on the device to find its current address. Network settings also determine whether the device always uses the same address or requests a dynamic address each time it connects to the network. Again, it's possible for IP addresses to change, so it's a good idea to have your company's network administrator make sure the IP addresses you are using are within the defined static address ranges so that this doesn't happen).
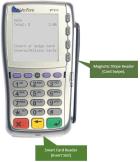
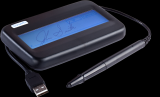
Signature Pad Address
This is the IP (Internet Protocol) Address assigned to the signature pad being used with this station (if any). If you are using VeriFone pads, the address setting is determined from the Settings form and does not need to be typed in here. VeriFone pad devices can also be connected by a USB cable. In these cases, the "address" will not be an IP address but will list a COM port instead. Each signature pad should only be assigned to a single station (only one station can use the pad at any given time, pads may not be shared).
Branch
This is the default branch used by the station. A user may be assigned to a default branch and may or may not have permission to access other branches. The branch assigned to the station may prevent some users from accessing the station if the user's access does not permit it. Each station has to be assigned to a particular branch.
Note: If you choose a branch for a station, and it differs from the branch specified in the user's record of the user assigned to the station, the station branch setting takes precedence. The user will see the branch data associated with the station's branch setting.
Max # Sessions
Typically, this entry is set to 1 when the station supports a credit card or signature pad. When users run more than one session at a time from a station, the second session is not able to use the devices for card processing and signature captures. The second session also tends to cause communication issues that affect the first session. For these reasons, we recommend this entry be set to 1.
A "session" is a unique instance of the software and does not refer to additional forms opened within a session. The number of sessions running at the same time determines the responsiveness of the system throughout the business. The more concurrent sessions one station runs, the slower the system for all users.
Note: Remember, per your contract, you have a certain number of concurrent seats (sessions) to use at a time. You can look up your business's number of concurrent seats by going to Maintenance > Database > Parameters > Software tab and in the Installed Sales section, check the entry in the # Concurrent Seats field.
Attachments
This section of the form is used for indicating the types of devices that will interface with the station. "Accessories" include bar code scanners, signature pads, cash ticket printers, and cash drawers.
Barcode Scanner/Scanner Scale
If the station will use a supported barcode scanner or scanner scale, check the Barcode Scanner or Scanner Scale check box to add it. If you are adding a Scanner Scale, choose the Scale Settings button to enter the device type and scale settings information.
We recommend that you work with your Implementation or Support team to add these devices to ensure they are supported in the software.
Review the General System Requirements document (available from the Customer Portal) for your application to see what scanners are currently certified. Programing involves scanning a series of barcodes in a particular sequence.
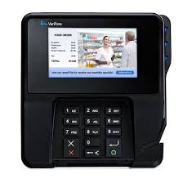
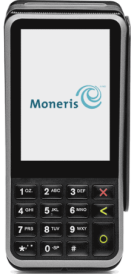
Card Pad
Select this option to add a card pad payment processing device.
Type
To add a card processing device to the station, select the Card Pad check box and press the Type button to select the card processing device for the station.
The card processing options that display in this list have been certified by our engineers to work with the application, although some devices are certified for a particular region. When the Setting button enables, choose this option to set the pairing and other device-specific details required for the successful operation of this device. We recommend that you work with your ECI Implementation or Support team to add these devices to ensure they are supported in the software.
Note: If you are using the FiServ Hosted Payment page to process transactions but do not have a card processing device, you should still enable the Card Pad check box and select None in the Type list.
Signature Pad (Secondary)
Select this option to add a signature pad as a secondary payment processing device.
Type
To add a signature pad device, choose the Type button to specify the device details. Since Card Pad Type and Signature Pad Type are separate entries now, some businesses may need to reset these options on your stations.
Note: Older pads may, in some cases, still be used for signature collection or item display; however, we cannot guarantee that they will be compatible with future software versions. Additionally, changes to Microsoft® operating systems as well as limitations placed by the manufacturers may cause older pads to no longer function at any time. Such issues are beyond our control. Legacy devices are included in the listing so that we don't prevent companies from continuing to use those devices if they work in some capacity.
For a list of supported and unsupported devices, click ![]() here.
here.

 Flex
Flex

Settings
When you select the TSYS Cayan, Verifone, Point, Clover, Linkly, or GlobalPay type, a Settings button opens additional settings for the pad device assigned to the station. The settings are different for each pad type.
TSYS Cayan
Information about device settings for use with TSYS Cayan can be found under the Special Topics section. Click here for more information.
Verifone Point
When companies with Verifone integrated card processing choose or migrate to Verifone Point, each device must be "paired" with a specific station. It's important to set and save the IP address of the device prior to pairing. For more information about device settings and pairing, click here.
Verifone (Legacy)
For more information regarding VeriFone pads, please see the topic VeriFone under the special topic Hardware and Peripherals. This option does not support EMV processing.
Clover (UK Only)
Work with your ECI Implementation and Support team using these Clover Setup instructions to set up stations to use the Clover devices.
Linkly (Australia Only)
Work with your ECI Implementation and Support team to set up your Linkly device.
No Item Display
This allows the item display to be enabled (not checked) or disabled (checked) for the pad assigned to this station. Disabling the display can speed up processing because less communication between the pad and station are required. A system parameter also exists which can be enabled to suppress pricing, but still display item information if the items are displayed. With Verifone Point enabled Verifone MX915 devices, the item display feature is improved from earlier implementations.
Cash Drawer
This check box may be used to indicate whether a station has an attached cash drawer; however, all cash drawer functionality is defined by drawer selection and configuration accessed via the Settings ![]() icon found to the right of the default printers listing (on this same form). All stations that may potentially process Point of Sale or Receivables transactions should have a drawer assigned.
icon found to the right of the default printers listing (on this same form). All stations that may potentially process Point of Sale or Receivables transactions should have a drawer assigned.
Note: If you need to set up an Ecommerce Cash Drawer, check out the Cash Drawer links below.
Remote Client (Cloud Hosting Only)
This panel allows you to set the "alias" and "settings" for remote printing for our cloud-hosted customers. The purpose of the Remote Client is to allow direct printing through either a user's RDP (Remote Desktop or App) connection or by a Remote Client application that's installed on the local user's computer. This avoids the use of a VPN (Virtual Private Network) for printing. The benefits of local printer management is that it's entirely within the control of your company and uses fewer server resources. In these cases, there's no need for support involvement to add or change printer settings, etc. This also allows the station to be used for POS Assured and SmartKiosk.
Enabled
Select this check box to enable remote client settings for this station.
Type
Select the type of remote client this station will be using. Options include: Standard Station (Default), POS Assured Appliance, or SmartKiosk.
Alias
This provides the ability to designate another station where printing will be directed to (in place of using the selected station's printers). That station's printers would be used for print processing in cases where the Alias was set.
Settings
Click the Settings button to specify the buffer size and write interval. Generally, these settings should not be changed except under the advisement of Support personnel.
Default Printers
Default printers assigned to a station will be used unless the branch has a default printer (for the same purpose) defined. Branches do not have the same number of default options as stations, so overrides only apply in some cases.
Invoice
This should be the printer device that will be used for printing documents that normally would default to an "invoice"' style print format (by this station). By "invoice" style," we are referring to a full page (8.5 x 11) printed document, not a cash ticket. This printer may also be used for customer orders, quotes,
Order
This is the default printer used for customer orders that are processed using this station. If no specific order printer is specified, the current branch's order printer will be used. If no branch printer is specified, the order printer defaults to the assigned invoice printer.
Quote
This is the default printer used for quotes that are processed using this station from Point of Sale. If no specific quote printer is specified, the current branch's quote printer will be used. If no branch printer is specified, the printer defaults to the assigned invoice printer.
Backroom
The back room printer is the printer that this station should use for reports and documents that are not Point of Sale related (purchase orders, receivables posting, etc.). Branch printer designations for purchase orders and session reports can override the printer selected here.
Ticket
This printer is used for printing with a specialty printer designed for printing small receipts. These are typically used for cash-only type transactions which don't require as much detail or printed signatures. Sale transactions for receivables customers can be printed using the ticket format; however, most users prefer the full page invoice for this. Cash tickets don't print customer signatures and omit some information that would normally be included on a full size invoice.
Direct
The "Direct" printer, if set, will be this station's default printer when processing a "Direct Ship" order from the Point of Sale area.
Label
This printer type refers to a specialty printer used for printing bar code labels. This printer might be used for document labels or for price tags and labels. Supported printers include specific models of Zebra® and DYMO® brand printers.
Security
The "security" printer either prints or sends a text stream to the designated security printer each time a Sales transaction is processed and a document is printed. This new feature was added to integrate with Watcher Total Protection security services (http://watcherprotect.com). When used with Watcher Total Protection video surveillance cameras, a port number is assigned to the Windows printer to indicate the camera assigned to the monitor the station. The Windows printer device would be installed as a local printer, TCP/IP connection, using a Generic (manufacturer), and the "Generic/Text Only" printer type. The printer device(s) would be installed on each PC or, in the case of Remote Desktop (Terminal) Services, a printer would need to be added on the server for each IP/Port (camera).
Dispatch
Certain transactions involving delivery will print a second copy (as the second printer selection) of the document to the default "dispatch" printer if one is designated. It's possible to designate a default "dispatch" printer for either a station or branch. If no station "dispatch" default is assigned, the branch default dispatch printer is used (if any). The dispatch printer must be assigned to the desired "dispatch" styles in order to print delivery relevant documents, this is not automatic. The dispatch printer is only set if delivery has been designated for the transaction; otherwise, no delivery copy will print (unless the invoice or ticket printer is mapped to delivery style documents as a primary, secondary, or third print selection).
Yard
Transactions involving "yard" flagged items will print a second copy to either the station default "yard" printer or if no station default exists, the branch default (if any). Only those items assigned a yard flag are printed on yard style documents. The yard style would need to mapped to the printer being used as the default "yard" printer assignment. The yard printer is set automatically as the second printer when at least one item included in the transaction is assigned a yard code and the transaction is not a delivery (when a dispatch printer is also being used).
Default Label Template
If this station creates the same labels every time, select the default label template from this list.
Additional Settings
In addition to physical devices that work with a station, there may be services and software (such as ActiveReports® software) which may be integrated with the application. The following settings apply specifically to users of these products and services:
Capital One Trade Credit (formerly BlueTarp) POS ID
This setting was added at the request of Capital One Trade Credit (formerly BlueTarp® Financial service); however, it is not currently used. If implemented in the future, Capital One Trade Credit (formerly BlueTarp Financial) would provide a Point of Sale (POS) identifier to assign to stations performing Capital One Trade Credit (formerly BlueTarp) transactions.
Custom Reports Access
For ActiveReports® software integration, the "Custom Reports Access" option can be enabled (checked) for any station that also has access to ActiveReports software and will use the Custom Library function under each application area's "Reports" drop down. Stations without access to this software should not have this feature enabled.
Request Email
This option, if enabled (checked), will solicit an email address from the customer either at the beginning or end of a Sales transaction if the following conditions are met:
-
True Value Rewards or other rewards program settings are enabled.
-
A loyalty ID is associated with the Sale
-
The customer has no email currently associated with their rewards membership.
-
The customer has not been prompted already the number of times set as the email prompt threshold during the threshold "wait" period.
The prompt timing, either "At customer entry" (beginning) or "Prior to transaction tender" (end) determines when the prompt appears if all conditions are met (true).
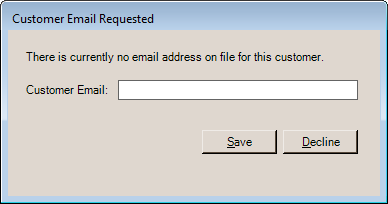
Email addresses, if provided, update the rewards information for the member, and not any other email addresses for the account, job, or any contacts.
POS Lock
If enabled, this feature prevents users from accessing any other application area except for Point of Sale. This does not block users from Point of Sale. Menu choices for other areas are not available for selection and appear in gray text. POS Lock does not function for users who are designated as either (1) branch managers or (2) system administrators. These users would notice no access limitation were the POS Lock setting to be enabled for their station.
POS Shared
When checked, the station will automatically log the user off after completing a Point of Sale transaction. This is intended for cases where the station is used by more than one user (at a sales counter, for example). If enabled, it's a good idea for the users to be set with home page locations of either the Point of Sale menu or their most used transaction. Users are not logged off when canceling or not completing a transaction. An inactivity time-out should also be considered.
POS Promotional Pricing Enabled
If the Promotional Pricing option has been enabled for your software by support personnel, this option will be visible when modifying or adding station devices; otherwise, this option is not shown. When checked (selected) and the station record is saved using the Process (F12) function, Promotional Pricing is enabled when using the Sales transaction in Point of Sale from this station. Promotions are applied automatically if the station is enabled. Promotional pricing does not refer to sale pricing and enabling a station does not provide or limit the station from accessing the Promotion Setup feature in the Price Updates area found in the Inventory area (user security can be used to limit access to Price Updates).
Custom Reports Access
Select this check box to allow the user of this station to access Custom Reports.
POS Advance to a New Line
If this option is enabled, the standard workflow in Point of Sale will change for scanned items. When scanning barcodes, items will be added as new lines in the item list (item grid) and the focus will be on the item SKU drop-down. All scanned items will be entered on new lines, the system will not group similar items together.
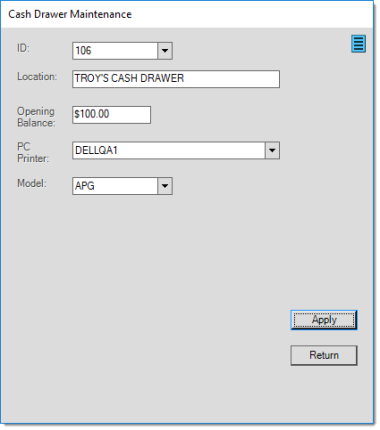
Cash Drawer #
The cash drawer assigned as the default for the station. This will be used as the cash drawer except when the current user also has an assigned drawer. Select the numeric ID for an existing drawer from the drop down or use the Maintenance Form icon to define a new drawer. For more information about Drawer Maintenance, click ![]() here.
here.

 provided on the form. Menu Marker access may be limited based on your user security. If the marker does not appear or its associated menu is disabled, you do not have permission to access it.