VeriFone Software Setup
Each VeriFone pad must be associated with one station record. This set up should be done from the station that will use the pad. The Devices database option in the Maintenance area is where pads are assigned to stations. From the Devices form, select the radio button next to Station then enter the station ID to add or modify. If your company has not transitioned to Verifone Point, use the drop down labeled "Signature Pad" and select Verifone. If your company has transitioned to using Verifone Point (required for EMV processing), select Point instead.
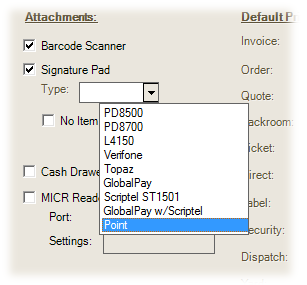
After choosing either "Verifone" or "Point" from the listing, a button labeled "Settings" appears to the right of the drop down menu.

VeriFone PAYWare Connect |
")
Verifone Point (EMV Ready) |
Click the Settings button. This opens a form containing the options for whichever Verifone pad type you've selected. The dialog for Verifone Point is different from the one used for legacy VeriFone PAYware Connect. Verifone MX9xx series pads, required for use with Verifone Point, must be "paired" to a specific station before use.
Verifone Point")
Verifone Point (Not Paired) Device Type This currently defaults to the MX915 model. MX800 series pads cannot be used with Verifone Point. IP Address The IP address of the pad device. Static addresses must be assigned to the pads. This is done by accessing the pads Port The port is used along with the IP address for network connectivity. Please see the next topic, MX915 - IP Addressing, for more information about assigning a static IP address to the device. Credit This indicates whether or not credit transactions are permitted using the pad. Debit This check box indicates whether or not debit card transactions are permitted using the pad. Gift (Stored Value) This setting would be selected if your company participates in a vendor gift card program such as with Do it Best Corp. or ACE Hardware Corporation. These "stored value" cards are handled similar to a credit card for payment. Activation occurs after payment processing. Your processor must be WorldPay to use this feature. In-House Gift This indicates you have a self-managed gift card program (or Blackhawk) and want to use the pad for scanning those cards for sale and use as tender. If this is the case, you would check this check box field. A "label" text area is provided for setting up to an 8-character text description for your gift card ("GIFT" for example). This appears on the pad display. To work, your gift card numbering cannot match any valid credit card number scheme. If your gift cards do not have an expiration date on the magnetic stripe, the pads won't work unless they require that the customer select a payment method (credit, debit, or gift) prior to swiping the card. Cards with an expiration date can be swiped at any time (the POS user must still choose the "gift" option when using as a method of payment). When the "in-house" gift card option is enabled, card holders will be prompted for a card type prior to swiping, inserting, or tapping their payment device/card in some cases. If the option is not selected, the card type selection is done after the card holder swipes, inserts, or taps their payment card/device. Training Mode Training mode bypasses actual card authorization and processing. Transactions do process through the software as if they were approved, however. Training mode should never be used in a "live" situation. Manual Entry AVS This indicates whether or not manual entry of AVS information is enabled for the pad device. Your company may receive a better rate if additional information is supplied for identity verification (such as a postal/ZIP code). Pairing This panel is used for pairing (linking) a device to a station which is required for Verifone Point implementation. A pad can only be paired with an individual (single) station at a time. For more information, please see the topic "Device Pairing." |
VeriFone PAYware Connect")
VeriFone Settings To set up your pad for first time use, do the following: Choose your pad device's model number from the drop down (model numbers are listed on a label on the pad's underside): Currently, the lowest supported SIM version is 2_0_4_3. Minimally, pads should be set to use this version. If your company's card processor is TSYS, Chase Paymentech, or WorldPay (RBS), you can optionally use higher SIM versions which offer additional features. If your processor is not in this list, please use version 2_0_4_3 or contact software support to verify that your processor has been re-certified for the advanced features (before enabling them). Advanced features include Purchase Level II data, device level authentication, card tokenization, and more. Select the "IP Address" radio button under the Connection group panel. Click in the IP Address text box to enter the IP (network) address of the pad. When the pad is powered on, the IP address displays on the System Information panel prior to the pad connecting to the client (PC). The IP address and Port are listed under the CommType label (between the parentheses and after the "S."). Your pad's IP addresses will vary the examples shown here and each pad must have a unique address that is not assigned to any other devices on your network. The "Use SSL" (Secure Socket Layer) is suggested if any of the devices used with pads have wireless connections. The Port will usually be 9001 but is also listed on pad display after a power reset in case it changes. Various options are listed on this form that define how the pad will operate: Swipe Timeout This determines the length of time after a card is swiped before a transaction is reversed automatically if not completed. Enable Credit A pad could be used for signature collection alone (receivables sales) and not credit card processing. This selection enables the pad to accept credit cards and would usually be checked. If this is not checked, the "Credit" button on the pad will not appear. Enable Debit Pads must be injected with security keys by your processor prior to being able to process debit cards. If this has been done with the pad, it's safe to enable debit transactions. Debit transactions require the customer to enter a numeric pin prior to processing. If this is not checked, the "Debit" button on the pad will not appear. Cash back (known as cash out in some regions) is only available with debit card transactions. Enable Gift This selection must be checked for the pad to allow stored value type gift card selection on the pad during Point of Sale transactions. A stored value "gift card" operates similar to a credit card and can be swiped at the same time as a customer would swipe a credit or debit card. If this is not checked, the "Gift" button on the pad will not appear when prompting the customer for payment type. Note: this option does not affect one's ability to swipe standard gift cards using the pad device. Standard Gift Cards Standard gift cards are different from a credit card and are processed locally only, not by a bank/card processor. In this case, the Point of Sale user must click in the gift card amount field on the process form before the pad will accept a gift card swipe. The pad will prompt the customer once it's ready to accept the gift card swipe. In order to use this feature, your gift cards must have a magnetic stripe and meet our requirements for gift cards. The pad will not read a barcode-only card (magnetic strips and barcodes are optional on standard gift cards). Cash Back Limit VeriFone pads are capable of handling cash back (cash out) transactions. If you want to allow cash back, you can set a maximum dollar limit on cash being paid out of the drawer. This option is only supported with debit-capable pads. Enable Manual Card Entry If enabled, this setting allows the customer to manually enter their card number if their card fails after more than 3 attempts at swiping. Prompt for Signature This setting only applies to signatures for Credit Cards. If enabled, the pad will prompt the customer for a signature. This signature is associated with the document. If this setting is not checked, the customer won't be prompted to sign the pad. It may be necessary to collect the customer's signature on paper. Signatures for receivables are not affected by this setting. Prompt of Amount Confirmation This setting determines whether an "amount ok" type prompt appears to the customer as a confirmation. If checked, the prompt appears. Should a customer choose to answer "no" to the prompt, a message appears to the warn the Point of Sale user. At this point, the sales clerk can either try the transaction again or make changes. In this second case, the customer may need to swipe their card again. If this option is not checked, no amount confirmation prompt appears to the customer. Prompt for Cash Back On debit transactions, it's possible to offer cash back (cash out). Check this setting to enable these prompts on the pad. If not, no prompt for this option displays. Prompt for Payment Type If enabled (checked), this option causes the pad to prompt the customer to choose a button designating the type of card transaction. The buttons are credit, debit, and gift. In cases where a company only accepts credit cards, not debit or stored value gift cards, this prompt adds an extra and unnecessary step, so disabling the prompt makes sense. However, if you do allow multiple card types (credit and debit, for example), you would not want to disable the prompt because it would prevent a user from choosing debit (or gift). Reverse Failed Signatures Card amounts are authorized before a signature is requested. This option causes an automatic reversal (void) of a transaction if the cardholder either (1) cancels the signature by choosing the Clear button on the screen or (2) does not sign the device in the allotted timeout period (as determined by the Swipe Timeout property). Check this option to reverse such transactions automatically (suggested). If not selected, transactions may still process, even if a customer cancels their signature or doesn't sign in the time allowed. Large Signature Area This setting increases the height of the signature area on the pad's display from approximately 1/2" to 1-1/4". Width is not affected and this has no effect on the size of the signature when displayed or printed on a document. The smaller size is the default. Display Message This text area allows you to type a message that replaces the VeriFone logo on the pad in between transactions. If nothing is entered, the VeriFone logo is the default display when the pad is not in use. Device Level Authentication This setting limits the handling of sensitive data to the pad device preventing any unencrypted information from being transmitted between the pad and other devices. For more information about this feature, click here. VeriShield Protect This setting indicates whether the pad has been configured with VeriShield Total Protect™ encryption. It is important to point out that checking this setting neither enables nor disables encryption. In fact, this check box has no affect on any settings on the pad and is just used by the software to indicate whether or not to expect encrypted data when knowing this is necessary. The principle reason this is necessary is for the processing of certain types of gift cards such as Do it Best cards via WorldPay. There are several steps required to enable VeriShield Total Protect on a pad: The pad must have VeriShield encryption keys installed on them. This is optional when purchasing a pad. The pad's serial number must be setup via the Merchant Console for use with PAYware Connect. Device Level Authentication must be enabled. A special VeriShield Card must be swiped which processes a transaction and enables the feature. Use Dial Backup? If the client (PC) that the pad is used with has a modem and is connected to a working telephone line, a dial-up modem connection can be used as a backup in cases where the Internet is unavailable. This allows you to continue to process credit and debit transactions until the Internet connection can be re-established. Click the Accept (Alt-A) button to save your changes then save changes to the Device (station) record by choosing Process (F12) on the Device Maintenance form. Now that the pad has been associated with a station, close the application. Pads have a power cable, USB cable, and Network TCP/IP cable. Make sure the pad is plugged in using the network cable (not the USB) and that it has been powered on and is at the "System Information" screen before signing back on to the software. First Time Use Pads are shipped pre-configured for use; however, in the event of a problem or need to change the pad's IP address, this may need to be done again. When first using the software on a client after assigning a VeriFone pad, you will be prompted to register the SaxComm8.dll. Users should click "Yes" at this prompt or the pad will not operate. After clicking "Yes," you should receive a confirmation that registration succeeded. These prompts should appear only once per release (the prompt will appear after each software update). To see if the pad responds, you should notice changes on the pad display when entering items into a Point of Sale transaction (such as Sales, for example). |