Device Pairing
This topic explains the process involved in pairing an MX900 series signature pad with a station record. This step is required when using Verifone Point for card processing. Pairing should be done for new devices as well as any existing legacy devices after their software has been updated for use with Verifone Point. Pairing is performed from the DevicesMaintenance form available from the Database menu in the Maintenance area. Only one device can be paired with any given station.
|
Important! Pairing is only permitted for stations once Verifone Point has been enabled for the branch location or from a station that is already enabled for Verifone Point. After Verifone Point is enabled for a branch location, and you are transitioning from legacy PAYware Connect, your company will no longer be able to process manually entered card transactions via Process (F12) forms on stations without a pad device. Only stations with a pad assigned will be allowed to process card transactions. |
Pairing can be done from any location. You do not have to be physically at the station; however, someone must enter the pairing code on the pad to pair the device. To pair a new pad with a new station, it's important to first save the station record and then modify it. Once this is done, or if you are working with an existing station, do the following:
•From the Devices form, choose the station that will use or is currently using the device.
•Change the signature pad type to "Point" and check the signature pad check box if necessary.
•The "Verifone Settings" form should appear. If it does not, click the "Settings" button on the Device Maintenance form.

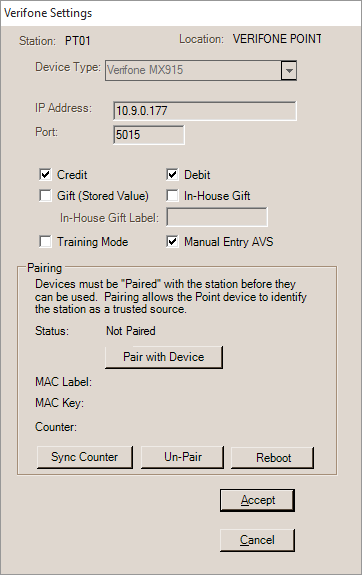
Verifone Settings (Not Paired)
•If the pad is new or no IP address is displayed, enter the IP address of the pad. An IPV4 address is a set of four (4) integer values, each with a maximum value of 255, separated by three (3) decimals. "123.10.0.1" is an example of an IP address.
•Important! If the address was not already set or has been changed, do NOT choose "Pair With Device" at this time. Instead, choose Accept and the choose Process (F12) to save the IP address and other changes for the Device.
•Modify (select) the station from the Device Maintenance form again and click the "Settings" button.
•The "Status" on the Verifone Settings form should say "Not Paired."
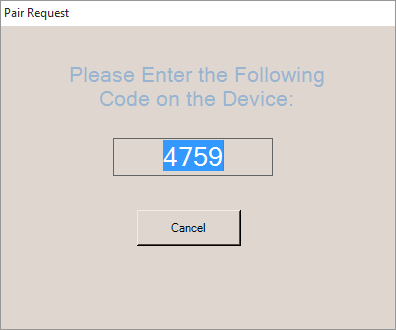
•Now, choose "Pair with Device." A new form should open that displays a numeric code.

Pair Request
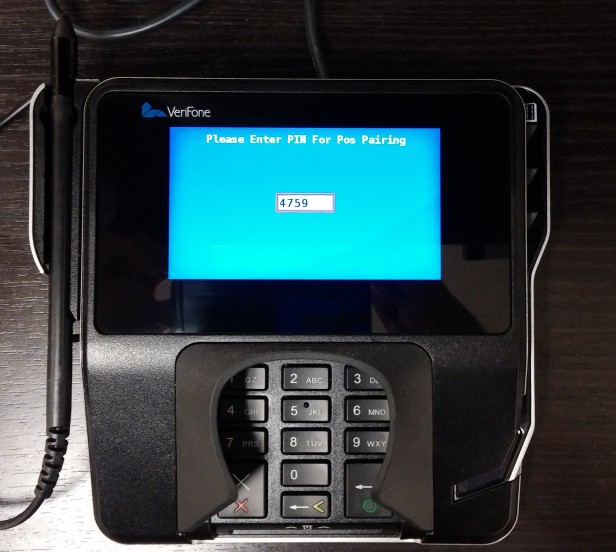
•The pad should now display a text area for entering the code.

Verifone MX915 Pad (Pairing)
•Enter the code on the Verifone MX900 series device and press the enter/accept button (the button with a green circle in the lower right-hand corner of the keypad).
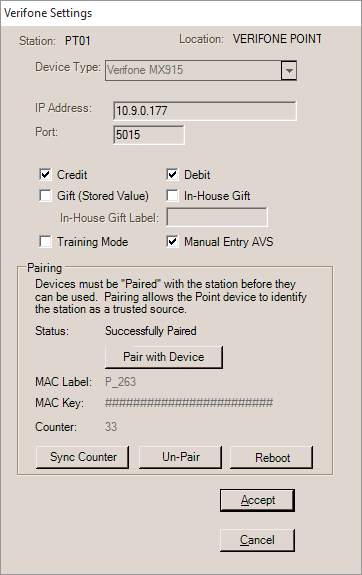
•The "Verifone Settings" form should change and now say "Successfully Paired." Choose the "Accept" button and the Verifone Settings form will close.

Verifone Settings (Paired Successfully)
•On the Device Maintenance form, choose Process (F12).
•Sign out of the application and log back in on the station that will use the pad.
Other Settings
There are some other settings for the pad device on this form. The check boxes, if checked, enabled those features.
•"Gift (Stored Value)" refers to branded gift cards (VISA, MasterCard, etc.) and includes Do it Best gift cards and others.
•"In-store" refers to your company's self-managed gift cards (if any) which includes Blackhawk cards if you accept those. In order for the pad to accept self-managed gift cards, the card stripe must include an expiration date (it doesn't matter what the date is); otherwise, the device won't accept the card. If your cards don't have expiration dates on the swipe data, you should probably not enable the "In-house Gift" option.
•"Manual Entry AVS" refers to "address validation service" information (zip code, etc.).
•"Training Mode" is intended for pre-live use only and should be disabled when your company is ready to start taking "live" card transactions. Please see the Training Mode topic for more information.
•A "reboot" button has been provided to allow for remote restart of the device from another location. This should work in most instances and situations; however, there may be times where the someone physically at the device needs to reset the pad.
Failure and Troubleshooting
If you receive a "failed" message, or the pad does not display the text area, there is a problem. Save the station record and try again. If the failure continues, check the following:
✓If the pad is new, check to make sure the pad is connected properly. Failure to connect to the network or display the text area would indicate some type of communication issue. IP address conflicts can cause issues. To check for this, ping the device's address from the command prompt as a test with the network cable connected and not connected. While connected, the ping should return positive results; if not connected, the ping should return a failed response. If the device isn't connected and you receive a valid (positive) response, there is another device with the same address active on the network. The addresses you choose should be within your network's "static" address range, and not dynamic addresses (DHCP).
Pads include a cable with a split providing a female network (TCP/IP) adapter and female power input. The other end of this cable connects to a "box" that slides into a slot on the back base of the unit. Even though you can plug the pad in directly (bypassing the cable) and the "box" includes network adapter slots, the cable must be used along with the box.
✓Make sure the pad is not paired with another station. To change the pairing, the pad must be unpaired with the original station before pairing with the replacement.
✓Ensure that the pad software has been updated for use with Verifone Point. This involves installation of a number of files and software by our personnel. The pad should display the "Point" logo.
✓Verifone Point must be configured andenabled (for the branch) in Parameters for the branch location using the pad (this is done by ECI Implementation or Support team members).