Setting up your Clover Device
The Clover setup process is largely described below, but the application configuration and pairing process must be completed by an ECI Implementation or Support team member. They need to know:
-
Credit cards you take
-
The threshold amount that you require for credit card signatures
-
Station IDs to be paired with each Clover device and the IP Address of the Clover device to which it will be paired
-
The time out time you prefer (how long do you want the application to wait to decide to end the transaction)
-
Whether you permit customers to get cash back (or cash out, in some regions)
-
Any proprietary information that FiServ has provided for your store(s), including Store IDs, names, passwords, and shared secrets.
During the pairing process, someone with access to the devices to be paired needs to be in contact with your ECI team because the pairing requires action on the device at the same time as the setup of the application. You can review the Clover Point of Sale process here.
Connecting the Clover Device to the Network
There are two options for connecting the customer’s Clover device to the network:
-
Attach an ethernet cable to the Clover device and connect it to the LAN manually.
There is no further setup needed in this case. -
Connect the Clover device to the wireless network (Wi-Fi), using instructions below.
Note: We do not recommend this if your Wi-Fi infrastructure is unreliable or weak. We strongly recommend a strong password to enhance security.
To connect the Clover device to the wireless network:
1. On your application computer, choose to the Windows Start ![]() icon, select the Settings
icon, select the Settings ![]() icon and select the Network & internet settings option.
icon and select the Network & internet settings option.
2. Ensure this computer is connected to the same Wi-Fi network as the Clover device and the network connection is enabled.
3. Turn on the Clover device and enter the login code.
4. On the Clover screen tap the Settings option.
An error message may display explaining that you need to connect to your Clover merchant account. Follow the prompts to do so.
Note: If this is a first-time connection, the application may also need to install an update before you go further. When these updates are complete, move on to the next step.
5. From the Settings list, select Network and Internet.
The Network and Internet options display. The Wi-Fi is set to Off.
6. On the right, drag the Wi-Fi button to the right to the On position.
The Wi-Fi entry updates to not connected.
7. Tap the Wi-Fi label to display the list of available network connections nearby.
8. Select the same Wi-Fi network discussed in step 2 from the list to connect to it.
The password box displays.
9. Enter the Wi-Fi password and tap Connect.
The Clover device connects and indicates that it is connected.
The Clover is configured to use DHCP rather than a static IP address, however, you will need the device’s assigned IP address later anyway.
Finding the Device's IP Address
To find the Clover device’s IP address and/or the MAC address:
1. On your Clover Mini/Flex, open the Settings app.
2. Scroll down and tap About device.
3. Scroll down and review the IP address and MAC address.
Make a note of this information because you will need it later.
Setting up the Payment app
The application will use Clover to make payments by communicating with the Secure Network Pay App through the device. After the Clover is setup and default apps have updated, install the Secure Network Pay App as follows:
1. On the Clover device, scroll right and tap the Settings app.
2. Tap the Apps & notifications option.
3. In the middle of the screen, tap the SEE ALL XX APPS link.
The exact number of apps displayed in this link may vary.
4. Tap the App Market app.
5. Tap the Open icon to start the app market.
Application icons display.
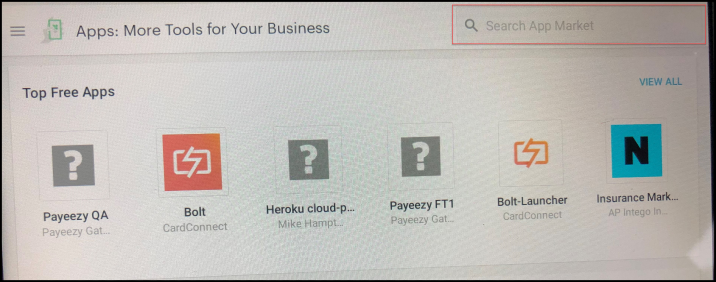
Clover: Search App Market for Secure Network Pay Display
6. In the search box, enter Secure Network Pay Display. When the Secure Network Pay Display option displays in the list, tap it.
7. Tap Install and allow the app to download and install.
8. When the installation is complete, tap Open.
The Network Pay Display Start page displays.
9. In the upper left corner, tap the Menu and tap Settings.
10. Select the Server Is Secured check box.
11. Tap Configure and Restart Server.
12. Then tap Back to return to the main Network Pay Display app screen.
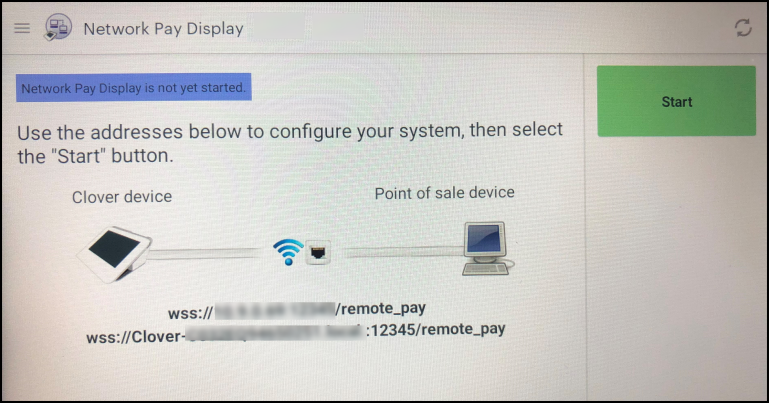
Clover: Network Pay Display
13. Tap Start.
The app displays a message telling you to exit the app, you have to touch all four corners of the screen at once.
14. Tap Got it. The payment app re-starts and the Welcome page displays on the Clover device.
From now on when you boot the Clover device, the Payment app should start automatically.
Installing Clover Device Certificates on the Pairing Computer
Any Windows computer that will connect to a Clover device needs to have the Clover SSL certificates installed into its trusted root store.
To install the Clover device certificates on the station:
1. On the application computer, go to this site to download the appropriate certificate: https://docs.clover.com/docs/configuring-secure-network-pay-display#device-server-certificates
2. Be sure to get the certificate that specifies the currency type you will work in (GBP, EURO, etc.) Choose the certificate that has the .crt file extension.
3. After downloading the certificate, double-click it to open it in Windows.
This will open a certificate install wizard.
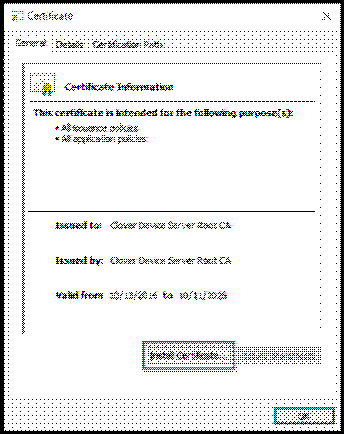
Windows: Certificate Information – General Tab
4. Click the Install Certificate button. The Welcome to the Certificate Import Wizard page displays.
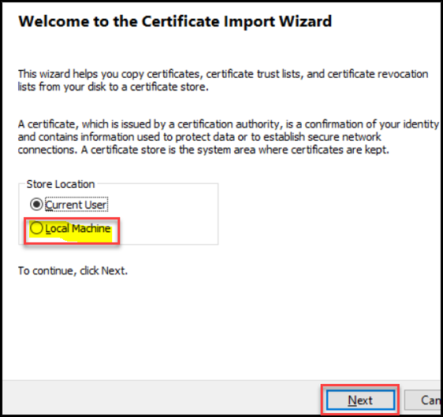
Windows – Welcome to the Certificate Import Wizard
5. Select the Local Machine store location option and click the Next button. The Certificate Store dialog box displays.
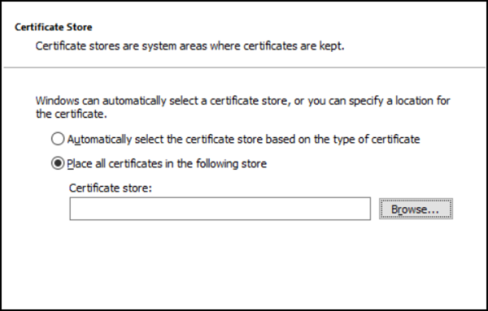
Windows – Certificate Store
6. Select the Place all certificates in the following store button and click Browse.
The Select Certificate Store box displays.
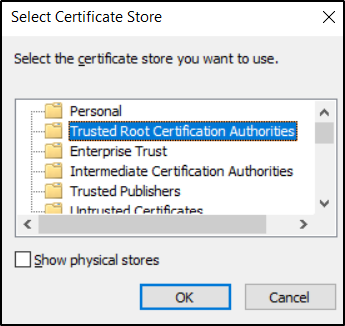
Windows - Select Certificate Store
7. Select Trusted Root Certification Authorities and click OK. The Certificate Store box redisplays.
8. Click Next.
9. Click Finish.
10. Open a PowerShell window as an administrator and run the following command:
-
New-EventLog -LogName "Application" -Source "_TransportEventLog"
Setting up the Cash Back Feature
If your business allows customers to receive cash back (cash out in some regions) for debit cards, there is some additional setup required to complete this feature.
Note: Make sure your Implementation or Support team knows that you are offering this service, so they can set that feature up properly in the application.
To set up the Cash Back (Cash Out) feature in Clover and the application:
1. Log into the Clover device as the administrator.
2. Tap the Setup icon. The setup options display.
3. Tap the Payments option.
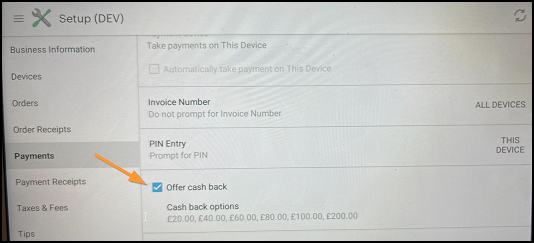
Clover: Setup > Payments > Offer cash back option
4. Tap the Offer cash back check box. The Cash Back Options list displays.
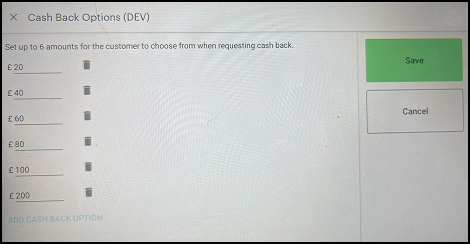
Clover: Cash Back Options List
5. Here you indicate which cash back amounts you allow.
-
Leave amounts you want to offer in place.
-
Tap the Dust Bin icon to remove the amounts you do not want to offer.
-
Tap the Add Cash Back Option at the bottom to enter new amounts.
6. When the list contains the options you agree to, tap Save.
7. Go to Network Pay Display and tap Start.
8. Make sure that the settings Server is Secured and Enable Ping are selected.
Adding your Clover Device to a Station
When you need to add a Clover device to a station, you may need to reach out to an ECI Support or Implementation Specialist to complete the work if you do not have administrative permission settings. These instructions need to be completed for each station that you are adding a Clover device to. These instructions assume that you already have the station set up for Point of Sale users. You can review the field definitions for these settings here. Complete the instructions in Installing Clover Device Certificates on the Pairing Computer before you begin.
IMPORTANT Note: If you use the FiServ Hosted Payment page from a station, but do not use the Clover device to process payments, follow the instructions below to step 4 on the station computer. Rather than choosing the Clover option from the Type list, select None instead, and choose Process (F12) to save this setting.
To add a Clover device to a station:
1. Log into the application with your administrative permissions.
2. From the Main Menu, choose Maintenance > Database > Devices. The Device Maintenance form displays.
3. From the Device Name list, choose the station you are setting the device up for.
4. In the Attachments section, choose the Card Pad check box.
5. From the Type list choose Clover. The Clover Device Settings box pops up.
Note: If you are converting this station to a Clover device, click the Settings button instead.
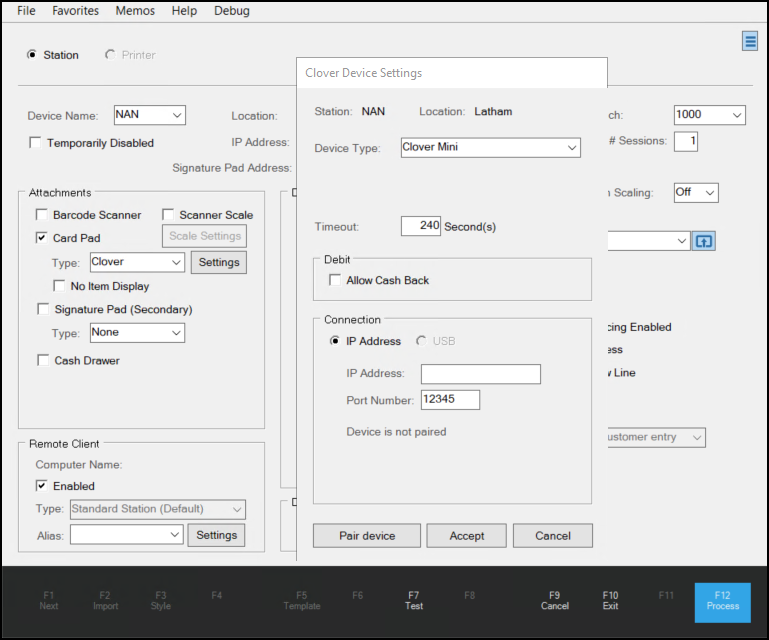
6. Complete these settings for this station:
-
Device Type
The Clover Mini device type is enabled by default. -
Timeout
The time out is the number of seconds that you want to give the station to process the transaction. Typically, this field is set at 240 seconds, but you can change it if you need more time. -
Debit - Allow Cash Back
Select this check box if you want to enable the Cash Back option for the Clover device. The steps for setting this up on the Clover side is covered in more detail here. -
IP Address
Enter the IP Address as found for the device you are connecting to this station (described here). -
Port Number
Enter the Port Number in this field.
To find the Port Number of the station, follow these instructions:
a) Click the Start icon on the station computer and in the Search field at the top enter, Device Manager. The Device Manager (Control Panel) option displays below the Search field.
b) Click the Device Manager option and click Yes to continue at the prompt. The Device Manager form displays. This is a list of devices and hardware settings for the station.
c) Scroll down to the Ports (COM & LPT) setting and click the down arrow beside it. The Ports list expands.
d) Double-click the port setting to display the port properties.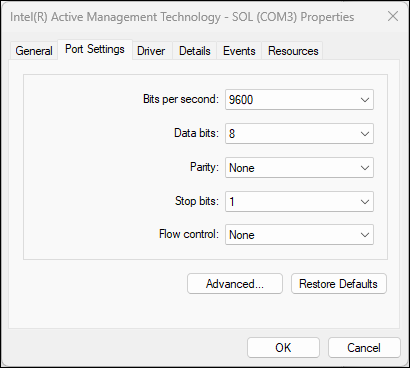
Typically, the Port Name, (COM3 in this case) displays in the heading.
e) To confirm this name click the Advanced button. The Advanced Settings display.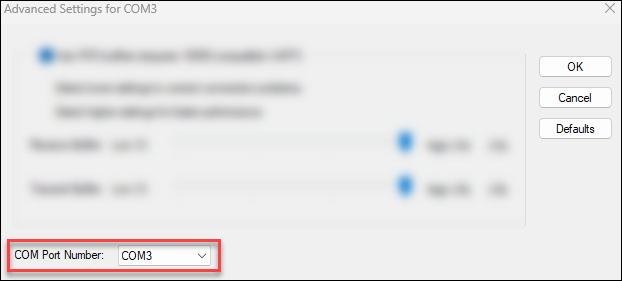
When you complete these settings, you are ready to pair the devices.
7. Click the Pair Device button. The application reaches out to the Clover device based on the IP address and the port number you entered. Follow the prompts that result to pair the devices.