Cash Drawer Maintenance
The Cash Drawer Maintenance form is used to add, modify, and delete cash drawers. This form is accessed via the Settings icon ![]() on either the Device Maintenance (select "Station") or User ID Maintenance forms (Maintenance > Database > Devices or User IDs). The Cash Drawer Maintenance Settings icon also displays on the Branch Setup > Ecommerce tab to support the addition of an ecommerce cash drawer. This process is described here.
on either the Device Maintenance (select "Station") or User ID Maintenance forms (Maintenance > Database > Devices or User IDs). The Cash Drawer Maintenance Settings icon also displays on the Branch Setup > Ecommerce tab to support the addition of an ecommerce cash drawer. This process is described here.
Cash drawers are minimally assigned a numeric ID, location (description), and opening default balance. When the cash drawer is wired either directly or indirectly or directly assigned a network address, the printer and/or model and other required fields must be specified.
Cash drawers, as a software function, perform the function of recording transactions and amounts (for the various payment methods) during a specified time period. A new period, or session, begins each time the drawer is closed (or when it's first created). The most recent "session" is considered the active session. Transactions only update this "active" session. Once a session, linked to a drawer, is closed, it is no longer updated. Drawer sessions can be manually closed at any time. Optionally, daily processing can automatically close all drawers (sessions) resetting their balances. The Cash Drawer utility is provided for inquiry, cash reconcile, and drawer closing.
Drawers can be linked with a user instead of a station; however, it's important to understand that a cash drawer is required for most Point of Sale processing and is required when adding or modifying a station. If no other drawer is specified for a station, the drawer will default to a selection of drawer number zero (0). When linked with a user, the user's cash drawer assignment will override the station's cash drawer in all cases. When assigned to a user, we expect that each user would be assigned their own independent drawer; however, this is not enforced.
Drawers may be shared; however, this is generally not suggested from a security standpoint. Drawers are optional except where required for processing. When neither the station nor the user have a drawer assigned, they wouldn't be able to perform any processing that requires a drawer be present.
To add a new cash drawer to the system:
1. From the Main Menu, choose one of the following, depending upon where you want to add the cash drawer:
-
To add a cash drawer in the User ID Maintenance form (to a user record), choose Maintenance > Database > User IDs. In the User ID Maintenance form, choose the User ID and beside the Cash Drawer field, choose the Settings
 icon.
icon. -
To add a cash drawer in the Device Maintenance form (to a station), choose Maintenance > Database > Devices. In the Device Maintenance form, choose the station and beside the Cash Drawer field, choose the Settings
icon.
")
2. Complete the following settings:
-
ID
Add the numeric ID you want to assign to the drawer. This is required.
-
Location
Enter a description matching the drawer's location, use, or assigned user.
-
Opening Balance
Enter the opening balance, the amount of cash that's to be left in the drawer when it's closed. This can be overridden when a drawer is closed manually using the Cash Drawer utility.
-
PC Printer
Choose the printer through which an open cash drawer sequence signal should be sent. In some cases, the Printer is a generic text driver that is installed with an IP (Internet Protocol) address pointing to the drawer itself. The model selection is related to this field as well. Printer and Model are only required when the cash drawer is a physical device assigned to a print server or connected to another supported printer device.
Note: The selection of a printer is not required when the cash drawer model is APGNET (these drawers are connected directly to the network).
3. Choose the model setting of the cash drawer from the list. There are currently three models in the list: APG, APGDC, and APGNET.
-
APG
This model type refers to older APG Series 4000 Model 320 cash drawers that are connected through a print server, which is assigned a network address and installed in Windows as a generic print driver. The open sequence set for this model is different from the APGDC option which is used for cash drawers connected to an Ithaca Peripherals iTherm 280 printer (the Epson TM-T88VII thermal ticket printer is the replacement for the Ithaca model which is no longer available). -
APGDC
This model refers to older APG Series 4000 Model 320 cash drawers directly connected to an Ithaca Peripherals iTherm 280 printer using an RJ-11 cable supplied with the drawer. The open sequence is different for this model and configuration. This device is no longer supported. -
APGNET
This model is used for the APG Series 4000 Model 1816 drawers that are directly connected to your network. In this case, no print driver or print server is required. Drawers are connected to your network (we suggest wired connections). The drawer must be assigned a static IP address (not a dynamic, or DHCP, address). Additional fields are provided for the IPV4 address and port. A configuration utility is required to set the IP address. For additional documentation, please click here.
•Network Address - The IP address assigned to the drawer.
•Port - The numeric port assigned to the drawer. When adding a new drawer, the port will default to 30998.
•Disable Alarm - Check to disable the security alarm (the drawer alarm sounds whenever the drawer is opened using the key or by forced entry).
4. When you have completed these entries and selections, choose Accept and Return.
5. Choose Process (F12) to save the cash drawer settings to the database.
Balancing the Drawer
It's important to understand that a cash drawer's balance is not necessarily the same as any particular day's activity. The totals for a given business day will not necessarily match with a drawer's session or amounts. Some transactions such as back office refund checks are not recorded in a drawer and drawer sessions may be started and closed at any time (plus a company can have up to potentially hundreds {or more} different cash drawers and therefore just as many open sessions). The sole purpose of a drawer is to record physical cash that should be in the drawer, its purpose is not for matching to reports based on daily totals, for example. If you use drawers actively, it's strongly suggested that you do daily comparisons between each cash drawer session and the actual cash and checks removed at the time the drawer is closed.
Deleting a Drawer
A cash drawer can be deleted as long as it has not currently assigned to any stations or users by using the Menu Marker ![]() provided on the form. Menu Marker access may be limited by your user security. If the marker does not appear or its associated menu is disabled, your user does not have permission to access it.
provided on the form. Menu Marker access may be limited by your user security. If the marker does not appear or its associated menu is disabled, your user does not have permission to access it.
Handling the Cash Drawer Tally
The Cash Drawer Tally process saves the count of bills and coins in a cashiers drawer at the end of the shift. This process gives your business a way to look up this information in the future and provide reports for audit purposes. After a cashier closes a cash drawer session, they cannot overwrite or re-save the bill and coin quantity values. This process works for all regional currency denominations.
To perform a cash drawer tally at the end of a shift:
1. From the Main Menu, choose Point of Sale > Utilities > Cash Drawer to display the Cash Drawer Handler.
2. From the Drawer # list, choose your cash drawer.
3. From the Session Activated list, choose the active session for that drawer.
4. Choose Tally (F6) to display the Cash Drawer Tally dialog box.
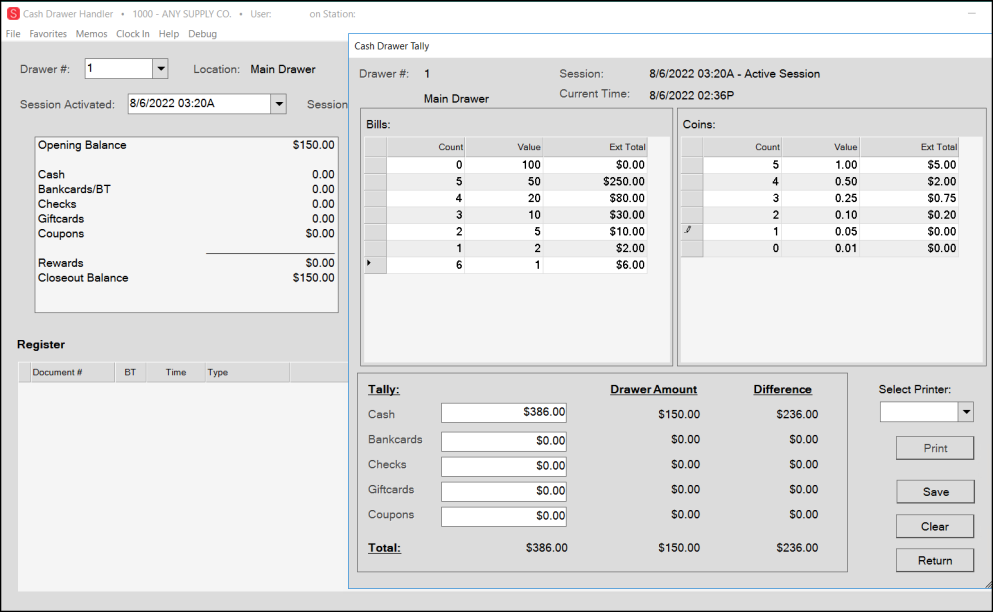
Cash Drawer Tally Box with Cash Drawer Handler Form in the Background
The denominations in the Cash Drawer Tally list reflect the local currency denominations.
5. In the Count column of the Bills and Coins lists, enter the number of bills and coins of each denomination.
The application totals the amounts you enter in the Cash field.
6. When you have completed your entries, click Save.
The message Cash Drawer tally totals updated displays. The Cash Drawer Handler form redisplays.
7. Choose Process (F12) to display the Process Cash Drawer box.
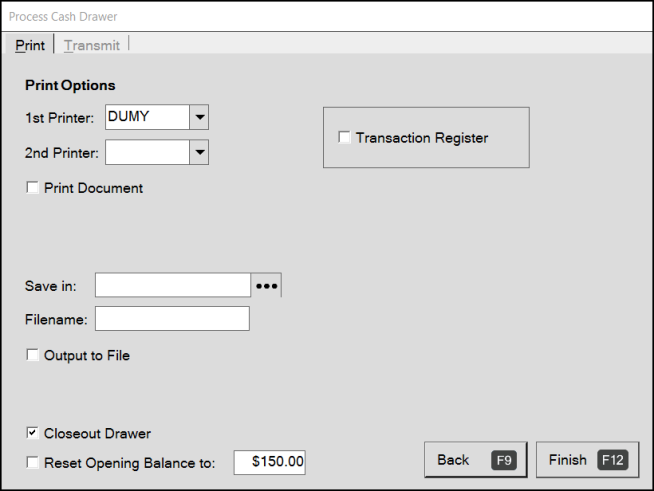
Process Cash Drawer
8. Continue based on management’s requirements:
-
To print the cash drawer report, select the Print Document check box and select the appropriate printer.
-
To save the cash drawer report as a file, select the Output to File check box and enter the filename and folder information to save the document.
9. Select the Closeout Drawer check box to add the tally denominations to the database. (Required)
10. When you have completed these selections choose Finish (F12).
Note: After you select Finish, you cannot make changes to the tally denomination values.
If you choose the same drawer and closed session again, you can still view the session information including the denomination detail, but you cannot make any changes to the entries. If you try to save a new session that does not have any tally information reported for it, a warning message displays.
-
There is no tally information saved for this drawer’s session.
When you print or save the report, the results reflect the cash drawer values you saved:

Cash Drawer Tally Report
At the request of a customer, we are updating the cash drawer tally handling when there are no existing tally values. Cashiers can enter and save the Cash Drawer Tally even if the drawer is closed. We also learned that some businesses close cash drawers automatically or before counting, particularly at shift change, and the cashier is not always the person counting the tally. When the Cash Drawer is closed, an authorized user can choose Tally (F6) in the Cash Drawer Handler form to update the cash drawer tally.
Reviewing the Bankcard and Check Tally Information in the Cash Drawer Utility
A Cashier can see a tally of their Cash Drawer amounts by some payment types using the Cash Drawer Utility.
To display cash drawer tally information:
1. From the Main Menu, choose Point of Sale > Utilities > Cash Drawer to display the Cash Drawer Handler form.
2. From the Drawer # list, choose your cash drawer (as assigned in the User ID Maintenance form).
3. From the Session Activated list, choose the session you want to review the tally for.
Note: The current (open) session is at the top.
4. Choose the Menu Marker  to the right of the data grid. Three options display.
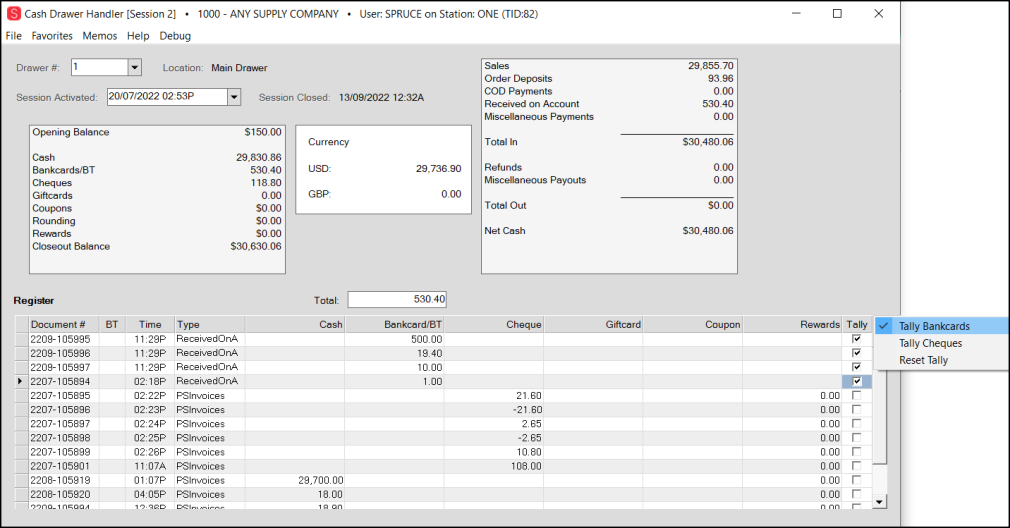
Cash Drawer Handler Form with Tally Menu Options
5. From the list, choose the tally option you want to calculate. The Total box displays.
-
Tally Bankcards allows you to total the bankcard transaction amounts (positive and negative) in the current session
-
Tally Checks (Cheques) allows you to total the check/cheque amounts (positive and negative) in the current session.
6. In the Tally column, choose the check boxes beside the rows you want to total based on the tally type you selected. The Total field updates as you select the amounts for that tally type. You can uncheck a Tally box to recalculate the amount without the selected row value in it.
Note: If you select a row for a different tally type, that amount does not update the Total field.
Setting up an Ecommerce Cash Drawer
Important: All ecommerce settings must be populated and enabled in the Parameter Settings and the Branch Setup forms before you can set up ecommerce cash drawers.
You use an Ecommerce Cash Drawer to track incoming online order deposits and account payments. You should add an ecommerce cash drawer to each branch that processes ecommerce transactions both manually and automatically. After you add an ecommerce cash drawer, you cannot delete it.
Note: You can use the Cash Drawer Maintenance form to add the Ecommerce Cash Drawers to the system and then assign them to the Branch records. If you are recording the Ecommerce transactions separately by branch, you may want to create separate Ecommerce Cash Drawers for each branch.
To add an ecommerce cash drawer from the Branch Setup > Ecommerce tab:
1. From the Main Menu, choose Maintenance > Database > Branches. The Branch Setup form displays.
2. From the Branch ID list, choose the first branch you need to add the Ecommerce Cash Drawer to.
3. Choose the Ecommerce tab.
The Enable ecommerce for this branch check box must already be enabled for the Ecommerce Cash Drawer setting to display.
![]()
4. Beside the Ecommerce Cash Drawer list, choose the Settings ![]() icon. The Cash Drawer Maintenance box displays.
icon. The Cash Drawer Maintenance box displays.
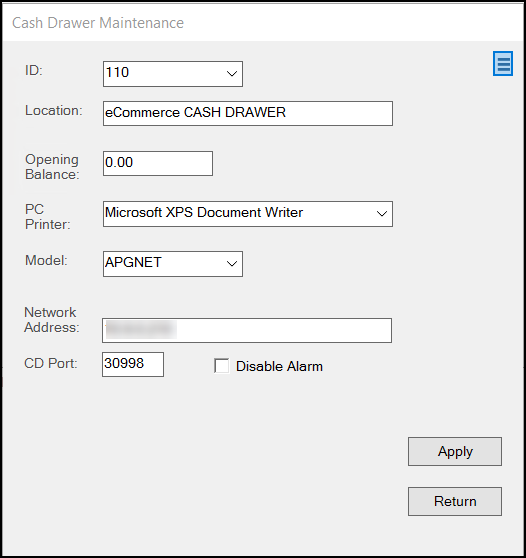
5. Complete the entries in this box to establish a cash drawer for managing online payments.
-
ID
Type a new ID number in this field for the ecommerce cash drawer. This must be an unique numeric entry. -
Location
Enter a cash drawer name that indicates it is for ecommerce payments only. -
Opening Balance
Enter 0.00 in this field. -
PC Printer
Use this field to specify the printer for the ecommerce cash drawer. -
Model
Use this list to specify the cash drawer device used to track the transactions. Options include APG, APGDC, and APGNET. -
Network Address
In this field, specify the cash drawer's network address. -
CD Port
Enter the port assigned to the drawer. -
Disable Alarm
Enable this check box to disable the security alarm (the drawer alarm sounds whenever the drawer is opened using the key or by forced entry).
6. Click Apply to save these settings. Click Return to return to the Branch Setup form.
7. Choose Process (F12) to save the new Cash Drawer.
When you complete this new cash drawer record, you can access the entries that are collected in the cash drawer using the Cash Drawer utility. After you process the ecommerce cash drawer entry, you cannot delete it; you cannot assign it to a user or a station record, and you cannot assign it to another branch.
Ecommerce cash drawers cannot be used for non-ecommerce purposes, ensuring that you can track these amounts in one place. You can assign an ecommerce cash drawer to more than one branch. There are additional error validations to prevent ecommerce cash drawers from being assigned to users (in User ID Maintenance) or to other Stations (in Device Maintenance):
We have tested these settings to ensure that an ecommerce cash drawer cannot be saved by default to another user’s station. If someone attempts to add the ecommerce cash drawer to a User ID in User ID Maintenance, and selects Process (F12), an error message displays (as shown below).
Similarly, if you attempt to add an ecommerce cash drawer to a station in the Device Maintenance form, this error message displays:
-
Selected Cash Drawer is set as the Ecommerce cash drawer for branch <Branch ID>
After the ecommerce cash drawer setup is complete, the application will apply all incoming ecommerce orders with deposits and account and job payments, whether processed manually or automatically, to this cash drawer. This will distinguish the ecommerce payment stream from the in-store cash drawer business. You can use the Cash Drawer utility to review these transactions when the process is complete.