EDI (Electronic Data Interchange)
What is EDI?
Vendor EDI is used for transmitting and retrieving data electronically from a vendor. EDI stands for "electronic data interchange" and refers to any method of transmitting data by electronic means. The data being exchanged is related to Purchasing and Receiving transactions, price updates,
How is data transferred?
For automated transfer of data, and in most cases, we integrate special scripts with a third-party application to perform a secure transfer of data using FTP (file transfer protocol). The application either creates the files in the proper format or processes the files received from an EDI vendor. As far as the actual transmission and movement of data, the 3rd party application performs all FTP processing. Users can disable automatic data transfer (scripting) and do the process manually if they prefer. No assistance or support is provided for manual methods of moving data. This is solely the user's choice and responsibility.
Is there a charge for EDI?
The ECI Implementation or Support team must configure the system before you use it and a set up fee applies for each installation. After your system is configured, EDI runs in the background to update your system, and that part is free.
Setting the EDI General Parameters
The EDI parameter settings are specific to the vendors you use and how you want to run your EDI processes to retrieve inventory and loyalty program data from those vendors.
To view and select the EDI parameters:
1. From the Main Menu go to Maintenance > Database > Parameters to display the Parameter Settings form.
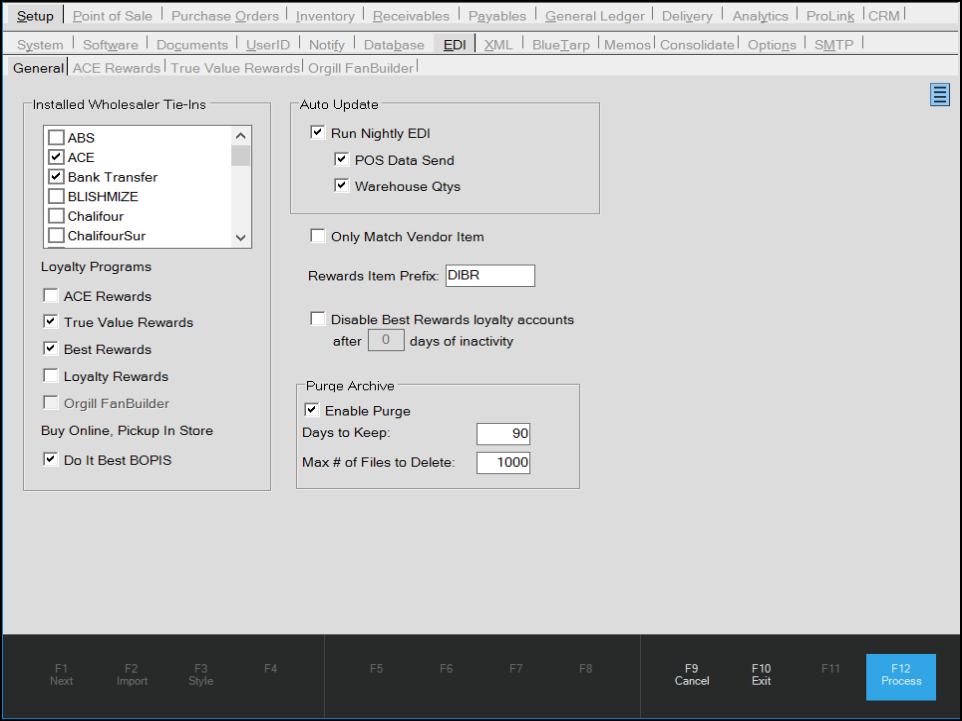
2. From the Setup Tab, choose the EDI > General Tab to display the EDI settings.
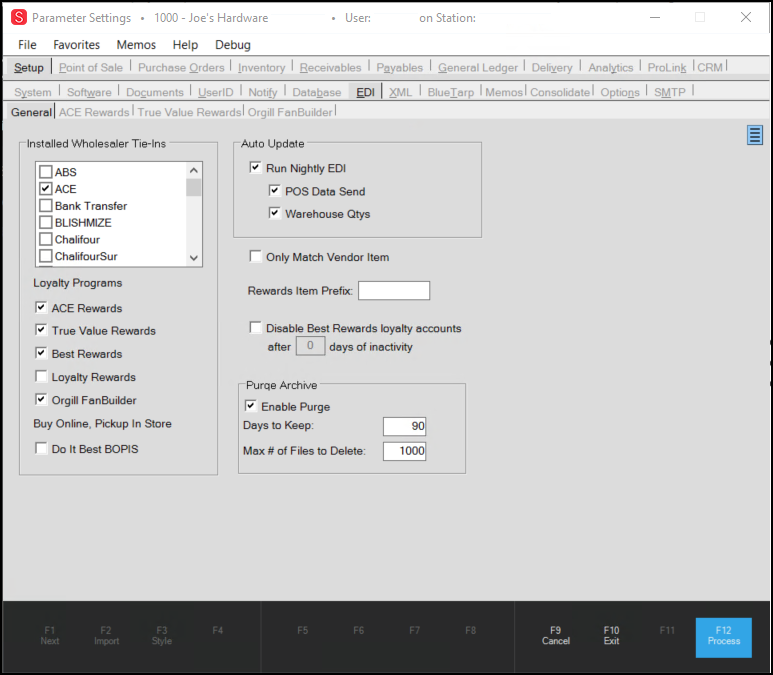
3. In the Installed Wholesaler Tie-Ins box, select the check box beside each vendor you want to retrieve warehouse inventory data and customer loyalty data from. Scroll through the list to ensure that you have selected all that apply to your business.
4. From the Loyalty Programs list, select the check box beside each program you participate in.
5. In the Auto Update box, choose the following options as works best for your business:
-
Run Nightly EDI
Check this option to run the EDI process each night. Then indicate which type of data you want to send and retrieve:-
POS Data Send
Select this check box to send your sales data pertaining to loyalty programs to the vendor. -
Warehouse Qtys
Select this check box to retrieve the vendor's current supply of each item in their inventory . This can include material you do not stock.
-
-
Only Match Vendor Item
Check this box to perform file maintenance operations for inventory items where the item is linked to the vendor record. This parameter is only considered for File Maintenance updates (including Price Updates). Other EDI operations will use additional look-up methods if a matching item is not found such as the SKU and barcode. -
Rewards Item Prefix
Enter the Do It Best Rewards prefix for the Do it Best Corp. rewards credit SKUs. The application appends the prefix (if any) to the reward item's SKU to help distinguish the credit SKU (used for coupons, etc.) from other items in your inventory. Using a prefix is especially important if there is a chance that any of your company's item numbers might match the credit SKU used by the vendor. If this happens, matching items that are not actually credit SKUs will be updated to match the vendor's credit SKU information. Having a prefix prevents this from happening.
Note: When the Implementation team is assisting you in converting data, if you use this option, let them know that your company has existing credit vendor SKUs with this prefix. -
Disable Best Rewards loyalty accounts after [0] days of inactivity.
Select this check box if you want to specify the number of days after which you disable a customer's loyalty rewards program participation. After you select this check box, you can enter the number of days up to 9999.
6. Choose your purge archive options to prevent the storage of old EDI data that you no longer need using the following settings:
Note: For more information about purging archive files see Purging EDI Archive Files below.
-
Enable Purge
Select this check box to allow the purge of EDI archive files. -
Days to Keep
Select this check box to specify the number of days the application should keep EDI files. The default amount is 90. -
Max # of Files to Delete
Select this option to limit the number of files that the application deletes at the same time.
7. When you have completed these entries, choose Process (F12) to save the settings.
8. Close the application and re-open it to ensure the update is enabled.
Setting up the Private Supply Network (PSN) Infrastructure
The Private Supply Network (PSN) is ECI's own Private Value-Added Network product that receives, stores, and transmits EDI messages both securely and efficiently. The Private Supply Network offers services beyond basic data transmission, such as message tracking, error detection, and data translation. The on-boarding process is more streamlined and simplified, which reduces the time and effort required to establish new Vendor EDI connections. Your business will now have a centralized and scalable system to manage EDI communications as well as provide better support for issues typically associated with EDI connections.
The first implementation of this Private Supply Network (PSN) technology will be for retrieving and updating your database with the Ace Hotsheets, promotions, and purchase order updates. After you set the PSN infrastructure up, the data retrieval process will work as it did before, but you will have more retrieval options, they will be more efficient, and there will be new features in place to prevent errors, which we will discuss below.
Setting up the Private Supply Network (PSN) (Internal Teams Only)
Most PSN settings will be enabled automatically for current customers. These instructions help when a customer needs a change or you are adding a new business to the cloud.
System Administrators can complete the PSN setup process as follows:
1. From the Main Menu, choose Maintenance > Database > Parameters. The Parameter Settings form displays.
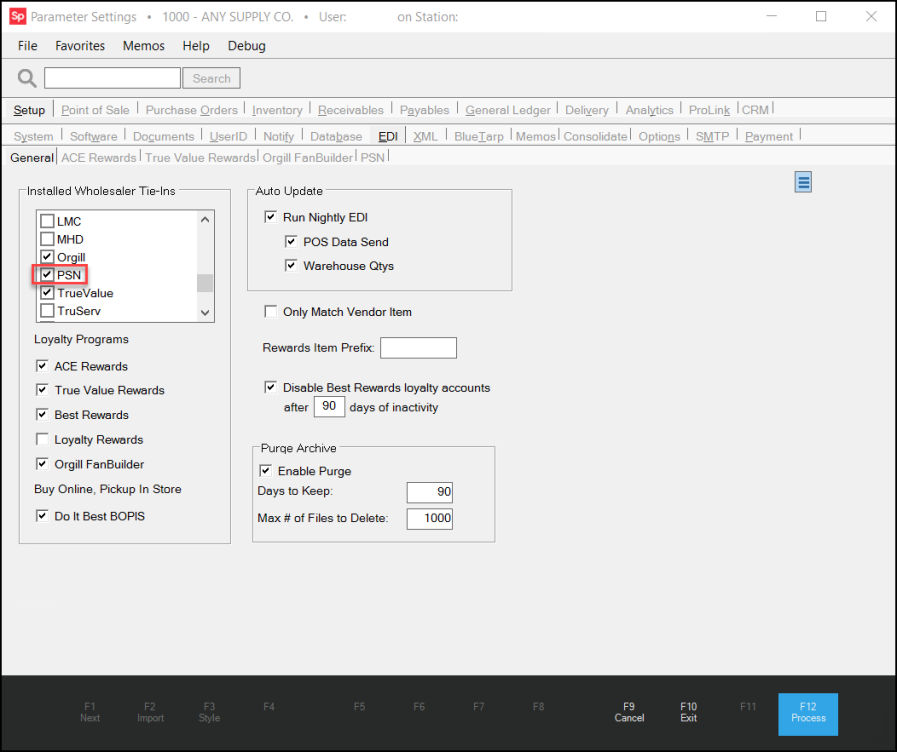
2. From the Setup tab, choose the EDI subtab to display the General tab options.
3. From the Installed Wholesaler Tie-Ins list, scroll down and select the PSN check box. The PSN tab displays.
4. Choose the PSN tab and complete the following settings:
-
PSN URL
In this field, paste this link: https://admin.privatesupplynetwork.com -
Logging Level
This sets the amount of logging the system uses to track the PSN processes. This is set to Minimal by default, but if you are having issues later, you can switch this to Verbose or Debug to learn more about what may be causing the problem. We recommend the Minimal setting to improve performance. -
Poll Interval
This refers to how frequently the application will check to see the status of the PSN request. After the vendor receives the request, it will collect the records that match your settings. This setting determines how frequently the API will check to see if all the records you requested have been collected. This is set to 10 seconds by default, but you can select 5, 15, 20, 25, or 30 if you prefer. -
Vendor Subscriptions
From the PSN Vendor list, choose the vendor whose data you are requesting. Then from the resulting list, select the check box beside each record type you will be requesting.
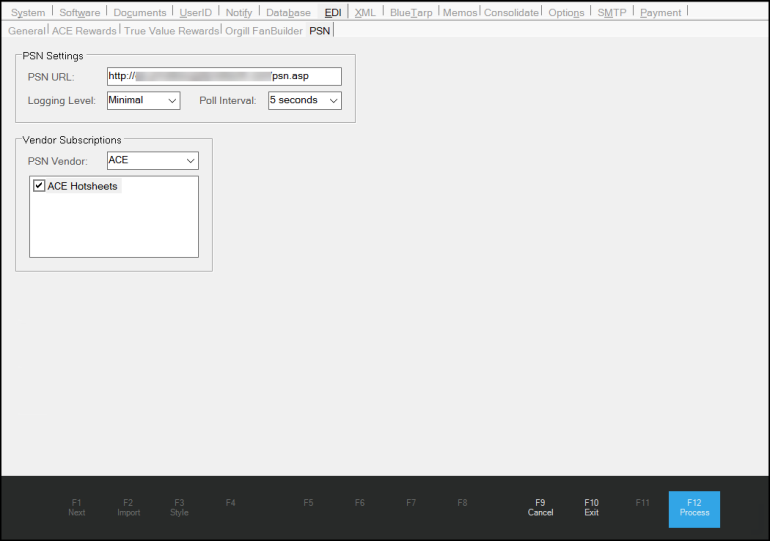
Parameter Settings > EDI > PSN > PSN Settings
As time goes on, there will be additional vendors and subscription options associated with this feature. You should select only the vendors and subscription options that meet your needs.
5. When you have completed these settings choose Process (F12).
6. Log out of the application and then back in to enable the feature.
To learn more about the Private Supply Network (PSN) and how to use it, click here.
Purging EDI Archive Files
There are tools for managing your excess files in the EDI archive. These purge tools to help you schedule and manage the number of files that you purge or retain as part of your use of the EDI tools. The purge process runs nightly, based on the purge options you select. Resetting this option requires administrative privileges.
Important: This feature is enabled by default, so if you do not want to purge archive EDI archived files, you need to disable or reset this feature.
To set the EDI purge archive options:
1. From the Main Menu, choose Maintenance > Database > Parameters to display the Parameter Settings form.
2. From the Setup tab, choose EDI > General to display the Purge Archive options.
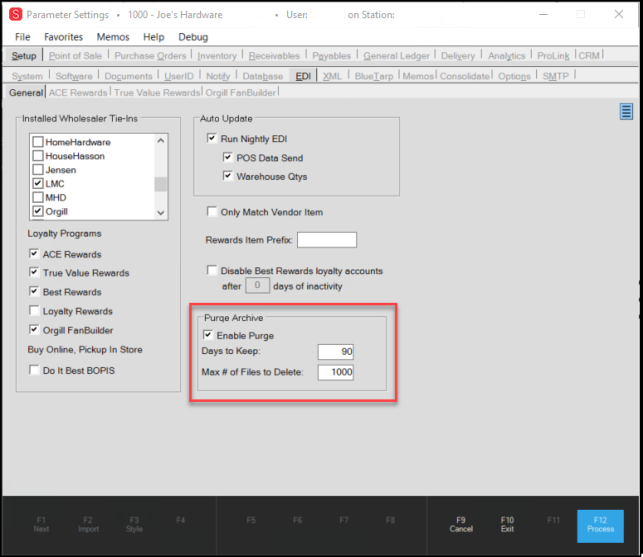
Parameter Settings > Setup > EDI > General Tab with Purge Archive Options Highlighted
2. Make sure the Enable Purge check box is enabled.
3. In the Days to Keep field, enter the number of days after which you want the application to purge the archive of files. By default, this setting is 90 days.
4. In the Max # of Files to Delete field, enter the number of files you want to delete during each nightly purge. By default, this setting is 1000 files.
Note: We recommend this file limit. Setting a maximum will prevent potential system performance issues resulting from the purge command.
5. When you have completed your entries and selections, click Process (F12) to save your changes.
Vendors that Support EDI Transmissions
We are always in the process of mapping new vendors for EDI use. Currently, EDI is available with the following vendor listing. Looking for a list of what functions are supported? Click on the links below to display the current function of each vendor's EDI program as integrated with the application:
Emery Jensen Distribution (EJD) Services
Freeway Commerce Ltd. (United Kingdom)
LBM Advantage (formerly ENAP, Inc.)
LMC (Lumbermens Merchandising Corporation)
X12 *
*X12 is a standardized format, not a vendor, but is supported by many vendors for data exchange.
EDI Feature Reference Table (Vendors)
This chart lists the wholesaler (EDI provider) and mapping options for each. Default mapping is indicated by an asterisk (*). There are often multiple mapping overrides provided for the same feature (price changes, for example). The application uses the default option unless this option is modified in the Maintenance > Database > Branches > EDI > Mapping Overrides box. This can be modified either by your company or by Support personnel at your direction.
| Wholesaler ID | Feature | Override Name | Description |
|---|---|---|---|
|
ACE |
Bar Code Load |
*BarCodeLoad |
Barcode Load |
|
ACE |
Catalog Load |
*CatalogLoad |
Loads Catalog from Hot Sheet records |
|
ACE |
PO Receive |
*ElectronicInvoice |
Receives Electronic Invoice(s) |
|
ACE |
PO Receive |
EDIINVOICESIMPLE |
Electronic Invoices that come into PO Update with fewer lines. |
|
ACE |
PO Receive |
InvoicePOMatch |
EDI Invoice that matches the PO number |
|
ACE |
PO Send |
*POSend |
Sends Purchase Order Documen(s)t |
|
ACE |
PO Send |
POSendWeb |
PO Send via the Internet |
|
ACE |
POS Data Send |
*VISTAUpload |
Sends Nightly POS Data upload to Vista |
|
ACE |
Price Change |
*Hotsheets |
Retrieves current Hot Sheets |
|
ACE |
Price Change |
HS_FileMaint |
Price Change with Catalog Maintenance |
|
ACE |
Price Change |
HotSheets_VP |
Variable Price hot sheets will use flag to determine which ACE Price to use. |
|
ACE |
Price Change |
HS_FileMaintNODESC |
Document |
|
ACE |
Price Change |
HSFileMaintCostOnly |
Price updates with file maintenance. Cost Only comes in for use with Margin Master. |
|
ACE |
Price Change |
HSFileMntCostOnlyND |
Price update with File Maintenance. Cost only for Margin Master, no inventory description changes. |
|
BLISHMIZE |
Catalog Load |
*CatalogLoad |
Catalog Load |
|
BLISHMIZE |
File Maintenance |
*FileMaint |
File Maintenance/New Items |
|
BLISHMIZE |
File Maintenance |
FileMaint_NoDesc |
No Inventory Description change |
|
BLISHMIZE |
PO Receive |
*POUpdate |
Purchase Order Update via Invoice |
|
BLISHMIZE |
PO Send |
*POSend |
Document |
|
BLISHMIZE |
Price Change |
*PriceChange |
Price Change Document |
|
Chalifour |
Catalog Load |
*CatalogEN |
Catalog load of Initial File English |
|
Chalifour |
Catalog Load |
CatalogFr |
Catalog load of initial file - French |
|
Chalifour |
Images Download |
*ImageUpdate |
Image Update |
|
Chalifour |
PO Receive |
*PoUpdateEn |
Purchase Order Update Documents - English |
|
Chalifour |
PO Receive |
PoUpdateFr |
Purchase Order Update Documents - French |
|
Chalifour |
PO Send |
*PO Send |
PO Send |
|
Chalifour |
Price Change |
*PriceChgEn |
Price Change and File Maintenance - English |
|
Chalifour |
Price Change |
PriceChgFr |
Price Change and File Maintenance - French |
|
Chalifour |
Price Change |
PrcChgEnNoDesc |
Price Change and File Maintenance English No Inventory Description change. |
|
Chalifour |
Price Change |
PrcChgFrNoDesc |
Price Change French version No Inventory Description |
|
Chalifour |
Promotional Item Update |
*PromotionEn |
Promotion update - English |
|
Chalifour |
Promotional Item Update |
PromotionFr |
Promotion update (Buy) - French |
|
ChalifourSur |
PO Receive |
*PORecv |
Purchase Order Update |
|
ChalifourSur |
PO Send |
*POSend |
Purchase Order Send Process |
|
DoItBest |
AP Receive |
*Direct Invoices |
EDI Direct Invoices |
|
DoItBest |
Bar Code Load |
*BarCodeLoad |
Barcode Load |
|
DoItBest |
Catalog Load |
*Catalog Load |
Initial Catalog Load |
|
DoItBest |
Classification Maint |
*ClassificationLoad |
Classification Load |
|
DoItBest |
File Maintenance |
*FILEMAINT v1.0 |
File Maintenance version 1.0 |
|
DoItBest |
File Maintenance |
FileMaint_NODesc |
File Maintenance that does not change description in inventory |
|
DoItBest |
File Maintenance |
FileMaint_Classic |
File Maintenance that always brings in Classic cost |
|
DoItBest |
File Maintenance |
FileMaint_Classic_ND |
File Maintenance that always brings in Classic Cost and does not change description in inventory |
|
DoItBest |
File Maintenance |
FileMaintNEW |
File Maintenance with NEW units of measures in vendor items |
|
DoItBest |
File Maintenance |
FileMaint_NODescNEW |
File Maintenance update with no description changes |
|
DoItBest |
File Maintenance |
FileMntClassicNEW |
Document |
|
DoItBest |
File Maintenance |
FileMntClassicNDNEW |
Document |
|
DoItBest |
File Maintenance |
FileMaint_ND_NEWKW |
File maintenance with new vendor item UMs with no description change in Inventory Common. Vendor number instead of name and Keyword0 Maintained in Inventory Common. |
|
DoItBest |
File Maintenance |
FileMaint_NEWKW |
File maintenance with new vendor item UMs. Vendor number instead of name and Keyword0 Maintained in Inventory Common. |
|
DoItBest |
File Maintenance |
FileMntClassNDNEWKW |
File maintenance with classic cost, new vendor item UMs with no description change in Inventory Common. Vendor number instead of name and Keyword0 Maintained in Inventory Common. |
|
DoItBest |
Full Inventory Send |
*SendFileMaintFULL |
Full inventory send |
|
DoItBest |
Inventory Send |
*SendFileMaint |
Incremental Inventory Send |
|
DoItBest |
PO Receive |
*PO Receive |
Document |
|
DoItBest |
PO Send |
PO Send NORETL |
Purchase Order Send No Retail is sent. |
|
DoItBest |
PO Send |
*PO send v.1.1 |
Purchase Order Send |
|
DoItBest |
PO Send CF1D |
*ClaimsCF1D |
Document |
|
DoItBest |
PO Send CF1W |
*ClaimsCF1W |
Send CF1S Warehouse Claims |
|
DoItBest |
POS Data Send |
POS Send Retail Sales |
Retail Sales Data Capture |
|
DoItBest |
POS Data Send |
POS Data Last Recpt |
POS Data Send sending Last Receipt cost |
|
DoItBest |
POS Data Send |
*POS Data AVG Cost |
POS Data Send sending weighted average cost |
|
DoItBest |
Price Change |
*PRCCHGS v1.1 |
Price date update |
|
DoItBest |
Price Change |
CostUpdate |
Cost-Only Unapplied Price Update |
|
DoItBest |
Price Change Send |
*PriceChangeSend |
Send Price Changes to IMCS |
|
DoItBest |
Price Change Send IMCS |
*SendIMCS |
Price change send IMCS |
|
DoItBest |
Promotional Item Update |
*Promotions |
Promotional Items Download |
|
DoItBest |
Warehouse Qty |
*Warehouse Qty Load |
Warehouse Qty load for Do It Best |
|
EJD |
Catalog Load |
*CatalogLoad |
Catalog load update |
|
EJD |
PO Receive |
POResponse |
Document |
|
EJD |
PO Receive |
*Invoice Receive |
Purchase Order/Invoice Receive process |
|
EJD |
PO Send |
*Orders File |
Purchase Order Send |
|
EJD |
Price Updates |
*PriceUpdateFM |
Price updates with file maintenance and description changes |
|
EJD |
Price Updates |
PriceUpdateFM_ND |
Price Update with file maintenance, no description change in inventory |
|
ENAP |
AP Receive |
*AP Receive |
AP Receive |
|
ENAP |
AP Receive |
APReceiveOrig |
AP Receive Original Bill Date=Transmittal Date |
|
ENAP |
AP Send |
*APSend |
AP Send remittance Advice CSV |
|
Freeway |
AP Receive |
*APInvoice |
AP Invoice update |
|
Freeway |
Freeway Order Confirmation |
*OrderConfirmation |
Order Confirmation |
|
Freeway |
FreewayASN |
*AdvanceShipNote |
Advance Ship Note |
|
Freeway |
PO Receive |
*Invoice |
Purchase Order Receive (Invoice) process |
|
Freeway |
PO Send |
*Purchase Order |
Document |
|
Freeway |
Price Change |
*PriceFile |
Price File |
|
HANDY (HDW Houston) |
PO Receive |
*POInvRec |
Purchase Order Receive process |
|
HANDY (HDW Houston) |
PO Send |
*POSend |
Purchase Order Send process |
|
HANDY (HDW Houston) |
Price Change |
*Price Update |
Price changes |
|
HANDY (HDW Houston) |
Price Change |
CostUpdate |
Cost only update for Inventory/Unapplied Price Updates |
|
HANDY (HDW Houston) |
Price Change |
PriceChgSuggList |
Original Price Update that pulls from Suggested List field. |
|
HANDY (HDW Houston) |
Promotional Item Update |
*Promotions |
Promotions |
|
HomeHardware |
Bar Code Load |
*UPCMaintenance |
UPC Maintenance/UPC Build |
|
HomeHardware |
Catalog Load |
*CatalogLoad |
Catalog Load |
|
HomeHardware |
File Maintenance |
*FileMaint |
Document |
|
HomeHardware |
PO Receive |
*POReceive |
PO receive Invoice |
|
HomeHardware |
PO Send |
*POSend |
Home Hardware Purchase Order Send |
|
HomeHardware |
Price Change |
*PriceChange |
Price Changes |
|
HomeHardware |
Price Change |
PromotionPrices |
Promotional Prices file into sale update |
|
HouseHasson |
Catalog Load |
*Catalog Load |
Document |
|
HouseHasson |
PO Receive |
*ElectronicInvoice |
HH PO Receive |
|
HouseHasson |
PO Send |
*OrderFile |
HH Order File - PO Send |
|
HouseHasson |
PO Send Alt Format |
*PO with Contract |
HH Order File - PO Send with Retail Price and Contract Number |
|
HouseHasson |
Price Change |
*LoadFile |
HH Load File, used to update catalog and price changes |
|
HouseHasson |
Price Change |
PriceChange |
Document |
|
HouseHasson |
Price Change |
CostChange |
Document |
|
HouseHasson |
Price Change |
PriceChange_NoDesc |
Document |
|
HouseHasson |
Price Change |
CostChange_NoDesc |
Document |
|
HouseHasson |
Sale Price Update |
*PromoPrice |
Document |
|
LMC |
AP Receive |
*Invoice 810 |
X12 Invoice 810 |
|
LMC |
AP Send |
*AP Send |
AP Remittance Advice |
|
LMC |
AP Send |
AP Send Test |
AP EDI 820 in test mode |
|
LMC |
AP Send |
AP Send EFT |
Sends Check ID instead of Check Number for EFT |
|
MHD |
File Maintenance |
*File Maint |
Electronic File Maintenance |
|
MHD |
PO Receive |
*PO Recv |
Electronic Invoice |
|
MHD |
PO Send |
*PO Send |
Document |
|
Orgill |
Bar Code Load |
*BarCodeLoad |
Bar Code Load |
|
Orgill |
Catalog Load |
*CatLoad_DO_NOT_Use |
Do not use, use the correct File maintenance format instead. |
|
Orgill |
File Maintenance |
*File Maint VP1 |
File Maintenance |
|
Orgill |
File Maintenance |
File Maint VP2 |
File maintenance for VP2 cost |
|
Orgill |
File Maintenance |
File Maint ADV |
Document |
|
Orgill |
File Maintenance |
VP1 NO DESC |
File Maintenance with no description change for VP1 pricing |
|
Orgill |
File Maintenance |
VP2 NO DESC |
File Maintenance with no description change for VP2 pricing |
|
Orgill |
File Maintenance |
ADV NO DESC |
File Maintenance with no description change for ADV pricing |
|
Orgill |
File Maintenance |
VP1 NO INC |
File maintenance without any inventory common changes for VP1 pricing |
|
Orgill |
File Maintenance |
VP2 NO INC |
File Maintenance with no changes to Inventory Common for VP2 pricing |
|
Orgill |
File Maintenance |
ADV NO INC |
File Maintenance with no changes to Inventory Common for ADV pricing |
|
Orgill |
Inventory Load |
*Special Inventory Load |
Document |
|
Orgill |
PO Receive |
*PO Update Invoice |
Purchase Order Update via an Orgill Invoice |
|
Orgill |
PO Send |
*PO Send |
Document |
|
Orgill |
Price Change |
*Price Change |
Price changes |
|
TrueValue |
Bar Code Load |
*BarCodeLoad |
Bar Code Load |
|
TrueValue |
Catalog Load |
*CatalogLoad |
All Tiered Maintenance |
|
TrueValue |
Catalog Load |
Catalog Export |
Document |
|
TrueValue |
CatalogPass2 |
*CatalogLoad2 |
Catalog Load Tiered Pricing Spec 41 and 46 |
|
TrueValue |
Coupon Load |
*CouponLoad |
Coupon Maintenance |
|
TrueValue |
Coupon Load 2nd Pass |
*CouponLoadPass2 |
Coupon Tiered Price |
|
TrueValue |
Coupon Maintenance |
*CouponMaint |
Coupon Maintenance |
|
TrueValue |
Coupon Maintenance 2nd Pass |
*CouponMaintPass2 |
Coupon Tiered Price |
|
TrueValue |
Customer Enrollment Load |
*CustomerEnrollLoad |
TVR Customer File from Loyalty Vendor - Spec 95 |
|
TrueValue |
Customer Enrollment Send |
*CustomerEnrollSend |
TVR Customer Enrollment File - SPEC 96 |
|
TrueValue |
Department Class Fineline Load |
*FineLine Descriptions |
Department Class FineLine Descriptions |
|
TrueValue |
File Maintenance |
*FileMaintTP |
Tiered pricing file maintenance |
|
TrueValue |
File Maintenance |
ItemMaintTP_NODESC |
Document |
|
TrueValue |
FileMaint2ndPass |
*FileMaintTP2 |
Tiered Pricing File Maint, 2nd pass |
|
TrueValue |
Full Inventory Send |
*Inventory Capture |
Retail System Data Capture Inventory File |
|
TrueValue |
Images Download |
*ImagesUpdate |
Images Update |
|
TrueValue |
Inventory Load |
*MemberPurchHist |
Member Purchase History |
|
TrueValue |
PO Receive |
PO Receive Export |
Document |
|
TrueValue |
PO Receive |
*PO Receive Invoice |
Purchase Order Receive Invoice |
|
TrueValue |
PO Receive Direct Ship |
*Direct Ship PO |
Po Receive Direct Ship |
|
TrueValue |
PO Receive Open Order |
*PO Update Open Order |
Document |
|
TrueValue |
PO Send |
*PO Send |
spec DS020 Order Upload |
|
TrueValue |
Policy A Claim |
*PolicyAAutoSend |
Document |
|
TrueValue |
POS Data Send |
*RetailerWorkbench |
Placeholder Document only. Real code uses the TrueValue RetailerWorkbench routine Mike M wrote. The existence of this document as a default causes frmPOEDI to show the POSData Send option. |
|
TrueValue |
Price Change |
Price Changes not VP |
Retail Pricing System Price Change Reg Retail |
|
TrueValue |
Price Change |
*PriceChangeVAR |
Price Change (Tiered Pricing Specs) Variable Pricing Only |
|
TrueValue |
Promotional Item Update |
*EventDownload |
Event Download into EDI Promotions DS071 |
|
TrueValue |
RPE Extract |
*RPE Extract |
SPEC 03 - Member Retail Price Enhancement (RPE) and AIM Upload File. This file is used to setup member's Retails based on Level 1 or level 2 pricing. It contains all items from the member's retails system inventory file. This file will also be used for the AIM extracts. |
|
TrueValue |
Sale Price Update |
*SaleReceive |
Sale Prices via Event Update file DS071 |
|
TrueValue |
Ship Later |
*Ship Later |
Member Ship Later Download File |
|
TrueValue |
Warehouse Qty |
*Warehouse Quantity Load |
SPEC 12 - RDC Balances MCS Download File. |
|
TruServ |
Bar Code Load |
*BarCodeLoad |
Bar Code Load |
|
TruServ |
Catalog Load |
*Catalog Export |
Document |
|
TruServ |
File Maintenance |
*FileMaintTP |
Tiered pricing file maintenance |
|
TruServ |
File Maintenance |
ItemMaintTP_NODESC |
Document |
|
TruServ |
FileMaint2ndPass |
*FileMaintTP2 |
Tiered Pricing File Maint, 2nd pass |
|
TruServ |
Full Inventory Send |
*Inventory Capture |
Retail System Data Capture Inventory File |
|
TruServ |
Images Download |
*ImagesUpdate |
Images Update |
|
TruServ |
PO Receive |
PO Receive Export |
Document |
|
TruServ |
PO Receive |
*PO Receive Invoice |
Purchase Order Receive Invoice |
|
TruServ |
PO Receive Open Order |
*PO Update Open Order |
Document |
|
TruServ |
PO Send |
*PO Send |
spec DS020 Order Upload |
|
TruServ |
POS Data Send |
*RetailerWorkbench |
Placeholder Document only. Real code uses the TrueValue Retailer Workbench routine. The existence of this document as a default causes the Vendor EDI form to show the POS Data Send option. |
|
TruServ |
Price Change |
Price Changes not VP |
Retail Pricing System Price Change Reg Retail |
|
TruServ |
Price Change |
*PriceChangeVAR |
Price Change (Tiered Pricing Specs) Variable Pricing Only |
|
TruServ |
RPE Extract |
*RPE Extract |
SPEC 03 - Member Retail Price Enhancement (RPE) and AIM Upload File. This file is used to setup member's Retails based on Level 1 or level 2 pricing. It contains all items from the member's retails system inventory file. This file will also be used for the AIM extracts. |
|
TruServ |
Sale Price Update |
*SaleReceive |
Sale Prices via Event Update file DS071 |
|
TruServ |
Warehouse Qty |
*Warehouse Quantity Load |
SPEC 12 - RDC Balances MCS Download File. |
|
TruServCA |
Catalog Load |
*Catalog Load |
Initial Catalog Load |
|
TruServCA |
PO Receive |
*PO Receive |
PO Receive (Invoice) |
|
TruServCA |
PO Send |
*Regular Order |
PO Send modified X12 850 |
|
UnitedHardware |
PO Send |
*PO Send |
Send a purchase order to United Hardware |
|
UnitedHardware |
PO Update Invoice |
*Electronic Invoices |
Purchase Order Receive |
|
UnitedHardware |
Price Change |
*Price Change |
Loads Pricing updates from United Hardware |
|
UnitedHardware |
File Maintenance with update item descriptions option |
*File Maint |
Loads File Maintenance updates from United Hardware including descriptions |
|
UnitedHardware |
File Maintenance with option to skip updating item descriptions |
File Maint_NODesc |
Loads File Maintenance updates from United Hardware excluding descriptions |
|
UnitedHardware |
Promotions Loading |
*Promotions |
Loads Promotional data from United Hardware |
|
United Hardware |
Catalog Load |
*Catalog Load |
Loads Catalog data from United Hardware |
|
X12 |
AP Receive |
*Invoice 810 |
Document |
|
X12 |
AP Receive |
Invoice 810 LMC |
Invoice 810 with different TDS |
|
X12 |
AP Receive |
InvoiceTimbrMart |
Document |
|
X12 |
PO Receive |
*Advance Ship 856 |
Advance Ship Notice 856 |
|
X12 |
PO Receive |
PO Update 810 |
Document |
|
X12 |
PO Send |
*PO 850 |
Purchase Order 850 |
|
X12 |
Price Change |
*PriceChange |
Price Change 832 |
|
X12 |
Price Change |
PriceChangeCostOnly |
Document |
EDI Requirements
To use EDI, installation and use of specific software may be required. In addition, users must typically contact the vendor that EDI will be used with. If EDI hasn't been used in the past, they may have some setup to properly prepare inventory, catalog, or other data for use with EDI processing.
Additional SoftwareFor some EDI features, additional software is required. For our cloud-hosted customers, additional software does not have to be installed locally, as they are already installed on the server. In the case of our cloud deployments, your application runs remotely from the server, not locally from your PC or other device. A third-party application, MOVEit Freely® software, must be loaded on any client PC or server that will perform EDI functions. "Automation" features generally require this be installed on the server (as well as 7-zip). Computers from where EDI procedures are done must have high-speed Internet access. Below is a link to Standard Networks web site where users can download MOVEit Freely software (the software is available free of charge; however, there is a registration form): https://www.ipswitch.com/resources/free-tools/moveit-freely In some cases, EDI also requires software that can extract zipped (archived/compressed) files from a command line. This is sometimes necessary with larger files to keep download and upload times manageable. When required, this should also be installed on any local PC or server that will do either manual or automated EDI processing. http://www.7-zip.org
|
Contacting the Vendor
Contact the vendor directly for any account and password information required for the EDI processes and provide it to Implementation or Support for set up. Any contact with the vendor is the end-user's responsibility. We maintain no business relationship with vendors from whom EDI is available.
We strongly suggested that users obtain a data file of their vendor's catalog so that Support can load it into the catalog database for use with ordering. This may be required in some cases. Having a catalog makes adding new items, as well as ordering items your company does not stock, must easier. Once loaded, the catalog is available to all users and is kept up-to-date by future EDI processing. See Inventory > Database > Catalog.
Data Maintenance and Preparation
The item database must contain some reference point for mapping vendor data to your items. It is the end-user's responsibility to make sure that the application data has vendor-item information (UPC codes) that can be used for linking items in the data to items in your company's database. In some cases, database changes may be necessary either by manual means or done by Support using a reference file provided by the vendor (this still requires some link between your company's items and the vendor's in the data provided). Database updates for vendor-item information are a billable service and are not included in the price of EDI or normal Support charges.
Vendors with whom EDI is used must be flagged with the EDI interface name in the Vendor database after configuration by Support.
EDI and Support
ECI Support is limited to the function of our application only. Transmission issues, PC problems, Internet connectivity, and issues within vendor data may occur and are not covered under ECI Support, which is limited to problems related to application processing, such as issues that occur before or after successful data transmission.
Some file maintenance by the user may be required for EDI to function ideally. This can include changes to unit of measure definitions and vendor purchasing preferences such as package quantities, etc. All such changes are the end-user's responsibility. Support for EDI does not include any database modifications that may be necessary to meet a vendor's requirements or preferences.
ECI Support assists users with the initial installation and configuration of EDI for use for one or more branch locations. Parameters and initial branch settings are configured by Support based on your instructions and account information. In most cases, each location will have their own account and password with the vendor. The Branch Setup database under Maintenance is used for these EDI settings.
Data Processing
The Vendor EDI transaction available from the Purchasing area can be used for most data exchange with your vendor(s). This offers the following capabilities:
Submit Purchase Orders
This offers the ability to electronically place an order with your vendor. This can also be done immediately when processing a purchase order from the Order Entry transaction available from the Purchasing area or Direct Ship order from the Point of Sale area.
Purchase Order Update
This option is used to retrieve data from the vendor for the purpose of updating a new or existing purchase order with EDI quantities and costs.
Price Updates
This feature retrieves price updates, which may include sale/promotional data, from your vendor(s). The sale pricing or price updates are automatically created, but not applied. Use the Price Updates transaction available from the Inventory area to review the changes. Updates are selected based on the date of the update. Sale pricing can be selected by the date range of the sale or the promotional ID. The Apply Price/Sale Changes utility (available from the Utilities, Updates sub-menu in the Inventory area) can also be used to apply sale and price updates, but does not provide the ability to review those changes.
For EDI with ACE Hardware Corporation, this option is named "hotsheets" and also performs file maintenance and retrieves promotional and ACE Rewards® data (when applicable). ACE Rewards participation is optional. The File Maintenance option (below) is not used in this case.
Bulk Receive
This feature retrieves all data (EDI documents) that the vendor provides and processes them. This can usually be automated and done on an hourly basis for example. In the case of LMC and LBM Advantage, this is used to generate payables invoices and credits from "AP Receive" type documents providing essentially the same capability as the "Retrieve Invoices" option except that it supports multi-branch capability and is suggested for companies who have more than one location using EDI. Bulk receive is also used for X12 and Chalifour for processing a variety of EDI document types.
File Maintenance
File Maintenance is used to update three types of data: catalog data, vendor-items, and inventory data. Inventory data usually includes the UPC, description, supplier class, fineline, and department. Usually, mapping overrides are provided that allow you to limit or prevent inventory updates (many users prefer to not update their item descriptions via EDI data, for example). Vendor-item data includes vendor SKU, package quantities (order multiple) and purchase levels. Catalog data varies based on the vendor, but is capable of updating most if not all catalog data. This does not load the catalog, it just keeps the existing catalog up-to-date. When available, catalog loads can be done using the "Extras" option from the Vendor EDI transaction in Purchasing; however, you usually must contact the vendor to request they place the catalog data in your mailbox.
Retrieve Invoices
This option is used only for companies utilizing the Payables feature. It generates payables invoices and credits based on the data received from the vendor. It can also update open purchase orders (optional). We suggest using the "Bulk Recv" option instead of this option if your company has more than one branch location using EDI. "Bulk Recv" processes the same "AP Receive" data, but is also capable of handling additional EDI document types for certain vendors.
Send Remit Advice
"Send Remit Advice" provides a way of submitting a notification for pending payments disbursed via Payables to your vendor. The "remittance" can be transmitted either immediately when you disburse the payments using the Disbursements transaction found in the Payables area (choose Transmit tab on the Process (F12) form) or later using the Vendor EDI transaction in the Purchasing area.
Extras
The "extras" option in Vendor EDI provides access to additional functions which aren't as frequently used or necessary. Some common "extras" are used for catalog and barcode loads. The choices provided, if any, vary by vendor.
Integrating EDI into the Application and the Database
The following areas contain settings and options that support EDI processes:
Maintenance > Database > Parameters > EDI > General
The Parameter Settings form contains some EDI-related settings. Most of these settings can only be changed by ECI Support personnel; however, some are available to users with sufficient security permission to access them. The EDI tab is typically locked from changes, but you can view your current settings. The "Auto Update" settings only apply to Do it Best® and ACE Hardware corporation and relate to sending Point of Sale (POS) data to Do it Best® for analysis and updating warehouse quantities in the catalog (not all file maintenance). Set up instructions for this section are provided here.
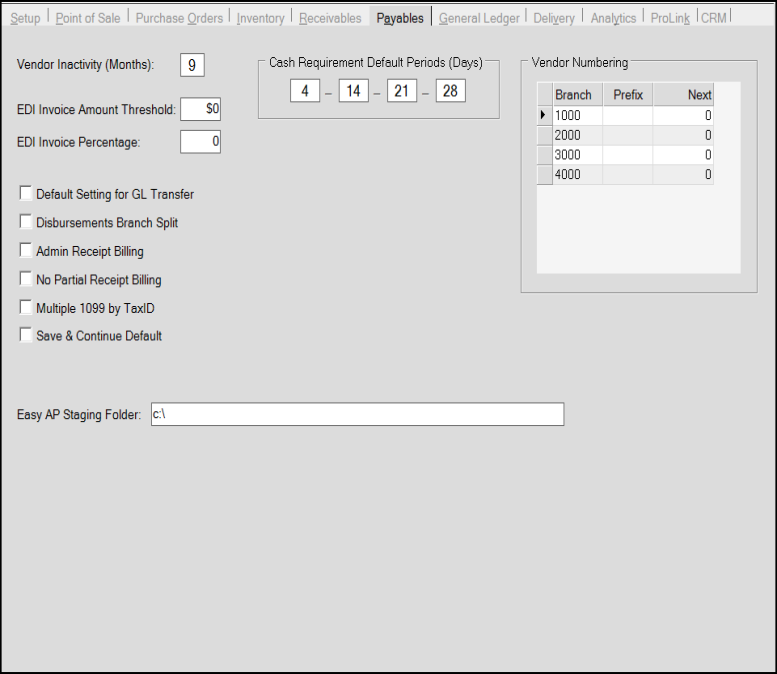
Maintenance > Database > Parameters > Payables
In addition, the Payables tab contains EDI settings for the invoice threshold amount and/or percentage. The threshold amount determines whether an EDI-generated payables invoice (or credit) is created with a status of either "hold" or "open." Hold status would be used for any invoices where the difference between the EDI data and the open receipt isn't within the threshold amount or percentage. Setting of a threshold is optional.
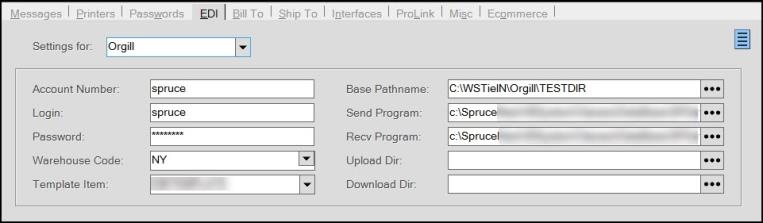
Maintenance > Database > Branches
The Branch Setup form contains an EDI tab for vendor interface settings. These are typically configured by Support and may involve the installation of additional files on your server prior to use. Usually, vendors provide separate ID and log in information for each branch location.
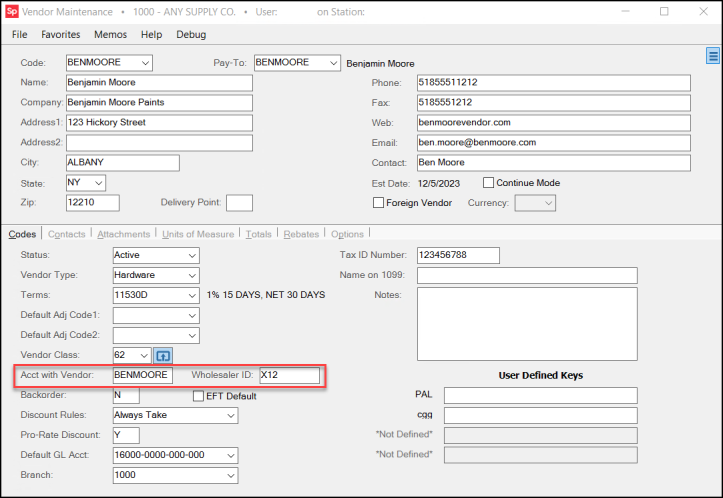
Purchasing > Database > Vendor
The Vendor Maintenance form contains a few fields that are related to EDI processing. In all cases, vendors require an interface name if EDI is used with that vendor. It's also possible that the account ID may be used, however, it can depend on the interface.

Inventory > Database > Item
The Item Maintenance settings are not just used for EDI, but can and do affect EDI processing. Purchasing settings are important because they allow you to set vendor specific settings such as order multiples and unit of measures. Settings can be mapped for up to six vendors (one primary, and five alternates).
 > Database > Item")
The Item Maintenance form is also used for adding a template item for new items added to the database by EDI processing.
Inventory > Database > Catalog
You can load the vendor's catalog using EDI processes, which is optional and suggested. It is typically loaded during EDI set up by Support using a file your vendor supplies. After the initial load of the file, catalog information is typically kept up to date by EDI processing (File Maintenance); however, the functionality of the catalog can vary by vendor.
Why use a catalog? Rather than clutter up selection lists, reports, and the database with items your company doesn't and may never stock, a catalog separates the vendor's merchandise from your own while, at the same time, keeping it accessible for ordering and inquiry purposes.
 > Database or Inquiry > Catalog")
Support for UPCs Added to a Purchase Order EDI Process
When you purchase materials from Benjamin Moore Paints (using the current vendor tie-ins) you can now send the item’s universal pricing code (UPC) when you purchase materials. This is the number format that Benjamin Moore wants to use going forward to ensure that they send the right materials that you order. We have modified our processes to provide this information in the purchase orders we send.
Note: You can use the instructions we describe below for other vendors and with other tie in options other than those referenced here. We recommend that you include the ECI Support team if you want to do this.
IMPORTANT: To use this feature, you must store each Benjamin Moore item’s UPC in the first Barcode field on the Item Maintenance form (Common > Select tab) to ensure this process works correctly.
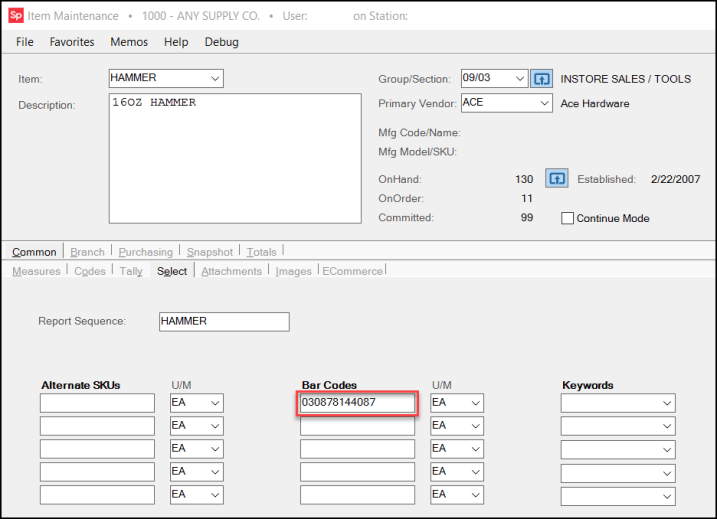
Item Maintenance > Common > Select > UPC Barcode Field
We have added a new mapping override format, PO 850 Ben Moore, to facilitate the item order so the application can send the item’s UPC in the first position when processing your purchase orders. Make sure the EDI default directory is set.
Note: To use this feature, you must have a Benjamin Moore Paints vendor record entered as described in the Help System.
The branch’s Vendor EDI settings must be current to use this feature.
Vendor Maintenance > Settings Needed to Define the X12/X12B Vendor Box Information
To complete the setup for this feature:
1. Make sure the X12 and/or X12B Wholesaler Tie Ins are enabled in the application parameters or follow the steps below to enable the tie in.
a. From the Main Menu, choose Maintenance > Database > Parameters. The Parameter Settings form displays.
b. From the Setup tab, choose EDI to display the EDI subtab settings.
c. In the Installed Wholesaler Tie-Ins list, scroll to the bottom to make sure that the X12 or the X12B options are selected.
-
If selected, move on to the next step.
-
If not, select the check box beside the X12 or X12B tie-in entry you use to send purchase orders to the vendor. Then, continue to the next step.
d. Choose Process (F12) to save this change to your settings.
2. From the Main Menu, choose Maintenance > Database > Branches. The Branch Setup form displays.
3. For each branch that needs to use this tie in, follow these steps:
Note: You must process each branch setting separately.
a. In the Branch ID list, select the branch you want to add this tie-in setting to.
b. Click the EDI tab for this branch.
c. From the Settings for list, choose whichever tie-in the branch uses.
d. From the Vendor list, do one of the following:
• If the vendor record already exists in the list, choose this option from the list, and continue to Step e.
• If the vendor record is not in the list, continue as follows:
-
Right click the Vendor Menu Marker
 and choose the Add Vendor option. The Add Vendor Settings box displays.
 -
Click the Vendor list down arrow, choose the Benjamin Moore vendor record and click Accept. The application searches for the appropriate vendor settings and displays the Settings for X12 Vendor box.
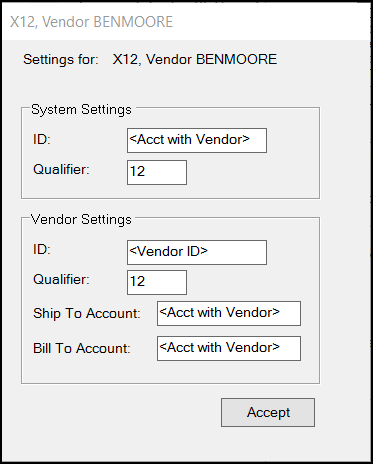
Settings for X12 Vendor (Benjamin Moore)
-
Complete the X12 Vendor settings based on the Acct with Vendor and Vendor ID entries in the Benjamin Moore Vendor record and click Accept.
(You can look up these settings in Purchasing > Database > Vendor and find the Benjamin Moore record). -
Continue to Step e. You are ready to choose the new mapping override setting for the Benjamin Moore X12 transmissions.
e. On the EDI tab, with the Benjamin Moore vendor record selected, right-click the Vendor Menu Marker and choose the Mapping Overrides option.
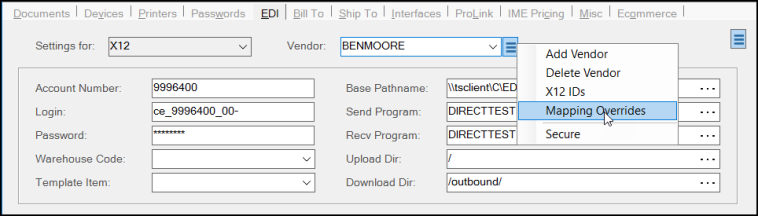
Branch Setup > EDI Tab > Mapping Overrides Selection
The Mapping Overrides for the Benjamin Moore X12 record display
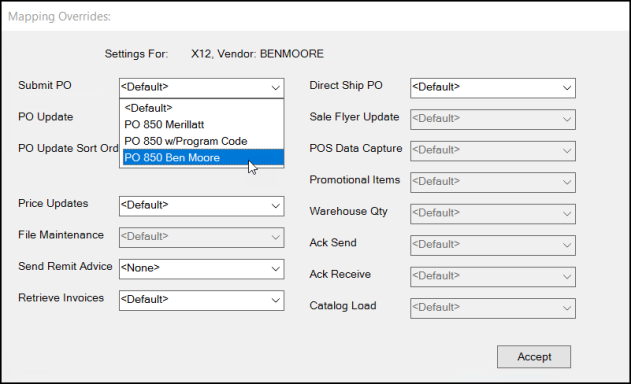
Benjamin Moore Mapping Overrides
f. From the Submit PO list, choose the PO 850 Ben Moore option and click Accept. The Branch Setup form redisplays.
4. Choose Process (F12) to save these settings.
Repeat Steps 3 and 4 for each branch that requires the Benjamin Moore X12/X12B settings.
After this process is complete, the application will use the new mapping override to send the item’s UPC when you use the X12 or X12B transmission method for Benjamin Moore purchase orders through the Vendor EDI process. This process has not changed, but the contents of the file you are sending do.
To review the purchase order record before sending it to the vendor:
1. Create the Benjamin Moore purchase order in Order Entry.
2. Choose Purchasing > Vendor EDI. The Vendor EDI Communications form displays.
3. Choose the Submit Purchase Orders button.
4. From the EDI Interface list, choose X12 or X12B, depending upon the setting you enabled for the Benjamin Moore vendor.
5. From the Vendor list, choose the Benjamin Moore vendor record. The application displays the Purchase Orders that match the vendor.
6. Double-click the row header to preview the record. The application displays the item detail that is scheduled to go in the PO send.
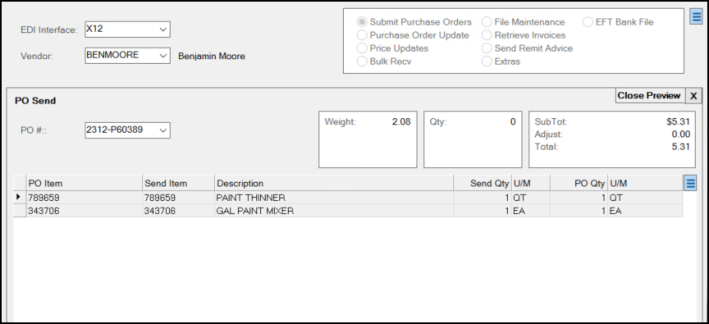
Vendor EDI Communications > PO Send Detail
7. Right-click the data grid’s Menu Marker and click the Preview Transmit Data option.
The application uses your default notepad app to display the transmission details as they will be sent to the vendor:
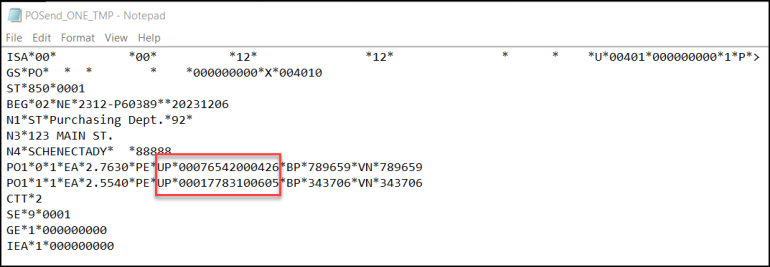
NotePad > PO Send Content > UPC Code Highlighted
The UP qualifier stands for the UPC code label and the next number is the UPC code for the ordered product. The BP qualifier precedes the branch’s SKU, and the VN qualifier precedes the vendor’s SKU for the ordered item.