Vendor Maintenance Form
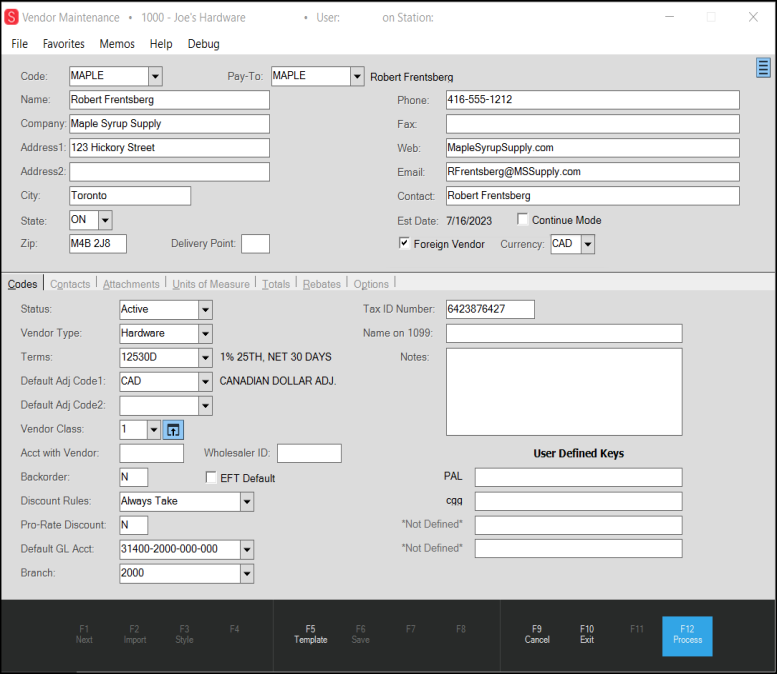
Use the Vendor Maintenance form to add, modify, and delete vendor records. To access this form, choose Purchasing > Database > Vendor
Vendors are used by many application transactions including customer orders, inventory,

Form fields such as name, address, and other contact information are fairly self explanatory. The "Pay To" is used to indicate when payments are directed to another party (vendor); otherwise, the pay-to should be the same (current) vendor. When necessary, "Pay To" vendors are set up in this same area.
New
Click the New button to generate a vendor code automatically. The generated number will be a sequentially assigned integer value along with an optional prefix character. Numeric ranges as well as the optional prefix character can be assigned from the Payables tab of the Parameters form (Maintenance > Database > Parameters). The button will only be visible if numeric ranges have been assigned for vendors in your system.
Continue Mode
When using this form to change or view the same settings on multiple vendors, continue mode can be used to retain the current selected folder tab between vendors. Otherwise, the form would normally reset back to its default state with the first tab being visible.
Foreign Vendor / Currency / Country of Origin
If the "Customs Manifest" or "Multi-Currency" options are turned on in Parameters, three options will be visible on the Vendor Maintenance form: Foreign Vendor, Currency, and Country of Origin(Customs Manifest Only). By selecting the Foreign Vendor option, you are indicating that purchases from this vendor are made through the customs manifest feature or a vendor is billing you in a currency other than your local default value. The Currency field is the currency the vendor deals in. If a vendor deals in multiple currencies, you would setup multiple vendors with a different currency. The Country of Origin defines where the product is from. For more about setting up vendor records to use foreign currency, see Setting up Currency Exchange Rates and Using Them in Transactions.
Address Fields
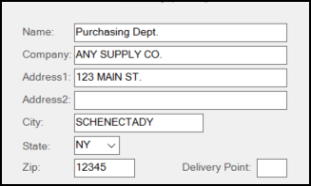
The format of the Address fields is determined by your application parameters and your system's region and language settings. The Address fields are different if you are located in the United States, Canada, Australia, or the United Kingdom. The application uses the same address control in a wide range of transactions and forms; however, each area may use the address differently. Branches, accounts, contacts, jobs, and vendors all have associated address data.

Name
This is the name of the person associated with the address and is typically the first (top) line when an address is printed or displayed. This part of the address can be up to 50-characters long.
In some cases, the Name field performs additional functions that might not be obvious. For example, when you are adding a new account, the Name becomes the default for the Sort Name field and the name of the primary contact for the account. You can modify this entry in a context form so it is different from the default address "Name;" however, any changes you make to the Name field entry or to the name associated with contact zero, automatically update to keep both fields the same.
Company
This is the company name associated with the address (if any). If supplied, the company prints/displays below the Name entry and above the Address 1 and 2 lines. This part of the address can be up to 30-characters long.
|
Note: If the Company and Name entries for an address match exactly, the text value is only printed once on documents to avoid unnecessary repetition. |
Address Line 1 and Address Line 2
These are the local/street address lines for business. Both are optional. Usually, when the application displays the address or prints it on a document, these address lines only show when they are filled from the account or branch settings. This is done to avoid unnecessary blank spacing between address lines. These lines can be up to 30-characters long.
City
This field is reserved for the "city" (city, town, village, etc.) part of the address and can be up to 30-characters long.
State or Province (Code)
This field length varies based on your regional setting in Parameters (United States, UK, Australia, or Canada). When shown, it is a postal abbreviation used for the state, province, or territory where the address is located. Depending upon your settings, entering a zip/postal code (in the Zip or Postal Code field) can result in this field automatically updating to match the database settings. Listings of state and province codes also include territories. This part of the address can be up to two- or three-characters long. In some cases, the printed address will only show the state/province if the City field is also complete.
Upon request, Support can enable a parameter to include country codes in addition to the state / province codes.
States, provinces, and country codes are grouped together. If your company is located in Canada, this list field displays the province codes first, followed by state codes, and then country codes (if enabled). In the United States, this list displays the state codes first, followed by Canadian provinces, and then country codes (if enabled). If your company is located in the United Kingdom (UK), this field does not display, nor is it typically printed. There is no "UK" parameter setting. If you are located in the United Kingdom, the software uses the region and language settings of your computer as well as the database region (in certain cases).
Zip / Postal Code (or Postcode)
In certain cases, changes you make to a postal (Zip) code can trigger other changes, such as setting the sales tax location. This part of the address can be up to 10-characters long. In the United States, the zip code is numeric and is listed to the right of the city and state code. The Postal Code in Canada is alphanumeric and also displays to the right of the province code. In the United Kingdom, the postcode is printed as a separate line (the last or bottom line of the address). In Australia, the postcode is four-digits long and displays to the right, after the name of the city/suburb/town, and the state or territory code.
Delivery Point
The United States Postal Service (USPS) assigns delivery points in addition to the zip + 4 codes to differentiate delivery points at the same address (as when there are four offices in the same building or multiple apartments in the same house, for example). Delivery points are not typically printed (except for Canadian regions in certain cases) but are included when POSTNET barcoded mailing labels are printed. Usually, this is a single digit added to the end of the ZIP code, ZIP+4 code, or a combination of both codes when printing a barcode. Typically, the application adds a check digit after the delivery point (if included). This part of the address can be up to four-characters long.
For Canadian users, the Delivery Point field has an alternate use (see below):
 Delivery Point Settings for Canada
If your company is located in Canada (and assigned to the Canada regional parameter), you can use the Delivery Point field to add a country notation to document addresses. If the Delivery Point entry is US, USA, or CAN, the application prints these codes as part of the address on documents.
Folders
Most settings, beyond the address and general information about the vendor, are found within the folder tabs in the lower half of the form. These folders are "static" meaning they are always shown and not dependent on the Folders (F4) function as folders are in some other areas. For more information about the settings found on the folder tabs, please see the following topics (or use the links listed below):
Codes
Contacts
Attachments
Units of Measure
Totals
Rebates
Options
Deleting, Merging, or Renaming a Vendor
You can use the Menu Marker ![]() to remove or change an existing vendor record. Options include: Delete Vendor or Merge/Rename Vendor. To access this menu, you must have system administrator "Secure" permissions.
to remove or change an existing vendor record. Options include: Delete Vendor or Merge/Rename Vendor. To access this menu, you must have system administrator "Secure" permissions.

Delete Vendor option allows you to permanently remove a vendor under certain circumstances. The reason why a vendor may not be deleted is provided if deletion is attempted and fails. A vendor may not be deleted under the following circumstances:
-
The vendor is currently assigned as the pay-to for another vendor.
-
The vendor has activity in the current or previous year.
-
There are open Purchase Order documents associated with the vendor
-
The vendor has voided payables.
If a vendor is deleted, any data older than the prior year will still reference the vendor; however, it is possible that information directly referencing the vendor record on documents, etc. may no longer be available. This depends on whether the data is maintained with the data used to build the document or not. If any errors are produced as a result of a vendor deletion, re-add the vendor code and see if the error is resolved. Information that is directly associated with the vendor such as units of measure and contacts is permanently removed when a vendor is deleted.
The Merge/Rename option allows vendors to be either renamed or merged with another existing vendor. Both of these options modify all occurrences of the vendor code in all tables referencing the vendor in the database (this includes data for past activity). Archived data is maintained in a separate database and not modified, so renaming (or merging and then deleting) vendors may cause issues referencing archived documents for the vendor. The rename option effectively removes the original vendor code if the operation completes successfully. The “merge” option combines the totals for the vendors after the operation completes (modifying the vendor codes in the database) and then disables the “from” vendor. Merging doesn’t immediately remove the original vendor; however, it is possible to then manually delete the vendor after the merge has completed.
We strongly suggest that any type of merge or rename be done outside of regular business activity in order to minimize the chance that the vendor is currently in use. It is possible for merges and renames to affect system performance. Additionally, merge/rename may cause errors if the vendor being changed is in use at the time of processing. There is no undo for merged data. A rename can be reversed by changing the vendor back to its original code. In some cases, it may be a better choice to disable the vendor and create a new vendor code in its place.