Parameters > Payables Tab
These settings pertain to Payables processing and preferences. You must have administrative rights to view and make changes to this form.

Parameters: Payables
Vendor Inactivity (Months)
In this field enter the number of month's that you have not ordered inventory from the vendor before you update the vendor status to Inactive by a monthly process. The application uses a similar process to label customer accounts.
Inactive status is more of a category than anything. A status of Inactive doesn't prevent you from ordering from the vendor in any way, but it can be used to help filter out unwanted data on reports. If you change a vendor's status to Inactive manually, you can undo this setting using the Vendor Global Modify process.
To disable this feature, set the number of months to zero. If the Vendor Inactivity (Months) entry is set to zero when the month ends, the application resets the Vendors with a status of Inactive to Active automatically. Other statuses are not affected.
What's considered active?When the monthly process runs to set the "inactivity" status, it checks a number of things to determine whether the vendor is Active." If ALL of the following conditions are true, the application updates the vendor status: •The vendor's current status must be active (0). •The vendor's established date* is either NULL (nothing/not set) or is older than the inactivity period. •The vendor's last purchase date is either NULL (nothing/not set) or is older than the inactivity period. •The vendor is not associated with any purchase order documents where the order, entry, expected (due), modify, and last received dates are ALL older than the inactivity period. •The vendor is not associated with any inventory receipt documents where the order, entry, expected (due), modify, and last received dates are ALL older than the inactivity period. •The vendor is not associated with any Payables documents where the vendor is the material vendor and the received, billed, and due dates are ALL older than the inactivity period. •The vendor is not associated with any Payables documents where the vendor is the pay-to (payment) vendor and the received, billed, and due dates are ALL older than the inactivity period. *Established date would only be null in the case of a vendor added as the result of a data conversion where there was no established (date added) in the original data. Established dates can be set upon request to your company's live date or another date upon request if your company wants to use the inactivity months setting, but not immediately affect the converted vendors. |
EDI Invoice Amount Threshold
The purpose of having a threshold is to increase efficiency by weeding out the small differences from larger one's so that users' time is being spent more effectively to just verify the larger differences. If the totals of the receipt and the invoice match, or the difference is less than the threshold, then the Payable's invoice is not put on hold. Both the threshold amount and percentage are considered if set. These amounts are also used for determining whether to send notification messages to the "Bill Discrepancy" user indicated on the Notify parameters tab (a sub-tab within the Setup folder tab). No notifications are sent if there is no user specified or the billed and received amounts are equal (=) or less than or equal to (<=) either threshold indicated here.
Understanding the EDI Invoice Threshold AmountThe amount specified is used for determining the discrepancy threshold for automated invoicing by EDI processing. EDI (Electronic Data Interchange) is any electronic process of data exchange. Payables invoices can be automatically created as a result of this process. If the difference between a purchase and the invoice total being transmitted is greater than the threshold, the invoice will be created but placed on "hold." If the difference is zero or less than the threshold amount, the invoice will be created as normal (open). In cases where there is no receipt found (via the PO), the Payable is marked as "PO not Found" and the generated invoice is put on hold. Users are responsible for researching these issues and for making decisions regarding the processing of the resulting EDI invoice. |
EDI Invoice Percentage (Threshold)
This percentage, entered as a whole number, is used for determining the discrepancy threshold for automated invoicing by EDI processing. EDI (Electronic Data Interchange) is any electronic process of data exchange. Payables invoices can be automatically created as a result of this process. If the percentage difference between a purchase and the invoice total being transmitted is more than the threshold, the invoice will be created but placed on "hold." If the difference percentage is zero or less than the absolute threshold percentage, the invoice will be created as normal (open).
When designating the percentage, enter the percent as a whole number rather than as a decimal equivalent. For example, a 2% threshold should be entered as 2.0 and not .02. The default threshold is 100% so that the new parameter doesn't interfere with any existing threshold established by your company.
In cases where there is no receipt found (via the PO), the Payable is marked as "PO not Found" and the generated invoice is put on hold. Users are responsible for researching these issues and for making decisions regarding the processing of the resulting EDI invoice.
Default Setting for GL Transfer
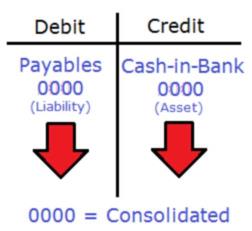
If checked, this setting defaults the "GL Transfer Eligible" option to selected (true) when manually entering new Payables invoices (does not apply to EDI generated payables). The default setting does not select invoices for transfer automatically. All payables invoices are transferred when paid if they haven't previously been. Transferring creates the ledger entries that record the purchase or expense as a "payable" liability. The typical offset to the payables liability account is either the accrual account, used for inventory purchases, or some type of expense report.
Branch Payables
The following settings pertain to multi-branch companies only and change the way Payables function financially. Discuss these options with your company's accountant prior to making changes! Using these functions add complexity to the normal function of Payables and your General Ledger and may make reconciling accounts to payables more difficult, especially if used improperly.
Disbursements Branch Split
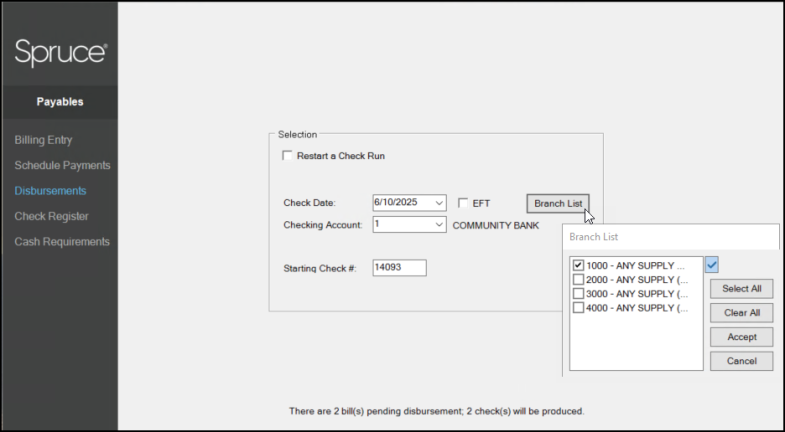
Use this option when your business has more than one branch and each branch is responsible for managing their own Payables. By default, the application follows a consolidated Accounts Payable process, however, Inventory and Accrual accounts are branch-specific. When you select this check box, the application allows you to use branch-specific Accounts Payable (AP) accounts for ledger entries associated with Payables. When you select this option, the Branch List button in the Disbursements form allows you to specify the branch associated with the disbursement.
You must add Branch accounts prior to use (branch is designated by the ledger account's assigned department).
We strongly advise against invoicing another branch's receipts or payables while using this option.
Note: If you do not select this check box and you set up branch-specific accounts payable accounts, the application will not use them.
Admin Receipt Billing
Warning! Additional Ledger Mapping is Required for this Feature. Please don't enable this option unless you have been trained and understand its use.
This option should NOT be used if the parameter, Disbursements Branch Split (above), is also in use. If enabled (selected), this feature adds a Inter Company Receivables and Inter Company Payables account entry to any Payables Invoice of a receipt (purchase) that originated from another branch location. Here's a break down of how it works from a financial standpoint:
In our example, we'll use a receipt from branch 2000 that is being invoiced by Payables under an administrative branch (this could be any branch location since a consolidated payables is being used).
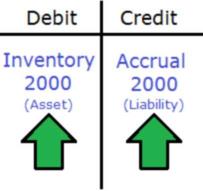
•Inventory is Received, so inventory assets for branch 2000 are increased (debited) and the accrual account balance for branch 2000 is also increased (credited). The debit records the change in branch 2000's inventory value and the credit records that branch 2000 owes payment for a purchase of inventory (accrual).
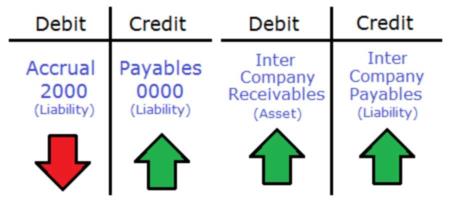
•Next, our receipt from branch 2000 is invoiced in Payables under the admin branch. This creates the standard debit to accrual (branch 2000) which is the offset to the credit to payables (our consolidated payables account is shared by all locations). Note: the Payables entry isn't shown in the Billing Entry screen but is assumed.
In addition, two other account entries are added to the invoice: one is a debit to Inter Company Receivables and the other is a credit increasing the Inter Company Payables account. The Inter Company Payables account would usually be mapped by branch since the balance represents the amount owed by that location to the company's consolidated Inter Company Receivables account. The Inter Company Receivables account would not need to be mapped by branch since it represents the money owed by each branch to the admin branch.
The Inter Company Payables account for branch 2000 is now reflects the amount of the purchase owed by branch 2000, the branch who purchased the inventory.
•When the Payables invoice is disbursed (the check is cut) by the admin location, the following occurs: company payables is reduced by the amount paid and the asset account mapped for "cash," representing the bank account selected for the disbursement, is reduced by the payment.
At the end of this process, you are left with a debit balance in the shared Inter Company Receivables and a credit balance in branch 2000's Inter Company Payables. These balances need to be dealt with at some point financially either via a manual journal adjustment or actual payment or transfer of funds between branches.
No Partial Receipt Billing
If checked, users won't be permitted to partially bill a receipt during receipt selection in Payables > Billing Entry. When partial billing is disabled, the "Inventory Receipt Selection" dialog displayed by the Receipts (F5) function in Billing Entry won't display a "partial" check box and the bill amount is read-only (changes aren't permitted). Partial billing (invoicing) of a receipt, if allowed, involves changing the amount to be billed during receipt selection (a check box is used to indicate partial billing and the amount can be modified on the data grid in this case). This setting does not change whether or not a user can mark an invoice for "partial payment."
Multiple 1099 by Tax ID
This parameter is used for 1099-MISC reporting done through the application when a company is multi-branch and the federal tax ID assigned to the branches differ. When selected (checked), the tax ID for the current location is displayed in the EOY 1099 Forms utility. This can be modified if needed. When the list of vendors is populated, using the View (F8) function, the listing will only include those payments for the branch or branches assigned to that federal tax ID. This feature would be used when branch locations do 1099-MISC filing separately and have their own federal tax IDs.
Save & Continue Default
This determines whether or not the Save & Continue check box in the Billing Entry form is selected by default. If checked (here), the check box option in Payables, Billing Entry will automatically be set when the Billing Entry form is accessed or reloaded.
Cash Requirement Default Periods (in Days)
These four input boxes are used for specifying four default projection periods in days for determining your company's cash requirements based upon outstanding payables, recent receipts, and up-coming purchases. The Cash Requirements option in Payables utilizes these settings as the defaults (they can be modified). The periods entered should be positive numbers that increase in value from left-to-right. For example, if you wanted to project your company's cash requirements for the next 4 weeks, you would use the numbers 7, 14, 21, and 28 since there are 7 days in a week. The current date is considered the base date and the date used for payables can be either the due date or discount date.
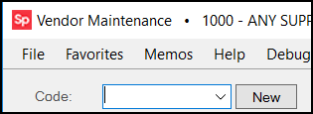
Vendor Numbering
Use this table to define branch-specific Vendor ID parameters for new vendor numbering. Setting these options allows you to click a New button in the Vendor Maintenance form to select the next available Vendor ID for a new record. For each location (branch), you can define up to a two-character branch prefix and "next" (or starting) number. Once a prefix has been defined for a particular location (branch), you can use the New button in the Vendor Maintenance form to automatically assign the next sequential vendor number. Any "next" or starting number indicated (this is optional) will be appended to the prefix and padded with zeros (on the left) so that the entire vendor number is a length of eight-characters in total.
For example, if your branch prefix is "C" and you specify a starting number of 30000, the first "new" vendor number generated would be "C0030000."
•Prefix characters should be uppercase letters, digits, or a combination of the two. Any lower case letters used in a prefix are automatically changed to uppercase when a new vendor identifier is generated.
•Special characters are not prevented; however, we suggest that characters not be used. Some characters are not allowed for vendor numbering and will produce warnings and/or errors if you attempt to create an vendor using them. If you do decide to use characters that are not letters or digits (again, not suggested), you should avoid using the following characters which are not allowed in vendor numbers:
|
' |
Single Quote |
|
[ |
Square Bracket (Left) |
|
] |
Square Bracket (Right) |
|
_ |
Underscore |
|
% |
Percentage |
•The same prefix cannot be assigned to multiple locations. Prefixes must be unique.
•Prefixes don't have to be assigned or used with all branch locations; however, the "new" button will only be provided in Vendor Maintenance when the user is currently signed into that branch.
•The maximum starting number is 999999 (regardless of the number of prefix characters).
•The "next" number is incremented each time the "New" button is used. This is done regardless of whether a vendor is actually saved or not using that number.
•The "next" number can be reset at any time manually and will roll over if once it reaches it's maximum value.
•If an existing vendor already uses the number generated, the software will increment the number until no match is located.
•The New button is not shown when modifying an existing vendor.
In the Vendor Maintenance form, the application displays the New button when you add a prefix for the current branch location.