Parameters > Setup > Notify Tab
Notify parameters are used for certain system type notifications, which are triggered by a variety of application events. Notifications may be delivered via application-managed activity messaging, and standard email
Note: Typically, the system sends a notification to a user using only one contact method. When the user is selected in the Notify parameters, notification occurs based on the user's settings in their User ID form.
-
If the user has a phone number and an email address stored, the application sends the notification to the phone number and not the email or as a system message.
-
If the user has no phone number saved but there is an email address, the application sends the notification via email and there is no phone contact or a system notification.
-
If the user has no phone number or email address saved, the system notifies the user using the system messages.

Specific actions in the software trigger notification messages when designated (selling an item, deleting an order, etc.). Messages are typically sent to internal users, but can also be emailed to customers in limited cases. In addition, a single notification action may result in multiple messages. For example, the same message might be sent to the application manager, branch manager, and the user linked to a particular notification action. Some notifications are restricted to a single person and not user groups (as in the Quote FollowUp Alert & To User setting).
Internal Tab: User Settings / External Tab: Enable Payment Notification Settings
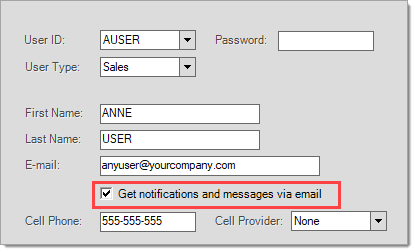
The Internal tab is mostly for specifying internal user settings (accessed from the User ID Maintenance form), which determine how a user receives application notifications. The exception is the Point of Sale > Work Order Completed > Send Customer Email setting, which uses the account's email address to notify the customer account that the work order is complete.
Notifications are sent using the user's email address, when the Get notifications and messages via email check box is checked in the User ID settings. For immediate pending Credit Override notifications, the application sends the email using the user's cell phone and provider (carrier) via a text message when they are also the designated Notify user for Credit Overrides.
User ID Maintenance Form (Maintenance > Database > User IDs)
User groups are now supported for most notification messages. These can be used to route a message to multiple users. Groups can be created from the Message Group maintenance option on the Messages form.
The External tab gives you a way to specify one or more email notifications for payments on account. This notification is made when the application processes a payment on account online or when the account has the Enable Payment Notification setting activated in Account Maintenance. For more information about setting up this feature, review the Account Payment Notification topic.
Choosing a User Group
User Groups are a collection of User IDs represented by a single up-to-six character code. When you select a user group for a notification, all of the users who are listed in that group are notified.
User groups are not listed along with user names during standard selection. If you already know the name of the user group, you can type it in and press the TAB key. If a matching group or user doesn't exist, you will receive a warning. To review a listing of user groups, right-click the down arrow and choose User Group from the context list.

After doing this, the selection listing will only include user groups, not any individual users.

From this parameter's tab, there are several applications that have options for automatic notifications: Point of Sale, Purchasing, Inventory, Accounts Receivable, Payables, and Mobile (Spruce ProLink). It's also important to note that there are also certain automated notifications that are not listed here.

Note: Due to the automated nature of notices, there can be cases where a user will receive duplicate messages for the same action (for example, a user may be both a branch manager and also the sales person associated with a work order. In this case, they'd receive multiple messages when their work order is completed.).
Choosing Point of Sale (POS) Notifications
Under the Point of Sale (POS) listing, you can enable the following notifications.
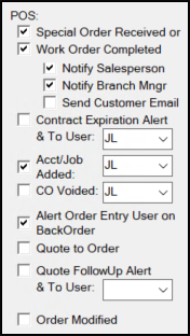
Special Order Received or Work Order Completed
When these notifications are enabled, upon completion of a work order (manufacturing) or upon the arrival of non-stocked items associated with a customer order, the application will send an email to a salesperson associated with the transaction, to the branch manager, and/or to the customer associated with the transaction (based on the email settings in Account Maintenance). Used with these particular notifications are three sub-level choices that determine who receives the message.
When a special order item arrives, the application sends a notification to the job's assigned user if that user is not the same as the order user. This is not currently done when a work order is completed (manufacturing).
The following is a sample of this message for special order receiving:
Item: SOC56572-000 (OAKNAT-SPECIAL ORDER HARDWOOD)
Quantity: 16.0000 BOX
Account: ANYACCT-1
JOB #1
Purchase Order: 1106-P07678
OAKNAT-SPECIAL ORDER HARDWOOD
FLOORING - 3/4" X 3-1/4"
The following is a sample of this message for work order completion:
Customer order 1104-C54302 for account
CASH (CASH SALES)
completed on work order 1105-W31759
Contract Expiration Alert
This notice is sent when a customer's contract is reaching expiration. Contracts with a starting date prior to the current date and an ending date within the next 7 days will generate a notification for the user assigned to the contract's account as well as one daily master listing of all contracts set to expire to the user specified here (if any). These notifications are triggered by a stored system procedure that runs on a daily basis (between business days).
Acct/Job Added
This parameter creates a notice if a new account or job is created during a Point of Sale transaction. This parameter does not create a notification when accounts or jobs are added directly from the Job database form, just Point of Sale. The following is a sample of this message:
Job Added: A00140-1
User: AUSER
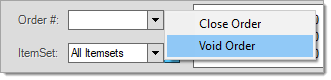
Customer Order (CO) Voided
This option creates a notification when a customer voids an order. You can void an order using the Menu Marker  located under Point of Sale, Orders next to the Order # list. Not all users may have access to the menu marker. These settings are specified in the User ID Maintenance form for each user by an application or system administrator.
Alert Order Entry User on Backorder
This parameter enables messaging when customer orders are sold (invoiced) with back-ordered items. Notification messages can be delivered either through the application’s messaging function or by standard email (delivery method is determined by the user’s settings). The notification’s subject is set to “Order invoiced with back order items on YYMM-123456 {Invoice Document ID}” and the body text includes the order’s document information (“Order: YYMM-654321 has items on back order,” for example). The following is a sample of this message:
Order: 1102-C52862, Item: 020408, Remain: 15.0000
Quote to Order
This notification creates a message whenever a quote is converted to an order and the cashier user is not the same as the user who created the quote. The "Quote Ordered" message is similar to the following example:
Quote: 1406-075358 for Account ANYACCT has been ordered on order number: 1409-C76124 by user AUSER
A secondary version of this message is generated when an order that was associated with a quote is modified by a user other than the user who created the quote. The trigger on this notification is that the order is not new and that the cashier user is not the same as the user who created a quote that is linked to the current order.
The subject of this second type of message will be "Order of Quote Modified." The following is an example of this type of message:
Order: 1409-C76124 for Account ANYACCT originating from Quote: 1406-075358 modified by user BOBC
Quote Followup Alert & To User
Select this check box to notify the assigned sales person and the user added to the drop-down list, when the quote is within seven days of the follow up date. After the quote's follow up date has passed, no further notifications are sent. In addition, the notification is only sent if no existing "follow up" notification for the same quote exists.
Note: You cannot choose a user group from the drop-down list for a Quote Followup Alert. Choose a User ID for an individual user instead.
Purchasing Notifications
Under Purchasing, there are five options for system notifications:
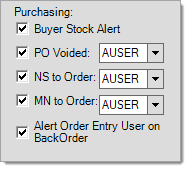
Buyer Stock Alert
The buyer stock alert can be enabled to notify the buyer assigned to an item when the item's on-hand quantity has dropped below minimum quantities (the Notification Buyer ID is designated in the item's Branch > Codes tab of the Item Maintenance form). For this alert to be initiated, the following conditions must be met:
•The item's Track Qty On Hand setting must be Yes (Y). This setting is on the Item Maintenance > Common > Codes tab (Inventory > Database > Item).
•The item's Notification Buyer ID list must contain a valid user ID. This setting is on the Item Maintenance > Branch > Codes tab (Inventory > Database > Item).
•At time of sale, the item's on-hand is adjusted by any customer orders due to be fulfilled (COQDue) as well as any purchases due to be received (POQDue).
•At the time the item is sold, the item's "adjusted" (see above) on-hand quantity must be equal to or higher than the minimum, and the sale of the item must cause the item's on-hand (adjusted) to drop below the item's minimum.
Buyer notifications are not triggered by availability. If an item is placed on an order and that causes the item's available quantity to drop below the minimum, it will not trigger an alert. In addition, if an item's on-hand is already below its minimum, no alert will be produced. Any on-order quantity is also not considered (on-order being the quantity ordered on purchase orders). Assuming other conditions are met, items with a zero minimum quantity will result in an alert should the item be sold into negative on-hand quantities.
|
51-031 - 16 OZ. CURVED CLAW STEELMASTER Based on quantity sold, projected quantity on order, and expected purchase order quantity, this item has fallen below minimum quantity |
Purchase Order (PO) Voided
This notification is made when a user voids a purchase order using the menu marker ![]() located under the Purchasing, Order Entry activity (next to the Purchase Order # input). This option allows an administrator to select a specific user who should receive this alert.
located under the Purchasing, Order Entry activity (next to the Purchase Order # input). This option allows an administrator to select a specific user who should receive this alert.
Non-stock (NS) to Order
This notification is made when a user adds a non-stocked item to a customer order. This is a notification during the customer order stage, but is really intended for purchasing so that they are made aware when customer orders are created with special order goods. This option allows the administrator to select a specific user who should receive this alert.
Manufactured (MN) to Order
This notification is sent when a manufactured type item is associated with a customer order. This is a notification during the customer order stage, but is really intended for the shop so that they are made aware when customer orders are created with goods requiring manufacturing. This option allows the administrator to select a specific user who should receive this alert.
Alert Order Entry User on Backorder
This parameter enables messaging when purchase orders are received and products are back-ordered. Notification messages can be delivered either through the application’s messaging function or by standard email (delivery method is determined by the user’s settings). The notification’s subject is set to “Order invoiced with back order items on YYMM-123456 {Invoice Document ID}” and the body text includes the order’s document information (“Purchase Order: YYMM-123456, Item: 12345, Remain: 16.0000,” for example). The following is a sample of this message:
Purchase Order: 1107-P08497, Item: SOC57106-000, Remain: 1.0000
Inventory Notifications
The Inventory notifications include four options: Pending Transfers, WMS Alert, Material Branch Delivery, and Lineal Tally Received.
Pending Transfers
A "pending" transfer is a request for a transfer made by one location to another. If checked, when a pending transfer (request) is made, an automated message is sent to the first user located who is both a branch manager and also dispatch user type at the branch the goods are requested from. The following is a sample of this message:
New pending transfer request from branch: 7000, User: AUSER, Transfer on date: 7/14/2013
WMS (Warehouse Management System) Alert
This notification is used with the WMS (Warehouse Management System) app when a staging document is saved. If a user is indicated (using the drop down), they will be sent a notification message each time a new WMS staging document is generated.
Material Branch Delivery
This notification is generated when either a Sale or Order transaction (Point of Sale) is processed with a material branch that differs from the current branch. When "by item" branch designations are not enabled, the notification is triggered whenever the material branch is different from the current branch when processing a customer's order. In this case, a single notification is sent to the first "dispatch" type or branch manager user assigned to the material branch.
The function of this notification changes slightly when the Delivery parameter, Allow Material Branch by Item is selected (checked). When this Delivery parameter has been enabled (checked), item-by-item designations for the material branch are permitted when processing a sale or order. These branch designations are done from the Branch tab of the Process (F12) form. The material branch may be set as an overall value or individually by item. For each material branch indicated, the first user found who is assigned to the material branch and is also either a user-type of Dispatch or is a Branch Manager is sent the notification.
A sample of this notification message text is listed below:
Order 1409-D76132 contains items to be supplied by branch: 1000
Lineal Tally Received
This notification is sent to the first (primary) contact for customers when a custom (special order) lineal tally item is received matching the dimensions they have ordered. An attempt is made to link the lineal tally to a customer order; however, no direct linkage between a customer order is necessarily available (lineal tallies don't generate a renumbered SKU and the purchase does not necessarily reference a customer's order directly). The message title/subject will be similar to the following: "Special Order Lineal Tally Items Received 9/29/2014." The body message lists the lineal tally description(s), level identifier, and selected dimension that were received (the description will vary by item).
1.5X6.0-20G-1/4F ID: CUSTOM - 10' 4"
1.5X6.0-20G-1/4F ID: CUSTOM - 8' 7"
1.5X6.0-20G-1/4F ID: CUSTOM - 4' 2"
Receivables Notifications
Within the Accounts Receivables category, there are currently 3 notification types: Credit Override, Late Payment, and Follow Up.
Credit Override
There are two different types of override notifications. The standard notification is only done after a credit override has been done for a transaction. This notification may be sent to either or both the account's assigned user (sales person) and a specific "notify" user selected here (if any). Only those customer accounts that are configured to prompt for an override and also meet the criteria for the override type selected will produce the override dialog at Point of Sale. The dialog form for overrides allows either (1) entry of a password directly at the Point of Sale station or (2) the approval or denial to be issued remotely by another user using the Credit Override utility form.

When a user receives the credit override dialog at Point of Sale and they choose the "Remote" button, an immediate text message notification can be sent to the user designated as the "Notify" user in this parameter, but only if the user has been assigned both a cell phone and provider (carrier) from the User ID Maintenance form. If these conditions are not met, no immediate notification is done, and the Point of Sale user must manually contact the credit or store manager to notify them that a remote override is needed. The text message appears similar to the following:
(Credit Override Pending)
Account: 000011,
Amount: 892.42
User: AUSER,
Station: USER,
Time: 7/30/2013 4:48 PM
Immediate notifications are only delivered if the Notify user is a specific user (with a cell phone and provider), not a "user group." Text messages are sent via email, not device-to-device, and many carriers block such text messages unless the phone's user enables email and/or Internet messages with their provider.
Late Payment and Follow Up
When enabled (checked), this notification sends a message (to the user designated) whenever a customer had promised to remit payment by the prior day but did not do so. A daily procedure is run (once a day between business days) that compares the promised payment date to the last payment date for all customers. If the promised payment date was the prior day and the last payment date is prior to that date, a notification is generated (to the selected user). Use of the promised payment date is entirely optional. This date can be set in Account Maintenance and the Status inquiry (under Receivables).
Payables Notifications
There are currently two Payables notifications: Bill Discrepancy and Backroom Check.
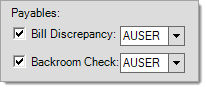
Bill Discrepancy
When a user is designated, this causes a notification when EDI payables are generated and the amount of the bill and purchase order exceed any threshold indicated (the threshold amount or percentage is determined by additional parameters... see the Payables parameters topic for additional information).
Backroom Check
This notification sends the designated user (selected in the drop down) as well as the user assigned to the customer's account (if any) a message when a backroom (AP) check refund is indicated as the payment method in a "negative" Point of Sale, Sales transaction. For system-type accounts, the shipping name is listed in the notification message; otherwise, the job name is listed. Messages also include the document ID, account, job number, and transaction (refund) amount. An example of the notification message is shown below:
CASH-0 (JOHN Q. PUBLIC)
Backroom Check Refund On Invoice 1409-076131 for ($115.11).
Notifications are only sent when the option is checked and a user is specified. The backroom check option is indicated by choosing the "Check" payment option on the Process (F12) form (Invoice tab) and then checking the "Backroom Check" check box.
Mobile (ProLink)
This notification produces a notification message to the selected user when a new order or quote request is submitted via the ProLink app. The subject/title of the message/email is "ProLink Order Requested." The message simply indicates the account (customer) who submitted the request.
A ProLink order has been requested for account: ANNE E. ACCOUNT
External Tab: Receivables
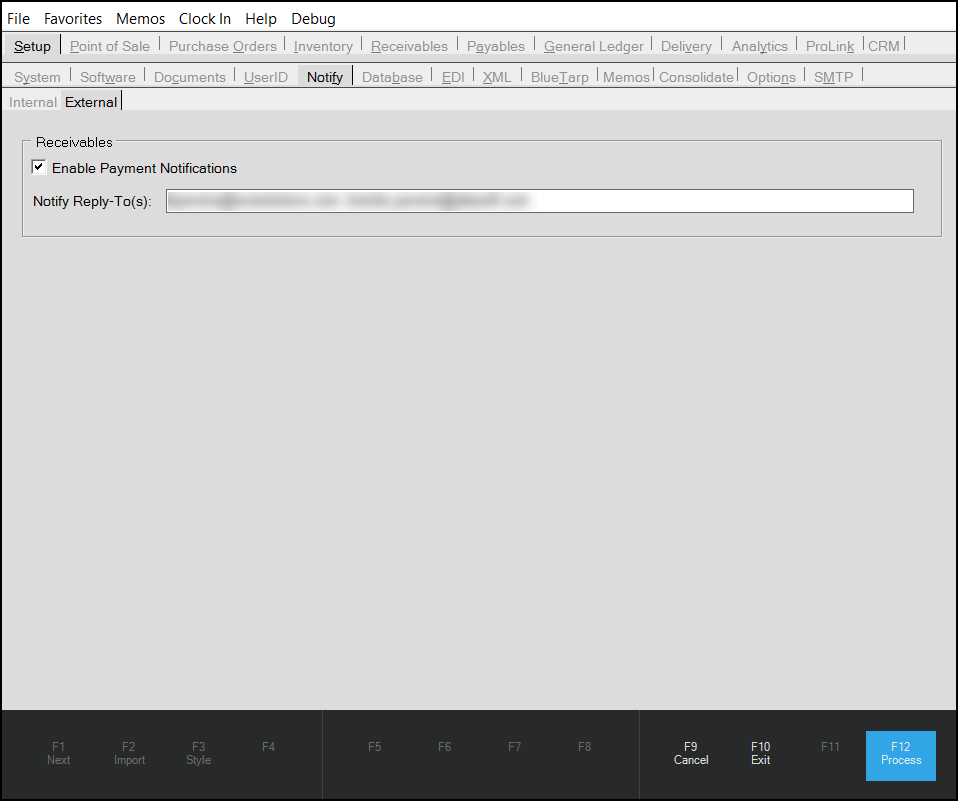
Parameter Settings > Setup > Notify > External
Enable Payment Notifications
Select this check box to enable payment notifications for this application.
Choose this option to notify the customers you have identified that you have processed their payments.
Notify: Reply-To(s):
In this field enter the email address(es) to insert in the notification email so that customers can respond to the payment information.
See additional notification instructions below.
Enabling Payment Notification for an Account
After the feature is enabled, you can add this notification option to an account individually or globally using the instructions in this setting. Ensure the account has a master contact record with a valid email address before enabling this setting. The application checks for a valid email address, and displays an error if there is no email address present.
Enabling Payment Notification for an Account
To set the payment notification option for an account:
1. From the Main Menu, choose Point of Sale > Database > Account to display the Account Maintenance form.
2. From the Account list, choose the account you want to set the payment notification for.
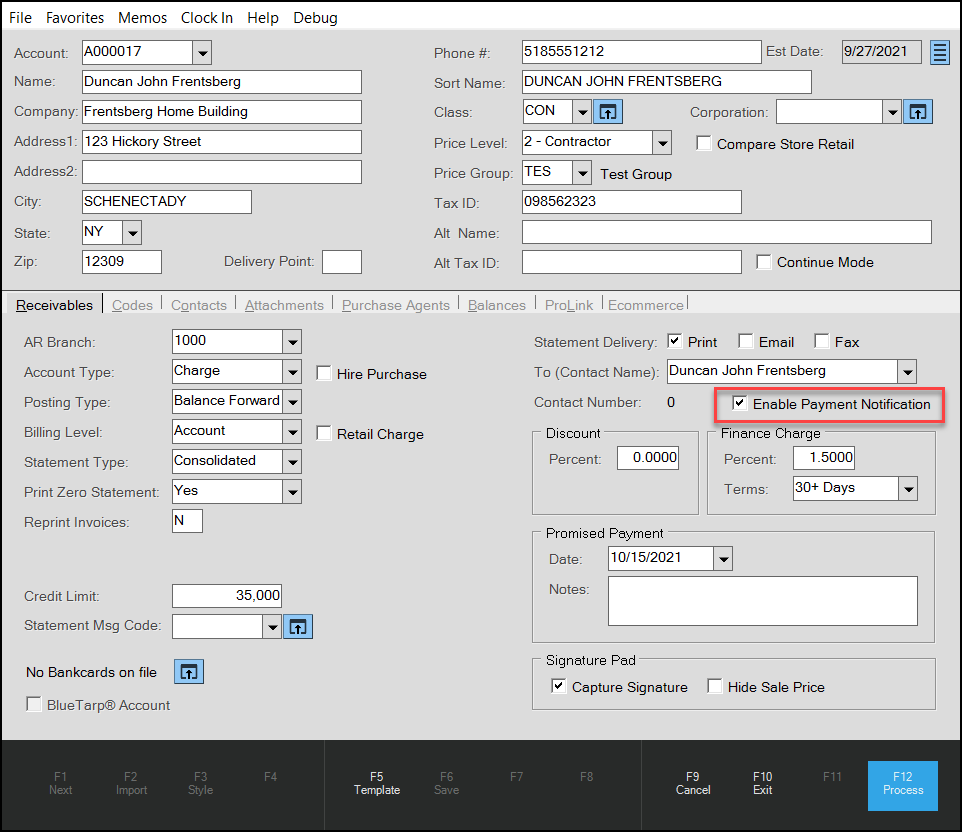
Account Maintenance > Receivables Tab > Enable Payment Notification Highlighted
3. On the Contacts tab, check to make sure the Master Contact record contains a valid email address. This entry has to be present to enable payment notification. If you change a contact record during this process, choose Save (F6) to save the changes before you move on.
4. In the Receivables tab, in the To (Contact Name) list, select the contact record to which the notification should be sent.
5. Select the Enable Payment Notification check box.
6. Choose Process (F12) to save this setting.
Enabling Payment Notification for Multiple Accounts
It would take a long time to set the Payment Notification option for each account individually, so we have added new functionality to the Account Global Modify feature so you can set this option for your selected accounts.
To set payment notification options for multiple accounts:
1. From the Main Menu, choose Point of Sale > Utilities > Maintenance > Account Global Modify to display the Account Global Modify form.
2. From the Field Name list, choose Payment Notification.
3. From the New Value list, select Y.
This sets the payment notification to Yes; this option is set to No by default.
4. In the Filter section, select the criteria to find the accounts you want to change the payment notification setting for or select the All Accounts check box.
5. Choose View (F8) to display the accounts that match your search criteria.
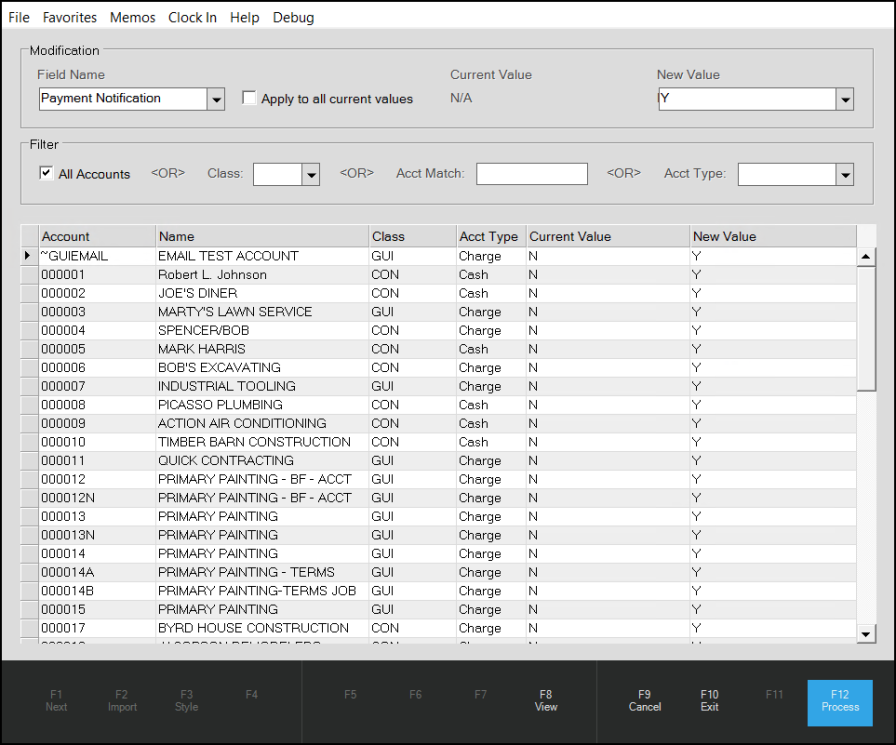
Account Global Modify > Payment Notification > Results
6. Look through the listed accounts to see if there are any accounts you do not want to send notifications to and if so, do one of the following:
-
Reset the criteria to display a different set of accounts, or
-
Make a list of the accounts you don’t want to send payment notification emails to. Complete the Account Global Modify process for all the selected accounts.
Reset the Payment Notification option for the individual accounts on your list using the instructions here.
7. To set the payment notification for the selected accounts, choose Process (F12).
Notifying Customers when Using Receivables > Payment Entry
After you set the parameter and enable the accounts, the application sets the Email Document flag for the account when you process a payment in the Receivables > Payment Entry form.
To see this feature in action:
1. From the Main Menu, choose Receivables > Payment Entry to display the Payment Entry form.
2. In the data grid, enter the payment information for the account as you usually would.
3. When you choose Process (F12), the Process Session Document displays, as usual.
4. Click the Transmit tab to display the new settings.
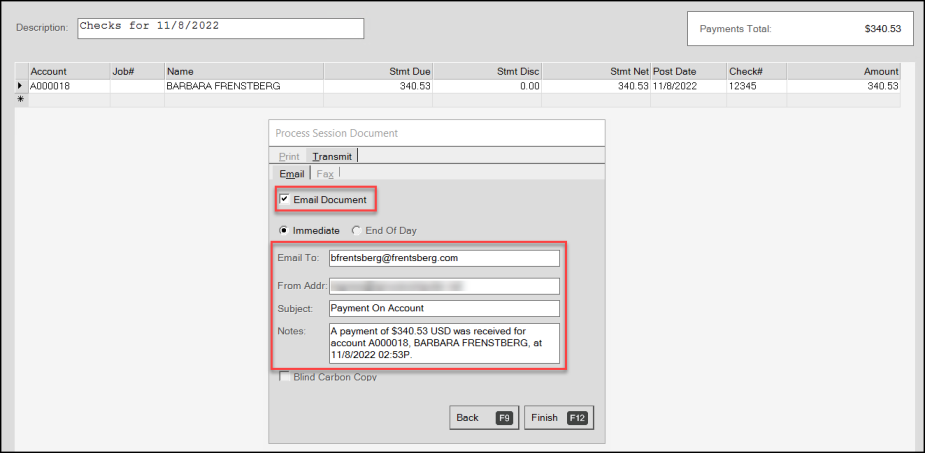
Receivables > Payment Entry > Process Session Document with Entries
The application sets the Email Document check box by default for these accounts. The Subject line reads, Payment On Account and the Notes section contains the details of the payment you processed. The payment values display in the customer’s currency.
5. When you are ready to send this email, choose Finish (F12). One of these events occurs:
-
If the application can send the notification, the application displays an <email address> queued confirmation message.
-
If the application cannot send the notification, an error message displays.
Notifying Users when using Receivables > Posting
The process is similar when posting a payment to an account using Receivables > Posting.
1. From the Main Menu, choose Receivables > Posting to display the Posting Payments form.
2. From the Account list, choose the account you want to post a payment from.
3. Review the account and apply any discounts or other modifications as you normally would.
4. Choose Payment (F5) and enter the customer’s payment information, and click Accept.
The application displays the message:
-
Payment Notification message queued.
The customer receives the email message, based on the transaction you completed.
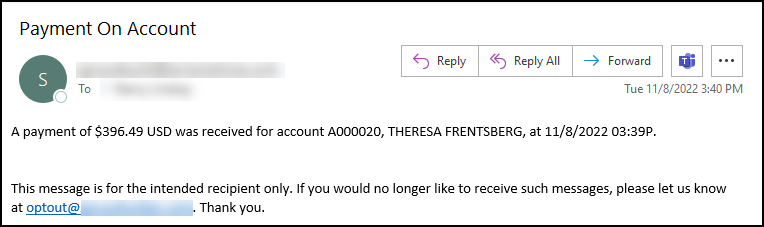
Payment On Account Email Message