Billing Entry
You can use the Billing Entry form to add, pay, and modify payable and credit invoices to prepare them for disbursements to vendors (payees). When invoicing inventory purchases, use the Receipts (F5) key to select from the list of open receipts for payment. You can pay receipts individually or you can submit multiple receipts together (paid on a single invoice). You cannot view or select previously paid invoices in this form. Instead, use Billing Inquiry to review paid invoices.

Billing Entry (Payables)
Basics of Invoicing
When you purchase inventory or other materials from vendors, the application creates corresponding invoices when you receive the bill. The vendor/payee's Vendor Invoice # is added to the bill the vendor sends. Payable invoices (and credits) are also assigned an application document ID after the application saves it using the format YYMM-###### (or 2401-123456, for example). When you print the checks, the application adds all of the related vendor's invoices (and credits) that you select as part of the payment to the voucher area with their amounts. This shows the vendor which invoices (bills) you are paying by the check. The application also prints the Description on the check voucher to reference the invoices if you choose to use a different identifier that does not match the vendor's invoice.
You choose a payment status for payables invoices (Open, Hold, PayInFull, etc.), which determines whether and how an invoice is handled when the disbursement process runs to generate the payments. Invoices are typically either linked with a purchase (accrual) or expense in the General Ledger. Inventory Receipt and Direct Ship documents can be directly associated with a Payables invoice. Certain actions, such as Point of Sale refunds, can automatically generate a Payables invoice in some cases. Invoices must be associated with at least one ledger account that indicates the offset(s) to the Accounts Payable account. Your company's AP or Accounts Payable account does not need to be referenced, only the offsetting account entries. Offsets are usually either the Accrual Account (for purchases of inventory) or some type of expense account.
|
How do I handle multiple Vendor Invoices for the same Inventory Receipt in Payables? |
|---|
|
There are a few different ways you might choose to handle this scenario; however, the easiest way is to enter each invoice and use the "partial pay" feature in the Receipts (F5) selection dialog to partially pay the receipt in question. This will work as long as the "No Partial Receipt Billing" parameter has not been enabled. Another method is to enter a single invoice for the entire receipt and do partial payments against the invoice as you receive the invoices from the vendor. Each time a partial payment is issued, change the "Description" in Billing Entry to match the vendor's invoice # (the description is printed with the check in the voucher area). This works fine as long as you didn't receive more than one invoice for the purchase at the same time (you can't issue multiple partial payments on the same check). If you received more than one invoice at the same time, you might still be able to enter a single invoice and then reference the additional invoices by typing them in the "description" field. Only 30-characters are allowed, so this may not work in all situations. Remember, the description is printed with the voucher, so your vendor will see a reference to the invoices with the payment if you use this field. For example, you could use the 1st invoice for the vendor's invoice number and then simply reference the remaining invoice(s) using the description field (if room allows). If the ideas listed above won't work, you can enter separate invoices. The only issue with doing this is that only one of the invoices (usually the first) can be associated with the Inventory Receipt document. In this case, you would do the following: 1st Invoice:
Additional Invoice(s)
A separate invoice will now exist for each vendor invoice you received; however, only the first Payables Invoice document will be linked with the original Receipt document. The additional invoices only reference the receipt via their "description. |
Vendor Invoice #
For new invoices, you must type the invoice number from the bill and press Enter. To review or modify a previous invoice, type in the number or select from the drop down. Only invoices that have not been fully paid can be selected. To view paid invoices, either use the Documents option to view AP Billing Invoice documents (you can select by vendor) or use the Billing Inquiry form.
A document is generated for each A/P invoice saved. Document numbers display to the right of the vendor's invoice when modifying an existing payable, but are not available on new payables until after processing.
Some companies print a bar coded label when they process invoices. The label may be attached to the vendor's bill and contains the document ID for the payable's invoice. Document labels make linking outside documents with
Another way to link the vendor's document to your Payable is to scan the document and attach it to the Document (using the Document Folder (F4) tab). The scanned copy becomes an attachment that is permanently linked with the Payables document and can be accessed from the Document Viewer.
Vendor and Pay-to Vendor
The vendor is the company or individual that the supplied goods or services and is usually the party who sent your company the bill; however, the vendor is not always paid directly. Some goods or services may be provided by one particular company but the bill is paid to another entity (a co-op or buying group, for example). The actual payee is known as the Pay To and may be either the same as the "vendor" or different. Both are considered "vendors" and must be set up in the Vendor Database prior to use. It's possible to designate that any particular vendor always use a particular pay-to as a default.
Using the MISC Vendor
For one-time miscellaneous payments, the MISC vendor can be used to pay an individual or company. This special vendor does not track payments or purchases/expenses separately for each payee, so it is not suitable for any payee that might require 1099 reporting (or if you need to view vendor information separately for any other reason).
The MISC vendor is not added or available automatically for use in Payables, it must be added in Vendor Maintenance if it is to be used. The vendor code and pay-to on this vendor must be "MISC" to function properly. A MISC vendor is required for merging Items if receipt history for the product must be merged.
What is the MISCPOS Vendor?
This vendor is similar to the MISC vendor, but is exclusively used for Point of Sale refunds that have been designated to be paid via "back-office check" (payables). When used, refunds designated for payables payment generate an invoice for the MISCPOS vendor that includes the customer's information (as typed or listed on the Point of Sale process form). The invoice number generated will be the document number prefixed with "POS#" (see below).
POS#1803-0440
The MISCPOS vendor is not created automatically, so it must be added in Vendor Maintenance if it will be used. If the MISCPOS vendor is not defined, refunds in Point of Sale that have been designated for payment through payables won't generate any invoice.

When an invoice assigned to the MISCPOS vendor is selected, an "Account" control will appear to the right of the vendor. This was added so that Payables users can auto-complete the address information matching with the customer's account they select. When a MISCPOS invoice is selected, document notes are added that include the original customer's name from the refund.
Installed Sales Vendors
Vendors may be designated as an "Installed Sales" type. This vendor type is used for third parties your company pays for installation services and/or materials. For example, if your sells hardwood flooring, you might pay this installed sales company to install it for the customer. In this case, you pay this company, using this vendor type. You can link the installed sales payment to an existing Installed Sale contract to record the expense for profit analysis using the Installed Sales Settings ![]() icon (which only displays when you select an Installed Sales vendor type).
icon (which only displays when you select an Installed Sales vendor type).
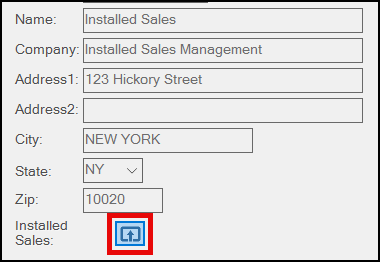
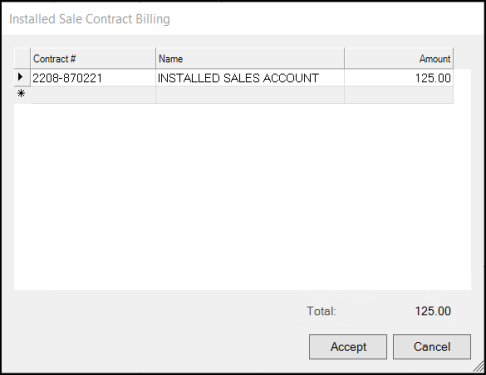
Click this icon to open the Installed Sale Contract Billing box. Select one or more installed sale contracts and enter the payment amount to apply the amount to the appropriate contract entry. The payable's invoice will be linked with each contract you select (and will appear on the 3rd Party tab).
Foreign Vendor
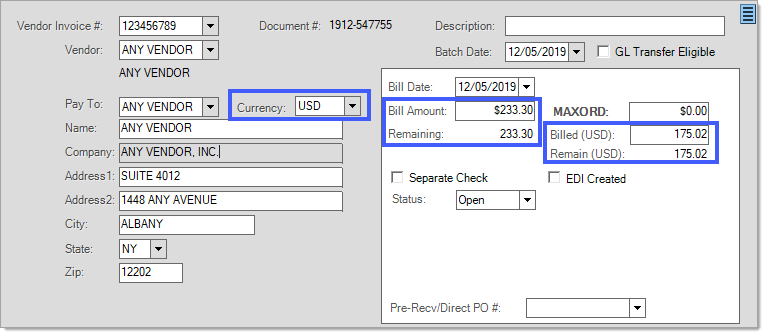
Vendors can be designated as a "Foreign Vendor". This vendor type is used when a vendor uses a currency other than what the default local currency is set to (see Vendor Maintenance). The "Bill Amount" will be shown in the local currency while the "Billed" and "Remain" values will be shown in the foreign currency. In the example below, the local currency is set to use the Canadian dollar, but the vendor is a US based company and bills using US funds. The Vendor's currency will also show next to the "Pay To" field.
|
What kind of bill? |
|---|
|
Payables can be used for paying pretty much everything except your company's payroll. Certain types of payables are handled differently from others. Most payables fit into 2 categories: expenses and purchases. For the most part, expenses are any type of payment your company makes that does not involve a purchase of inventory (office equipment, utility bills, mortgage payments, etc.). Purchases are payables that involve purchases (and credits) related to inventory. Expense type bills are not necessarily linked with any application documents or processing. These usually involve some type of expense account as an offset to your Accounts Payable liability account. Recurring Invoices may be considered for certain types of "expense" payables. Purchase type bills are usually linked with some other transaction document such as an inventory receipt or direct ship purchase order. Inventory receipts use your "accrual" account as an offset to the Accounts Payable liability account. Direct Ship purchase orders don't involve inventory directly but do use a "dummy" accrual account (a wash account). Purchase Order documents can be selected and "pre-billed" (invoiced prior to delivery). In most cases, the accrual account is used when any type of purchase of inventory is involved. |
Receipts (F5)
After vendor selection, the Receipts (F5) function becomes active. Use this function to select inventory purchases for payment/invoicing. Multiple selections can be done, and, if enabled, partial payments can be indicated. Choose Select All (ALT-S) to mark all receipts for invoicing or instead, click in the check box next to the receipt(s) individually. Once selection is complete, choose Accept (ALT-A). A total of all selected receipts is displayed in the selection window for reference (Total Received). A Payables parameter, "No Partial Receipt Billing," can be used to disable the partial billing feature on this form. When disabled, the check box column "Partial" and the three (3) columns, Orig Amount, Prior Billed, and Bill Amt, are replaced by an "Amount" column.
")
Inventory Receipt (F5) Selection (Partial Billing Disabled)
Partial Payments (if permitted)
To specify a partial payment, enter an amount less than the amount remaining (original amount - prior billed) in the "Bill Amt" column. This is the only column that allows for text entry. Reducing the "billed" amount will automatically select the row and set the "partial" check box. You can choose "partial" before changing the amount; however, the "select" check box is not automatically selected in this case.
Once a partial payment on a receipt has been invoiced, the "prior billed," will then reflect the amounts. Billed amounts that exceed the remaining are not allowed. This is intentional and is done to maintain the balance between the accrual and ledger entries created by receipt selection. If you are being billed for a different amount, you can either fix the receipt prior to billing (using cost corrections, for example), or change the invoice amount after receipt selection. Changes to the billed amount will require that additional ledger selections be made.
")
Inventory Receipt Selection (with Partial Payments Permitted)
The name and address information is filled in automatically after vendor selection. The Pay To defaults to the designated "pay-to" for the vendor if one is designated; otherwise, the pay-to and vendor will be the same. Users can modify the pay-to vendor during entry if needed. Address information in the Billing Entry area displays the Pay To's information.
Note: If a billing invoice is linked to a partially received receipt and the bill is re-opened, the receipt is not reopened.
Direct PO (F7)
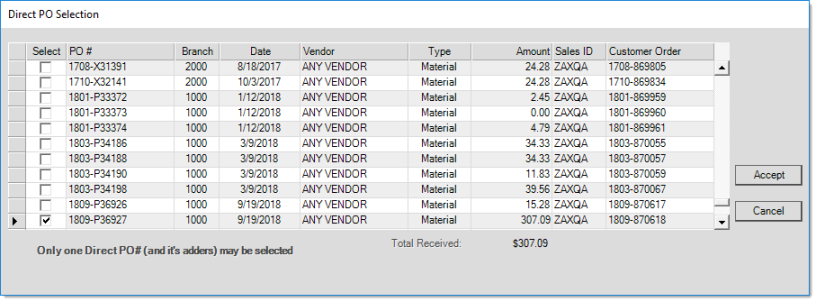
The Direct PO (F7) function is used for associating an invoice with a Direct Ship to a customer. Only one direct shipment can be associated with any given Payable's invoice. Direct shipments are initially processed through the Point of Sale, Direct Order activity. This type of transaction is used when goods are being shipped directly from a vendor (supplier) to a customer. Due to this, no inventory is involved, so it must be handled a bit differently in a number of ways.
Direct Ship may orders hold a "deposit" until they are invoiced in Payables. If the customer paid the deposit using their account (charge deposit), a debit adjustment was created at that time and the Direct Order is considered "Paid in Full" by a deposit. Debit adjustments for "charge deposits" occur immediately upon processing the Direct Ship order and are not held for Payables billing. The order is considered "paid in full" in this case and the deposit was immediately billed to the customer's account, so the "invoice" of the Direct Ship Order won't ever appear on the customer's account in this case.
One difference between a Direct Ship and a regular purchase of inventory is that goods are never received, so there is no accrual associated with the purchase. Instead of associating the payable with a Receipt, it's done with by choosing a "direct" Purchase Order instead. To handle the lack of any real accrual, the Point of Sale journal can be mapped with a "dummy" accrual account to be used for direct ship type purchases. The invoicing of the Direct Order to the customer happens automatically when the payable is processed (when the invoice is saved, not when it's paid). The Point of Sale ledger entries created by this will offset the accrual account for the Payable (creating a "wash" entry).
|
Direct Ship Credit (-) Orders |
|---|
|
When a Direct Ship involves a credit (meaning a "negative" Direct Ship order was created), the payment methods in Point of Sale are not provided. In these cases, we assume that either a backroom check or receivables credit is being issued. If you are doing a credit order, it's a good idea to verify that the following has occurred:
If the account associated with the Direct Ship is a "charge" type account (charge being a self-managed receivables account, not a credit/debit card) then the processing of the Direct Ship PO as a Payable (invoice) will automatically generate a credit adjustment to the customer's account. Cash-only customer accounts work differently. In this latter case, a Payables invoice for the MISC vendor is generated so that a back-office check may be generated to refund the Direct Ship amount to the customer. In all cases, the actual payment method used for the Direct Ship is not considered. If a Direct Ship was paid by credit card, for example, no automated credit to the card is generated. This would have to be done manually. The credit adjustment (receivables) or MISC invoice that is automatically generated would still occur (based on the type of account). This would also have to be handled manually (either reversing the credit or deleting the MISC invoice). |
Transfers (F8)
The Transfers (F8) function is provided for invoicing adjustments (adders) associated with a "transfer-in" document. Transfers "in" are branch-to-branch transfers of inventory where your (the current) branch is the recipient of the materials transferred. Adjustments are provided as an option for transfers "out" and pending transfers. These might be used when a 3rd party is providing shipping, for example. Transfer adjustments are available for billing processing in Payables from any location once either the transfer-in or pending transfer has been received. Transfers are only included when containing adjustments for the current material vendor (or the Pay-to if one is selected and if no material vendor has been designated).
")
Inventory Transfer Selection
If multiple transfer adjustments are found for the same vendor, they may be invoiced together. By default, adjustments affect the accrual account both when the transfer is processed and after invoicing the payable. Up to three adjustments may be optionally associated with each transfer document.
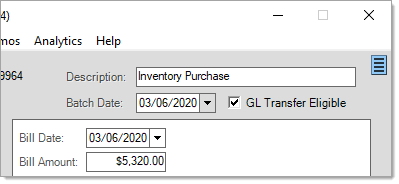
Description
You can always specify a Description for a Payable; however, the description also may be automatically set in some cases:
-
Receipts
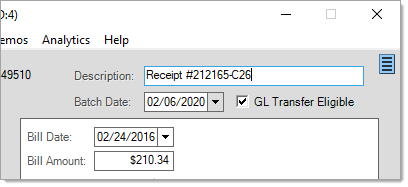
If you have not entered a description previously and are invoicing a receipt using the Receipts (F5) function, the description will be auto-filled with the word "receipt" followed by the document number of the first receipt selected. Multiple receipts may be associated with the same Payables invoice, so only the first one is used.
-
Direct Sales (aka. Direct Ship)
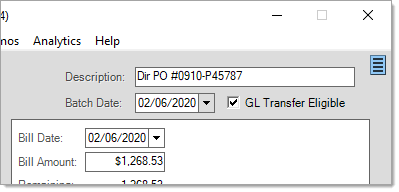
If you have not entered a description already and are invoicing a Direct Purchase Order using the Direct PO (F7) function, the description will be auto-filled with the text "Dir PO" followed by the document number of the first receipt selected. Only one Direct PO may be associated with a Payables invoice at a time, so if a Direct PO is selected and then changed to another, the description will not automatically change (unless you clear the description before changing your Direct PO selection).
-
Point of Sale Refunds (MISCPOS)
Returns and refunds in Point of Sale may be paid using Payables rather than returning cash (or checks, etc.) from the drawer. This might be used in situations where you want to verify a purchase or wait for a customer's deposited check to clear the bank before issuing a refund, for example. It may or may not be a part of your company's standard procedure for refunds. When a Payables invoice is created from Point of Sale processing (returns/refunds), it is automatically assigned a description of "POS Refund." This may be modified by the payables user.

Batch Date
This date is provided for grouping payables into a batch. For example, you may want to process all the payables being paid on the 10th of the month at the same time, but the invoices will have different due dates, discount dates, and entry dates. If you manually assign them to the same batch, you can both select and pay invoices based upon the "batch date" rather than the other dates (due, discount, and entry).
GL Transfer Eligible
Below the description area, there is a GL Transfer Eligible check box. Usually, processing an A/P invoice creates journal entries so invoices that are either Paid or Partially Paid during the business day update the General Ledger. This occurs during the End of Day process. However, when you choose the GL Transfer Eligible check box, you "force" the invoice transfer to the General Ledger, so it appears as part of the Accounts Payable balance before the payment is processed. When you do this, the application applies the changes to the A/P liability account and either the Expense or A/P accrual account (used as a holding account for inventory purchases) during the End of Day process, and the changes are visible the next day.
Selecting the GL Transfer Eligible check box transfers the invoice to the ledger as part of the End of Day process.
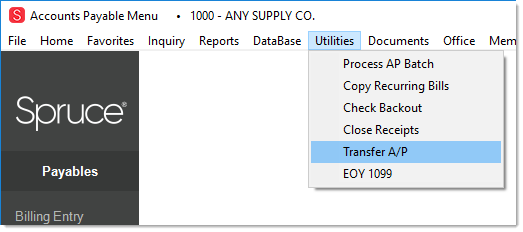
Note: You can use the Transfer A/P utility to update payable records manually immediately.
When you process the Billing Entry transaction, the application generates the General Ledger entries for these records during the End of Day process. This affects these accounts' purchase or payment values and the Accounts Payable liability account balance. If you do not have the GL Transfer Eligible check box selected during the Billing Entry process, the application makes these ledger entries when the invoice is paid instead.
Your company can choose whether the GL Transfer Eligible check box is selected by default.
To set the GL Transfer Eligible check box by default:
1. From the Main Menu, choose Maintenance > Database > Parameters.
2. Click the Payables tab.
3. Check the Default Setting for GL Transfer box.
4. Choose Process (F12) to save this setting. Setting this option requires administrative permissions.
Understanding the Reversing/Closing and Deleting AP Invoices Rules
In the Billing Entry form, if the Menu Marker ![]() is visible, you have two choices for managing invoices that should be removed: Delete Invoice and Reverse and Close. These options may be hidden if you do not have system or Payables administrator user permissions.
is visible, you have two choices for managing invoices that should be removed: Delete Invoice and Reverse and Close. These options may be hidden if you do not have system or Payables administrator user permissions.

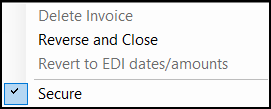
Here are the rules that govern when it's possible to delete or reverse/close an invoice in the Billing Entry form:
-
In both cases, the invoice must have a status of Open.
-
When deleting, the invoice must not have been transferred to the ledger originally.
-
When reversing, the invoice must have been transferred to the ledger originally.
-
In both cases, the invoice must not have been partially paid.
When you reverse and close an invoice that has been transferred to the ledger, the application adds a new invoice to account for the amount.
-
If the invoice you are reversing is a credit, the application adds a debit invoice to reverse it.
-
If the invoice you are reversing is a normal debit, the application adds a credit invoice to reverse it.
The offsetting invoice number matches the original, except that we add a suffix of R (reversal). The application maintains the documents associated with both the original and the reversal invoice, and you can view them in the Billing Entry form. When you reverse an invoice, the status of both the original and the reversal invoices is void.
When you reverse an invoice that was in a closed GL cycle, the current date (at the time of the reversal) determines the cycle of the reversed invoice, which is not necessarily the oldest open GL cycle.
For example, if the original invoice was expensed in March 2023, and the oldest open cycle is December 2023, but the current cycle is May 2024, when you reverse the invoice, the application places the reversal in the May 2024 cycle.
Note: If a billing invoice is linked to a partially received receipt and the bill is re-opened, the receipt is not reopened.
Billing Panel
Bill date and bill amount can be modified on an invoice if the invoice has not been transferred and has not been partially paid. Remaining is automatically affected if the bill amount is modified.
Bill Date
This is intended to be the date that the bill was received, and defaults to the current date. "Bill Date" is used for determining the discount and due date when terms are involved. Changes to the bill date are only allowed until the invoice has been transferred to the ledger or the invoice has been fully or partially paid. Once transferred or payments have been made, the date will no longer allow modification.
Bill Amount
This is the total amount being billed by the payee (vendor, service supplier, etc.). This amount must match the net total for any offsetting ledger entries before saving the invoice (using the Process (F12) function). Changes to the amount are only allowed until the invoice has been transferred to the ledger or the invoice has been fully or partially paid. Once transferred or payments have been made, the amount will no longer allow modification.
VAT*/GST (UK/AU)
In the United Kingdom (UK), this displays or is used to modify the "value added tax" amount for a purchase or expense or GST in Australia. The VAT/GST location selected will be the first tax location located with an "invoice name" of VAT. Additionally, the VAT Maintenance area for defining the VAT tax location has an option for Payables mapping which isn't currently used. If the purchase involves a receipt of inventory, the VAT is set based on the sub-total of the purchase as well as any adjustments.
Note: The Australian tax code uses the GST label for taxes, which is not to be confused with the Canadian GST. The Australian GST is calculated similarly to the United Kingdom VAT, so typically we group them together in the application. For more about VAT/GST use in the Billing Entry form, see Seeing VAT/GST Discounts in the Billing Entry Invoice.
GST/PST or HST* (Canada)
In Canada, you may see either one (1) or two (2) text areas for tax on the purchase or expense. In provinces or territories where both GST (Goods & Services Tax) and PST (Provincial Sales Tax) apply, two (2) text areas for each will be provided; otherwise, if your company operates in a "harmonized" (HST) province or territory, a single text area is provided for the combined tax. When GST is shown, the GST tax location set in Parameters is used (Main Menu, Maintenance, Database, Parameters and choose the Point of Sale, Settings tabs). The PST or HST location is determined by the tax location assigned to the current branch initially but is changed to the receiving branch when invoicing a receipt for another location.
*Not shown in the United States.
EDI Created
The EDI Created check box indicates that the payable was generated automatically using data from a 3rd party. EDI means "electronic data interchange" and describes any process or method where data is exchanged between parties using electronic means. When EDI processing generates invoices, the status of those invoices may be set to "hold" in certain circumstances. Usually, the reasons for this are linked to whether a supporting purchase can be associated with the bill as well as whether or not there is a difference in the billed amount and how much of a difference.
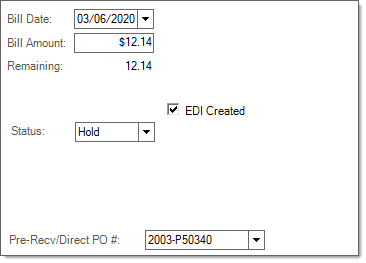
If the EDI invoice was placed on hold, a reason will appear next to the status drop down. There are three (3) reasons: none, No PO, and Amounts Differ. "None" means that the invoice was placed on Hold independent of EDI processing (manually changed by a user). The "No PO" reason means that a matching purchase order document could not be located so no comparison was possible (purchase orders are required for some EDI processing). If "amounts differ," it means that a purchase order was located, but the amounts differ between what was billed and what was received. If the "threshold" parameter is set to an amount above zero, only invoices that differ more than a set dollar amount are placed on hold. A second parameter, based on a percentage difference, has been added. Either threshold (dollar based or percent based) can trigger the "hold" status. Both are optional.
Separate Check
The Separate Check option indicates that a particular payable (invoice) should be issued a check separately rather than be combined with other selected invoices for the vendor on a single check. This option shouldn't be used with credit invoices. In the case of a credit, checking this option would stop a credit from being applied toward a payment involving other invoices, and since you can't have a "credit" check, the credit would not wind up being included in a disbursement even if selected.
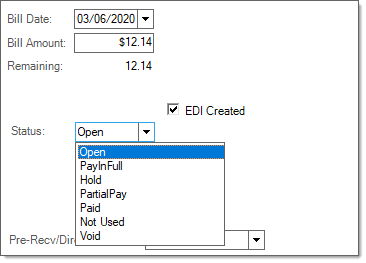
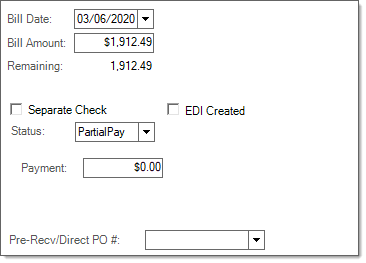
Status DescriptionsThere are six (6) different statuses: open, pay in full, hold, partial pay, paid, and void. Note: the "not used" type was originally an "EDI" type, but this function has been changed and the status is no longer needed. It has been left in the listing due to programming reasons.
Depending upon the "status" selection, the billing panel's selections sometimes change. Open A status of "open" appears both on (1) invoices that are entered into Accounts Payable but not selected for payment, and (2) invoices that were partially paid in the past, but aren't currently selected for payment. Pay-In-Full (PayInFull) The status "pay-in-full" is used when an invoice has been selected for payment in the next disbursement of checks. Hold "Hold" status indicates that the bill is invoiced but there is some reason why it should not be paid. The hold will remain until the status is manually changed. Partial Pay (PartialPay) Invoices can be designated as "partial pay" if a payment is being made that is less than the remaining total due on the invoice. Partial pay invoices will be included in the next disbursement of checks unless the status is changed beforehand. Partial pay invoices require entry of an amount greater than zero (for invoices... must be less than zero for credits) and the amount must be lower than the total remaining. One invoice may potentially involve many partial payments. Partial payments can also be indicated against individual receipts when using the Receipts (F5) function.
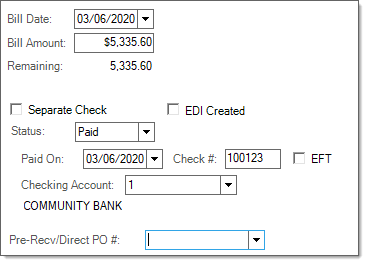
Paid Use the "Paid" status when invoicing a bills that is being paid manually by updating the status to "paid" rather than by the disbursement of checks printed through the application. Previously paid invoices cannot be viewed in the Billing Entry area, instead you must use the Billing Inquiry. The next AP (Payables) disbursements journal will include any manually paid invoices. If the paid date is set to a different month, the relative ledger cycle for that month will be used for the journal as long as it is still open. This can result in more than one disbursement journal for the same date (one for each cycle). When designating a payable as "paid" outside of a disbursement, the user is required to specify a date, checking account, and designate either a check # or EFT for the payment.*
*The "EFT" (Electronic Funds Transfer) option can be used if the payment was previously issued electronically using either on-line banking, transfer, or other means rather than by physical check. No check number is assigned to EFT flagged payments. Marking a payment as EFT does not actually remit any payment electronically automatically to the vendor. EFT is only a status flag used for your reference and also to prevent disbursements of EFT payments from incrementing the check register's next check number. Credit payables can also be marked as paid. If an EFT credit is marked paid as part of a disbursement, the negative "check" is marked as "void" in the check register; however, if you are manually marking a credit invoice as "paid" by EFT, the check register entry will not be voided. You can use the EFT Default check box found on the Codes tab in Vendor Maintenance to always default the EFT check box to selected for vendors who are always paid by electronic transfer. All payments generate some type of check entry. A single payable (invoice) can potentially involve multiple payments over time. There is no "paid" date associated with billing data; however, once a payable is fully paid, a close date is set. The close date is not based on the "paid" date used for the payment. Void Invoices may only be voided by using one of two (2) methods. The menu marker has an option for "Reverse and Close" which automatically creates a reversal of an invoice that had been previously transferred to the ledger but not paid (or partially paid). This marks the original invoice and subsequent reversal as "void." The second scenario where an invoice can be marked as "void" involves manually changing the status in the form. This is not typically suggested as no reversal entries are created. If an invoice has not yet been transferred to the ledger, it is best to either delete the invoice or change the status to "hold" rather than mark it as "void." The "Void" status won't prevent an invoice from transferring. |
Pre-paid Purchases
Use the "Pre-Receive PO#" drop down to select a purchase order that is being billed prior to receipt. This might be done in cases where you are required to pay for goods in advance of shipment. As long as their is no default ledger account associated with the vendor, the accrual account will be used when selecting a Purchase Order to pre-receive.
If you partially pre-bill a purchase (pay part of the total), the receipt of the PO won't be left open for the final payment of the balance. In this case, you must manually invoice the payable. The debit offset will be the accrual account for the remainder of the amount due.
Discounts and Terms
Vendors may offer discounts for early or on-time payment. In some cases, the discount terms always stay the same, and in others, they change based on a number of factors. For vendors (payees) with consistent discount terms, it's possible to designate default terms using a "terms code." A database exists for vendor terms codes, and allows terms to be defined based on a number of criteria (for example, terms codes can set discount/due dates based on the number of days from the invoice's bill date or instead, specific dates such as the 10th day of the month, etc.). Terms codes can be assigned to vendors (usually done when the vendor consistently applies the same conditions to billing), or they can be added during invoicing (Billing Entry). In place of terms codes, it's possible to manually set a discount and due date during invoicing along with a percentage or dollar amount discount.

Discounts
Discounts and terms, when in place on an invoice, are enforced based on the vendor's "discount rules." Vendors can be set up to "always take" discounts or to "pay by discount date." If the "pay by discount date" option is used, the date the bill is paid (disbursed) determines whether or not discount will be taken. If the "always take" option is used, payments will be reduced by the discount regardless of the payment date.
When specifying a dollar amount as a discount ($ Discount), it's important to understand that any previous percentage amount displayed will not be converted to the dollar equivalent and will be treated as the dollar amount unless modified. The dollar discount option assumes that the user is manually entering a dollar amount, so no calculation is done. Note: To learn more about VAT/GST Discounts, see Seeing VAT/GST Discounts in the Billing Entry Invoice.
Save & Continue
This feature allows your company to enter multiple invoices without being prompted to print a document each time you save. If the "save and continue" check box is selected (checked), the Process (F12) function will save the invoice (or credit) and not display the "process" dialog.
Rebate Credits
When the Rebate Tracking feature is enabled and a credit invoice (negative amount) is being entered, a Maintenance Form icon ![]() is provided next to the label "Reconcile Rebates."
is provided next to the label "Reconcile Rebates."
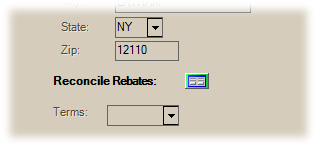
This form provides a selection list of the vendor's rebate and item rebate code combinations. Designate the period (month or quarter) and amount for each applicable combination the credit rebate was received for. Processing will result in the credit invoice being reflected in the Rebate Tracking data and inquiry for the selected vendor. A total of the current amounts entered is provided for comparison to verify against the credit amount.

Rebate Reconcile
Typically, rebates would be distributed in either of two (2) forms: physical check or a credit toward future purchases. Credits toward future purchases would be entered using this form (Billing Entry); however, actual check payments can be entered using the Payments transaction in Point of Sale (a "Rebate Check" option is provided for this). In both cases, a rebate code and month (or quarter) period can be designated. The Rebate Inquiry form is used to compare the expected rebates to received rebates.
Invoicing and General Ledger
Payables processing can generate journal entries for General Ledger as part of the scheduled processing that runs between business days. There are two (2) distinct parts to recording a payable in the ledger. One part records the expense or purchase. The second records the payment. These may be done at the same time or separately based upon your company's preference.
Payables may be optionally transferred to the ledger before payment to record the expense or purchase separately. This is indicated by checking the "GL Transfer Eligible" check box when adding or modifying a payable --or-- by using the "Transfer A/P" utility. Otherwise, daily processing after disbursing the payable records both (1) the expense or purchase billing in General Ledger and (2) the payment of the invoice. Payment reduces the balance of your company's open Payables and bank account (as mapped in General Ledger for the selected check register).
Purchases of inventory are handled a bit differently from expenses. Purchases (receiving inventory) increase both your company's inventory on the date receipts are processed as well as the A/P accrual account. The "Receiving" journal handles these ledger entries. Inventory is typically recorded as an "asset" in the ledger. The "accrual" account is a special liability account that is used as a temporary holding account until purchases are recorded as Payables and subsequently transferred to the ledger.

Billing Entry: Ledger Selection
You'll notice that the ledger's Accounts Payable (AP) account is not listed. It is not necessary to specify your company's Accounts Payable liability account. All payables are assumed to use your company's Accounts Payable account as the offset to the accounts you specify. If you enter a credit amount for a ledger account, the AP entry will automatically be a debit for the same amount. If you enter a debit, the AP offset will be a credit. Any payables offset amount is calculated with daily processing, not for each invoice or credit. Ledger amounts must equal the invoice's billed amount in order to save the payable.
|
Important Information about Ledger Entries and the AP (Accounts Payable) and Accrual Accounts |
|---|
|
Any ledger accounts you enter (in the data grid) provide the offsets to the Accounts Payable (AP) for the current branch location. This account does not need to be specified here and is automatically added when the journal entries are created. It is never necessary to enter the AP account for the current branch and this should not be done or you will cause issues with your ledger. Additionally, the accrual account is used solely for inventory purchases and adjustments and should always match the original amount of receipts and/or adjustments so that the amount being removed from accrual is the same as the amount that went in. Either correct the receipt or adjustment discrepancies prior to invoicing so the receipt total then matches the vendor's bill (suggested) or enter additional offset accounts when the difference between billing and the receipt total isn't due to inventory purchase (if the bill includes charges such as advertising fees, etc.). The accrual account should never be used for Payables that did not originate with inventory purchasing activity. Accrual should never be used as the offset for expenses or other manual bills that would have not originally affected the accrual account. |
Manually Choosing an Account
When manually specifying ledger account offsets on a payable, most of the time the account is going to be an expense (or other expense) type. Account types (assets, liabilities, and so on) are assigned to numeric ranges, so the easiest way to select the account is to type the beginning digit(s) of the account number to produce a listing of matching accounts.

Selecting by Ledger Account Type
Another method, is to use the alternate mouse menu to specify the account types you want included in any selection lists. For example, if you are invoicing and expense such as a utility payment, you might want to select "expenses" and "other expenses" to be included in the selection of accounts. A default ledger account may be assigned to a vendor to simplify entry when invoicing a non-purchase type expense.
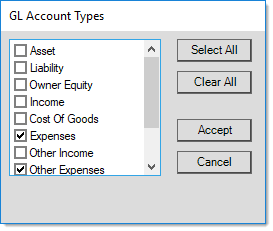
Use the check boxes to designate the account types for inclusion in the selection list (in the drop down). If no filtering is done, the entire chart of accounts (posting accounts only) will be listed in numerical order when using the drop down for selection. The "description" option on the alternate menu lists the selected account types (or all accounts if no filtering has been done) in alphabetical order based on the text description of the posting account.
Owner's equity (aka. retained earnings) and net income type accounts are not valid for selection for Payables. Should your intention be to create a payment for an owner's draw or dividend, you must first use a manual journal to transfer the desired amount from the owner's equity account to another liability account. This other liability account would be the offset account selection in the Billing Entry data grid.
Seeing the VAT/GST Tax Discounts in a Payables Invoice
After you set the Adjust Tax on Discounts parameter, and verify that the Vendor provides a discount, the application can calculate the VAT/GST discount in the Billing Invoice Entry form. This works the same way whether you process the payable before you receive the materials or after you receive them. It works whether you choose to pay the entire amount or submit partial payments.
In this case, the company has purchased $1890.00 of materials, with a GST Tax of $189.00 for a total of AU $2079.00. Let’s see how that displays in the Billing Entry form. The vendor’s discount is 1% on net 30 terms.
To review the VAT/GST Discount on a Payable Invoice:
1. From the Main Menu, choose Payables > Billing Entry to display the Billing Entry form.
2. In the Vendor Invoice list, choose the invoice with the discount to pay.
3. In the Vendor list, choose the vendor. The application fills in the appropriate fields.
4. Depending upon when you are processing this billing, do one of the following:
-
If you are paying the bill ahead of receiving the inventory, in the Bill Amount field, enter the total amount (in this case, 2079.00) and in the VAT field, enter the tax amount ($189.00) and press Enter. The application calculates the item discount and the VAT discount based on the entry in the Terms field using the information you entered.
-
If you are importing the information from receipts, choose Receipts (F5) and select the receipt you are paying for. The application updates the Bill Amount, the VAT Amount, and the discount amount fields based on the discount quantity in the Terms field.
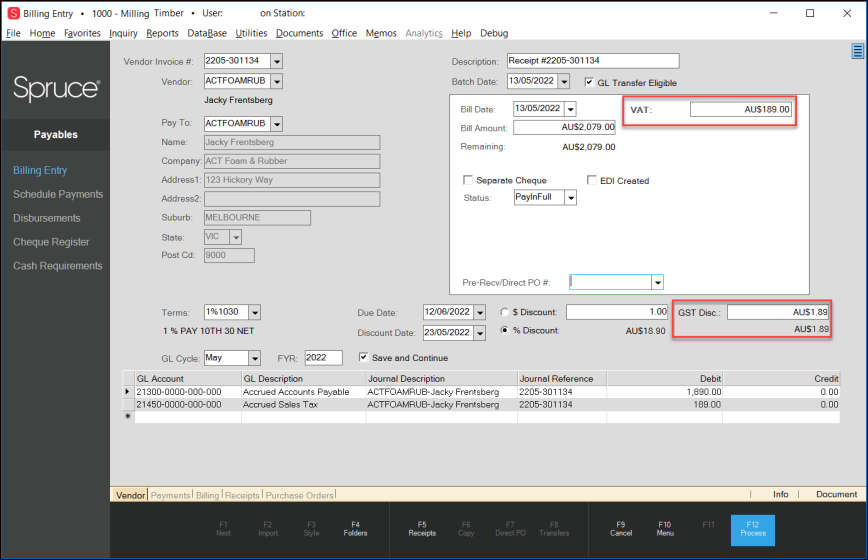
Billing Entry Form with GST Payable Discounts Applied
This section of the form displays the discount information. The VAT/GST Disc field contains the application’s calculation of the tax discount. The total discount for the transaction would be (18.90 (for materials) +1.89 (for the tax) = $20.79 discount for the transaction. The application calculates the discount, in part based on the status (Open, PayinFull, Paid, etc.)
5. To ensure that the amounts that display in the transaction are transferred to the appropriate GL account, select the GL Transfer Eligible check box.
6. If you decide to make a partial payment, the application manages the discount based on your pro-rate entry in the Vendor Maintenance record:
-
If you selected N in the Pro-Rate Discount field, the application applies the entire discount in the last payment;
-
If you selected Y in the Pro-Rate Discount field, the application applies a pro-rated discount amount for each payment.
7. To change the GST Discount, you can type over the amount in the GST Discount field. If you modify the VAT/GST entry manually, the application displays a warning message:
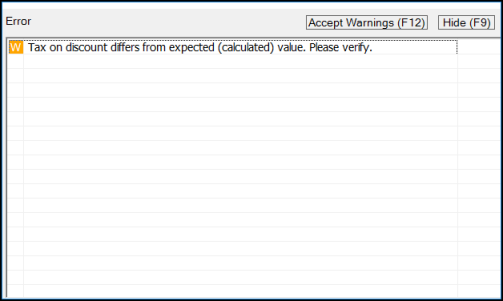
Billing Entry Form Warning Message
8. Select Accept Warning if you are confident that your change is appropriate.
9. When you process the payment, the application keeps track of the discount information you applied.
After the check run, the application applies the calculated discount to the transaction, so the payment amount displays correctly on the check.

Check Run Results
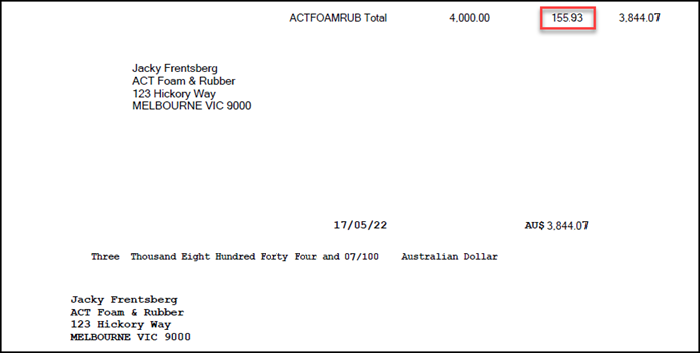
When you look at the AP Billing Invoice, it reflects the discounts for the item and for the taxes:

Billing Invoice with Item and Tax Discounts Highlighted
When you are paying a foreign vendor with a VAT/GST discount, the discount is calculated in the local currency and then applied to the foreign account.
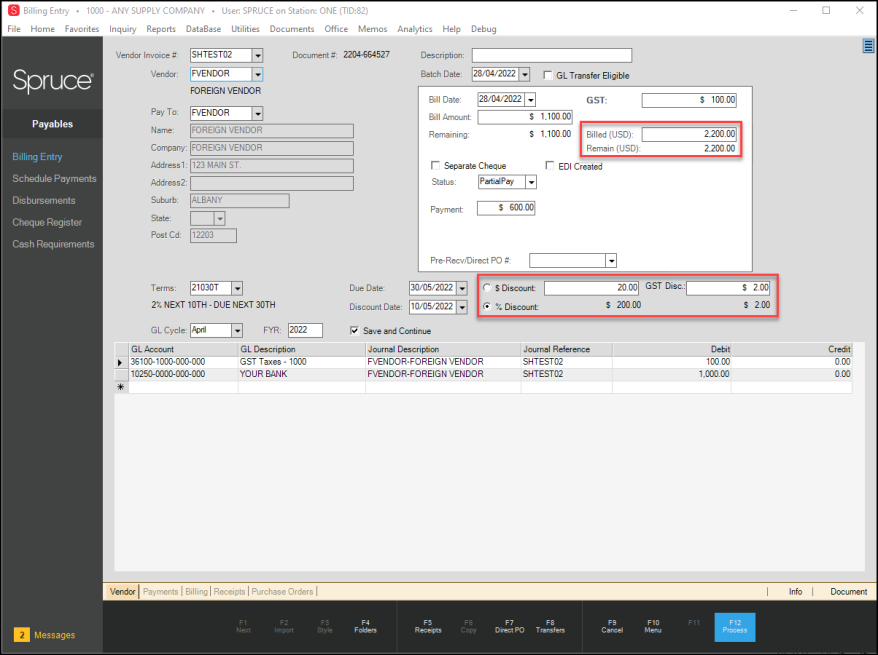
Billing Entry Form with Foreign Vendor GST Discount Highlighted
The Billing Tax Invoice reflects the amounts in both local values and foreign amounts:
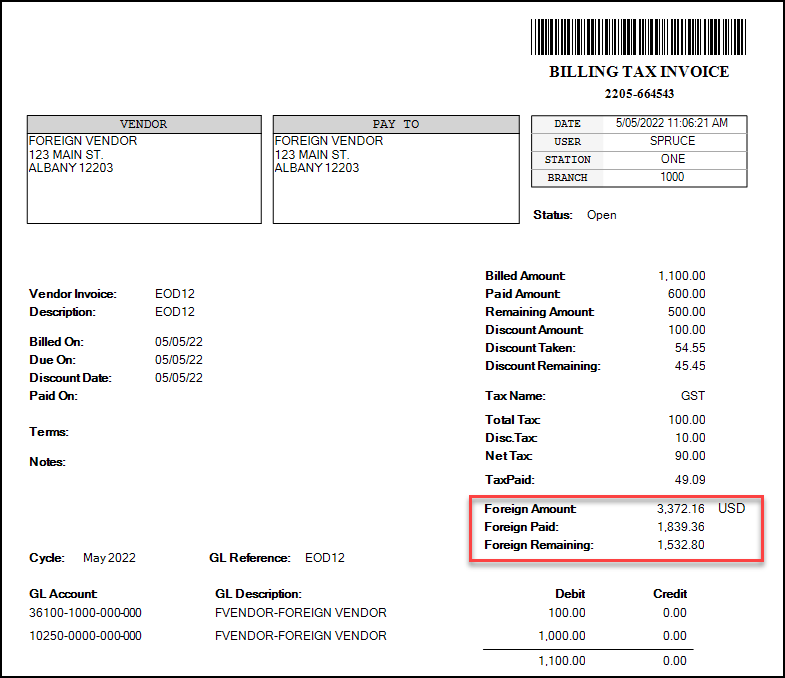
Billing Tax Invoice with Foreign Values Highlighted
Reviewing VAT/GST Tax Discount Applied to Partial Payments
In partial payments, you need to check the Pro-Rate Discount field to determine when the discount is applied. To review: In the Pro-Rate Discount field, you indicate whether the discount is prorated.
-
When you enter N in this field, the application applies the discount only on the last payment when you make partial payments. In our example, this is the option we show.
-
When you enter Y in this field, the application applies the discount on a pro-rated basis based on the amount of the partial payment.
This affects when the discount appears in the Billing Entry form and in the subsequent GL entries.
In this example, we have purchased inventory, received it, and will work with the received records.
To see the partial payments effect on the payable billing (Pro-Rate Discount = N):
1. From the Main Menu, choose Payables > Billing Entry to display the Billing Entry form.
2. Choose Receipts (F5) and pull in the receipt you want to partially pay. The form updates with your changes.
3. In the Status field, choose PartialPay and in the Payment field, enter the amount of the partial payment. Press Enter. The Recalculate prompt displays.
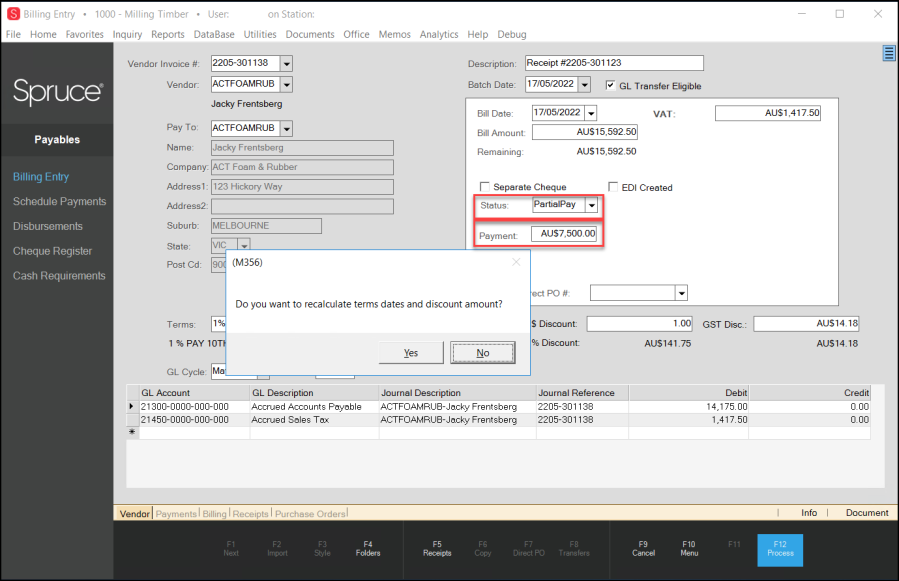
Billing Entry Form with Partial Payment Entered and Recalculate Prompt Showing
Note: If you change the terms entry, a pop-up message displays asking you if you want to re-calculate the term dates and the discount. Select Yes to recalculate the term dates and discount amount. In this case, nothing updates because the discount will be applied when you make the final payment.
4. Choose Process (F12) to process the payment.
5. Run the disbursement process and create the first check. When you look at the first check, there is no discount amount reflected:
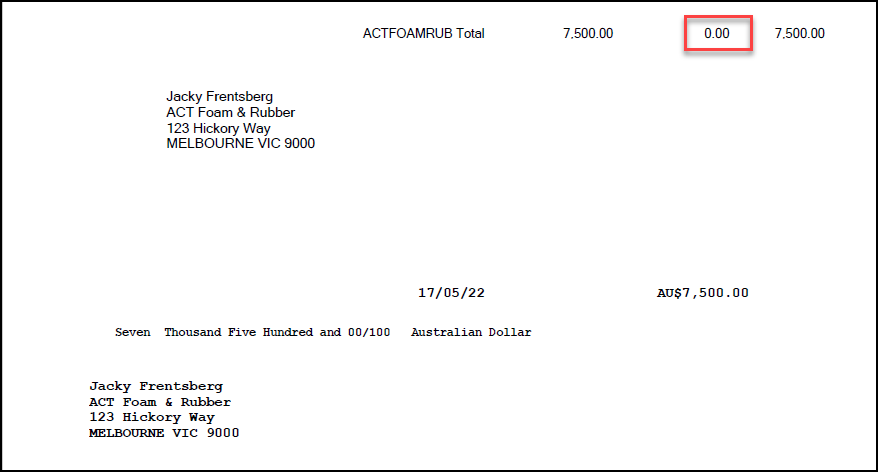
Check 1 with No Discount Recorded
6. When we return to the payable, you can see that the first payment amount has been deducted from the total and the Discount fields are disabled.
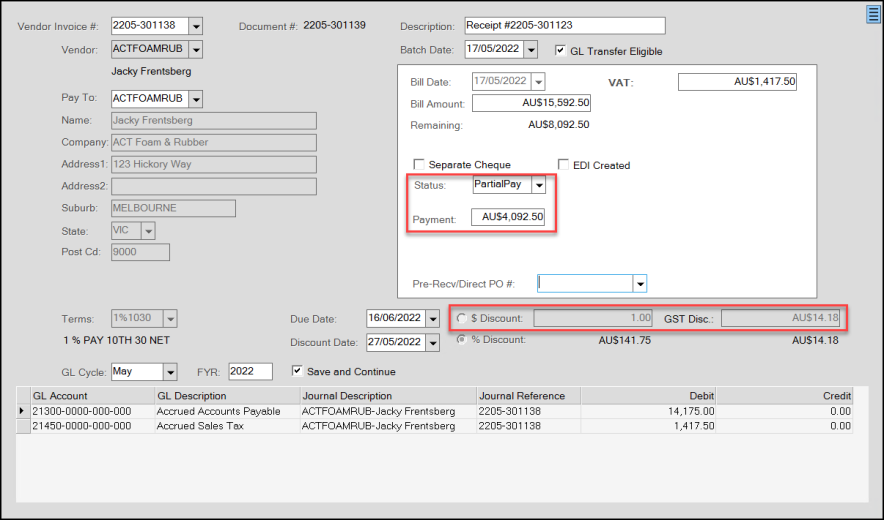
Billing Entry Form with Second Partial Pay Amount Entered and Discount Fields Disabled
7. Choose Process (F12) to process the payment.
8. Run the disbursement process and create the second check.

Check 2 with No Discount Recorded
9. When we return to the payable, you can see that the second payment amount has been deducted from the total.
10. Choose PayInFull from the Status list. The application moves the cursor to the Pre-Recv/Direct PO# field, so you can select the PO from the list.
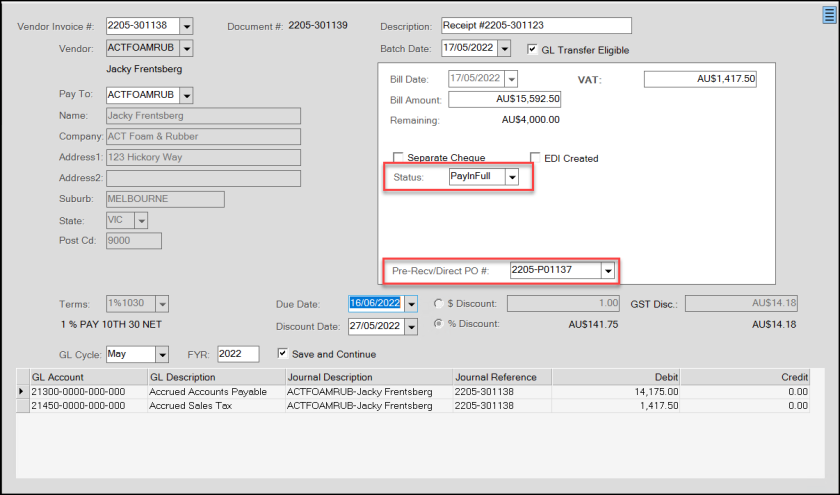
Billing Entry Form with PayInFull Selected
11. Choose Process (F12) to process the payment.
12. Run the disbursement process and create the last check.
Check 3 with Discount Recorded
Seeing the VAT/GST Tax Discount Applied to the General Ledger Account
It is also important to see that the VAT/GST discount is applied to the appropriate AP Tax Discount GL account, so you are reporting the appropriate amount of tax to the tax authorities. Setting this up properly ensures that the discount is also recorded in the End of Day (EOD) report so the books balance.
When you process a payment that has a VAT/GST tax discount associated with it, the tax discount amount displays in the VAT/GST Disc field of the Billing Entry form. It is important that you select the GL Transfer Eligible check box to ensure that the application transfers the correct tax amount minus the discount. This is why it is important that you map the tax discount to a GL account before you set the parameter. If you do not add this mapping, the application will separate the tax amount into a separate account, but it will not display the Discounted tax amount on the GL account.
![]()
Billing Entry Form with GL Transfer Eligible Field Highlighted
If you choose to transfer the payment amount to the General Ledger account manually:
1. In the Main Menu, choose Payables > Utilities > Transfer A/P to display the Transfer Accounts Payable form.
2. Choose View (F8) to display the eligible transactions.
3. Choose the Select check box at the end of the row of the transaction you want to process.
4. Select the Transfer Now check box.
![]()
Transfer Accounts Payable with Transaction Highlighted
5. Choose Process (F12) to complete the transaction.
6. Then go to General Ledger > Inquiry > Journal to display the Journal Inquiry form.
7. In the Journal ID, choose the journal you just completed the transfer for.
8. Then, choose the Accrued Sales Tax entry to see the detail.
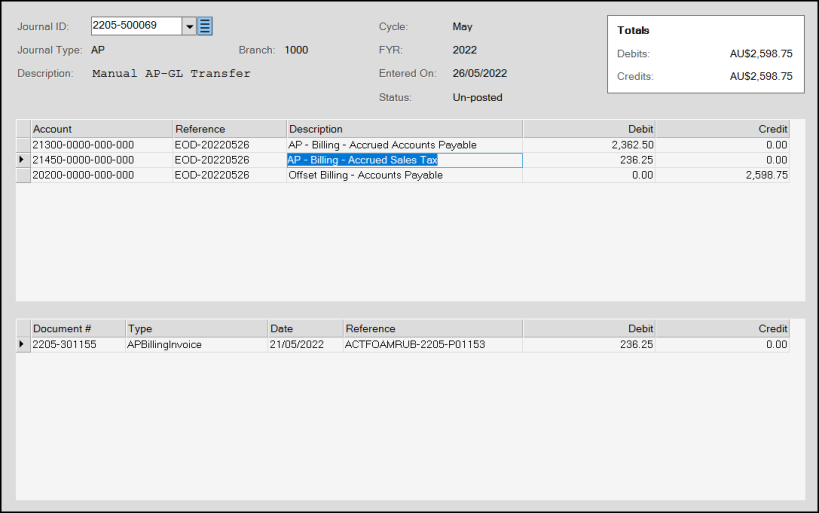
Journal Inquiry Form with Sales Tax Detail
9. Run the Disbursement to pay the bill:
-
Choose Payables > Disbursements to display the Disbursements form.
-
Select the appropriate checking account.
-
Choose Process (F12).
10. Run the End of Day GL Report.
11. From the Main Menu, choose General Ledger > Inquiry > Journal to display the new Journal Inquiry form.
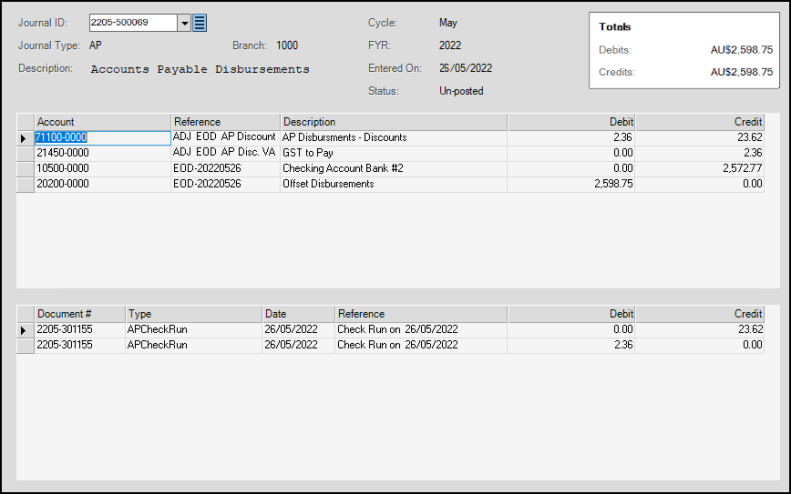
Journal Inquiry Form after EOD Report Run
Looking up the Tax Discount in Billing Inquiry
After the disbursement run, you can also review the tax discount on a payable in the Billing Inquiry system.
To review the tax discount in the Billing Inquiry system:
1. From the Main Menu, choose Payables > Inquiry > Billing to display the Billing Inquiry form.
2. From the Vendor Invoice list, choose the invoice we have been working with to display the tax discount information.
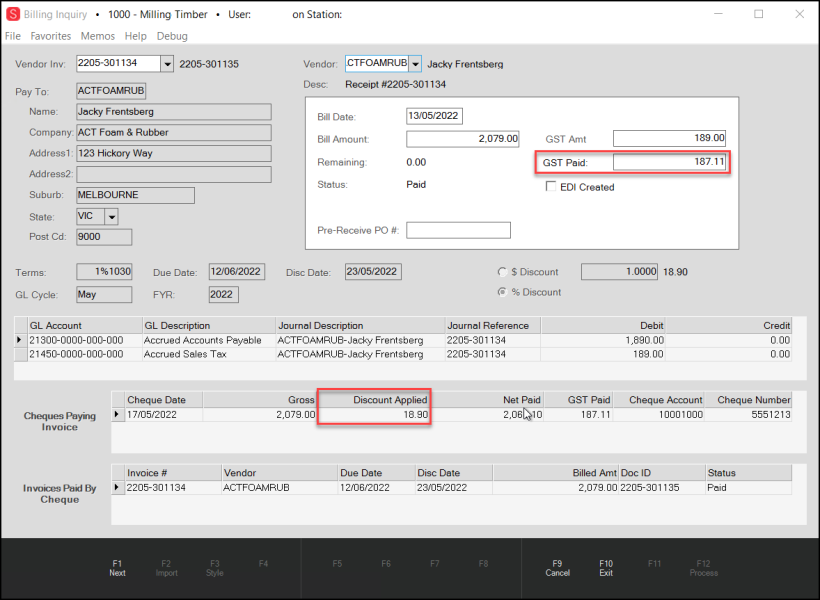
Billing Inquiry Form with Discount Fields Highlighted
Setting the Adjust Tax on Discount Payables Parameter
If you decide you want to adjust your VAT/GST tax on an account when there is a discount for on-time payments, begin by setting the Adjust Tax on Discounts option in the Payables tab in the Parameter Settings.
To set the Adjust Tax on Discounts parameter:
1. From the Main Menu, choose Point of Sale > Database > VAT or GST to display the VAT/GST Maintenance form and make sure you have set up the GL mapping for your Payables transactions.
This includes creating a mapping for the new tax discount adjustment.
2. From the Main Menu, choose Maintenance > Database > Parameters to display the Parameter Settings form.
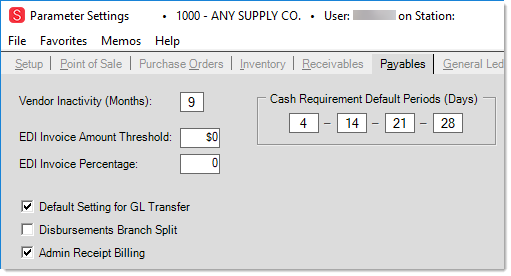
3. Select the Payables tab to display the Payables parameter options:
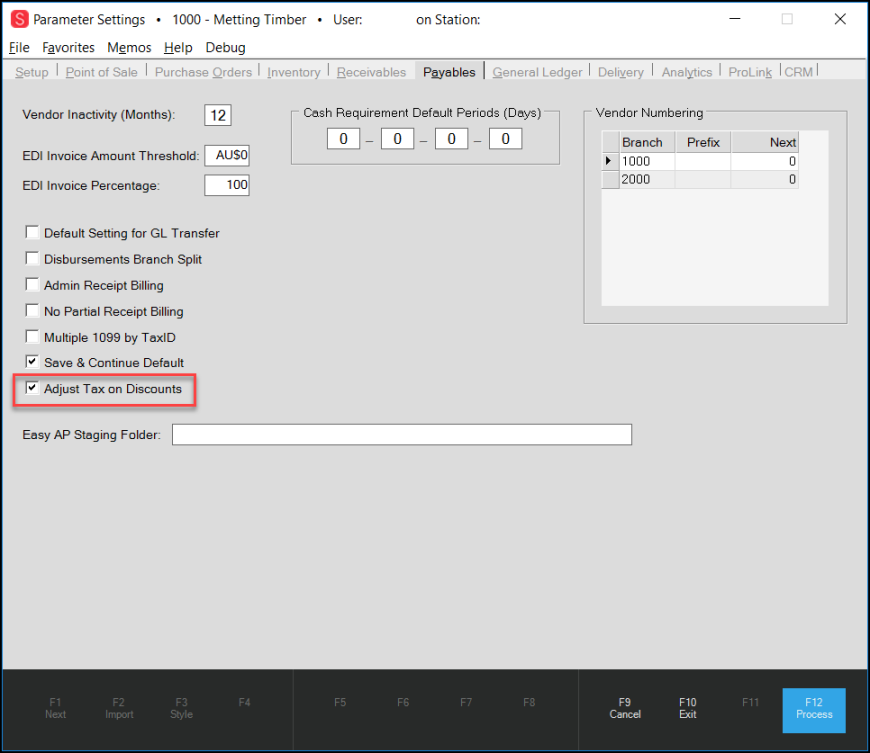
Parameters > Payables > Adjust Tax on Discounts
Note: The Adjust Tax on Discounts field does not display for non-VAT/GST tax regions. This field will not display for UK applications until the HMRC is updated to handle this feature.
4. Select the Adjust Tax on Discounts check box.
5. Choose Process (F12) to save the change.