Purchase Order Update
The "Purchase Order Update" option is used for one or more existing purchase orders with data retrieved from a vendor. The data indicates the items and quantities being shipped. To access this form choose Purchasing > Vendor EDI. After you choose the Purchase Order Update radio button, you can use the Retrieve (F5) function key to retrieve the latest purchase order data from your vendor. The actual operation of data retrieval can vary somewhat by vendor. Some vendors allow direct connections to their data services, others don't. In some cases, we must use third party software products to assist with vendor communication. This topic does not specifically discuss the retrieval process and is limited to processing after data is successfully retrieved.
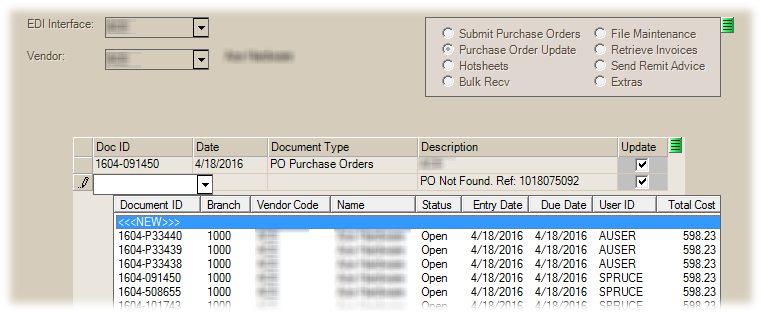
For data to be linked with specific purchase orders, the vendor's data must include some reference to your company's purchase order and the purchase order must still exist (not be closed, etc.). Usually, matching is done on the sequence portion of the Spruce document identifier (the part to right of the dash). For example, if your purchase order's document ID was 1604-091450, the match would be done on the "091450" portion only. If a matching order cannot be located, a "not found" message will appear in the description column of the grid along with a reference ("Ref:") in some cases. The "reference" indicates the identifier in the vendor's data. Often, vendors offer ways of ordering outside of using the Spruce software (online, etc.). These types of orders would usually have an identifier that isn't going to match with an existing order in your data.
|
Please Note: These examples are generic, but the process explained here is the same, or very similar, for ALL vendors. Differences are noted when relevant. |
Any time data is retrieved and does not match an existing purchase order, the user can set either
(1) associate that data with an existing purchase order or
(2) generate a new purchase order from the Vendor EDI transaction using the "<<<NEW>>>" selection.
Click in the Doc ID column cell for any "not found" orders to assign or create a purchase order.

Items that were not originally associated with a PO, but were linked to an order via the Vendor EDI transaction, will display with a zero "ordered" quantity when viewing the PO document or making changes to the purchase order in the Order Entry transaction. This is normal.
Previewing the Purchase Order Data
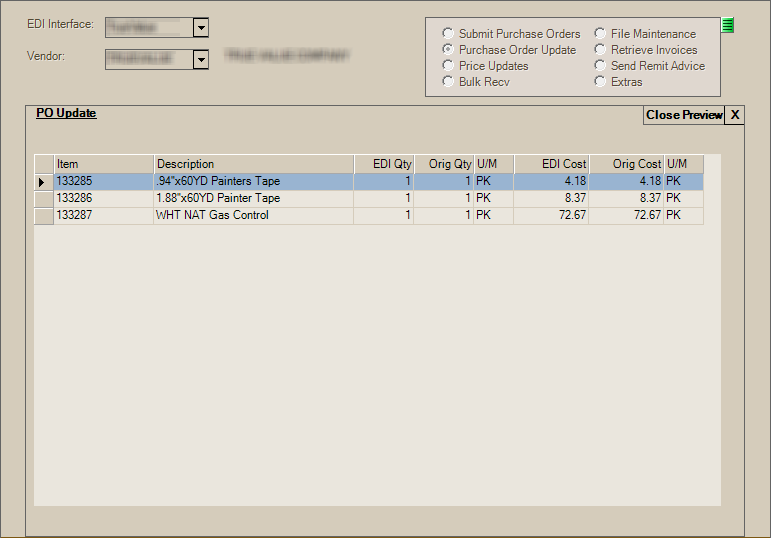
One of the best "hidden" features of the Vendor EDI transaction is the data preview. You can preview the data for a particular order by double-clicking the row header column (the "blocks" along the left-hand side of the data grid). This displays the listing of items that the EDI data includes as well as a comparison between EDI quantities and what was ordered. This is especially useful in identifying "mystery" orders that aren't linked with a purchase order.

To review received quantities prior to receiving, but after updating the purchase order, select the purchase order in the Order Entry area and use the Style (F3) function for either "Vendor EDI" or "Vendor EDI Tote" (the "tote" option applies to Do it Best Corp. only) to display the shipment quantities.
To end the preview, click the "X" next to the "close preview" text in the upper right-hand corner of the Preview panel.
It is also possible to view details regarding Vendor EDI processing using the Vendor EDI Log feature (Main Menu > Purchasing > Inquiry > EDI Log).
Matching your Received Data to Purchase Orders
This can be a challenge in some cases because of a number of factors. Your vendor may use different SKUs to identify the items they are shipping and may, or may not, supply your Purchase Order number in their data. The following steps outline the method we use to match your vendor's data with the items you ordered:
•We first compare the vendor's SKU for a matching vendor item associated with the Purchase Order (when a PO is provided). Matches are updated with the quantity indicated in the data.
•If no matches are located on the Purchase Order for the item, we check the entire inventory for a matching vendor item. If no matching vendor-item is located, we look for a matching SKU (your item). If no match is found by that method, we then check the barcode UPC. Barcodes (UPC) can be assigned to multiple items, so this can be an issue. In this case, the first UPC (barcode) matched item with a committed quantity will be selected (if any).
•If the above steps did not locate a match for an item, we then attempt to add the item as a new item. This is only done if your company has specified a "template" item for the EDI vendor for use with the current Branch (Maintenance, Database, Branches). The template item must exist in the branch location. The template item's settings are used for any information not available in the data. The "new" item is also added to the purchase order.
If your company uses non-stocked items to order products which you also maintain a "stocked" item for, the update will only update the non-stocked (renumbered) SKU if it's possible to match with an existing special order item on the Purchase Order being updated by EDI data.
Processing your Purchase Order Updates
Mark the documents that should be updated using the check box ![]() under the update column in the grid. To update the selected purchase orders with the data, choose Process (F12). Processing time can vary based upon the amount of data. Once the "processing complete" message appears in the functions area (bottom of the window), the purchase orders have been updated. It's important to point out that updating a Purchase Order does not receive the merchandise. Inventory receiving must still be processed.
under the update column in the grid. To update the selected purchase orders with the data, choose Process (F12). Processing time can vary based upon the amount of data. Once the "processing complete" message appears in the functions area (bottom of the window), the purchase orders have been updated. It's important to point out that updating a Purchase Order does not receive the merchandise. Inventory receiving must still be processed.
Receiving the Purchase Ordered Products into Inventory
Processing a "Purchase Order Update" from the Vendor EDI transaction does not actually receive the inventory, it just updates the purchase order(s) with the EDI quantities and costs. The final step after updating the purchase order is inventory receiving. This is typically done after the goods have arrived from the vendor and is done using the Receipts transaction located on the Purchasing menu.
There are two ways of processing the data you have received:
•One method is to copy the purchase order into the Receipts transaction using the Receiving (F5) function. When done, the EDI updated quantities and costs will copy in (not the original ordered quantities or costs). The user can then make changes to quantities or costs as necessary based on what is actually delivered.
•The second method is to not copy a purchase order, but to enter or scan all items shipped into the receiving grid then after all items and quantities are entered, use the Reconcile (F7) function to compare the entered quantities to the updated purchase order in order to review any differences (discrepancies).
Retrieving Purchase Order Information using the PSN
ECI's Private Supply Network (PSN) allows you to import and process purchase order invoices using an API rather than traditional EDI tools. As of this writing we are expanding our ability to retrieve data for vendor EDI using the PSN as it is more secure and requires less change over time. Currently, this process only works for ACE and some Do It Best processes, but we will expand this over time.
The results of this process are the same, they just use a different endpoint.
To retrieve purchase order updates and create invoices:
1. From the Main Menu, choose Purchasing and from the Left Menu choose Vendor EDI. The Vendor EDI Communications form displays.
2. From the EDI Interface list, choose the vendor’s name, in this case, ACE.
3. From the Vendor list, choose the vendor’s vendor ID, in this case, ACE.
4. Choose the Purchase Order Update button in the list. The Date field displays the current date.
5. From the Date list, choose the invoice date of the purchase orders you want to retrieve.
6. Choose the Retrieve (F5) key. The Retrieve File confirmation message displays:
- Scripting is enabled, meaning the software may connect externally to your vendor when you press OK. Press OK to Continue Retrieving.
7. Choose OK to continue. The Open box displays. The application updates the data grid with the invoice(s) you requested, when they are available.
8. In the Doc ID column of the data grid entry, click the down arrow and choose New to create a new invoice document for the downloaded purchase order. Complete this step for each entry in the data grid.
9. Choose Process (F12) to create the invoice documents.
After you complete this step, you can receive the purchase order(s) in receipts.
10. From the Main Menu, choose Purchasing and from the Left Menu choose Receipts. The Inventory Receiving form displays.
11. From the Vendor list, choose the ACE vendor ID.
12. Choose the Receiving (F5) key to display the context list.
13. Choose Purchase Order. The PO Purchase Orders box displays.
14. From the PO# list, choose the new purchase order (invoice) you just imported and click Accept. The Inventory Receiving data grid updates to show the item associated with the purchase order invoice.
15. Choose Process (F12). The Process Session Document box displays.
16. Choose Finish (F12) to complete the document import process.