Disbursements Processing
This activity is used to print checks for payees (vendors) and in turn, marks the invoices (bills) as "paid" (when fully paid) or updates the paid amount on invoices being partially paid. Only payables that have been selected for payment processing will be included. This can be done individually by invoice (or credit) in the Billing Entry area or for multiple payables at the same time from the Schedule Payments form. The "status" of the Payable determines whether or not it is considered "selected" for payment. Two statuses indicate this: Pay in full and Partial pay.
Note: Disbursement is limited to 30 vouchers at a time.
Select a check date, checking account, and change the starting check number as necessary. The form will remember some information from the most recent check run.
A label found at the bottom right-hand side of the form indicates the number of "bills" selected for payment and the number of checks required. Below is an example of this message:
There are 6 bill(s) pending disbursement; 4 checks will be produced.
Check the EFT (Electronic Funds Transfer) button if you are not printing checks but processing the payments electronically instead.* EFT checks don't require or use a check number. An EFT will display a check number of zero (0) in the Check Register and show "0-EFT" on the Checks report.
With Release 12.14, the date format used with Canadian checks can be either MM/DD/YYYY or DD/MM/YYYY format. DD/MM/YYYY is the default date format for all checks unless requested.

*You can use the "EFT" (Electronic Funds Transfer) option if the payment was previously issued electronically using either online bank transfer, or other means rather than using a physical check. No check number is assigned to EFT flagged payments. Marking a payment as an EFT does not actually remit any payment electronically automatically to the vendor. EFT is only a status flag used for your reference and also to prevent disbursements of EFT payments from incrementing the check register's next check number.
Restarting a Check Run
One of the nicest features of this activity is the ability to reprint checks starting at any point with in a check run (disbursement). Click on the check box next to Restart to do this. The form will change to include additional fields used for reprinting checks from a disbursement the user selects. The check range of the original disbursement is displayed and the user can restart at any point in the range. In addition, the user can specify the check number to restart on.
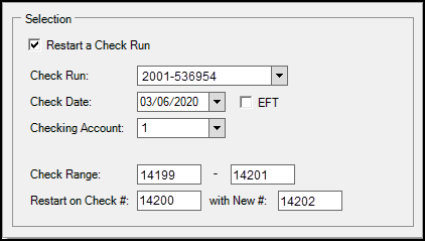
Some fields may not be modified and are displayed for reference.
•The "on Check #" is the previously issued check number you want to begin reprints with.
•The "with New #" is the next check number that will be used for the rerun (this number will be used for the "on Check #" designated and then incremented for any additional checks).
Printing a Signature with Checks
It is possible to print a signature on Payables checks. To do so, you must create an appropriately sized image (JPG) file of the signature you wish to print. The file’s name must be APSig.jpg and must be placed in the same “image” directory as is specified in the Parameters form (this directory is also used for your company’s logo images).
The image will be re-sized to match the space available; however, it’s best to maintain a 3:1 (width to height) rectangle for your image to avoid distortion. For our testing we used an image sized approximately 390 by 130 pixels. Signatures will not appear when viewing a check document in the Viewer, only when printed. To test your signature, we suggest using one of the following methods: “restart” a previously completed check run on plain paper – or -- create a single dummy invoice, process a disbursement, and then reverse the check and delete the invoice).
Using a check image is not required and your company should carefully consider security ramifications of automatically printing a signature on checks.
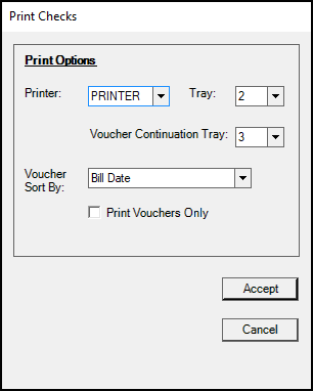
Printing and Printer Requirements
Disbursements are designed for printing on printers equipped with two or more trays. The check tray and voucher tray are usually different trays since checks are printed on special forms and vouchers on plain paper. Checks and voucher copies must be printed to the same printer. It's possible to print vouchers only during processing. The printed check format is designed for use with standard #10 windowed envelopes.
Transmit Via EDI
Use this check box to send a notification to specialized vendors about the current disbursement. This check box displays if the disbursement includes payables for these vendors who are assigned a Wholesaler ID of ENAP (LBM Advantage) or LMC or involve a vendor who uses the X12 standard data format. Checking the box will create and transmit an EDI document to notify the vendors of the payment (remittance) being processed.
Note: Selecting this check box does not transfer any funds to the vendor, but provides a notification of the transfer to come.