Selecting Document Styles for POS Email Attachments
When you transmit transaction documents to your customers based on their orders, quotes, purchase orders, and payment transactions, it can be useful to allow authorized salespeople to choose the document format for the transmission during checkout. This ensures you can manage data sent over the internet, providing better control over the format of the transaction information you send.
This new feature lets you specify which document formats to use by default when sending email transaction documents to your customers. You choose the document style defaults based on the printer settings for each transaction type. You can also allow the salesperson to choose from a list of document formats during checkout. We will cover these processes in this section.
You can look up the Point of Sale document styles in the Help System here to see what kind of information they include or exclude by entering the document style name, such as PS Customer Orders.
Setting the User Permissions for Changing the Default Doc Styles
Use the instructions in this section to allow specific Point of Sale users to change the default document style for transaction documents that the application emails to their customers. When a Point of Sale user has this permission, they can pick a different email document style before the message is queued and sent. When you do not enable this permission for a user, the application uses the document style specified in the branch default setting, and users cannot override it. This permission is disabled by default.
To add this user permission:
1. From the Main Menu, choose Maintenance > Database > User IDs.
The User ID Maintenance form displays.
2. From the User ID list, choose the user ID of the Point of Sale salesperson you want to add the permissions for and press Enter. The user’s profile displays.
3. On the Security Options tab, click the Application Security Settings  icon to display the POS Permissions List Code Maintenance list.
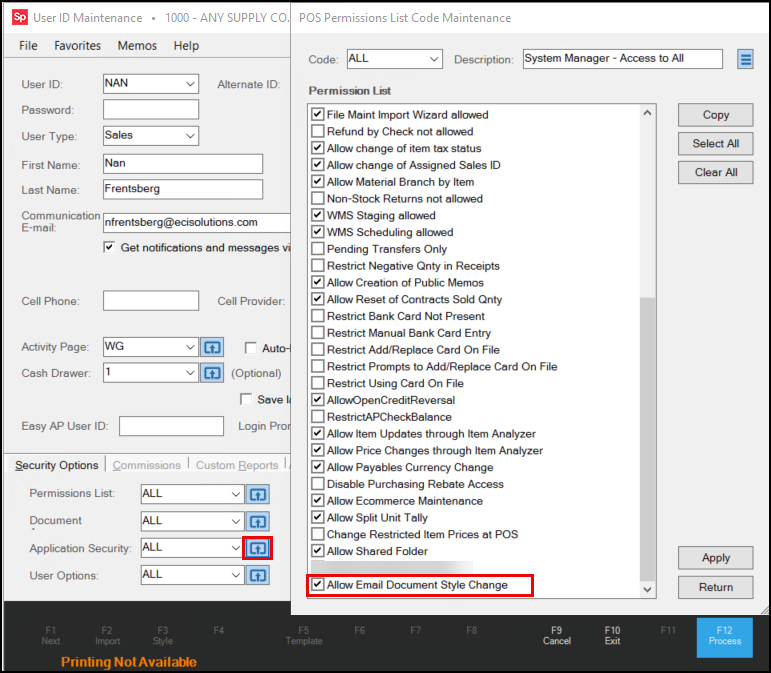
User ID Maintenance > POS Permissions List Code Maintenance
4. In the Permissions List, scroll down and select the Allow Email Document Style Change check box.
5. Choose Apply and Return. The User ID Maintenance form redisplays.
6. Choose Process (F12) to save this change to the database.
Setting the Default Printer for Email Style Transmissions for the Branch
When you set up a printer on your system, you set the default document style formats for each document type in the Maintenance > Database > Devices > Printers form:
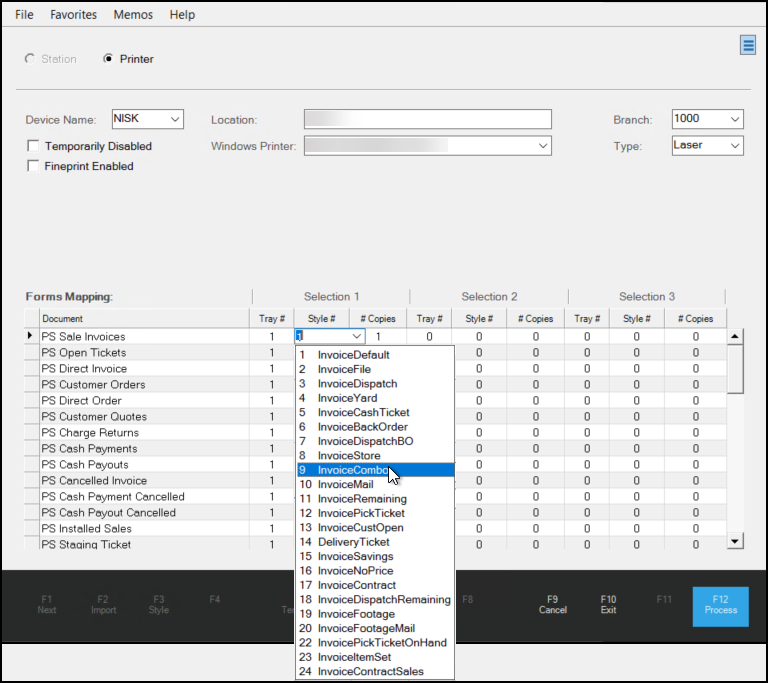
Device Maintenance > Printers > Printer Settings
In the Style column, you choose the default document format for each document type that is tied to that printer. This is entry will be treated as the default style for transmitting the transaction document initially. The Tray # and # of Copies entries are ignored.
For the instructions below, choose a printer (Device Name) that includes the default document styles you want to use for emailing transaction documents to your customers. If you do not choose a default printer, the application uses the default document styles for the transaction type by default.
Selecting the Default Email Style Printer for a Branch
Use these instructions to set the default email style printer (and the related document styles associated with it as chosen above) for each branch.
To select the default email style printer (with the corresponding default document style selections) for the Branch:
1. From the Main Menu, choose Maintenance > Database > Branches.
The Branch Setup form displays.
2. From the Branch ID list, choose the branch you want to set the default email style for and press Enter.
The branch details display.
3. Choose the Printers tab.
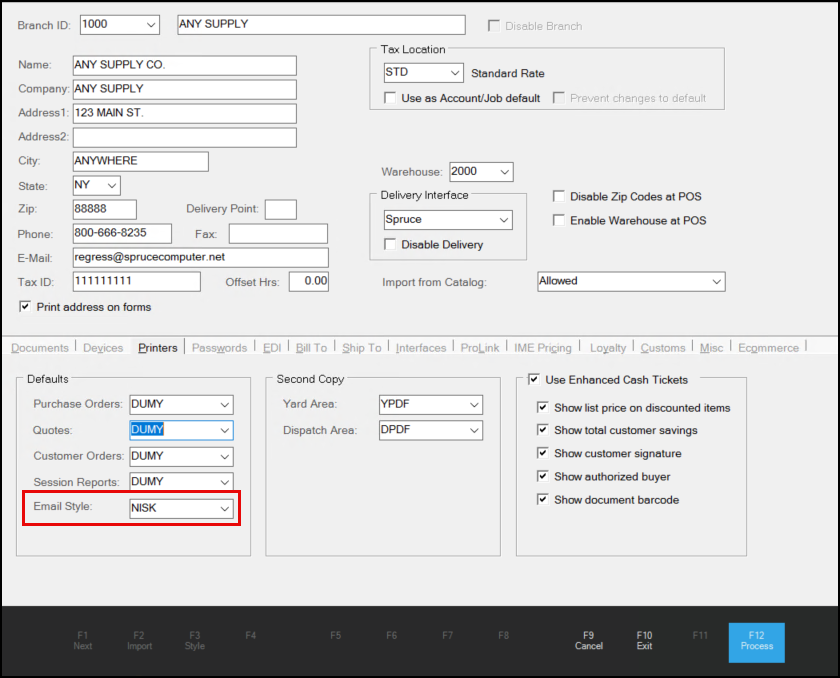
Branch Setup > Printers > Defaults > Email Style
4. From the Email Style list, choose the printer that uses the styles you want to use for email transmissions to customers.
5. When you complete this setting, choose Process (F12) to save this setting.
Choosing the Document Style During the Transaction Process
Now that your users have permission to change the default email document style during a transaction and you have selected the printer that contains the list of default email styles for each document type, users can change the document style format during the transaction document process.
To choose a new email document style during a transaction:
1. From the Main Menu, choose Point of Sale > Orders.
The Order Entry form displays.
2. Set up the order as you normally would (account name, order number, and item selections) and then choose Process (F12). The Process Order Document form displays.
In general, the Point of Sale user handles the payment information and any additional settings required before moving on to the Transmit tab settings.
3. Choose the Transmit tab to display the email transmission options.
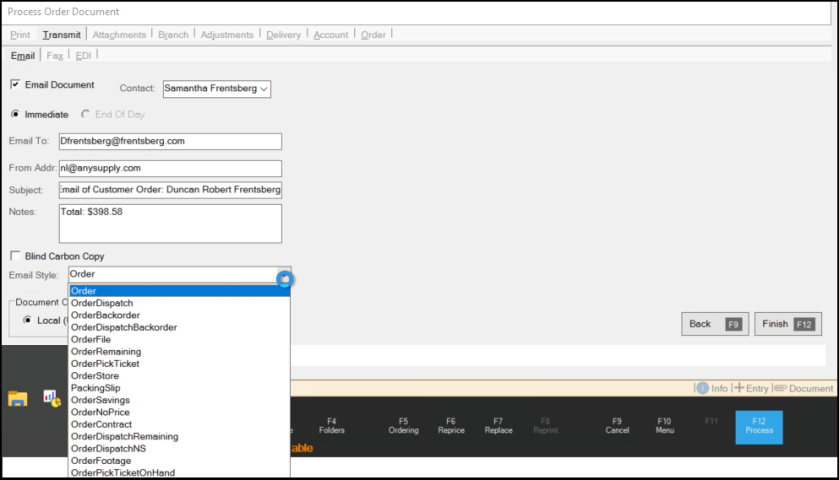
Process Order Document > Transmit > Email Tabs> Email Style Options
4. Select the Email Document check box (if not already selected) and review the list of Email Style options.
5. From the Email Style list, choose the appropriate alternate document style.
Note: The Email Style list override appears only when the user is permitted to change the document style and when multiple styles exist for the document type. If there is only one style to select, that style is used by default.
6. Choose Finish (F12) to process the transaction.
Choosing a Point of Sale Document Style Format
To choose a document style effectively, we recommend that you familiarize yourself with the available document style formats, so you understand which formats include the information you want and which exclude the information you do not want. Here is a list of the Point of Sale Invoice Types and the styles available for each.
Point of Sale (PS)
-
PS Installment Purchase (Rent to Own / Hire Purchase)
Purchase Order (PO)
Manufacturing (IN)
Receivables (AR)
General Ledger (GL)
Payables (AP)