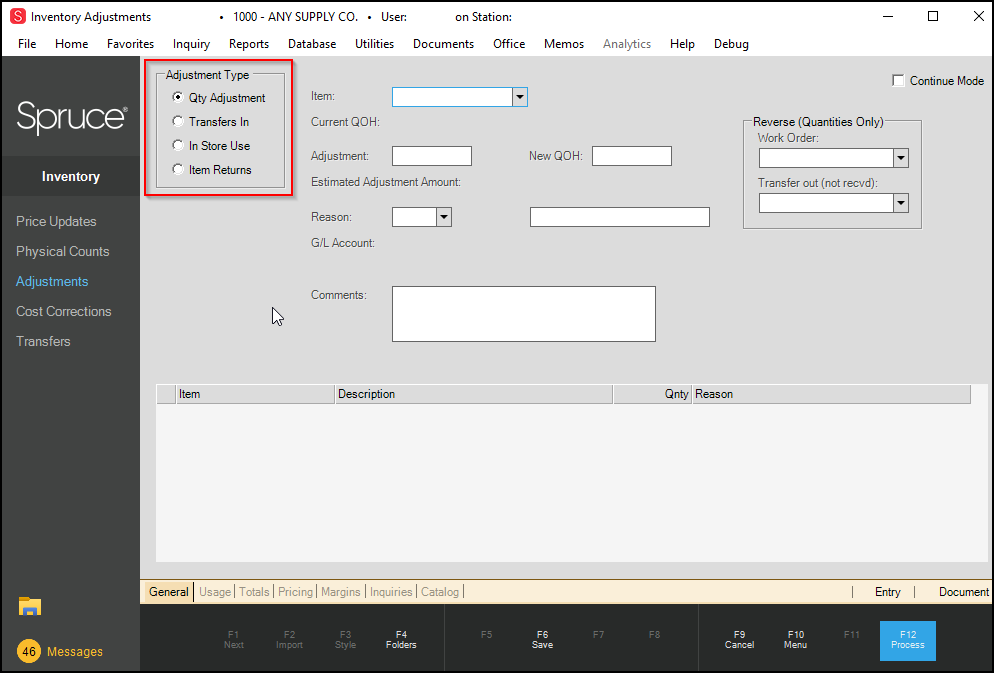
Inventory Adjustments
Inventory quantities are naturally adjusted by sales, returns, and inventory receipts; however, there are other factors that require manual adjustment such as human error, damage, and theft, for example. You can process four types of quantity adjustments from this activity: quantity adjustments, transfers in, store use, and returns. The form area will change based upon the type selected; however, there are some similarities.
Additionally, you can modify Quantity on Hand Adjustments from the Item Maintenance form, if you have the appropriate permissions. See Adjusting Quantity On Hand Inventory (Item Maintenance).
Notes:
-
Continue Mode - Retains the ledger information between entries. Select this option when you are making more than one entry with the same ledger information.
-
The data grid lists pending adjustments. These are not final until you choose the Process (F12) function.
-
The Save/Modify (F6) function label displays differently based on the status of the entry.
For new entries the Save label displays to add the new adjustment to the list of pending adjustments in the data grid.
When you select a pending adjustment in the data grid, the label changes to Modify to reflect the change in the entry.
When you complete your work on these entries, choose Process (F12) to save them.
Once an adjustment "type" has been selected, a series of items can be adjusted (for the selected type) and processed at the same time.
Types of Adjustments
The four types of adjustments are:
Quantity Adjustment
Quantity adjustments are occasionally necessary due to damage, theft, human error, and other reasons. Miscellaneous types of quantity adjustments can be done using this selection. Adjustment amounts are entered in either of two ways:
(1) enter the amount to be adjusted as either a negative or positive quantity, or
(2) enter the new on-hand and the adjustment will be calculated for you.
When adding a new adjustment, or changing the adjustment quantity, the estimated dollar amount of the adjustment is shown.
Note: If you are adjusting the item quantity of more than one item, and you are entering Comments, after you display the new item, click in the Comment box to clear the previous entry. This issue will be corrected in version 33.
Reversing a Work Order or Transfer Out AdjustmentThis Work Order and Transfer out lists only display if your company has created at least one work order document using the Manufacturing feature or a "transfer out" from the Transfers transaction (also in the Inventory area). For Work Orders, the application displays both open and closed work order documents. In most cases, you only adjust a completed work order; however, open work orders can contain more than one manufactured item. The reversal will adjust quantities for completed manufactured items only. It is important to point out that this only reverses quantities and is not a complete reversal of the manufacturing process or a transfer. The sooner you "reverse" a manufactured work order or transfer, the better. It is not be a good idea to reverse older transactions. Before using this, please consider the following:
At this point, new item rows will be immediately added to the pending data grid for both the manufactured items and materials used for manufacturing or those items that were transferred. Manufactured items are typically a negative (-) adjustment (decrease in on-hand) and materials are a positive (+) adjustment (increase in on-hand). Additional StepsSince we are only adjusting quantities using the current average cost, there can be differences between the original work order's costs and the adjustment. The software does not calculate these differences for you nor are adjustments included. You will likely need to make a manual journal entry for the difference. |
Transfers In
This selection can be used to make adjustments to the quantity of a previously processed transfer for the current location. Transfers may be selected by the transfer document ID, by item, or both. Enter a minus before the "adjustment" quantity to reduce the transferred quantity (or just enter the "new" quantity).
![]()
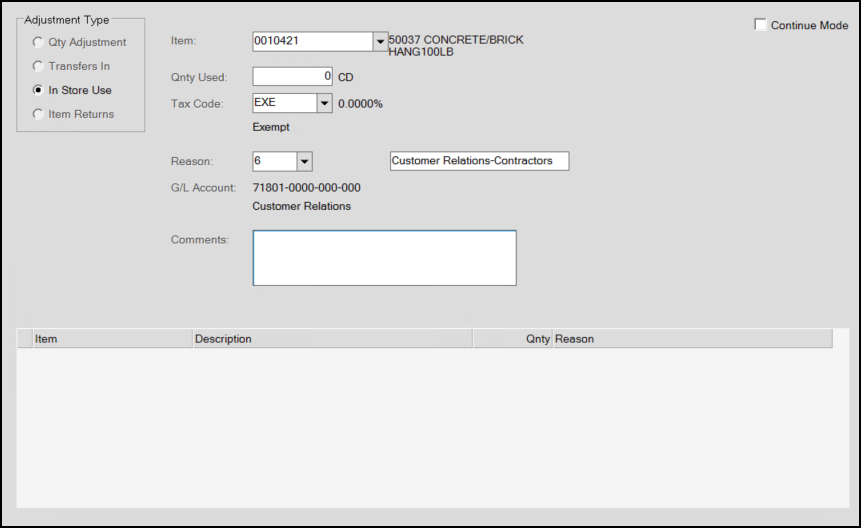
In Store Use
Items in your inventory may sometimes be removed for your company's use, and due to this, may have some sales tax liability. For example, a company may stock and also use paper towels or use lumber to build a shed, etc. You may be required to pay sales tax on the "use" of that inventory since you are essentially "selling" the material to yourself. The "store use" adjustment can be used to reduce inventory without doing a sale. If sales tax should be charged for the goods used, use the "tax code" drop down to select the appropriate location. The application security option, "InStoreUse Inventory Use," must be enabled for the user to access this feature.
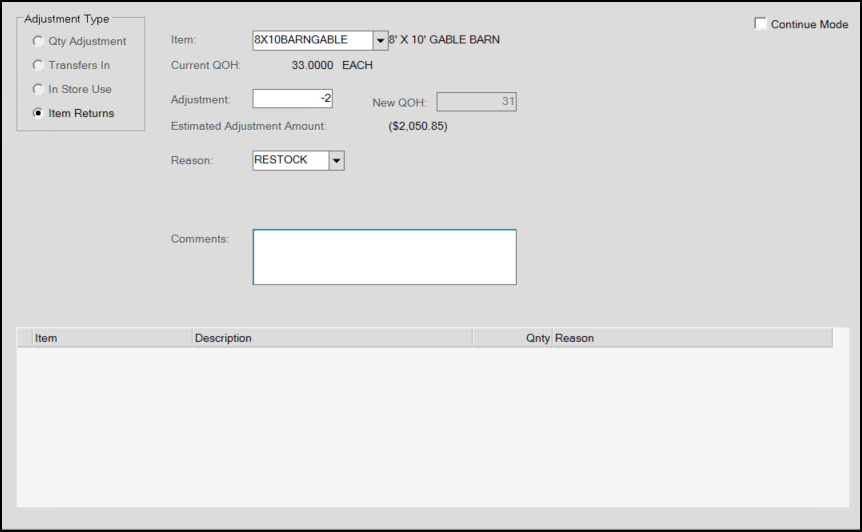
Item Returns
This option is only displayed if enhanced returns have been enabled for your software. If shown, the radio button allows direct entry of an item into the item returns data without having to process a return sale. This would be used if damage was noticed prior to sale, for one example. Enhanced returns can be enabled for either or both stocked as well as non-stocked items by two parameters found on the Parameters form's Point of Sale and Settings tabs. This is very similar to the "quantity" adjustment option except that the adjustment quantity is always negative and you can select a return reason. After the user chooses Process (F12) after saving one or more item return adjustments, the items will be available for further processing using the Item Returns utility.
Processing
For multiple adjustments, select the Save (F6) function after each item and the adjusted item will move to the grid. You can modify "reason" comments directly in the grid and the grid displays adjustment quantities for verification. If you need to make changed to a previously "saved" item, click on the item's row, make the changes, and choose Modify (F6) to complete the change.
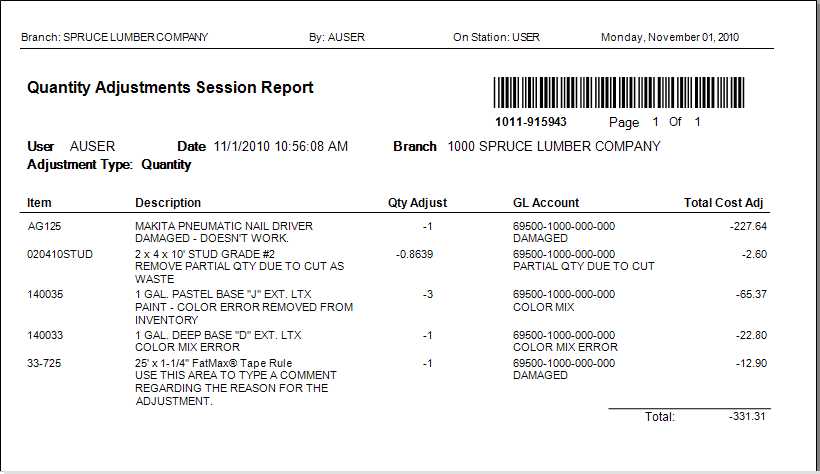
Once all adjustments are complete, choose the Process (F12) function to update quantities in the database. Modifications cannot be made to the original adjustments after processing; however, additional or reversing adjustments can be done in the event of a mistake. An adjustment session document is produced during processing. This can be accessed from the Documents form.
Click here for information regarding Folder (F4) contents for Inventory application activities.
Ledger Account Selection
General Ledger accounts listed for selection represent the offset to either a debit or credit entry being made to inventory assets. The "asset" side of the entry is determined by either:
-
(1) the default System Journal mapping for the type of adjustment* as found in the Inventory journal (if no product group mapping is set up), or
-
(2) Detail Mapping by product group (if it has been set up).
The choices listed in the G/L Mapping list (often "expense" accounts) will be used as the offset to this asset side of the entry. Adjustments increasing inventory will be a debit on the asset side and a credit for the offset.
Process (F12)
When you have completed your adjustment settings, click the Save (F6) key. The application collects the adjustments you modified in the data grid. When you are ready to process the selected adjustments, choose Process (F12). The application creates an adjustment document that can be optionally printed or transmitted.
Adjusting the Inventory (QOH) in Item Maintenance
Customers have asked for a quicker way to adjust the quantity on hand values for inventory items in the application database. Our goal was to ensure that we make these modifications easy but also secure, so you have adequate documentation and protection for these changes. Using these new features, you can keep better track of stock amounts and give the entire team that information when dealing with your customers. Users with permissions to access the Adjustments feature (in the Inventory menu) and access to Inventory > Database > Item will also be able to use the new feature in Item Maintenance. You can still use the Adjustments menu option to perform inventory adjustments as you did before.
Note: You cannot modify the on-hand quantities using this process for lineal tally items, fixed tally items, or other items with the tally group name (such as Pull to Length).
When the Item Maintenance QOH Adjustment feature is enabled and the user permissions are complete, you are ready to use this feature to adjust the quantity of items in inventory in the Item Maintenance form. Typically, these adjustments occur when you receive new items using the Purchasing features, customers return items they do not need, or when you move materials from location to location. This feature is probably best used for other small changes to inventory that can occur during the normal business changes not covered by those transactions. If you make an adjustment after processing these transactions, you risk double counting inventory changes.
To adjust the quantity of an item in inventory in the Item Maintenance form:
1. From the Main Menu, choose Inventory > Database > Item to display the Item Maintenance form.
2. From the Item list, choose the item you want to adjust the inventory amount for and press Enter to display the existing settings for this item.
Note: If you select an item type that cannot be adjusted using this feature, the Settings icon does not display.
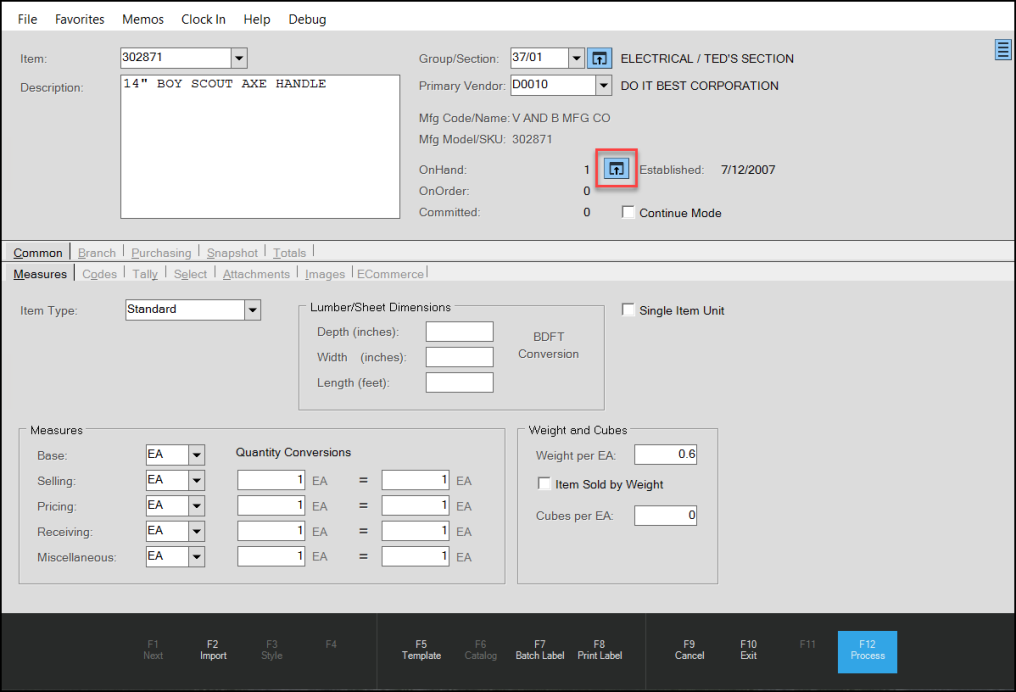
Item Maintenance > Inventory Adjustments Settings Icon Highlighted
Note: You can adjust the number of disabled items that you have in inventory, but a warning message displays reminding you that the item is disabled.
3. To adjust the quantity on hand value for the selected item, beside the OnHand entry choose the Settings ![]() icon.
icon.
The Quantity Adjustment box for the selected branch displays.
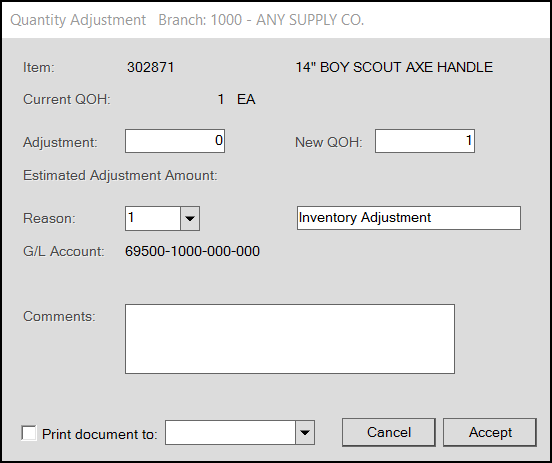
Quantity Adjustment Box (Current Branch)
You can record either a positive (for additions) or a negative (for removals) adjustment in the Adjustment field.
4. In the Adjustment field, enter the number of items of this type you are adding or removing to/from inventory.
The New QOH field updates to reflect the change in the inventory quantity. The application also updates the Estimated Adjustment Amount value by multiplying the item price times the quantity entered in the Adjustment field.
5. The Reason field prefills with the GL mapping option that was selected in parameters.
You can change this entry if you have permission to do so. Changing the label will not change the default GL mapping label for the journal you selected.
6. In the Comments field, it makes sense to enter the reason you are updating the inventory amount, but this entry is not required.
Note: If you enter a comment into this field and then subsequently adjust another item, click in the Comment field of that new item to reset the Comment field entry. This issue will be corrected in version 33.
7. To print a record of this transaction, select the Print document to check box and select an authorized printer from the list. This is not required.
The application keeps a record of the transaction in the Documents section.
Note: If you choose to print the document, the application prompts you to choose a document name, location, and a format for the document. Choose the document name, location, and document format and choose Save to print the record.
8. When you have completed your changes to the inventory quantity on hand for this item, choose Accept. This saves the inventory adjustment to the database.
When you return to the Item Maintenance form, the application displays the updated OnHand quantity for the item.

Item Maintenance with Updated Quantity On Hand Setting
9. To see the inventory adjustments documentation, from the Toolbar, choose Documents to display the Documents form.
10. From the Document # list, choose the inventory adjustment record that you just created.
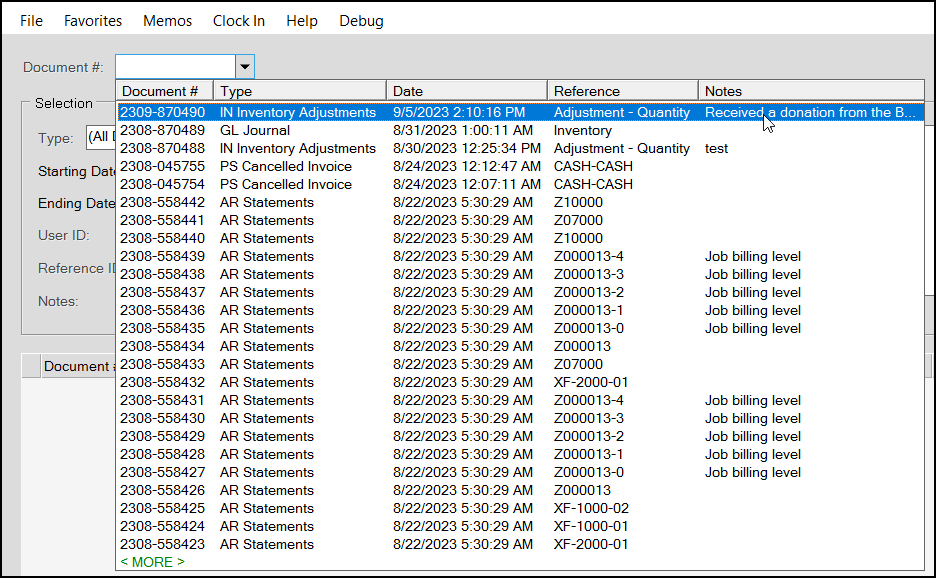
Documents > Inventory Adjustments Document Selection
The document displays.
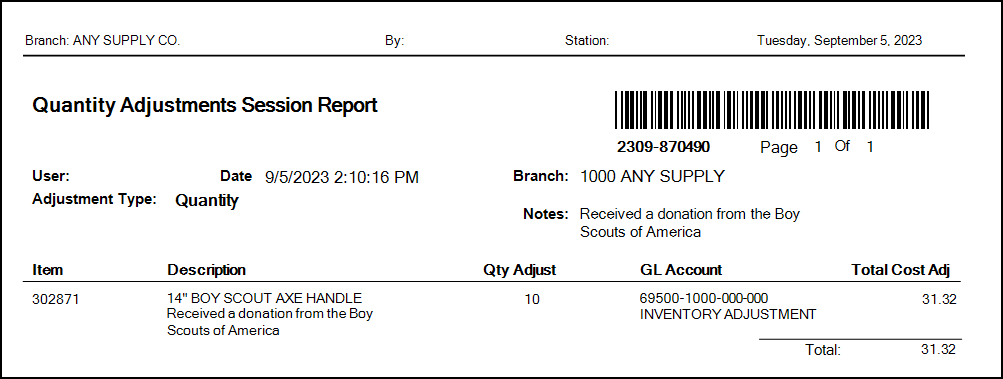
Documents > Quantity Adjustments Session Report