Attachment Maintenance
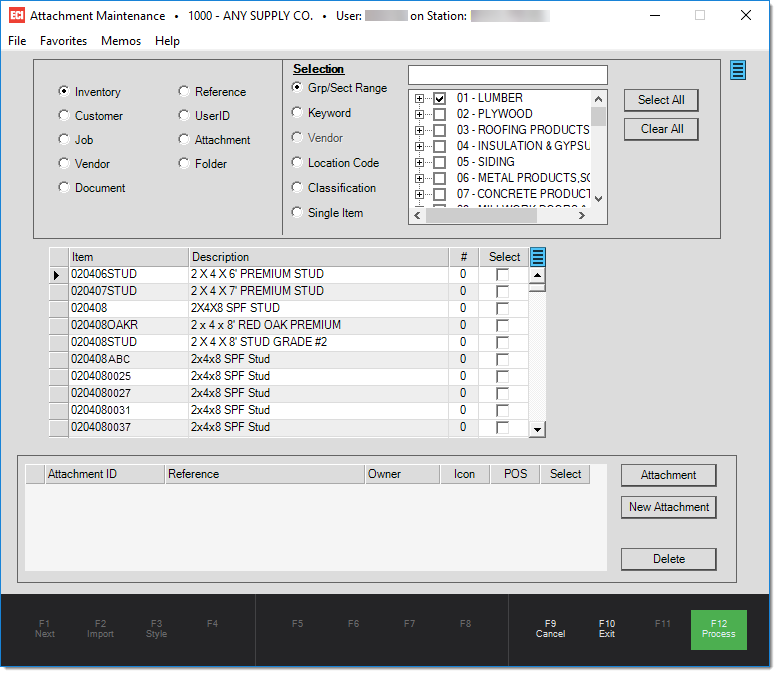
The Attachment Maintenance form is available from the Maintenance area's Utilities menu. This feature provides the ability to add, modify, and remove attachments for the various record types capable of maintaining attachments.
Attachments can be any Windows® compatible file. They can be associated with either a database record (item, customer, job, vendor, etc.)
This utility is provided as a way to (a) associate new or existing attachments with records, (b) remove attachments from records, or (c) make changes to existing attachments. For example, if there is a product data sheet that applies to an entire line of chemicals, a user could use this utility to quickly associate that document with the items in question instead of bringing up each item individually using a database function.
Attachment Types
Users can add, modify, or delete attachments based on either record type or the properties associated with the attachment. Begin by selecting a record type (inventory, customer, job, vendor, or document) or choose an attachment look-up method (reference, user ID, attachment, or folder) in the upper left-hand corner. Although, it's possible to have attachments linked with General Ledger accounts, we don't allow maintenance on them from this area since the content of any attachments may contain sensitive material.

Attachment Selection Options
The selection area to the right of the button choices (shown above) changes based on your choice. When choosing a record type (item, customer, or vendor), the appropriate selection tools will appear.
Inventory
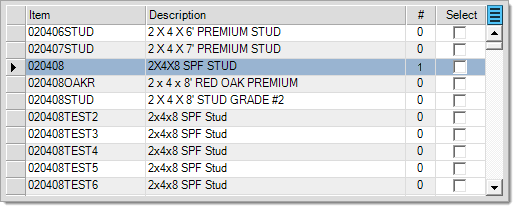
The inventory selection is used for attachment maintenance on items. Use the selection options, displayed on the right-hand panel, to build (create) a list of accounts. From this list, you can view which accounts have attachments and make changes or add new attachments to the customers listed. The selection methods offered are similar to those used with reports. For more specific information regarding Inventory (Item) selection options, please click here.
Inventory Selection OptionsSelection using inventory, primarily used with reporting, offers the following selection choices: group-section, keyword, location code, and classification. In some cases, vendor selection may also be allowed. Radio buttons determine which selection options are displayed in the area on the right-hand side of the panel. Depending upon where this panel is used, you may or may not be able to specify more than one selection choice. When more than one selection criteria has been selected, a check box is used to indicate which selection methods have been assigned values. 
Item Selection by Group Section Group/Section RangeGroups and sections are numeric values between 1 and 255 that are assigned text descriptions and used for inventory organization. Your company can define up to 255 product groups. Within each group, your company can also define up to 255 sections. This provides many different group and section combinations. Groups and sections are required. In most cases, the structure of the groups and sections has already been established prior to using the software. This organization might have originated outside your company to coincide with a primary supplier's structure or it might just have been some logical order your company came up with at some point. Groups and sections are listed in what's referred to as a "tree." The tree is comprised of "nodes" and each node has an associated check box. There are two levels of nodes. The first level are nodes that indicate your company's product groups. The second level are nodes indicating sections within each product group. Product group nodes within the tree are expanded by clicking the "+" to the left of the node or group's description. Doing this displays the next level of nodes which are used to list the product sections assigned to the selected group. When a node is expanded, you can then click the "-" to hide that node's contents. Selections are made by checking the check box next to a node. Checking a group node selects all the section nodes within that group. Checking a section node in the second level, only selects that section. Group nodes with only some, but not all, sections selected display a check with a grey background color Two buttons are provided: Select All and Clear All. The "Select All" button selects (checks) all group and sections in the tree. The "Clear All" button clears all group and section selections in the tree. We should point out that selecting all groups and sections without any other selection criteria or conditions (such as reporting filters) will include your entire inventory which may return a significant quantity of data (items). Selections involving large quantities of items can produce warnings in some cases. The tree supports keyboard navigation. If you tab to the tree control using your keyboard, the up and down arrow keys can be used to navigate through the nodes. Nodes can be expanded or minimized (hidden) by using the right (expand) and left (close) arrow keys. Expanding and hiding (closing) only works on "group" nodes, however. Selection (checking the check boxes) is accomplished by pressing your keyboard's space bar in this case. An alternative to using the tree control is to type the group and sections using the text-area found above the panel containing the tree control. For example, if you type "01/01" and press the TAB key, the group 01 and section 01 (within that group) will be selected. Here are some examples to illustrate how keyboard selection works:
KeywordKeywords are one of the look up methods provided for item selection. It is best practice to use keywords that are more general than specific so that keywords reflect more general attributes describing a product. These are intended to be used for broader selection rather than specific item selection. For example, a keyword of Hammer would be more useful than a keyword matching the manufacturer's SKU since Hammer would apply to many items as opposed to just one. Keywords are associated with items from the Item Maintenance form's Common, Select tabs. 
Item Selection by Keyword Keyword selection allows you to choose between one and three keywords to match on. Matching has two variations: Contains All and Contains Any. The "Contains All" condition means that for items to be selected, they must be associated with all of the keyword selections made. For example, if you choose three keywords, only items that were associated with all three would be included in the selection. The "Contains Any" is less limiting and tends to return more results. When the "any" condition is applied, items only need to match one of the selections you have made. VendorVendor selection isn't provided in all areas, however, when it is permitted, it selects items with a primary vendor matching the selection. Alternate selection is provided matching on the vendor's name or company name. Type in the name prior to choosing alternate selection methods from the context menu (usually a right-click). 
Item Selection by Vendor Location CodeLocation codes are similar to keyword selection in function; however, location codes are used for indicating where a product can be found. Items are limited to a maximum of three location assignments. Each location is a code with an associated description. You can define the Location Codes in either the Item Maintenance form or the Codes Definition form (Inventory > Database > Code Definition). 
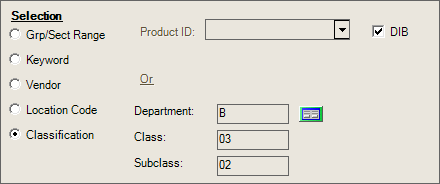
Item Selection by Location Location selection allows you to choose between one and three locations to match on or a range of location codes in certain cases. Matching has two variations: Contains All and Contains Any. The "Contains All" condition means that for items to be selected, they must be associated with all of the location selections made. For example, if you chose three locations, only items that were associated with all three would be included in the selection. The "Contains Any" is less limiting and tends to return more results. When the "any" condition is applied, items only need to match one of the selections you have made. If selection is permitted using a range (not available in all cases), use the text areas near the top of the panel to designate a valid range of location codes. The range must be done in numeric-alphabetical ascending order with the lower (lesser) range in the left-hand text area and the higher (upper) range in the right-hand text area. Location codes can contain either letters or numbers as well as certain characters. Every character is assigned a specific ASCII order. This is important to understand especially if your company's location codes are all numeric. Numeric codes are not ordered based on numeric value, but are treated as text instead. Just as how words would be alphabetized, the character value of the "numbers" are grouped in reading order (from left-to-right) to determine placement. The following is an example of a list of numbers ordered by text value (ASCII order): 00000123 00065 1 1005884 1005886 305 3899841 99 If your company does only use numbers for codes, it's a good idea to keep the overall length of the location code consistent (consider padding codes with zeros to keep the length constant). Note: selection is permitted either by range or specified location codes, not both. Classification (Merchandising)The classification selection allows you to select items based on their merchandising classification settings (Class, Department, and Fineline) found in Item Maintenance or the Product ID assigned to the item(s). Product ID is either a self-determined organizational structure or it can originate with a supplier such as Do it Best Corp. Use the DIB check box to indicate that product ID selection is to be done using Do it Best Corp. classification product IDs instead of a self-determined structure. For more information about Product ID or merchandising classifications, search for these items in the Help System.
When you enable True Value EDI settings for your branch location, the application represents the merchandising (classification) codes differently and provide a tree-based selection option (accessed from the Maintenance Settings
Single ItemThis option is only provided in the Post Physical Counts utility (Inventory > Utilities > Updates > Post Physical Counts). Enter, scan, or select the item for selection from the drop-down list. The selected item's description will be listed below. 
Item Selection by Single Item |

Choose Process (F12) to populate the middle grid with any records matching the selected criteria.
Customer
This option is provided for maintenance on attachments associated with (customer) accounts. Use the selection options, displayed on the right-hand panel, to build (create) a list of accounts. From this list, you can view which accounts have attachments and make changes or add new attachments to the customers listed. The selection methods offered are the same as those used with reports. For more specific information regarding Account (Customer) selection options, please click here.
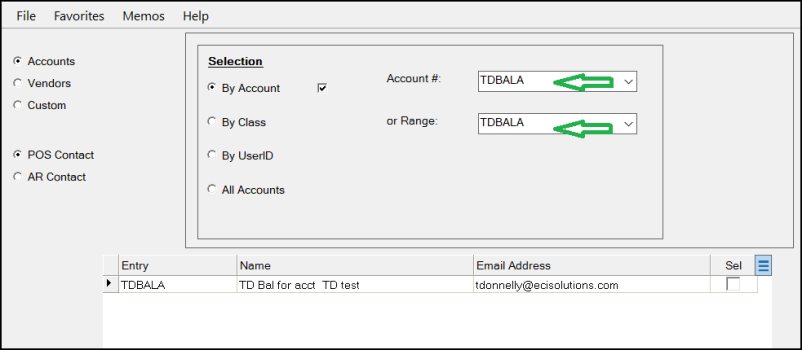
Selecting Account(s)The account-job selection panel typically offers four radio buttons: By Account, By Class, By UserID, and All Accounts. You can select more than one check box at the same time to collect a smaller list of results. When you specify criteria for any of the four selection options, a check box For example, when you select the By Account radio button, the application displays the fields for specifying an account number or range.
By AccountSelect this option to choose either a single account or a range of accounts. If you want to limit the report to a specific job and account, use the "Job #" option instead. Account selection should either be done either from this option (By Account) or from the "Job #" option, not both. Accounts are selected based on the alpha-numeric values of the account identifier in ascending order. Some companies may use numeric account numbers; however, regardless of whether the actual account is numeric or not, the value is always treated as alpha-numeric (because alpha characters are allowed whether your company uses them or not). For this reason, accounts are always sorted "alphabetically" rather than numerically (the left-most character position is sorted first followed by the next position moving from left to right). For example, if you enter a starting range of "1" and an ending range of "1999," any accounts beginning with a digit other than "1" will not be included (the values: 2, 30, and "000722" would not be part of the selection even though they would fall numerically within the range).* ")
*For this reason, we strongly advise that account numbers be the same length in characters and if numeric values are being used, we advise padding any numbers with leading zeros (on the left) such as "000089" instead of "89" to maintain a consistent length and to force accounts to be sorted the same as their numeric sort order would indicate. For ranges, the upper text area (drop down) is the lower range value and the bottom area is for the upper or higher range value (in ascending order 0-9, A-Z). The form won't allow you to enter an invalid range. Additionally, it is not possible to specify an upper (bottom) range without also a lower (top) range. To send an E-Blast to a single account, enter/choose the same account number in the Account # list as in the or Range list.
By ClassClass selection may also be used to build a list of customer accounts for reporting and other purposes. One customer class code may be selected from the drop down. Classes can be used for grouping certain types of customers together. Customer class is an optional classification tool that may be used along with accounts. This feature involves defining codes that maintain a description and then assigning them to customer accounts (jobs don't have a class code assigned to them). If you add selection criteria based on customer class, only accounts assigned to that class code will be included in the selection. 
By UserIDThe "By UserID" selection option only includes accounts where the "assigned" sales person (Account Maintenance, Codes tab, Salesperson field) matches your selection. An option (check box) for "Current User ID" is also provided. 
All AccountsThe All Accounts option allows you to collect the data you need by account type (Cash-only, Charge, Retail* and/or Rent to Own*). Users can check one or more when using account type as a selection method. Due to the nature of this option, the application returns a large number of account records if you use it on its own, so it is best to only use this selection with one of the other three options. *Note that the "Retail (Revolving Charge) and Rent to Own (Hire Purchase)" options will only be visible if those features are turned on in Parameters. The "Rent to Own" terminology is customizable, therefore your captions may differ from what is shown in the example below. 
|

Choose Process (F12) to populate the middle grid with any records matching the selected criteria.
Job
The job selection is used for maintenance on attachments for the jobs associated with a given account. This involves selecting an individual account using the "account" drop down control. Since job selection only offers and requires a single parameter, the grid (middle) is immediately populated with all of the jobs for the selected customer.

Job Selection by Account
Choose Process (F12) to populate the middle grid with any records matching the selected criteria.
Vendor
This selection is used for maintenance of attachments associated with vendors. Selection options are the same as those used with many reports. To display more specific information regarding Vendor selection options, please click here.
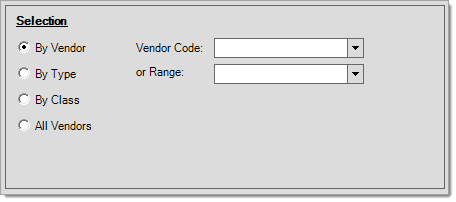
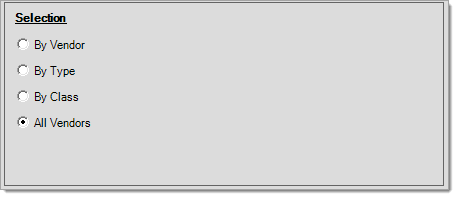
Selecting VendorsThis control, primarily used with reporting, provides several options for vendor selection. Currently, four options, selected by using the radio buttons, are provided: vendor (or range), type, class, and all vendors. The current selection determines which fields are displayed in the area of the panel to the right. For example, when the "By Vendor" radio button is the active selection, fields for specifying an vendor code or range of codes are shown.
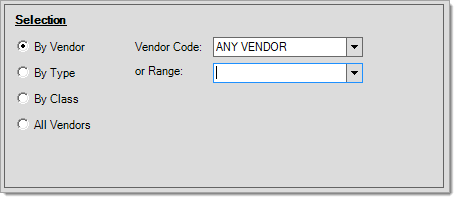
By VendorVendors may be selected individually by specifying or selecting the vendor's code in the upper text-area. It's also possible to specify a range of vendors. The range is defined by the values in both the upper and lower text areas (drop downs). The lower value must be specified in the upper text area ("Vendor Code") and the higher value in the lower text area ("or Range"). Ranges will include any vendors that fall within the listing of vendors sorted alpha-numerically in ascending order (0-9, A-Z) between the two values.
Use the alternate menu to select a vendor by the name or company instead of the code in either text area.
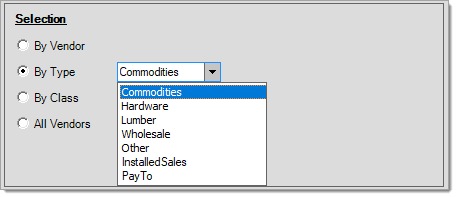
By TypeThere are preset types that may be assigned to vendors for classification reasons. A few, if used, such as "pay to" and "installed sales" are used to either filter out or include the vendor in certain areas of the software; however, most are just provided for your own classification reasons and are not required.
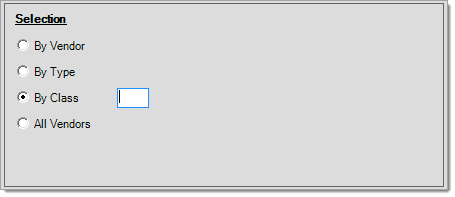
By ClassClass is another optional classification tool provided for vendors. In this case, there are no pre-defined values, so your company would decide whether or not and in which way these would be implemented.
All VendorsThe "all vendors" radio button will include all vendor records in the selection. Depending upon the number of vendors your company uses, this may be a significant number of records.
|

Choose Process (F12) to populate the middle grid with any records matching the selected criteria.
Document
Document selection can be done for all documents or by document type. A date range can be specified or selected using the preset date options found by clicking on the ![]() icon. Specifying a date range (or other criteria) is strongly suggested because the application database will maintain a very large library of documents the longer the application is actively used. Users can also designate a specific user ID or reference (part of the document description) to narrow down the selection even more. Existing document attachments can originate from either this form, transaction processing (using the Document tab in Folders to associate attachments), or the Document form (used for viewing documents).
icon. Specifying a date range (or other criteria) is strongly suggested because the application database will maintain a very large library of documents the longer the application is actively used. Users can also designate a specific user ID or reference (part of the document description) to narrow down the selection even more. Existing document attachments can originate from either this form, transaction processing (using the Document tab in Folders to associate attachments), or the Document form (used for viewing documents).
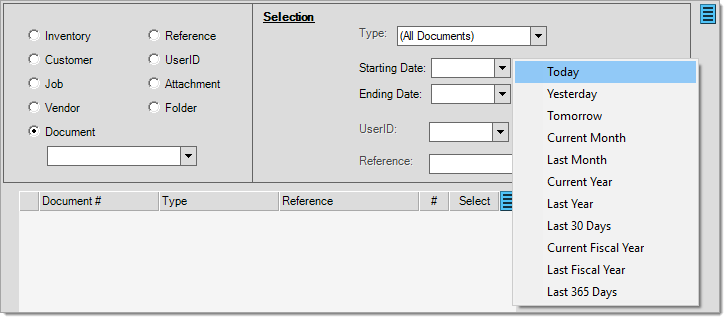
Type
All documents are assigned a type. In some cases, such as with Point of Sale payments and payouts, a single document type may represent variations on the same transaction (received on account vs. order deposits, for example). In these cases the "reference" can sometimes be used to retrieve the particular document variation you want (if needed).
Starting Date
The beginning date in the range. Dates can be set manually by using the calendar control or by choosing a preset from the context marker ![]() . When preset dates are chosen, the date selection will be listed in green text and the date will be read-only. To change the date in this case, you must deselect any preset date selections previously made.
. When preset dates are chosen, the date selection will be listed in green text and the date will be read-only. To change the date in this case, you must deselect any preset date selections previously made.
Ending Date
The ending date in the range. Dates can be set manually by using the calendar control or by choosing a preset from the context marker ![]() . When preset dates are chosen, the date selection will be listed in green text and the date will be read-only. To change the date in this case, you must deselect any preset date selections previously made.
. When preset dates are chosen, the date selection will be listed in green text and the date will be read-only. To change the date in this case, you must deselect any preset date selections previously made.
User ID
Documents have at least one user associated with them. This user identifies who created or last modified the particular document. In many cases, the same or additional users are linked with the data "behind" the document (invoice data, for example). For attachments, we are only considering users who are associated with the document data and not those associated with data linked to the document.
Reference (Document)
The reference assigned to documents will vary based on the type of document. References are automatically set when a document is created. References may include a document, customer's account, vendor code or other information, for example. The reference text you enter will produce matches regardless of where in the reference it appears. For example, to find documents including a reference to customer order 1412-C19999, you could put the text C19999 in the reference text area. Below are some common "wild card" search patterns for various document types:
|
Document Type |
Reference using Wild card* |
Description |
|
PS Cash Payments |
ROA |
Only returns Payments that were "Received on Account" types. |
|
PS Cash Payments |
DEPOSIT |
Only returns Payments that were Order and Direct Order deposits. |
|
PS Cash Payments |
DIRECT ORDER |
Only returns Payments that were Direct Order deposits. |
|
PS Cash Payments |
CUSTOMER ORDER |
Only returns Payments that were Customer Order deposits (no directs). |
|
PS Cash Payments |
GIFT |
Only returns Payments that were "Add to Gift Cards" types. |
|
PS Cash Payments |
COD |
Only returns Payments that were applied to C.O.D. (Cash on Delivery) sales. |
|
PS Cash Payments |
INSTALLED |
Only returns Payments that were made against an Installed Sale Contract. |
|
PS Cash Payments |
REBATE |
Only returns Payments that were received toward vendor rebates. |
|
PS Cash Payments |
MSCPMT |
Only returns Payments processed using the Miscellaneous type. |
|
PS Cash Payouts |
DEPREF |
Only returns Payouts that involved Customer Order deposit refunds. |
|
PS Cash Payouts |
DIRECTREF |
Only returns Payouts that involved Direct Ship Order deposit refunds. |
|
PS Cash Payouts |
CHECK |
Only returns Payouts that involved check cashing. |
|
PS Cash Payouts |
MISC or PAYOUT |
Only returns Payouts that were for Petty Cash. |
*These document reference "wild cards" can be typed using either upper or lower-case letters.
The references on most other Point of Sale documents include the customer's account code (ID), so this could be used for wild card selection. Purchasing documents typically use the vendor's code as the reference.
Choose Process (F12) to populate the middle grid with any records matching the selected criteria.
Reference
This "reference" refers to the reference assigned to the attachment. References are initially set when the attachment is added, but can be modified later. How well "reference" will work for attachment selection will depend upon how descriptive and consistent users are when creating a reference. For example, you could use this to find attachments with references including the word "directions" or any other text. Only valid attachments are returned... meaning that attachments which are no longer linked to valid data (items, jobs, vendors, etc.) are not included in the selection.
 Reference")
Selection by (Attachment) Reference
Reference Contains
This indicates the text to search attachment references for. The search is not case sensitive; however, if you enter multiple words, they are considered as an entire phrase, so each word is not independently matched.
Type
This drop down control can be used to limit the attachment selection to a particular type. Types include: windows file, map link, and web address. Type selection is not required and no selection indicates that the selection will include all types.
Not in Use
When checked, the selection will include file type attachments that have an invalid image ID (linking to the attachment's database). It would not necessarily include stranded attachments that are linked with application data records (items, jobs, etc.) that no longer exist.
Choose Process (F12) to populate the middle grid with any records matching the selected criteria.
User ID
Users, and sometimes user groups, are associated with attachments. The user is either the user who created the attachment, or if you are choosing a user group, the user group assigned to the attachment. In this case, users linked to the data (document, customer, job, vendor, etc.) is not being considered. Only valid attachments are returned... meaning that attachments which are no longer linked to valid data (items, jobs, vendors, etc.) are not included in the selection. Selection is permitted by either User ID or User Group, not both.

Attachment Maintenance by User
UserID
Type the user ID, if known, or use the drop down to select a user. Alternate selection can be done by "last name" if needed.
User Group
Type in the user group name, if known, or use the drop down to select a group. User Groups (aka. Message Group) can be defined from the
Not in Use
When checked, the selection will include file type attachments that have an invalid image ID (linking to the attachment's database). It would not necessarily include stranded attachments that are linked with application data records (items, jobs, etc.) that no longer exist.
Attachment
This option allows the selection of an attachment by the ID (identity) of the record. The ID is a unique integer (numeric) value assigned when the attachment was initially added to the database table. This can easily be confused with the "ID" column shown in the middle grid when certain types of attachment selections include a variety of data types (a mix of attachments, some for items, some for customers, etc.). The numeric attachment ID is listed when viewing the list of attachments (bottom grid) after you select a record with attachments from the middle grid. Only valid attachments (attachments currently linked with valid data) are returned.
Folder
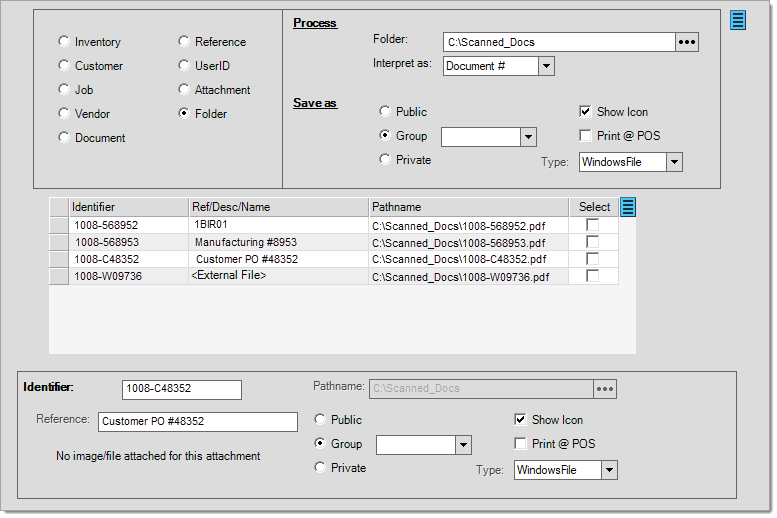
The folder option is a bit different from the other selection options. The Folder radio button allows you to quickly add attachments from files that are all located in the same folder. The files are typically scanned documents. The file names must match actual records for your selected record type (document, item, bar code, account, or vendor code). Processing adds the files as attachments if records matching the file names are located.

Attachment Maintenance by Folder
Here is a specific and step-by-step explanation of how you would add scanned documents as attachments:
1.Create or designate an existing folder on the PC or a network share location for saving scanned documents.
2.Add scanned images of documents to the folder. The file names must match with an existing application document ID (see the examples below):
1101-C40152.JPG
1012-015842.TIF
The file extensions can be any valid Windows® file type (images, documents, etc.).*
*Remember, for a user to be able to access attachments locally (on their PC, station, etc.), their device must have the software required to open the particular file type. For example, users who don't have Microsoft® Excel® software installed, may not be able to open an Excel spreadsheet.
3.After adding some files to the folder, go to Maintenance, choose Utilities and select Attachment Maintenance.
4.Click the  Folder radio button.
5.Use the browse button (...) to choose the Folder on your PC or network share containing the scanned images.
6.Make sure that "Document #" appears in the "Interpret as" drop down control (document is the default).
7.Choose whether the attachments should be public, assigned to a group, or private (same user only).
8.If desired, modify the Show Icon or Print @ POS check boxes.
9.The "Type" should be left as WindowsFile.
10. Choose Process (F12) to populate the grid with any files that match an existing document.
11. To add the files as attachments, check the check boxes for each row you want to add as a new attachment. The menu marker may be used to "select all."
12. Press the Insert button.
13. The files should now appear as attachments for the related documents.
Some Points about Folder Attachments
✓Attachments are maintained as image data in a separate SQL database... not the folder you designate. The folder location is not saved nor is it used to retrieve the attachments once they've been added.
✓Adding the same file as an attachment does not replace any prior attachment (even if the file name matches), it creates a new one. Any given document (or other record) may have an unlimited number of attachments... the folder option does not have a way of distinguishing between one or the other.
✓Files are not removed from the designated folder location (you may want to either remove or move the files elsewhere after attaching to avoid duplicates in case the folder location is used again).
✓References (attachment descriptions) default to the reference associated with the document (or description of the item, customer, etc. when linking folder-based files to other types of records), but can be modified before adding the attachments.
Viewing and Modifying Attachments
Once selections have been made, use the Process (F12) function to populate the grid with matching records, documents, or attachments. The grid can be used to select the records, documents, or attachments for updating. When updating attachments, the user is really modifying the attachment, not the records associated with the attachment. This might be done to update an exist product safety sheet or customer directions, for example. With a record, such as an item, customer account, or vendor, the user can associate a new or existing attachment with items in the grid or modify an existing attachment.
When attachments list in the grid, users double click on the record with an attachment to move the attachment to the lower grid where changes may be made. Note: checking the "select" check box in the grid is not considered the same as row selection in some cases and will not display attachments in the lower grid area.

Use the "New Attachment" button to select a new Windows file for use as an attachment. Use the "Attachment" button to make changes to an existing attachment (one that's already been selected in the lower grid). When either button is used, some changes to the form occur:

Change any attachment settings as needed then click Update to save the modifications. The Cancel button can be used to leave the attachment unchanged.
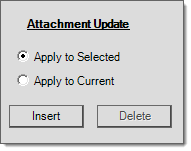
When attachments are added or modified and the changes should be applied to records in the grid, use the Attachment Update area of the form. If an existing attachment is just being modified and no changes are being made to which items the attachment is associated with, there is no need to use these functions. Choose either Insert or Delete to associate (add) or remove the selected attachment for the selected records.