Open Item vs. Balance Forward Posting Types
How your customers pay your bills is defined by the way their payments are posted to the account. The posting process varies based upon the type of account. Accounts can be assigned a "posting type" of either Balance Forward or Open Item. You cannot change an account from a Balance Forward to Open Item after the account becomes active.
-
For Open Item accounts, the application posts payments/credits to specific invoices.
-
For Balance Forward accounts, the application applies payments/credits to the overall account balance the customer owes.
For details regarding the differences between statement documents for the various account types and options, please refer to the Special Topic titled Billing and Statements.
Choosing a Posting Type for an Account
You don't have to apply the same posting settings to all of your accounts, and most companies choose an account's posting type by considering their own needs and the needs of their customers. You may prefer the Balance Forward posting type because it is simpler and more consistent from a processing standpoint; however, there are going to be customers who require or request one method vs. the other. For example, government agencies typically remit payment by invoice and want to see their billing reflect that. Even if the majority of your customers pay by balance, there are often exceptions. As a rule, Balance Forward accounts are less time-intensive, not as complicated, and easier to manage. Since the Open Item customer remits payments by specific invoice, this type of posting involves more manual entry and time on the part of Receivables staff, but may be required for some customers.
How Billing Level Affects Posting
Another variation in posting has to do with the customer's Billing Level. There are two billing level types: Account and Job. When you set up a customer with Job billing, the application treats each job the account adds as an independent account when applying credits and payments, so as they are paid by their clients, they can remit payment to those specific jobs. Accounts with Job Billing levels can also choose a "consolidated" posting option, which allows them to apply payments across jobs. If a customer prefers to remit separate payments by job, the Job billing level works well (in most cases, you can still apply payments across jobs using the "consolidated" option when needed).
Open Item Posting
After you use the Payment Entry process to record the account's incoming receivables, you can post them in the Posting Payments form.
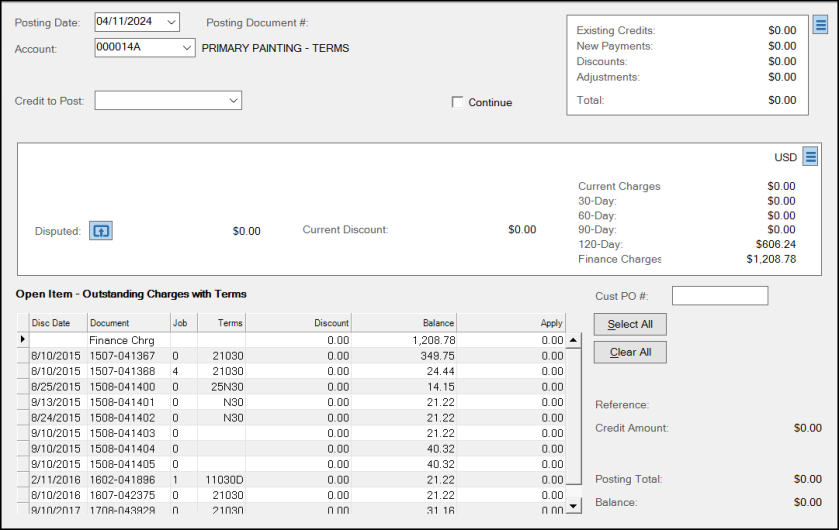
To post credits or payments for an Open Item account (from the Main Menu, choose Receivables > Posting > Posting Payments form), choose the account from the Account list to display the outstanding charges and terms currently associated with the account. When the account is job billed, the Job list also displays so you can apply credits to the job.
Note: We are using the term "credits" to refer to credits, payments, memos, and adjustments that may apply to the account that displays.
From here, you can select see the entered payments and credits in the Credit to Post list.
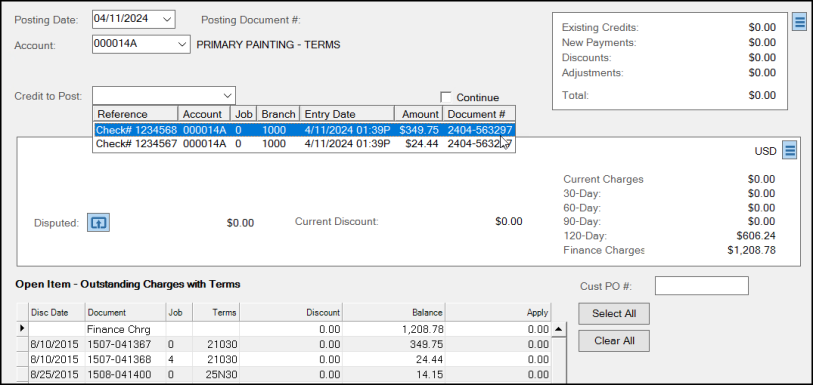
If the account is job-billed, this form has a Consolidated check box you can use to apply credits/payments across jobs. If the same account has more than one credit to post, you can retain the same account, account-job, and consolidated selections between postings by checking the Continue check box. When you select Continue, the form will reset to the prior account, job, and consolidated selections and place the user in the credit selection drop down. This Continue option is not available for Balance Forward accounts, since all credits are displayed at once and apply to the entire account.
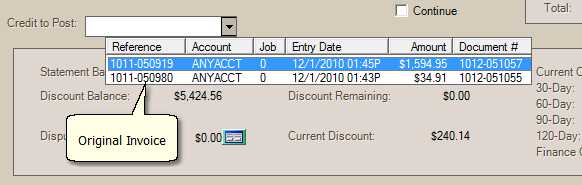
If any credit memos were processed and an "original invoice" was selected, the "Document #" of the "original invoice" is displayed as the memo's reference. Memos without an "original invoice" as well as payments and adjustments will not list a document (these may list a reference if processed via Charge Returns and one was entered).
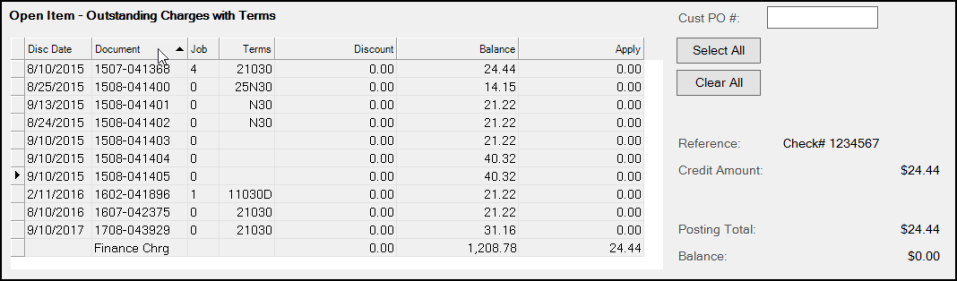
Once a credit item has been selected for posting, the user can either (1) manually specify the amounts they want to apply or (2) choose the Select All (ALT-S) button to distribute the payment (credit) beginning with the oldest debit. Use the Clear All (ALT-C) button to revert all apply amounts back to zero.
Open Item accounts display outstanding charges (debits) in the grid near the bottom of the screen (located under the heading Open Item - Outstanding Charges).
These are initially sorted by the type of debit in the following order (from top to bottom):
1.Finance Charges
2.Invoices
3.Debit Adjustments (includes Installed Sale billing)
Just as with other types of grids, you can change the sorting order either temporarily or permanently. To temporarily sort the open items, just click on the column heading cell for the column you want to sort by. The first time you click on the heading cell, all rows will be sorted in descending (highest to lowest) order based upon the values in that column. If you click again on the same heading cell, the rows are resorted in ascending order (lowest to highest). While a temporary sort is being done, no changes can be made. Press the ESC (Escape) key to clear the temporary sort. This returns the grid to it's original sort order and allows you to once again make changes.
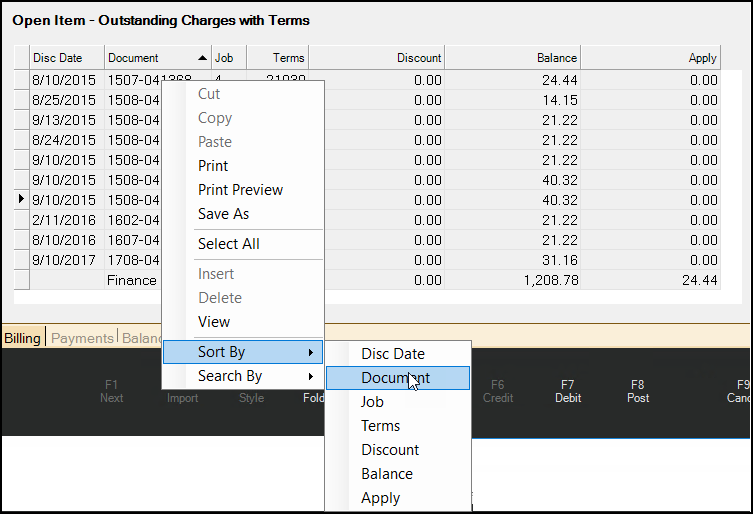
To permanently sort the entries in the data grid, right-click the data grid and choose the Sort By option. Then choose the sort criteria you want the form to use permanently (Disc Date, Document, Job #, etc.) to make the sort change. You can change the permanent sort again using the same instructions.
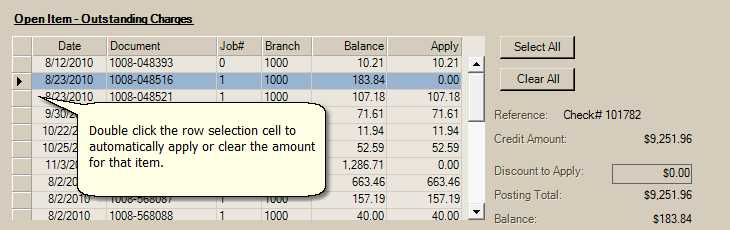
Hint! When you apply credits to an Open Item account, you can double-click the row to apply the available amount of the selected credit instead of typing in the amount manually. This can also be done again to clear the item's apply amount back to zero.
When you are ready to finalize the way the credit item has been applied to debits (charges, etc.), select or press the Post (F8) function.
Balance Forward Posting
As previously stated, a "balance forward" customer pays by balance not individual invoices. Credits are usually applied to finance charges first then the customer's oldest balances. Due to the nature of balance forward accounts, it is usually not necessary to manually post credits. We suggest using the "Post All Credits" feature with balance forward accounts to make management easier.
Balance Forward accounts do not display open debit items (charges, etc.) nor is there a drop down selection for credits as there is with "open item" type accounts. Instead, all open credits appear in the grid near the bottom of the screen under the heading Balance Forward - Open Credits.

Balance Forward Posting Detail
There are a few ways to select payments to post. Use the Select All (ALT-S) and Clear All (ALT-C) buttons to either select or clear the entire list of open credits. Double click on the selected grid item to select or clear that item, or click in the check box in the Post column (use the space bar as a keyboard shortcut).
Once you are ready to apply the selected credits, press or select the Post (F8) function.
Discounts and Balance Forward Accounts
The following explains the logic behind whether or not the software automatically populates the "Discount to Apply" amount for a balance forward account:
When rows are either selected or deselected, the software calculates a total for the discountable credits. Discountable credits are payments, credit memos, and adjustments that fall within the discount period. If you have set a grace period (parameter), the posting or entry date of payments is adjusted by subtracting the number of days grace period. For example, if the posting (or entry) date of the payment is 5/14/2025 and the grace period is seven (7) days, the adjusted date would be 5/7/2020. If your company's discount date is the tenth (10th) of the month, this example's payment would be considered "discountable" and included in the discountable total. Grace period is only used to adjust payments, not credit memos or adjustments.
If credit memos and adjustments are included and selected for posting, but they were entered after the discount date, you can still force a discount by changing the "Posting Date" in the form relative to your company's discount date.
The total is based on either the selected posting date (form) or the date of the selected credits whichever is the earliest. Finally, this figure plus the remaining statement discount (not yet applied) is compared to the sum of the customer's balances plus finance charges. The remaining discount plus the discountable must be equal to or greater than the balances for the discount to be automatically applied.
It's important to note that you can always force a discount, even one that is greater than the customer's remaining statement and current discount if you choose.
Finance Charges
If your company has enabled (checked) the "pay finance charges" first parameter and the balance forward customer has a finance charge balance, the "ToFinanceChrgs" text area will automatically populate with an amount. If the posting total is greater than the finance charge balance, the total of the finance charges due populates the "to finance charges" text area. If the finance charge balance due is greater than the posting total, the finance charge amount to apply is adjusted to match the posting total. Once any amount has been set in the "to finance charges" text area, no further automatic adjustments are made.
The software will prevent users from Posting payments if the finance charge to apply amount is greater than the total finance charges due for the account. Additionally, a warning is provided whenever the Posting user overrides the amount manually.

Task List