This topic explains how ACE Rewards® has been implemented for use with the software. ACE Rewards is a loyalty program offered by ACE Hardware Corporation. Similar to other types of loyalty programs, customers are assigned a unique ID and given a corresponding card, key tag, etc. Membership in the rewards program offers a number of benefits including the following which are now implemented in the application:
-
Rewards Points - Customers earn points based on their purchases and certain other activities (referrals, sign-up, etc.). The application tracks and transmits ACE Rewards data to ACE Hardware Corporation on a daily basis. Earned points are redeemed in the form of coupons.
-
Dynamic Promotions (Coupons) – Special pricing for rewards members based on either a dollar or percentage discount amount. We support seven (7) types of dynamic promotions: 2, 3, 4, 6, 7, 9, and 10 (described in more detail later). Dynamic promotions be based on either a minimum overall purchase requirement, item-specific for the highest priced eligible item (up to a “maximum” dollar amount), or a free gift card based on the purchase of specific items. Additional types will be added in the future. Items can only have one dynamic promotion applied at a time during a sale (including Instant Savings).
-
Instant Savings (Immediate Rebates) – Instant rebates applied at Point of Sale. The dealer is reimbursed for these.
Benefits are managed by the use of several new special item types which are linked to promotional and instant savings data received from ACE Hardware Corporation. Items used with the ACE Rewards program are loaded initially by support personnel and are maintained by EDI (Electronic Data Interchange) processing. This additional data is retrieved along with price change (“Hotsheet”) data. Point of Sale data is also sent via EDI to ACE Hardware on a daily (nightly) basis.
Additional benefit types, such as Buy-One, Get One Free (BOGO) and Buy-One, Get-Another (BOGA) will be implemented in the future.
In addition to benefits, implementation in the software allows Point of Sale users to do the following:
-
Sign-up customers for ACE Rewards membership at Point of Sale.
-
Automatically prompt for the customer's rewards ID at the beginning and/or end of a transaction. A customer’s rewards can also be applied at any time during processing.
-
Look up a customer’s membership ID using either their phone number or name (first and/or last). Look-up can be done for local or national members.
-
Allows custom changes to certain types of promotions using the Price Changes area. A dealer may extend or limit promotion dates, determine which items are eligible for a promotion (based on pricing, item type, etc.), and enable/disable a promotion.
-
Send Point of Sale data to ACE Hardware on a daily basis.
Some connectivity is directly established between the application, services, and database and ACE Hardware Corporation web services. Hotsheet data, which includes some rewards related data, does require that MoveitFreely software be installed on any client (PC, etc.) that will do EDI processing.
The ACE Rewards program is portable (can be used at any participating dealer); however, members are linked with a “home” store and some benefits are intended to be store-specific. ACE Rewards is a paid feature, so if you are interested in offering it to your customers, reach out to your After Market Sales Manager for more details.
ACE Reward Requirements
The ACE Rewards integration will be available to any current or new users who are ACE Hardware dealers. Use of EDI (Electronic Data Interchange) is required for retrieval of Hotsheet data and the Point of Sale nightly data submission. There is an initial setup fee for ACE Rewards implementation as well as ongoing maintenance. This is in addition to usual EDI setup fees and normal monthly maintenance for EDI which still apply regardless of whether ACE Rewards is used.
Setting Up ACE Rewards
Assuming that EDI for ACE Hardware is already in place, ECI Support staff must enable the ACE Rewards option and configure the web services parameters for your company's use. Typically, a company also has to apply for participation in the ACE Rewards program and be approved by ACE Hardware Corporation first. After parameters have been set, the remaining rewards setup is done in the Branch Setup form. These settings are required for each branch that participates in the ACE Rewards program.
Note: If you are going to select the Type 10 Pricing Default Type, you should use these links to create the Type 10 Giftcard SKU and the Type 10 Offset SKU before you get started.
To set up a branch for ACE Rewards program:
1. From the Main Menu, choose Maintenance > Database > Branches. The Branch Setup form displays.
2. From the Branch ID list, choose the branch you want to add the ACE Rewards settings to and press Enter.
3. At the bottom of the form, choose the EDI tab.
4. From the Settings for list, choose the ACE EDI interface.
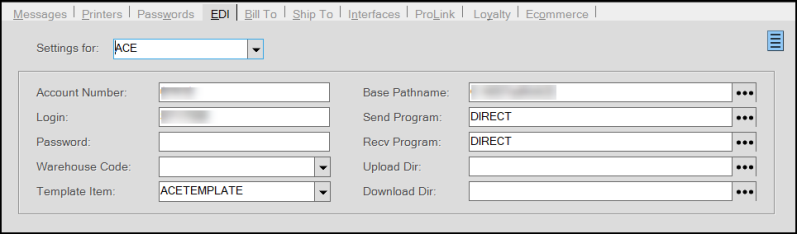
Each branch (store) will typically have its own settings for EDI processing.
ACE Hardware Corporation EDI settings must have previously been enabled for “ACE” to be listed.
5. Click the Menu Marker  to display the context menu and choose ACE Rewards from the list.
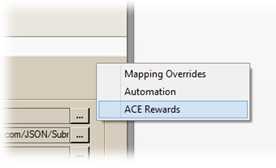
The ACE Rewards EDI Settings options display.
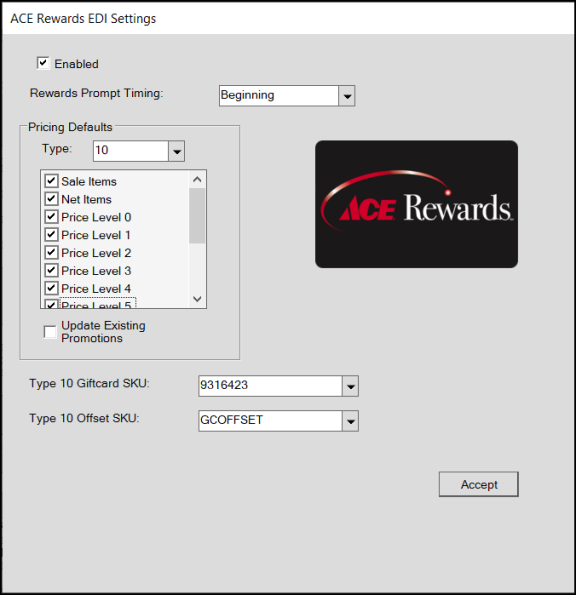
5. Select (check) the Enabled box to turn on the ACE Rewards feature.
ACE Rewards are activated independently for specific branch (Store) locations and the settings for each location can vary.
6. To define when the application should display the prompt for the customer's ACE Rewards ID during a Sale transaction, choose the Rewards Prompt Timing list option that works for you. Cashiers can display the ACE Rewards prompt at any time by selecting <CTRL R> in the Sale Entry form.
-
Beginning and End – The Cashier will be prompted for the ACE Rewards ID when beginning a transaction and when processing (finalizing) the sale.
-
Beginning – The Cashier will only be prompted for the ACE Rewards ID when beginning a new transaction.
-
End – The Cashier will only be prompted for the ACE Rewards ID after choosing Process (F12) to complete the transaction.
-
Never – The application will not prompt the Cashier to request the ACE Rewards ID during the transaction.
7. From the Pricing Defaults Type list, choose the promotions you support from the list below (to allow or exclude promotions). As you select the type option, the list of transaction types and price levels may update to reflect the change. You can update these settings by selecting or unselecting particular check boxes before processing.
-
Type 2
This type of promotion allows the customer to buy "n" or more of a particular item for "$p" each.
For example, “Buy 10 sodas or more items for $1 each.” Promotions won't be applied if the customer does not buy the threshold number of the items. -
Type 3
This type of promotion allows the customer to buy "x" and get "y" for free or for a discounted price.
For example, “Buy four chairs and get a table for 1/2 off.” Promotions won't be applied if the customer does not buy the items specified. -
Type 4
This type of promotion allows the customer to use a coupon to buy 1 "x" for $p.
For example, “Use your coupon to get $5 off a pair of leather gloves.” Promotions won't be applied if the customer does not have a coupon or does not buy the items specified. -
Type 6
This type of promotion is for either a set dollar or percentage amount that may be applied to a single item up to a maximum retail amount. It is applied to the highest priced eligible item in the transaction. For example, “save 10% on the highest priced eligible item up to $100.” Select the pricing types that your company supports for type 6 dynamic promotions. Promotions won't be applied if the customer price reason doesn't match a selected type. Preferences are the defaults for new promotions. -
Type 7
This type of promotion is for either a set dollar or percentage amount that may be applied to the total for all eligible items in the transaction as long as the minimum purchase requirement has been met. For example, “save 10% on your next purchase of $50 or more.” Select the pricing types that your company supports for type 7 dynamic promotions. Promotions won't be applied if the customer price reason doesn't match a selected type. Preferences are the defaults for new promotions. -
Type 9
This type of promotion allows the customer to receive Instant Savings.
For example, “Save $2 on a gallon of Ben Wah Multi-Surface Stain, limit two per customer.” Promotions won't be applied if the customer does not buy the items specified or attempts to apply the discount to more than two of the item. -
Type 10
This type of promotion adds a free gift card for eligible sales. Two additional fields are required for type 10 promotions: "Type 10 Giftcard SKU" and "Type 10 Offset SKU."
a. The gift card SKU should be set to ACE item #9316423, which should be assigned to the item type of Stored Value Card. This item should be non-taxable (N in the Taxable setting on the Common > Codes tab of the card's Item Maintenance form).
b. The offset SKU must be a Credit SKU item type that is marked as Taxable (Y on the Common > Codes tab of the card's Item Maintenance form).
8. Review the check boxes in this list to confirm which types of pricing the promotions work for your business. For example, this could be used to exclude “employee” pricing or “sale” prices from being eligible for ACE Rewards promotions (coupons). A check mark indicates that ACE Rewards promotions are allowed for the pricing type or level.
-
Sale Items - If checked, allows promotional coupons to be applied to items when pricing reflects a sale price.
-
Net Items - If checked, allows promotional coupons to be applied to items with a discount code of “N” (net).
-
Price Level (0-6) - Checks determine which item pricing levels allow promotional coupons. A company is not required to use all 7 levels.
-
Break Price - If checked, allows promotional coupons to be applied to items when pricing is the result of a volume discount.
-
Special Order - If checked, allows promotional coupons to be applied to special order items (renumbered or resale types).
-
Material Lists - If checked, allows promotional coupons to be applied to material lists (known as Bill of Materials (BOM)).
-
Contract Price – If checked, allows promotional pricing to be applied to items when the price was determined by contract pricing.
|
Please Note: Product Group pricing is affected as long as the product group price is mapped to a “price level” and not a discount. |
9. Consider whether you want to update existing ACE promotions, and select the Update Existing Promotions check box if you do.
10. If you selected the Type 10 Promotion type, make sure you choose the Type 10 Giftcard SKU and the Type 10 Offset SKU from the respective lists.
11. Review the entries in this box and choose Accept.
12. Choose Process (F12) to save these settings to the application.
13. When you are ready to submit rewards data to ACE, click the Menu Marker to display the context menu and choose Automation from the list. The AutoRun Schedule - ACE box displays.
14. In the Nightly Routines section, choose the POS Data Send check box and update the Daily Update Runs At field to 10:00 pm. Until this is done, your company won't receive credit for Instant Savings and your customer's rewards information won't be updated. ACE Hardware Corporation typically quarantines the first few files you submit until they have been reviewed. Certain time periods are blocked out by ACE.
Offering ACE Rewards at Point of Sale
A Point of Sale user (cashier) may be prompted to scan or enter a customer’s ACE Rewards ID number at the beginning or end of a transaction or they can press <CTRL-R> to initiate the ACE Rewards dialog at any time.

ACE Rewards Pop Up at Point of Sale
ACE Rewards cards include a barcode along with the customer’s rewards number. The barcode actually includes a total of 12-digits; however, the card only shows 11. The last digit isn’t typically shown in listings and the first digit is always 4 (not printed on the card). The software stores 11 digits and calculates the check digit for validation.
")
ACE Rewards Card (Back)
The form offers either three or four buttons depending on whether a rewards ID has already been associated with a transaction. The following buttons are always displayed: OK, Lookup, and Cancel. After a rewards ID has been associated, re-showing the form (CTRL-R) displays an additional “Update” button that allows updates to the member’s information. Cancel would be used in the event that the customer doesn’t have an ACE Rewards membership (and does not want to sign-up at the time) or if their rewards ID has been associated with their receivables (in-house) account. OK is used to accept the scanned or manually entered ACE Rewards ID number either (a) for an existing reward’s member or (b) when scanning a card for a new membership. Lookup is used to find a member’s ID if they don’t have their card, etc. (more about this on the following page(s)).
A few different things can happen when scanning or entering an ACE Rewards membership number:
-
The number is validated as an ACE Rewards card
-
The number is validated but the application requires some information to be updated.
-
The number is not validated and prompts the cashier to sign the member up.
If the user “Lookup” allows the sales clerk (cashier) to find a customer’s ACE Rewards number by using either their name or phone number. If the customer is an ACE Rewards member, but not for the local store, a “national” look-up is also provided.

ACE Rewards National Lookup Prompt
The upper panel, labeled “In Store Lookup,” only provides matches on the members associated with the current store. A cashier can use the customer’s phone number, first name, or last name to produce a list of matches in the drop down.
National Lookup uses the ACE Rewards web service to retrieve a customer’s information based on either the customer’s phone number or their first/last name and zip code. Partial matches for the name fields are accepted. First name is not required but will be used if supplied. If an exact match is found, the form will close and the member’s rewards ID will be displayed below the account label (see below).
A customer’s reward ID is listed below the account ID label on the Point of Sale, Sales form once scanned or when associated with their “house” account.
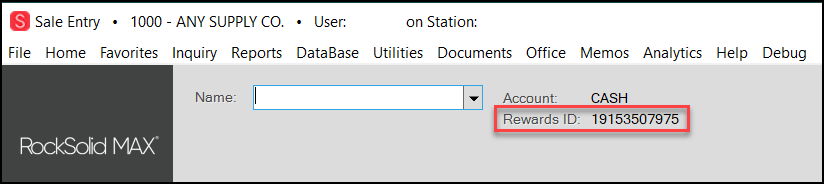
Rewards ID in Point of Sale
It is possible to clear the rewards and remove any promotions by right-clicking on the Rewards ID number and choosing Clear. Doing so will also remove any applied promotions automatically.
![]()
How Rewards are Applied at Point of Sale
There are several ways that rewards can be applied to products during a sale.* Some rewards are applied to specific items (such as Instant Savings), all eligible items, or one or more items meeting some type of criteria. Rewards are generally handled by the association of any of three special types of items with a transaction. These rewards items are listed along with the items being sold in the grid area and also on the invoice or cash ticket.
The three item types are listed below:
-
1.ACE Reward
-
2.ACE Instant Savings (Instant Rebate)
-
3.ACE Reward Credit SKU
Items are added to your inventory automatically during initial setup and are maintained going forward by Hotsheet EDI updates. The “item type” is set automatically and should not be changed. Additional types may be added in the future.
*We should point out that no ACE Rewards functionality exists with regard to non-sale transactions such as customer orders, quotes, direct ship orders, etc.
Item Entry and Data Grid
Some ACE Rewards, such as instant savings, are only applied after an ACE Rewards membership has been associated with the Sales transaction; others, may or may not require a membership depending upon the type of promotion.
Instant Savings (rebates) items automatically associate with their assigned item similar to how an “add-on” SKU would function. Upon entry, Instant Savings (IS) items are listed in the grid in the row immediately below their associated (trigger) SKU.
|
Material Lists and Other Special Item Types Instant savings are not applied to ANY items that are "hidden" (not visible in the data grid after entry). This would include items being sold as part of certain material list and tally types. Material list or tally types that add the items to the data grid would be eligible for Instant Savings or other promotions. Material lists themselves can be linked with Instant Savings when the promotion involves a "pack" type purchase. These don't occur often. If an Instant Savings promotion does involve a "package," you can define a new material list with a SKU that matches the ACE promotional SKU (the "trigger" SKU linked with the IS promotion). The promotion would be applied to the unit price of the material list in this case. Package type SKUs (material lists) are not added automatically via any EDI processing. New material lists would have to be created manually in these cases. |

When you add an item to the data grid for a customer that has ACE Rewards, Instant Savings items are automatically added to the data grid. If the clerk enters an item and a quantity and selects the Enter key, the cursor automatically drops to either:
(1) the Item column for a new (empty) row below the IS item or,
(2) to the quantity column for the existing item (row) immediately below the IS item’s row.

ACE Rewards Add-On and Item Entry
All other types of rewards and promotions are coupon-based. Coupons can be scanned or entered (using the digits below the barcode). To manually type the number in, enter the digits below the barcode in the item text-area and then choose “barcode” from the alternate menu (usually a right-click). As an alternative, you can press Ctrl-B prior to typing the digits and then press either Tab or Enter on your keyboard.
You may notice that the Description column’s grid cell for an ACE Rewards type item displays with a yellow background that is different from the standard background coloring of the data grid. Clicking on the description cell of an ACE Rewards item selects any rows (items) to which the promotion or instant savings is being applied. Instant Savings and type 6 Dynamic Promotions are applied to single items and more than one type 6 promotion can be applied during a sale (each one must be applied to a different item). Type 6 dynamic promotions are applied in the order they are scanned to the highest priced eligible item. Type 7 Dynamic Promotions can be associated with multiple items. Only one (1) type 7 promotion can be associated with a sale. If a user scans more than one type 7 promotion, the first one will be applied and any remaining will be removed once the Process (F12) form is selected.

ACE Rewards Highlighting Linked Products
In addition, ACE Rewards item descriptions (as shown in the data grid) are manipulated based on a number of factors. The same set of ACE Rewards items are re-used by different promotions, rewards, and instant savings, so the item’s description is set to reflect the specific promotion or instant savings that triggered the item. If a promotion or instant savings no longer applies, the description is also used to indicate this (see below).

Dealers have the ability to manipulate certain aspects of dynamic promotions (extend dates, set which types of item pricing is included, etc.) via the Price Changes transaction found in the Inventory area.
|
Which items are eligible for promotional discounts? Your company may stock products that are not supplied by ACE Hardware Corporation; however, any item in your inventory may be eligible for (type 7) promotional discounts regardless of whether it is an "ACE" item. Type 6 promotions are linked with specific items, so this is not an issue in those cases. Your company can use pricing defaults to control which items type 7 promotions are applied to (this is based on the item's default pricing, sale price, and discountable settings). For example, you can exclude "net" items from promotional pricing. Any restrictions (fine print) printed on the promotional coupons is not enforced by the software. For example, should a promotion not apply to a particular group of products, such as "power tools excluded," the sales clerk will need to enforce that restriction. This is also true of "bag sales" where most items are 20% off but some types are only 10%, for example. These types of restrictions are only enforced by your sales staff. |
Making Changes (Editing Items in the Data Grid)
Based upon the type of rewards (dynamic promotions, reward credits, and instant savings), certain changes are prohibited.
Instant Savings (IS) items cannot be removed themselves. They are only removed if the linked or “trigger” item is removed. Rewards Credit SKUs (HH) and Dynamic Promotions (DP) can be removed from the grid. Items are removed by selecting the row and either choosing Delete from the alternate menu (usually a right-click) or pressing the Delete button on your keyboard.
In addition, changes to the unit price, quantity, and units of measure for all ACE Rewards item types is restricted. It is possible to make changes to other items (those that aren’t ACE Reward types); however, doing so can affect the promotions and instant savings previously associated with the transaction. For example, changing the price on an item linked to a dynamic promotion can cause the promotion to no longer be eligible (or the promotion may become associated with another eligible item instead, etc.). Deleting any item linked with Instant Savings will also remove the corresponding Instant Savings SKU from the data grid.
Sorting & Item Order
ACE Hardware Corporation requires that rewards linked with specific items be listed below those items on the resulting document (invoice, cash ticket, etc.). For this reason, items and the rewards SKUs are sorted automatically based on their type of linkage to either an individual item or multiple items. Here are a few points about how this sorting is implemented:
-
Sorting is done when choosing Process (F12) or when the user chooses to manually sort the data grid during a sale.
-
Instant Savings are always associated with specific items and will be listed below the associated item SKU both in the grid and on documents. Instant savings automatically associate with their “parent” item (as an “add-on” SKU), so they naturally would appear below the item they are linked with. If the Point of Sale user (cashier) changes this natural order themselves, the ordering will be reset, forcing instant savings to appear next to their associated item at time of processing.
-
Type 6 Dynamic Promotions are also associated with a single item meeting some type of criteria. Dynamic promotions typically include some type of coupon and aren’t automatically associated with specific products. Sorting order is set so that the dynamic promotion item is listed below the associated item during processing, but this is not done on initial entry. It’s also important to point out that the “associated” item can change as the cashier enters or makes changes to the items in the data grid. Dynamic promotions are applied based on set rules, so adding or removing items, changing pricing, etc. all can affect which item they are applied to.
-
Type 7 Dynamic Promotions can be associated with more than one item; however, only one Type 7 promotion can be used per transaction (sale). These are always listed at the end of the document or data grid after sorting. The first type 7 promotion scanned will be the one applied.
-
Credit SKUs are not associated with specific items. These are also listed at the end of the document or grid when sorted.
Note: There are many different document styles for available for invoices. Sorting for ACE Rewards will be implemented for cash tickets minimally. Other styles, in particular those intended for store-use only, may or may not include ACE Reward SKUs and/or may include but not sort them. Some styles perform their own sorting, such as by branch, location, or yard code, for example. The sorting of these documents will take precedence.
New Member Sign-Up
If the Cashier scans or enter a rewards card number that is not currently assigned to a membership, they will be prompted for the customer’s phone number. A phone number must be supplied to continue with on-line sign-up. As an alternative to this process, customers can instead mail the paper form or apply on-line (requires setting up an on-line account).

ACE Rewards New Member Sign-Up
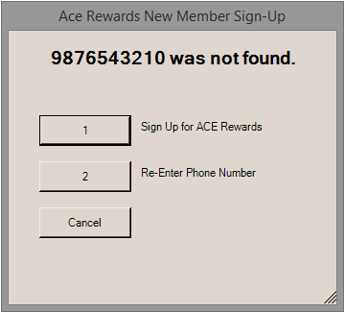
Entry of the phone number results in a search of the national database. If no matches are found, a message is provided offering three options:
(1) Sign Up for ACE Rewards,
(2) Re-enter the Phone Number (this is also provided as an option during sign up), or
Cancel.
If the Cashier chooses button 1, the ACE Rewards New Member Sign-up form displays so they can capture the new member information. Mandatory fields are indicated by an asterisk (*).
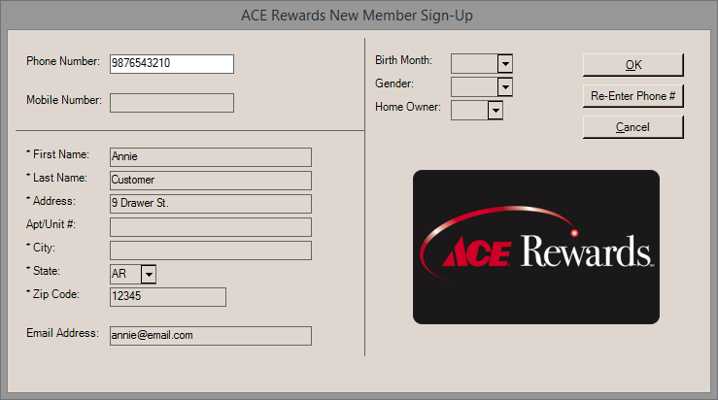
Phone Number
The customer’s phone number, as entered on the prior form, will appear here. It can be moved to the “mobile number” if desired.
Mobile Number
This text-area is used to indicate the customer’s mobile (cell) number if applicable.
First Name (Required)
The customer’s first name. This is required and will produce a task list error message if not completed.
Last Name (Required)
The customer’s last name. This is required and will produce a task list error message if not completed.
Address (Required)
The customer’s street or post office box address. This is required and will produce a task list error message if not completed.
Apt/Unit #
This text-area is provided for any additional address information. This is not required.
City (Required)
The city/town/village name for the customer’s address. This is required and will produce a task list error message if not completed.
State (Required)
The state code associated with the customer’s address. The cashier (user) can type in the code or select from the drop down listing. This is required and will produce a task list error message if not completed.
Zip Code (Required)
The zip (postal) code associated with the customer’s address. This is required and will produce a task list error message if not completed.
Email Address (Optional)
The customer’s Email address. This is optional and used for ACE Rewards Email messages if supplied. The Email address is only validated if something is entered (typed) in the text area. Validation is only done on the format of the address and does not indicate whether the address is linked with a valid Email account.
Birth Month (Optional)
The customer’s month of birth. If supplied (optional), enter the first 3-characters of the month name or select a month abbreviation from the drop down listing.
Gender (Optional)
Enter or select the customer’s gender. This is optional.
Home Owner (Optional)
Choose whether the customer is a homeowner or not. Valid choices are Y (yes) or N (no). This is optional.
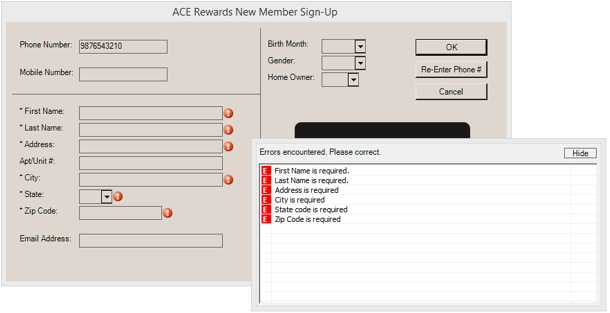
Once form entry is complete, choose “OK” (button). In the event that invalid or missing required information has been entered, a task list will be shown listing the form errors (fields with errors are also indicated).
If there are no errors or warnings, the application attempts to enroll the customer as an ACE Rewards member using the ACE Rewards web service. This process returns either a status of success or some type of error. When successful, the message “ACE Rewards New Member Sign-up Successful” appears at the bottom of the application window (over the listing of function keys). Newly activated memberships may not be updated for between 24 and 48 hours after sign-up. This is a restriction enforced by ACE Hardware Corporation, not the application.
If an error occurs, a message dialog box displays to show that an error or exception occurred. This could be an error accessing the web service or it could be generated by the software (although those typically would be reported differently). You can try more than once; however, if the error continues, the customer may have to complete a paper application. This may be the case if the web service is unavailable for some reason (Internet issues, etc.).
Needs Update
In some cases, a member’s information may be flagged by ACE Hardware Corporation as requiring updating. This may be triggered by returned mail, email, or for other reasons. If this happens, a form similar to the “New Member Sign-up” is displayed titled “ACE Rewards Member Updates” followed by a dash and the member’s ID. The information fields requiring update are highlighted with a yellow background color.
In addition, a member may ask to update their information. Manual updates can be done using this same form. Use the “Update” button from the “ACE Rewards” (CTRL-R) dialog after scanning, entering, or looking up the member’s ID. Newly activated memberships may not be updated for between 24 and 48 hours after sign-up. This is a restriction enforced by ACE Hardware Corporation, not the application.

ACE Rewards Member Updates
“N/A” (not applicable) check boxes are listed next to the Mobile Number, email, and birth month fields. They may be used if the customer either does not have a mobile phone or email or is unwilling to provide the information.
After verifying the information with the customer, choose OK to submit the information or choose Cancel to prevent the update. Even if the Cashier chooses Cancel, the application still associates the rewards membership with the sale.
"House" Accounts and ACE Rewards
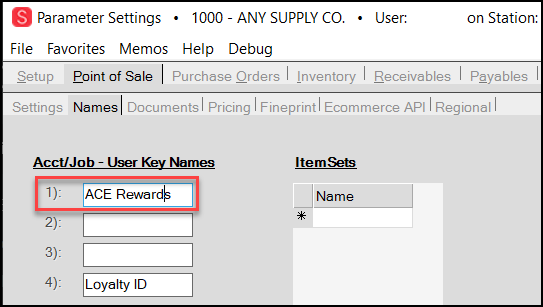
If your company maintains self-managed receivables or cash-only accounts for your customers, it’s possible to associate the customer’s ACE Rewards membership with their account in the software. To do so, you must use one of the four miscellaneous customer keys. The key name must include both the words “ACE” and “Rewards.” Case, spaces, and positioning are not important. Key names are modified from the Point of Sale, Names tab of the Parameters form (Main Menu > Maintenance > Database > Parameters).
Look for the four numbered text areas under the heading "Acct/Job – User Key Names" and enter the desired label (“ACE Rewards,” for example) in the first (top most) available (unused) label (if any). Choose Process (F12) to save your changes.
Acct/Job - User Key Names (ACE Rewards Entry Highlighted)
Next, to assign a membership to an existing “house” account, modify the account using the Account Maintenance form. This is available from the Database menu in both the Point of Sale and Receivables areas. After entering or selecting the customer’s account, enter the 10-digit ACE Rewards member ID in the appropriate User Defined Keys field on the folder tab labeled “Codes.”
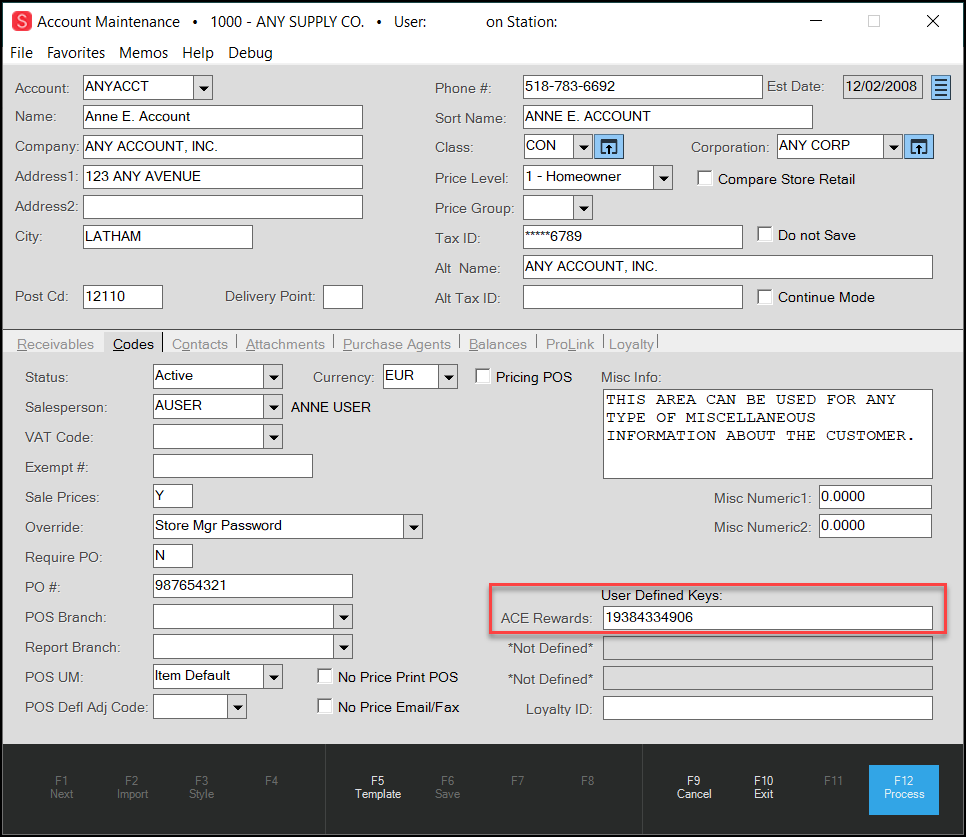
Account Maintenance > Codes Tab with ACE Rewards Key Highlighted
Remember to choose Process (F12) to save your changes.
After the ACE Rewards has been associated with the account, the number will be displayed during a sale below the customer's account number (ID) and automatically set after account selection. ACE Rewards may be cleared on a transaction by choosing "Clear" from the context menu selected while the mouse cursor is placed over the rewards ID (usually a right-click).
Price Updates for ACE Rewards Promotions
When ACE Rewards has been enabled for your company and the current branch, the Price Updates transaction found under the Inventory area offers an option labeled “ACE Rewards.” This allows the dealer to make changes to any dynamic promotions and instant savings offered by ACE Hardware Corporation which have been received along with the Hotsheet EDI data.
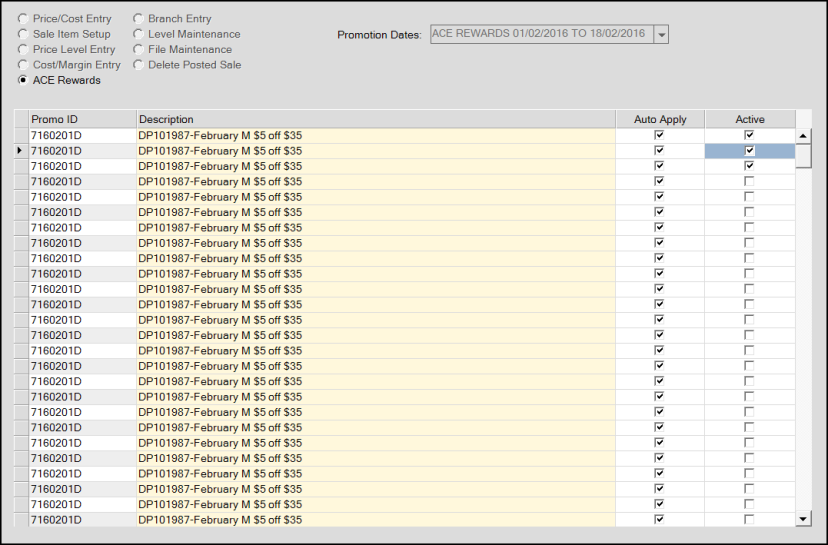
ACE Rewards - Price Updates
After selecting the “ACE Rewards” radio button, a drop down control labeled “Promotion Dates” will be displayed on the right-hand side of the upper form area. Use this to select the particular promotion period to view or edit. All promotions are listed by default.
There are three alternate selection methods available for choosing a promotion: promo ID, item number, and active only. To use any alternate selection with a particular search value, type the value (item number, for example) in the text-area prior to selecting the alternate method from the menu (usually a right-click).
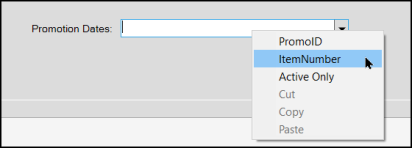
Right-Click the Promotion Dates to Display Options
Promo ID
This option finds a promotion matching the promotional ID entered in the text area. Only exact matches are accepted.
Item Number
This option finds promotions matching including a specific item SKU entered in the text area. Only exact matches are accepted.
Active Only
This option only populates the selection list with promotions that currently have a status of “active.” This status can be manually set.
Once a promotion has been selected, the data grid will populate with the specific promotions for that period. Each promotion has an ID, description, and two check box columns indicating whether the promotion is to be automatically applied and whether the promotion is currently active.
Auto Apply
The “Auto Apply” setting is set to true (checked) by default. As with other types of price update and sale pricing, promotions must be applied to be activated. The auto apply setting indicates that the dynamic promotion will be applied automatically on the “start” date of the promotion unless the setting is modified prior to that date. An hourly process checks all ACE Promotions and marks those where “auto apply” is true (checked) and the current date falls within the range of the promotion’s starting and ending dates.
Active
The “active” check box indicates whether the promotion is currently enabled or not. This will be set automatically if the promotion has been set to “auto apply” (checked) and based on the dates of the promotion. You can disable any promotion by clearing the “active” check box and also by either modifying the dates to not include the current date or clearing the “auto apply” check box (and then re-saving the promotion). The “active” status can be reset if the “auto apply” option is selected.
Items also have a flag (setting) that is used to indicate whether the item is currently associated with a promotion. Processing (saving) changes to an ACE Rewards promotion from the Price Updates transaction updates this flag as does the hourly “promotions” process.
For additional information about a specific promotion, you can click on the description of the promotion. This also allows you to make changes to certain aspects of the promotion.
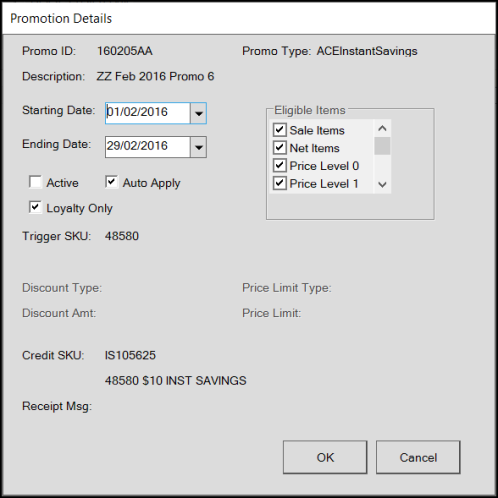
Promotion Details
The following aspects of a promotion can be changed using this form:
-
Starting Date
The date that the promotion begins. Can be used to limit or extend a promotion.
-
Ending Date
The date that the promotion ends. Can be used to limit or extend a promotion.
-
Active Status
Indicates whether a promotion is currently active. When “auto apply” is set (checked), this can be automatically set (to either active or inactive) based on the dates of the promotion.
-
Auto Apply Status
Indicates whether a promotion should be automatically be set to either “active” (enabled) or “inactive” (disabled) based on the dates of the promotion.
-
Eligible Items (as based on type of Pricing)
The defaults pricing selections for promotional pricing is set based on your selections in the ACE Rewards EDI Settings form available from the EDI folder in the Branch Setup maintenance form (Main Menu, Maintenance, Database, Branches). For more information about each type see the Pricing Defaults topic in this document.
Active and Auto-Apply
There are four possible combinations for these fields:
Active (Yes) and Auto Apply (No)
The promotion will remain active until the status is modified (manually changed). Because the “auto apply” is not enabled, the status won’t ever be updates automatically even after the promotion has ended.
Active (Yes) and Auto Apply (Yes)
The promotion is currently active and will remain active until the dates of the promotion no longer include the current date.
Active (No) and Auto Apply (Yes)
The promotion’s “active” status will be automatically updated based on the dates of the promotion on an hourly basis. The promotion may temporarily show as “active” until the next hourly update (unless the dates are still valid).
Active (No) and Auto Apply (No)
The promotion is disabled and won’t be triggered by Point of Sale activity.
Other Informational Fields
Promo Type
Indicates the type of promotion. Valid Types include the following:
ACERewardsDP6 (Dynamic Promotions Type 6)
ACERewardsDP7 (Dynamic Promotions Type 7)
Description
Describes the promotion. Often, the receipt message and/or credit SKU descriptions would match or be very similar to this description when they are indicated.
Trigger SKU
The item that triggers the promotion to be applied during a Sale. In the case of Instant Savings, this would be a regular ACE Item SKU that the instant rebate/savings is triggered by. For dynamic promotions, it’s the promotional type item.
Discount Type
Indicates whether the promotion is either a set dollar amount or calculated based on a percentage. This doesn’t apply to Instant Savings.
Discount Amount
Either the dollar amount or the discount percentage to be applied. This doesn’t apply to Instant Savings.
Price Limit Type
This indicates how and if the price limit dollar amount is to be applied. There are currently two types:
Note: This doesn’t apply to Instant Savings.
-
UpToXAmount – Promotion is applied up to a specified amount.
-
GEAmount – Greater than (>) or Equal to (=) the amount specified.
Price Limit
This is the dollar amount used with the limit type described above. This is either a “minimum” amount or “maximum” for determining eligibility. This doesn’t apply to Instant Savings.
Credit SKU
If a credit SKU is involved with the promotion, it will be listed here along with the credit SKUs description (below).
Receipt Message
The Receipt Message is intended for printing on cash ticket and invoice documents along with certain promotions. Not all promotions will have a receipt message. When applicable, this is often similar to the promotion description and the credit SKU item description associated with the promotion.
Processing
To save changes to a promotion, click the OK button on the Promotion Details form and choose Process (F12) from the Price Updates transaction.
Vendor EDI Changes
Along with ACE Rewards implementation, some additional features have been added to the Vendor EDI transaction on the Purchasing menu in the software.

Vendor EDI Communications Options for ACE Hardware
The Extras” radio button offers additional options that relate to ACE Rewards processing:
-
POS Data Send and
-
ACE Rewards Item Setup.
ACE Rewards Item Setup is only necessary once and is described in another section of this document (Initial Item Load). ACE Rewards Item Setup is only shown if ACE Rewards has been enabled for the current branch; otherwise, the option isn't listed.
Vendor EDI - Extra Function Options
POS Data Send
Use this option is to allow manual transmission processing of the daily Point of Sale rewards data to ACE Hardware Corporation. This is an automated process that would usually not require user intervention; however, manual processing may be necessary in the event of transmission errors (Internet issues, power outages, etc.) or if ACE Hardware Corporation requests a refresh of your customer or item (inventory) data. It’s important to point out that manual processing for the current day’s transactions is not suggested since your company may not get full credit for the later processing of any instant savings.
Data transmission is limited to certain times... the following notice from ACE Hardware Corporation explains these limitations:
-
Stores must transmit data before 3:00 AM CST. Data cannot be transmitted between 3:00 AM and 5:00 AM CST. Hawaii stores are more likely to send data a day late.
We suggest that companies transmit at 10 PM.
You must choose one of these two radio buttons:
New POS Data (Since Last Send)
Sends all Point of Sale data (invoice data) since the last send date. This includes any current day data, so it should either be run prior to the start of business or after the close of business for the day.
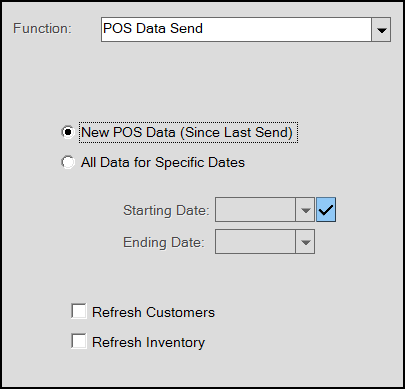
All Data for Specific Dates
This is a “resend” type function. If for some reason, there is an issue with the (invoice) data sent and ACE Hardware Corporation requests that Point of Sale data be resent, you would use this option to do so. Again, we don’t suggest including the current date in your selection since that could prevent your company from being reimbursed for instant savings processed afterward.
Refresh Customers
This check box option indicates whether ACE Rewards customer data should be included with the transmission of POS Data. If checked, all ACE Rewards customer information will be submitted; otherwise, customer data will not be sent.
On a daily basis, the automated POS Data Send may also send data for ACE Rewards house accounts to ACE Hardware Corporation; however, this is only done when certain types of changes have been made (address changes, etc.).
Refresh Inventory
This check box option indicates whether inventory data should be included with the transmission of POS Data. If checked, all item (inventory) information will be submitted; otherwise, this data will not be sent.
On a daily basis, the automated POS Data Send may also send inventory data to ACE Hardware Corporation; however, it only includes items with specific types of changes. Sending your inventory data provides the ability to view your pricing and certain other information when using ACE Hardware Corporation’s ACENET on-line system.
Once all selections have been made, use the Transmit (F6) function to send the indicated data to ACE Hardware Corporation. You will receive the following “are you sure” confirmation prompt prior to actual processing. The “scripting” option must be enabled when using this option.
![]()
Transmit Prompt
After choosing OK, additional dialogs and/or notifications will appear indicating either the success, failure, or processing of the data.
Setting up ACE Rewards Items
This one-time step is done to load the item SKUs for use with the various ACE Rewards promotions. This step is typically done by ECI Implementation or Support staff and is done using a Microsoft Excel spreadsheet provided by ACE Hardware Corporation. The file is processed from the Vendor EDI transaction on the Purchasing menu in the application.
Please Note: ACE Rewards has to be enabled for the current branch (Branch Setup, EDI, ACE Rewards) or this selection won't be listed.
The EDI “Template Item” for the current branch determines the default settings for ACE Rewards items to a limited degree (can be viewed from the EDI tab of the Branch Setup form found on the Maintenance area’s Database menu). ACE Rewards items override more template fields than usually would be the case. For example, ACE Reward items are not set with any pricing, costs, minimum/maximum quantities, and don't track on-hand (don't maintain receipts). To load rewards items, a template item must be specified (in the Branch Setup form) and exist within the branch that the load is processed from.
-
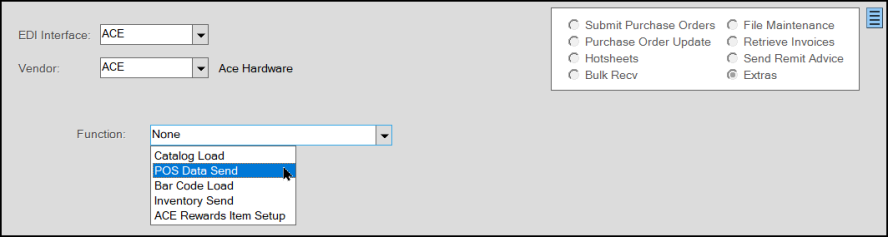
From the Main Menu, choose Purchasing > Vendor EDI. The Vendor EDI Communications form displays.
Vendor EDI Communication transaction, choose “ACE” from the EDI Interface list.
-
From the EDI Interface list, choose the ACE Hardware Corporation interface setting. Usually, the Vendor list updates to show the ACE vendor code.
-
Next, choose the Extras radio button from the panel in the upper right-hand area of the form.
This displays the “Function” drop down control. -
From the Function list, choose ACE Rewards Item Setup. Choose Process (F12).
A file explorer (browse) window will open. Locate the spreadsheet file on your local machine or a share directory and choose Open. -
Choose one or more branches (this determines which branches the items will be added to) and click Accept.
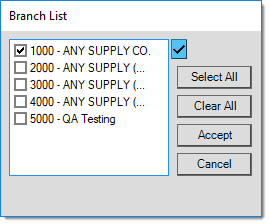
Branch List (Selection)
During processing, you will be unable to use the current software session (this will not affect other users). A progress indicator display.
Once processing has completed, your session of the application will again be available for use; however, no status or message is provided. This is intended to be used by support personnel only. The status can be viewed from the EDI Log inquiry (Main Menu, Purchasing, Inquiry, and EDI Log).
Items are added using prefix characters that indicate their use. For example, dynamic promotion items are prefixed with “DP” followed by a number. “HH” is the prefix for the original Helpful Hardware credit SKUs. "IS" is the prefix for "instant savings." It’s possible to check and see the items that were loaded by typing either prefix in any “item” selection control (drop down). This could be done in Item Maintenance or Inquiry, for example. DP, HH, and IS type items are never purged; however, many are re-used on a regular basis. These items should not be manually removed or modified.
Note: This process does not currently add “instant savings” SKUs, used for instant rebates, which are only added via Hotsheet EDI processing.