Material Lists
You can use material lists for a number of purposes. Assigned to a unique item code, material lists provide a way of linking items (and lists of items), comments, and prompts together. When a material list is used in a Point of Sale or Manufacturing activity, a special form opens where the user can make selections and choices based upon the setup of the material list.
Note: You cannot use tally items in material lists at this time.
In Point of Sale, Material Lists are always treated as "net" for further statement discounts except in the case of "item selection" types. Any material list that includes items can potentially have a mix of both net and non-net items.
There are six types of material lists:
-
Variable Price (pricing is determined by user selections),
-
Item Selection only (no comments, just a list of items and/or levels grouped for convenience),
-
Comments/Prompts (may be used for brief comments or prompts only),
-
Catalog Options, and
-
Auto (Auto BoM).
Material lists may be used for relationships or grouping of items as well as ordering or establishing a hierarchy in a list.
The structure of a material list is determined by the user. Levels can be set up to create lists of lists. Prompts and comments can also be added. Other material list items may be embedded within a material list making it far easier to quickly assemble new material lists that have similar types of selections (interior door hardware, for example). Default quantities may be specified or the user can be required to enter quantities for selected items.
Types of Material Lists
Here are descriptions of the five material list types:
Fixed Price
Fixed price material lists have a set price just like any regular item. This price does not update when changes occur to the prices of items making up the material list and must be changed by the user when pricing needs to be adjusted. Users responsible for maintaining these items can determine how or if each item in the material list affects the overall price using 4 different pricing options.
Variable Price
Variable pricing material lists don't have a set price structure. The price of these lists is determined by the default items as well as any user selections. As pricing changes for the items in the list, the overall price of the material list is affected.
Item Selection Only
This type of material list is used for picking item that will be sold individually once selected. This type might be used for grouping similar items together to make selection easier in Point of Sale. When used at Point of Sale, each selected item appears as a separate line item within the grid and are no longer linked together in any way. Levels may be created within Item Selection lists.
Comments/Prompts
This material list option doesn't include an item option. It is only used for building a list of short comments or prompts. This material list may be used on its own or it may be associated with (embedded within) another material list, or associated with a non-stocked item (see the CMT/Catalog List field under Item database documentation). This can be useful if you are creating a number of separate lists that may have the same or similar options.
Note: You must add a Description for comment and add-on material list items or SKUs to ensure the item is saved properly. Failing to do so can cause errors later when processing ecommerce transactions.
Catalog Options
This is used to build a material list comprised of vendor catalog products/options rather than items in inventory. Catalog material lists may contain catalog items as well as levels and comments/prompts. Only catalog products from the same vendor should be combined on any given "catalog" material list because the resulting order can only be for one vendor (per material list item). The item description is required for Catalog Options.
The intention behind this option is that this material list would be associated with a non-stocked item (see the CMT/Catalog List field under Item database documentation) and used to build a description listing the items and quantities requested (rather than using separate items for each catalog product). When this type of material list is used to order from a vendor, only a single line item is involved. This item's description lists the products and quantities that were selected. Individual tracking SKUs are not generated for each selection.

Auto
This material list option is intended for customers who manufacture products using a consistent process involving basic in/out materials and finished products. Users must create a material list suitable for one-step processing, similar to manufacturing, which is converted into an item, and can then be added to a sales transaction as a single item. The "Auto" option allows users to create an Auto BoM (Bill of Materials).
Level of Detail
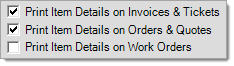
In some cases, material lists may be something that are intended for internal access only. In others, you may want the details of a list to be visible to the customer. Check boxes are provided for determining the default setting for printing detail on various types of documents. When a material list is used directly within a transaction or linked with another item, such as a manufactured type item, a form is displayed. This form includes a "Print Details" check box and the settings here determine the default status of the check box (checked or not checked). When checked, the details of the material list will be printed as long as no other settings override the printing of item details in general.
One example where this applies is when the material list is associated with a manufactured item. In this case, the details are only printed when the manufactured item is also being printed. The "Print Details" setting does not determine or override the printing status of the parent "manufactured" item in this case.
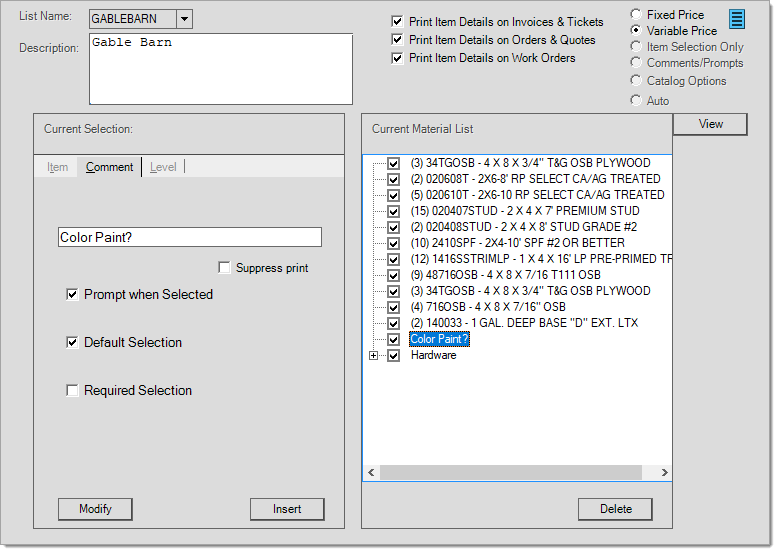
Creating a New Material List
Begin by assigning the list a code. The material list's code is used from Point of Sale grids just like a regular item. When entered a special window opens for selection. Give the material list a text description then select the type using the radio buttons to the right. Type selection is important because it's not always possible to change types later.
Users will notice two large sections in the window labeled "current selection" and "current material list." The current selection area is used for specifying the items, comments, prompts, or levels to be used with the material list. The "insert" button moves the selection to the "current material list" pane. The "modify" button is used when making changes to the current selection (highlighted in the right-hand pane). The pane on the right, "current material list," displays the tree structure of the material list. Some changes can be made directly from the tree area (listed elements can be moved to different locations by clicking and dragging using your PC's mouse).
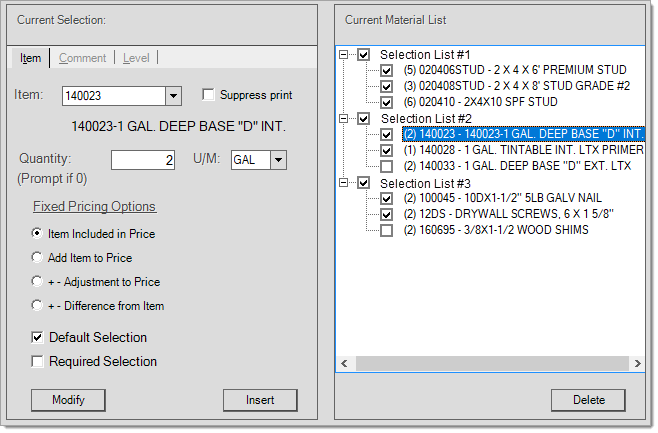
Check boxes ![]() appear next to each item, comment or prompt, and list in the tree (right). If the box has a check, it means that the element (or list) is "selected" by default and is normally included as part of the material list when sold (this can be modified during Point of Sale processing, unless the element is a "required" selection). If there is no check in the box
appear next to each item, comment or prompt, and list in the tree (right). If the box has a check, it means that the element (or list) is "selected" by default and is normally included as part of the material list when sold (this can be modified during Point of Sale processing, unless the element is a "required" selection). If there is no check in the box ![]() , the element in the list still appears as part of the material list, but won't be included unless a user specifically selects it during Point of Sale entry.
, the element in the list still appears as part of the material list, but won't be included unless a user specifically selects it during Point of Sale entry.
Item Options
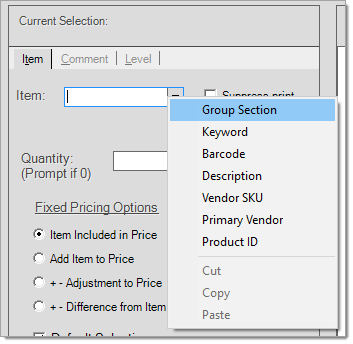
Add items by entering the code or selecting the item from the drop down. Alternate menu selections are also available for item selection.
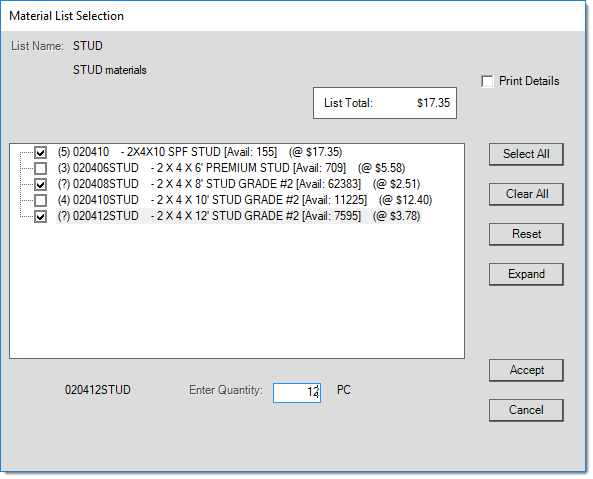
Default quantities may be specified for each item in the material list. If an item has a default quantity specified, the quantity will appear in brackets to the left of the item's description when the material list item is displayed, {5} for example. Leaving the quantity field blank for an item means that the Point of Sale user will be required to enter a quantity if the item is selected. Those items that have no specified quantity appear with a {?} to the left of the item's description when the list is displayed. Selected items (those displaying a checked box) require quantity entry before completing Point of Sale selection. Specify the unit of measure to be used for quantities.
Fixed Pricing Options
This section of the Item tab is only used with "fixed price" type material lists. With this type of material list, there is a base price set for the entire material list using the Pricing (F6) function. This overall price represents the price for items that are marked as "included in price" only. In addition, users can specify other items either as add-on's, upgrades, or substitutions, for example. These item selections can increase the price, represent a specific dollar adjustment to the price, or increase/decrease the price by comparing the optional item to a base item's pricing as specified in the form.
One real world example that many people may have encountered, is automobile options. Some auto manufacturers allow potential customers to build a car on-line and receive a quote or estimate of the price. Usually, this involves making a series of selections such as paint color, performance options, and the type of upholstery (leather or cloth, etc.). Some choices are included in the base price of the car, others are not and increase the price (cloth upholstery is included, but leather is more, for example). Fixed price material lists provide a similar functionality.
Since these can seem confusing, let's go through each option individually:
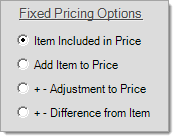
Item Included in Price
This option means that the item being added/modified is considered a part of the material list's overall price. If selected for sale, items designated with this option cause no adjustments to the material list's price. If this item is not selected, the price of the material list still does not change. Why? Included items potentially can be part of a selection list within the material list. For example, our selection list contents may include five similar "included" items but only require one selection be made by the user. In this example, the material list's pricing assumes that one item from the list of five will be picked, and since the five items have similar or the same pricing, the price of that selection is already considered in the set price of the material list.
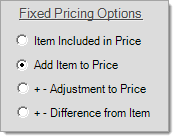
Add Item to Price
When an item in the material list uses this setting, the item's price will be added to the set material list price if the item is selected during a Point of Sale transaction. The intended use is for items that are considered optional rather than items that are always sold as part of the material list. For example, if the base price of our material list is $700 and the customer selects two optional add-on's totaling $50, the end price for the material list will be $750.
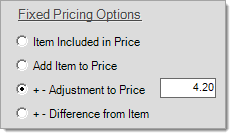
+ - Adjustment to Price
This option allows a specific dollar amount to be used for either increasing or decreasing the overall price of the materials list. Enter a minus symbol prior to the amount if designating a decrease in the overall price.
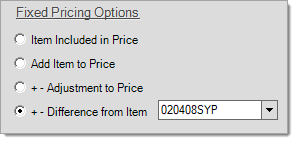
+ - Difference from Item
This pricing option designates that the difference between this item's price and a designated base item either increases or decreases the price of the material list. One possible use for this option are upgrades. For example, a customer may want to purchase a standard pre-hung interior door, the door's material list includes a basic handle set, but the customer decides they'd like a keyed lock instead. A list of options can be included in the materials list that includes the handle and lock sets available for that type of door. If a more expensive option is selected, the price of the door can automatically be adjusted using this option.
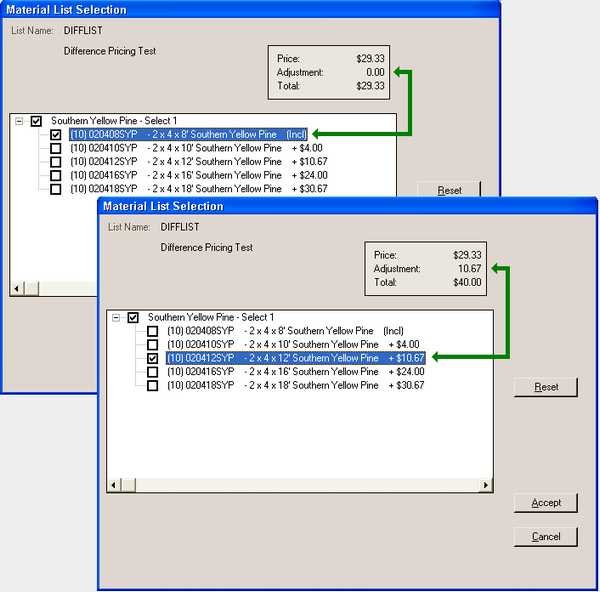
The base item doesn't necessarily have to be part of the list or material list, but often it will be. This option should only be used if there is an actual difference between the base item's price and the item selection being added.
Default vs. Required Items
Items that are incorporated within a material list can be set as "default, "required," or neither. Default items are those that are automatically selected when the material list is accessed in a Point of Sale transaction. "Selected" means the item will be included/considered in the pricing (if any) or will copy in (if an "item selection only" type list) if no changes are made by the user. Selected items appear with a checked box ![]() next to them. Default items can be reselected manually. Required items are also "default" items; however, they cannot be changed by the user. A required item is a mandatory selection.
next to them. Default items can be reselected manually. Required items are also "default" items; however, they cannot be changed by the user. A required item is a mandatory selection.
Items that are neither default or required types must be selected manually by the user in Point of Sale before they will be included in the materials being sold.
Previewing a Material List
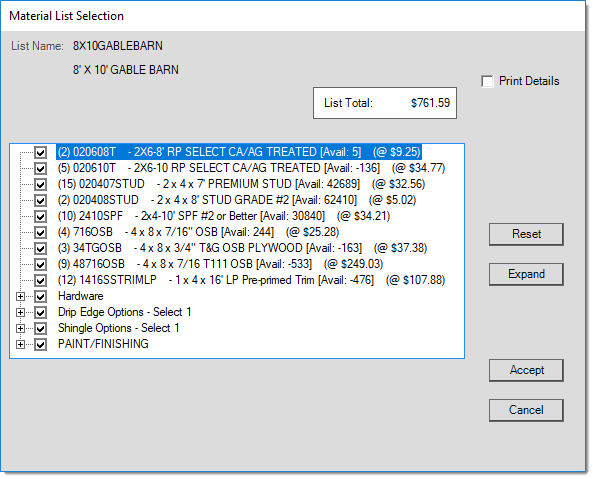
Use the View button to preview the list as it will appear in Point of Sale transactions. The check boxes indicate that the line item is selected. The numbers in parentheses () are the default quantities for the items listed. Next, the item code and description appear. At the end of the line, items that are included in the pricing are listed with "(Incl)" after their description. Items that are optional display a price or price difference (depending upon the item's designated pricing in the material list).
Pricing (F6)
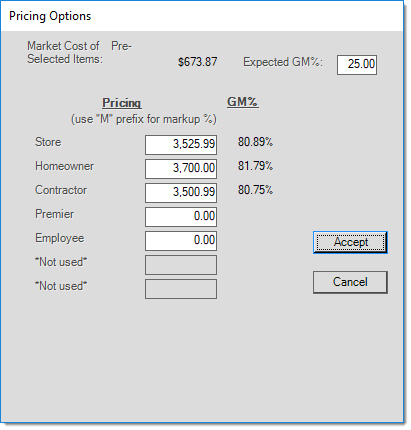
For fixed price items, the Pricing (F6) function can be used to set pricing and levels. It's important to realize that these are the base prices for the material list, user selections can alter pricing if "Fixed Pricing Options" other than "Item Included in Price" are used by included items.
Re-arranging Elements within a Materials List
Items, comments, and prompts that have already been inserted into the materials list can be re-arranged. To move an existing element to another location within the list, (1) click on the item, comment, or prompt and hold down the mouse button. While holding the button down, (2) drag the item to the new location. (3) Release the mouse button to "drop" the element into its new location.
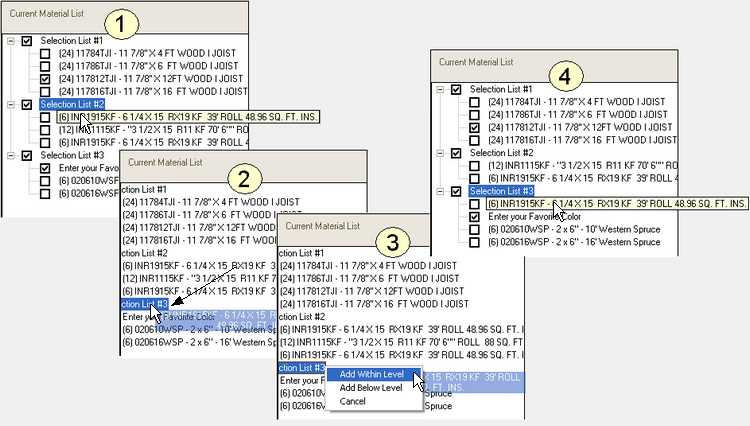
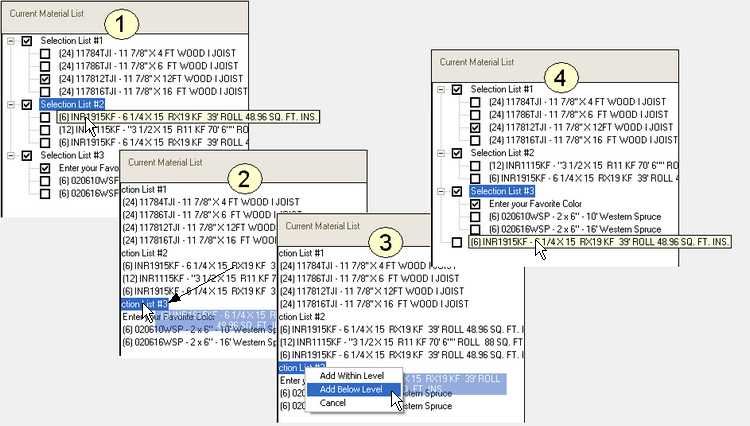
In some cases, users may want to move an element to a different level. In these cases, "drop" the element at the nearest element that's above the desired location and on the same level as the one you want to move to. When done, a small menu will appear with three choices: Add Within Level, Add Below Level, and Cancel.
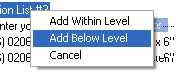
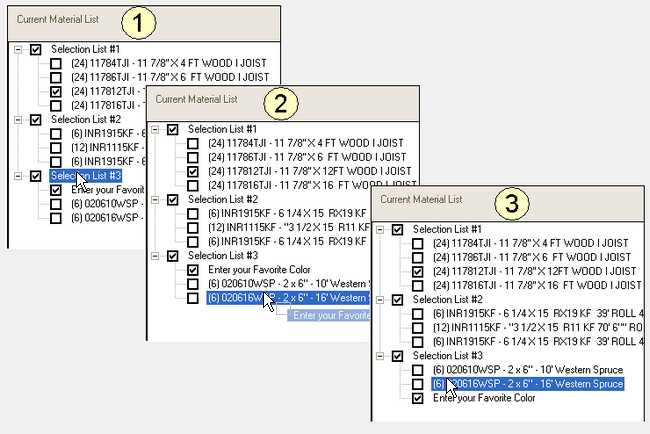
The selection "Add Within Level" moves the selected item, comment, prompt, or list to the top of the list of elements falling below the level where it is dropped. (1) An item from "Selection List #2" is selected for movement. (2) The user clicks on the item, holds down the mouse button, and drags the cursor to "Selection List #3." (3) From the menu that appears, the users selects "Add Within Level." (4) The item, originally from "Selection List #2," now appears as the first item in "Selection List #3."
The selection list "Add Below Level" moves the item to the same level as the drop point but after any items appearing in that level. Steps 1 and 2 are the same as in the example above. (3) From the menu, select "Add Below Level." (4) The dropped item appears below all of the elements of "List #3" and at the same level in the hierarchy as that level (it's no longer a part of any selection list in the case of this example).
Comment Tab
Include a comment to the Material List by entering it in the Comment field. If the "Prompt when Selected" option is selected, a prompt will appear when viewing or processing the material list, addressing the comment entered. If "Suppress Print" is selected, the comment will not print on the material list.
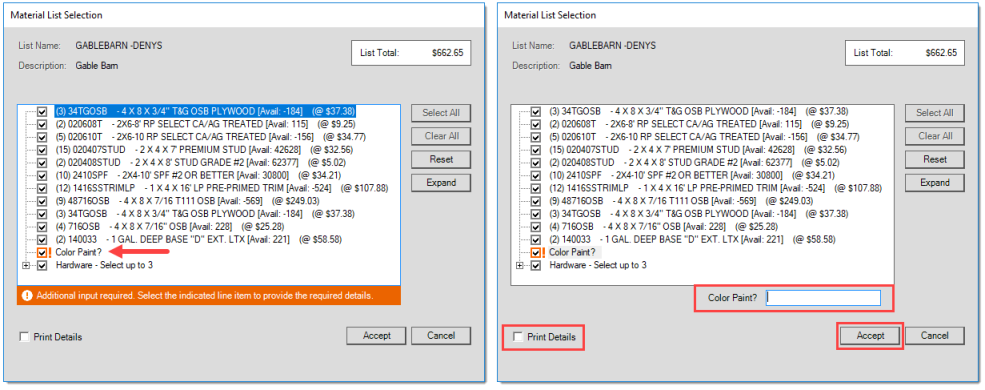
Prompt when Selected
When you select this option, the Material List Selection window will have an orange exclamation point next to the comment(s) requiring attention. This will prompt the user to click the comment with the exclamation, and enter the required information in the associated field. You may also choose to print the comment details by checking "Print Details". Press Accept once all comments have been addressed.
Level Tab
The Level tab allows you to create nested levels within the Tree View. To create a level, enter the name of the level created, select the required settings, and press Insert. The new level will be added to the Current Material List tree view. To nest items within the level, select the item and drag it on the name of the level heading, select "Add Within Level". To remove an item from within a level, click and drag on the name of the level you want to remove it from and select "Add Below Level". If you select a level heading and press Delete, all items within the level will be deleted.
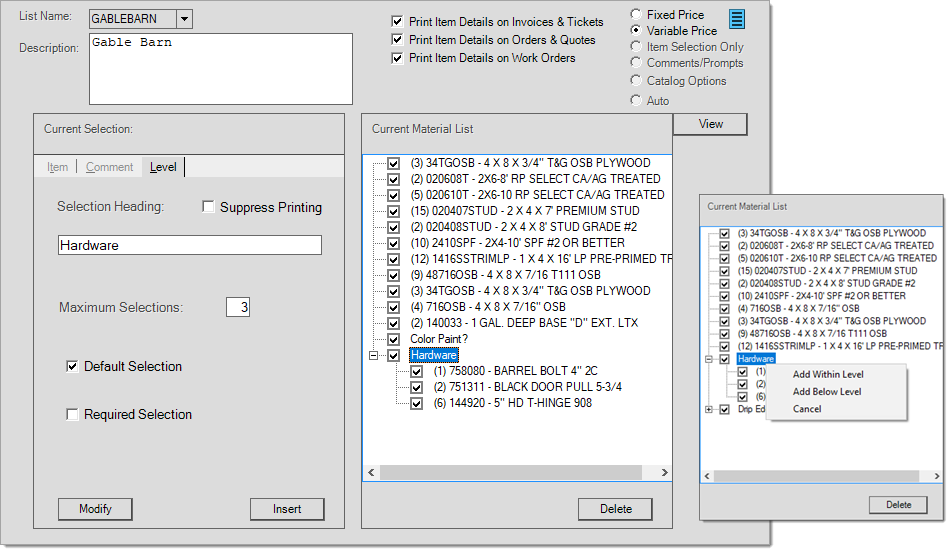
Selection Heading: Enter the name of the level heading in this field. If "Suppress Printing" is selected, the material list will print as one long list without the nested levels.
Maximum Selections: Maximum number of items allowed under a heading. If the amount of items exceeds the allowed amount, an "error encountered" dialog will pop-up when F12 Process is pressed.