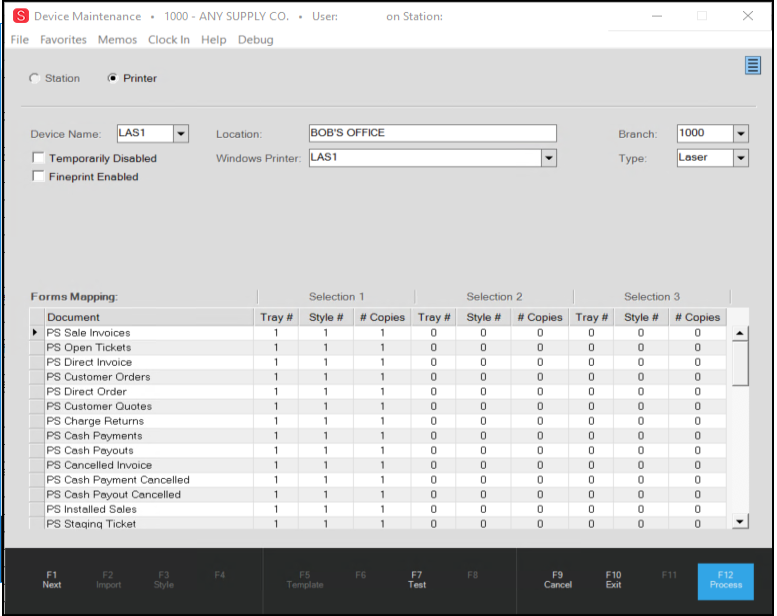
Device Maintenance > Printers
Printers, like stations, have a three or four-character device name, a location (description), a type, and a branch. You configure the printers used by the stations in the Device Maintenance form, including those used to print receipts (tickets), documents, and labels. Users can use the "LOCAL" option to print to the station's Windows default printer; however, if you want to set preferences for trays and document styles, you complete these settings in the software in this form.
Apps designed to work with ECI software may offer printing in some cases. Printing from an app on a mobile device will only work after nightly services mark a new printer as "server" available or if Remote Client has been set up for the device. The printer must be added from the server in this case using the same Windows name as any other computers that also use the same printer and driver version.
|
Adding Printers When you want to add or modify printer settings, we recommend that you access the Device Maintenance form from a computer that already has the desired Windows printer installed on it. This is important because the listing of Windows printers is for the local (current) computer only and tray selections can change from computer to computer. All of the computers that access these printers should use the same printer names and tray selection details so there is a common language for the printer(s) in use. You should be cautious when you modify the settings for any existing printer, particularly when the changes are being made from a computer where the printer is not installed. We suggest that you install all printers on the server as well as the clients that will use them whenever possible. Printers should be installed as a local network (TCP/IP) port on each computer they will be used with and not shared network printers. All printer devices should be assigned to a static IP address in your network's defined static IP range. The preferred IP address for printers can be designated from the printer device. Every computer that uses the software must have at least one installed printer and one of the computer's printers must be designated as the Windows default printer. Any time a printer is to be used with more than one computer, you should make sure that the "name" of the printer in Windows is the same across all machines. If not, you will have to define a separate software printer for each unique "name." The name is used to identify the printer by the software. Due to differences between computer's operating system versions, you may need to install different drivers on some computers for the same printer. In these cases, you may need to define a printer device in the software for each driver since tray numbering and printer naming may be different. For cloud-hosted customers, most currently use a VPN (Virtual Private Network) device to connect their local network (LAN) to our cloud servers. Printers must be configured on the cloud servers to be used by the application. Any changes to printers such as IP addresses, adding additional printers, and changed to existing printers would require support assistance. We are currently working on alternatives to VPN printing that utilize the RDP connection and/or a utility service and application for printing. Windows Default Printer There must be at least one printer configured for every client machine or RDP server. We strongly advise setting a Windows default printer for all Windows users who use the software. The default should only be set to a standard laser printer driver (not a specialty printer such as a CTP (Cash Ticket Printer) or label printer). Documents use the default printer prior to displaying any Windows print dialog. In some cases, even if you change your printer selection from the dialog, you may have issues if your selected default isn't a standard laser printer or you don't have any default printer (this can cause erroneous errors regarding paper-tray size and issues with the way documents print). Windows provides the "Microsoft XPS Document Writer" print driver which can be used to save print output as a file (XPS or OXPS formats generally). This is acceptable for the default printer if your Windows user doesn't have other more suitable printers installed. A note about installing printer drivers, particularly for HP printers: We have learned the importance of using the manufacturer’s printer-specific drivers, or for HP printers, the Universal Print Driver. While the standard Windows printer drivers work fine for generating and printing most document types, the complexity of statement printing requires and relies heavily on the drivers created by the manufacturer. When there is a specific driver for the printer you are using, it makes sense to use the latest version of that driver. Cloud-hosted users can change their user's default using the Windows print dialog (accessible from the Document Viewer's Print feature). This only changes the default for the current RDP connection. There are multiple servers that you may connect to, so it might be necessary to change the default more than one time if you happen to connect to a different server. |
Understanding Form Mapping
When you add form mapping using the process below, this mapping overrides any document parameters default mapping (except for index and logo designation). In most process forms, you have a choice of at least two printers. There are three sets of selection settings for each existing document type. For each printer and document type combination, you can designate up to three printer selections; however, not all transactions support additional printer selections (
Adding a New Printer
These instructions assume you have already added the printer to the network successfully. After you add a printer in Device Maintenance, you can assign it to one or more stations. The printer will only work if those stations (computers) have a Windows printer named exactly the same as the Windows name for the printer configured in the software. Stations offer a number of default printer selections that can be assigned to a printer device defined in the software. Some printer defaults are required, others are optional. Printer defaults can also be assigned to a Branch for certain types of printing. After you add this printer, to learn how to select it for printing a transaction document or a report, click here.
To add a new printer:
1. From the Main Menu, choose Maintenance > Database > Devices to display the Device Maintenance form.
2. Choose the Printer radio button to display the printer-specific settings.
3. In the Device Name field, enter a new device name.
To modify the settings for an existing printer, select the printer from the Device Name list.
For help setting up printers for the first time, please refer to the topic Printer Configuration before adding any printer devices here.
4. Complete the following settings as appropriate for the printer you are adding:
-
Location
Enter the place where this printer is installed. It can be an office name or room number, whatever will allow users to find it when needed. Even though it may not seem important, accurate settings can help when you are trying to troubleshoot a printing issue. For example, if your printers are named generically, such as LAS1, LAS2, LAS3, and LAS4, the location can help you figure out where the device is. -
Windows Printer
From this list, choose the new printer you have installed. Printers in the software must be mapped to an existing Windows® printer. The selection listing of printers only includes printer devices that have been installed on the local computer. If a printer will be used by more than one computer (station), the Windows printer name should be exactly the same on every computer. -
Branch
Choose the branch location of this printer. -
Type
Choose the type of printer. Options include Laser, Ticket, Label, Fax, or Dymo.-
Laser
This type is used with most standard network printers. If the printer is used for standard printing and not a specialty printer (for labels, tickets, etc.), select this type. -
Ticket
This type is used with a cash-ticket printer ('CTP' for short). These devices print small receipts (the paper is rolled on a spool) and are usually reserved for cash-type transactions that may not require significant detail. When you select this option, a new box displays so you can specify the details of this printer type. In the Model list, choose the model (such as Epson, Zebra, Dymo, etc.) and select Has Cutter (when applicable) or select Setup New Ticket Printer, if the model you have does not match one in the list.
Ticket Printer Setup Options
-
Label
Label printers are specialty printers used for high-volume barcode label printing used for price tags, bin labels, and special order labels. We provide a custom label designer in the Tags & Labels area for use with supported Zebra® and DYMO® brand printers. Select the Label option to use a Zebra brand printer for printing these label designer labels only. If you use a DYMO printer, use the Dymo type option to print Tags and Labels Designer templates instead. While both Zebra and DYMO printers print tags and labels, they operate very differently so we have a separate Dymo option for this type of printing (see below) -
Fax
These printer types are no longer used. -
DYMO
You can use a DYMO brand printer for printing bar-coded document labels and preset price tags. These printers use a USB connection and may not be shared. For more information about this type of printer, see DYMO LabelWriter Printers.
-
-
Temporarily Disabled
Choose this option only if the printer is currently disabled. When you choose this option, the printer won't allow this printer to be selected in areas other than this maintenance form. The printer will not appear in selection listings outside of this maintenance from. Disabling a printer does not remove the printer from any prior assignments. -
Fineprint Enabled
Choose this option if this printer will be used in printing Fineprint inventory information.
When these options are complete, consider the types of documents you will be printing using this printer. The next step allows you to choose the form mapping settings for each document type. If you are not printing these document types with this printer, skip to the testing or the last step. To learn more, see Understanding Form Mapping.
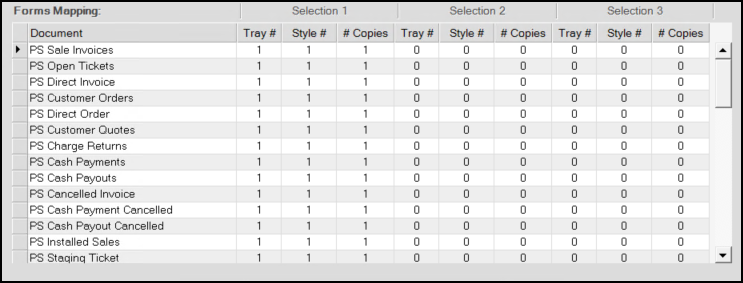
5. If you are printing Point of Sale documents (invoices, orders, etc.), Purchase Order documents (purchase orders or quotes, etc.), Inventory documents (physical counts, price updates, sales flyers, etc.), Accounts Receivable documents (debit or credit adjustments, payment entry, etc.),
-
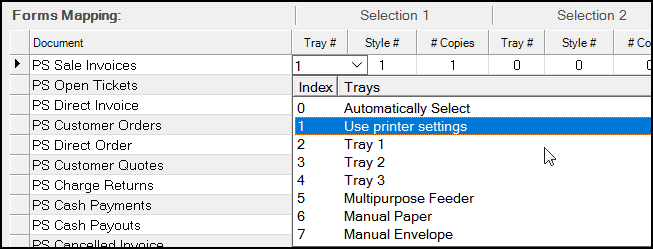
Tray #
This option sets the tray to be used with each of the three (3) selections. Tray choices 0 and 1 let the printer decide which tray to use. Other options allow you to specify which tray the application should use for this document type.
|
Tray numbering is determined by the printer manufacturer and driver software. Some printers will begin numbering with tray zero (0), others with tray one (1). Consult the printer software, manufacturer's documentation (printer manual, etc.), or web site for information about each specific printer's tray scheme. Tray options and availability are based upon the printer configuration at your current location. In some cases, different driver versions for the same printer will have different numbering. For example, you might have one computer that requires a 32-bit driver version and another that requires a newer 64-bit version for the same printer. The two drivers can have completely different tray numbering even though the printer is the same device. The solution to this problem is to define two separate printer devices in the software for each driver and tray scheme. The software's "index" number is usually not the same as the tray number. You can test tray selections by marking the top sheet in each tray with a sequential number and then print a document from either the software or a Windows program such as Notepad or Microsoft Word®, for example. Paper Type Trays will usually only be used if they meet the requirements for the particular type of print job. An indicated tray selection may be ignored if the paper type assigned does not match the print job's format. Additionally, the tray's sliding holders must be set appropriately for the paper size in the drawer. |
-
Style
Style settings control what information is printed on the document and how the information is organized. Many document types offer several style definitions. Please see the topic, Document Viewer, for more information about the styles available.
-
# of Copies
This is used to set the number of copies of each document that should be printed every time a document type generates. If set to zero, the printer will not print a copy of the document regardless of any tray or style selections.
6. When all of these settings are complete, you can test them by selecting Test (F7) and selecting the printer and station. The application checks each printer type and displays the results in the list. This step is not essential, but may be helpful.
7. When you are ready to save these changes, choose Process (F12).
Selecting a Printer after Setup is Complete
After you compete the printer setup process, you can select a printer in a Print tab or Report form from the 1st Printer or 2nd Printer list. In most areas requiring printer selection, the application auto-fills the printer for you based on your station or branch default settings. To change the standard printer, delete the existing text from the drop-down list (using the Backspace or Delete keys) and either type the name of the printer you want, or select the printer from the drop-down list.
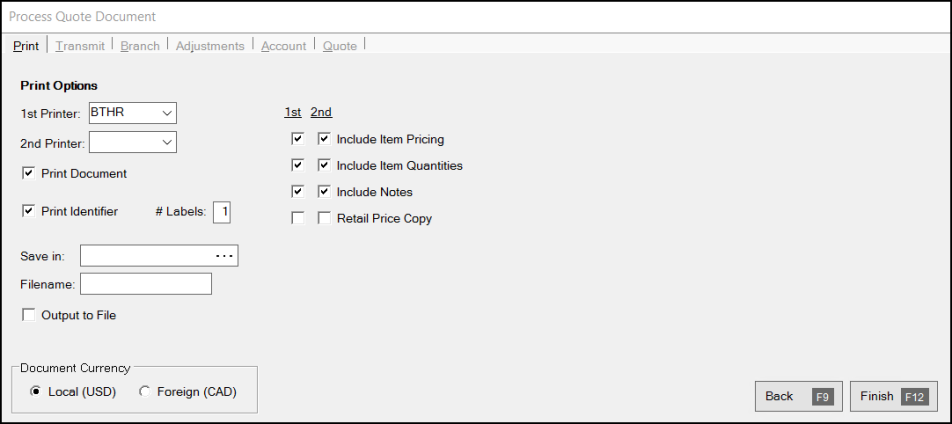
Process forms and reports provide first (1st) and second (2nd) printer selection. The first (top) selection is usually the only one that is automatically filled; however, in some cases, a second printer may also be auto-filled when it applies to the transaction.
In process forms and reports, the drop-down list only includes those printers available for the station. "Available" means that the computer signed under the station has a Windows printer name matching one or more defined printers. Disabled printers are excluded from that list.
Some of the Print list options, such as those in Maintenance areas, include all printers regardless of their availability. Printers that are not available are listed in red text.
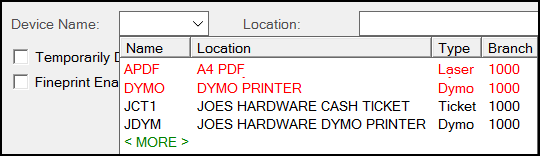
Printer Listing
Choosing the Right Printer
You can use different types of printers with this software. Some have a specific purpose, as when printing cash tickets or bin labels, and others are for printing invoices. It is important that you know what kind of printer you need for the work you are printing when you choose a printer.
What is the LOCAL printer?
A printer named, "LOCAL," is automatically included in some printer selection listings. If you select "LOCAL" as a printer, the document or report will be sent to your station/computer's default Windows printer. This printer has no configuration in the software so you typically won't get additional styles and selections like you might with a defined printer.