Tags & Labels > Designer
The Tags and Labels Designer gives you control over the layout, design, and content of the labels and tags you create. You can base these tags and labels on existing templates or create new templates that work for your business. The Designer makes label features available to you based on the type of printer you have (Zebra, DYMO, or Laser printer). You can use and modify Vendor templates as well. Using this new feature, you can create tags and labels for:
-
Price tags,
-
Bin labels,
-
Special order item labels for individual order items,
-
Unit tally item labels and tags,
-
Price update tags and labels, and
-
Sale price tags and labels

Tags & Labels Designer Form
See Also:
Tags & Labels Batch Maintenance Utility
Layout of the Tags and Labels Designer
The Tags & Labels Designer gives you a clean slate to create new bin labels, price tags, special order item labels, unit tally item labels, price update labels, and sales price labels. The appearance and layout features can be customized based on the type of printer (Zebra, Dymo, or Laser printer) you use to produce your tags and labels. Let’s take a look at the layout of the Designer. The page defaults to 8.5 x 11, but you can customize it to your template needs.
Template Section
The Template section shows you the options for designing your tag or label.
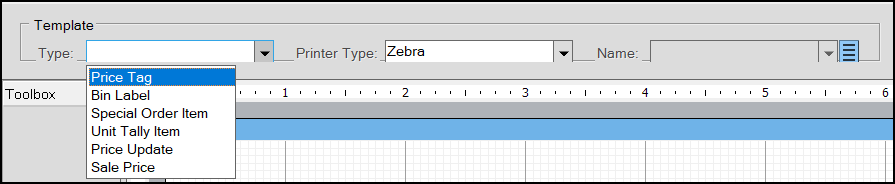
Designer > Template Type Options
Here, you select the Template type, the Printer Type, and the template's name. If you are editing an existing template, you can choose it from the list. If you want to create a new label or tag, type a new name in the Name field instead.

Designer > Printer Type Options
The design options you can access are defined by the printer you use to print your content.
From the Template Name list, you can choose the templates you have already created.
Toolbox
After you pick a template type and printer type, you can access the features on the Toolbox.

Toolbox Feature
Label
Drag this option to the Detail tab to add data from the application to your tags or labels. This can include item information, price, quantity, account information, branch-location information, etc. In the past, you were limited to the options the application selected for you. Now you can choose any data you have added to the Item Maintenance form, Point of Sale records, or even tally item info. To learn more about the Label options, see What is Data Mapping?
TextBox
Drag this option to the Detail tab and type the text you want in the box, such as Sale! or Coming Soon!

Picture
Drag this option to the Detail tab and in the Data field of the Settings box, click the Ellipsis  button. Navigate to the picture you want to display in the label. After the image displays, you can drag the image to the spot you want and resize the image to fit.

Line
Drag this option to the Detail tab and position it as you want it on the tag or label. Use the options in the settings box to change the color and size of the line.

Barcode
Drag this option to the Detail box to add a Barcode for easy scanning. You can resize this box to fit.
When you print the label, the barcode will be specific to the items you select in the Printing data grid. To learn more about the barcode options, see What are the Settings for Barcodes?

Shape
Drag this option to the Detail box to and drag the edges to add a box around your label or tag. Putting a box around a price label makes it more visible.

The template you select determines the box size of the template.
To use a toolbox feature, use your mouse to click the tool you want to add to the label and drag it to the Detail box.


Add new features to your label as you need them:

Designer > Bin Label with More Tools Added
Settings Box
Using the Settings box, you configure the labels and the barcodes with the data from the application. The settings options (such as Appearance, Behavior, and Data) determine what the labels you drag to the worksheet mean and how they look. The Settings options vary based on the type of printer you use. Some of the label options are the same for different printer types.


Zebra Appearance Label Options > DYMO Appearance Label Options > Laser Appearance Label Options
When you click in the right corner of the second column, you can select options for each setting type. Here are the Appearance settings options for Designer labels.
Not all Appearance, Behavior, and Data settings are available for all Printer types.
Appearance and Behavior Options
| Title | Settings Options | Printer Type |
|---|---|---|
| Alignment | Left, Center, Right, Justify | Zebra, Dymo, Laser |
| BackColor | Full range of colors from Transparent, Black, Grays, Reds, Yellows, Greens, Blues, Purples, and Pinks | Dymo, Laser |
| Font | Windows standard fonts, styles, sizes 8 pt. to 72 pt. | Dymo, Laser |
| FontSize | 8 pt to 72 pt | Zebra |
| FontStyle | Regular, Bold | Zebra |
| ForeColor | Full range of colors from Transparent, Black, Grays, Reds, Yellows, Greens, Blues, Purples, and Pinks | Dymo, Laser |
| OutputFormat | International Currency formats (with or without symbols), Extended Price, Percent, Quantity, Date Formats (various), Unit Price, Weight, None | Zebra, Dymo, Laser |
| TextAngle | 0 to 359 | Zebra, Dymo |
| TextJustify | Auto, Distribute, Distribute All Lines | Dymo, Laser |
| VerticalAlignment | Top, Middle, Bottom | Dymo, Laser |
| Visible | True or False | Zebra, Dymo, Laser |
| WrapMode | No Wrap, Word Wrap, Character Wrap | Dymo, Laser |
| WrapText | True of False | Zebra |
Data Mapping Options
If you open your existing templates, you will find that we have converted the label settings to data mapping codes. These codes are tied to the information saved in the application about your inventory items, sales, orders, etc., and your business. With this update, you can add all of this data to your tags and labels.
To select a Data Mapping code, select the down arrow in the second column in the Data Mapping row.

Designer > Settings Box > Data Mapping Drop-Down List
In this list is every setting available to you in the database. Select the appropriate data mapping code for the label you are adding. Then, enter a name for this code in the corresponding Text field.

Designer > Settings Box > Data Mapping Detail
This will help you know what this data mapping code means to you. After you enter the text, the name on the label updates with your entry.

To make it easier to figure out what data mapping code refers to what information, we have added tables in the What is Data Mapping? section that contain the most commonly used data mapping codes currently used in Tags & Labels. We also provide some coaching so you can figure out other codes that may be useful to you in your business.
Print Output Settings
The printer type you use also determines the Print Output settings and the Template type you select in the Template Section.
For example, when you don’t select a template, and you choose either the Zebra or Dymo Printer type, these options are enabled:

Print Output Settings when Zebra and Dymo Printer Types are Selected
The Orientation option is fixed at Portrait for these printer types, but the Paper Type options vary:
-
Zebra Printer type has these options: Custom, 1x2, 1x3, 3x4, or 6x4
-
Dymo Printer type has these options: Custom, Dymo Shipping (30323), Dymo Address (30252), or Dymo Multipurpose (30336)
The Print Output settings for a Laser printer are different, including Orientation and Paper Type settings:
-
Orientation options: Portrait or Landscape.
-
Paper Type options: Letter, A4, or Custom.
Note: When you select the Custom paper type option for any of these printer types, you can manually set the dimensions of your tag or label.
When you add a template type to the Print Output settings, more options display, but these template settings also inherit the Printer Type settings.
For example, when you select the Price Tag, Bin Label, Price Updates, and Sale Price template types, the Inventory Item list also displays. This allows you to create a tag or label for a specific item you have in inventory. It is also helpful to see how the actual item settings display when you preview a tag or label before printing.

Designer > Print Output Options > Preview Options > Inventory Item
For Special Order item templates, a different set of Print Output options display. The application defaults to the last customer order record selected, but you can choose another.

Designer > Print Output Options >Preview Options for Special Order Templates
You can choose a specific Unit Tally item from the Preview Options list for Unit Tally templates. The application defaults to the previously selected tally item, but you can choose another.

Designer > Print Output Options >Preview Options for Unit Tally Templates
What is Data Mapping?
The application stores your inventory, business, and Point of Sale information in database tables that you can access using the Designer data mapping codes. Here, we provide the tools you need to identify which data you want to display in your tags and labels and choose a data mapping code that matches. The data mapping codes that are available depend on the template type you choose; not all data mapping codes display for all template types. For example, Special Order item templates have more document and order options than bin labels do, which are more focused on inventory information.
To learn more about the meaning of the labels in the Data Mapping Codes list, look at the structure of the entries. Entries in the Data Mapping Code lists follow the pattern:
-
prefix_specific data
Typically, the prefix for anything that begins Branch_, CAT_, Documents_, InvCom_, InvStore_, OrdersDtl, OrdersHdr, or Vendor refers to specific tables in the ECI data dictionary. Similarly, Job_ entries can refer to invoices, orders, adjustments, etc., depending upon the context of the data. The application Data Dictionary is available on the Customer Portal.
Data mapping codes that begin with Lbl refer to labels created over the years that hold specific information and are not listed in the data dictionary.
Unit tally item labels have two additional data mapping options (UnitsHdr and UnitsDtl) that are specific to the structure and use of unit tally items. The specific data section name largely explains these.
| Prefix | Data Dictionary Table |
|---|---|
| Branch | Branches |
| CAT | Vendor Catalog (some items, not all) |
| Documents | Documents |
| InvCom | Inventory Common |
| InvStore | Inventory Store |
| OrdersDtl | Orders Detail |
| OrdersHdr | Orders Header |
| Vendor | Vendor Catalog or Vendor Items |
The following sections contain lists of the most frequently used Data Mapping codes and associated descriptions.
Some of these names will be familiar to you from the Item Maintenance and Point of Sale forms.
Inventory Data Mapping
Inventory Data Mapping codes are typically related to fields in the Item Maintenance form.

Item Maintenance Form Reference
| Data Mapping Code | Description | Item Maintenance Form Sample |
|---|---|---|
| Branch_BranchID | Branch Number | 1000 |
| Branch_Name | Name of the Branch | ANY SUPPLY CO. |
| CAT_Manufacturer | Name of Product Manufacturer | ANY MAKER |
| Customer_CustomerName | Name entered in the Account Maintenance form | Anne E. Customer |
| Documents_Notes | Stored notes from Item Maintenance Entry tab | |
| InvCom_Department | Merchandising Department entry (Item Maintenance > Snapshot Tab) | |
| InvCom_Description | Description entry (Item Maintenance form) | 2 X 6 X 10' SOUTHERN YELLOW PINE #1 (10 BF = 1 PC) |
| InvCom_Description0 | First line of Item Description (Item Maintenance form) | 2 X 6 X 10' SOUTHERN YELLOW PINE |
| InvCom_FineLineCode | Merchandising Fineline entry (Item Maintenance > Snapshot Tab) | |
| InvCom_Group | Group entry in the Group/Section list (Item Maintenance form) (can be up to 3 digits) | 01 |
| InvCom_Item | Item ID (Item Maintenance form) | UNITTST999 |
| InvCom_ItemType | Item Type entry (Item Maintenance > Common > Measures tab) | Standard |
| InvCom_PricingUnitofMeasure | Entry in the Pricing list (Item Maintenance > Common > Measures tab) | PC |
| InvCom_PrimaryVendorCode | Vendor ID (Item Maintenance form) | ANY VENDOR |
| InvCom_Receipts | On Hand entry (Item Maintenance form) | 1,464 |
| InvCom_Section | Section entry in the Group/Section list (can be up to 3 digits) | 26 |
| InvStore_LastReceiptDate | Last Receipt Date (Item Maintenance > Snapshot tab) | 11/7/2018 |
| InvStore_MaximumQty | Maximum Quantities entry (Item Maintenance > Snapshot tab) | 400.00 |
| InvStore_MinimumQty | Minimum Quantities entry (Item Maintenance > Snapshot tab) | 200.00 |

Item Maintenance Form > Branch > Pricing Tab with Quantity 0-3 and Price 0-3 Highlighted
Additionally, we added some new data mapping codes so you can print quantity break price information on your tags and labels.
| Data Mapping Code | Description | Branch Pricing Tab Sample |
|---|---|---|
| InvStore_QtyBreak0 | First Quantity Break entry in Branch Pricing Tab for selected Item | 10 |
| InvStore_QtyBreak1 | Second Quantity Break entry in Branch Pricing Tab for selected Item | 50 |
| InvStore_QtyBreak2 | Third Quantity Break entry in Branch Pricing Tab for selected Item | 100 |
| InvStore_QtyBreak3 | Fourth Quantity Break entry in Branch Pricing Tab for selected Item | 150 |
| InvStore_QtyCurrent Price0 | First Quantity Break Price % in Branch Pricing Tab for a selected item | 2 |
| InvStore_QtyCurrent Price1 | Second Quantity Break Price %in Branch Pricing Tab for a selected item | 5 |
| InvStore_QtyCurrent Price2 | Third Quantity Break Price % in Branch Pricing Tab for a selected item | 10 |
| InvStore_QtyCurrent Price3 | Fourth Quantity Break Price % in Branch Pricing Tab for a selected item | 20 |
Label Data Mapping
Here is a list of the most commonly used label data mapping codes and their meanings.
| Data Mapping Code | Description |
|---|---|
| Lbl_CashPOSPrice | Price of the item based on cash account (store) pricing |
| Lbl_CashPOSPriceUM | Item’s unit of measure associated with the cash account (store) price |
| Lbl_Excl_Vat_Desc | Displays the text “Ex VAT,” indicating the item price excludes VAT |
| Lbl_Group_Section | Displays the item’s group and section labels |
| Lbl_Inc_Vat | Displays the price of the item based on cash account (store) pricing, including VAT |
| Lbl_Inc_Vat_Desc | Displays the text “Inc Tax” to indicate that the item price includes VAT |
| Lbl_Inc_Vat_Prc0 | Displays an item’s price at price level 0, including VAT |
| Lbl_Inc_Vat_Prc1 | Displays an item’s price at price level 1, including VAT |
| Lbl_Inc_Vat_Prc2 | Displays an item’s price at price level 2, including VAT |
| Lbl_Inc_Vat_Prc3 | Displays an item’s price at price level 3, including VAT |
| Lbl_Inc_Vat_Prc4 | Displays an item’s price at price level 4, including VAT |
| Lbl_Inc_Vat_Prc5 | Displays an item’s price at price level 5, including VAT |
| Lbl_Inc_Vat_Prc6 | Displays an item’s price at price level 6, including VAT |
| Lbl_Item_Locations | Displays an item’s primary and alternate location codes separated by commas |
| Lbl_Item_Status | Displays item availability status. A indicates Available, D indicates Discontinued. |
| Lbl_Label_Date | Date and time the label was generated. |
| Lbl_Package_Qty | Vendor item package quantity and retail quantity UM code |
| Lbl_Store_Price_Foreign | Displays an item’s cash (store) price converted to the system-defined foreign currency |
| Lbl_Store_Price_Local | Displays an item’s cash (store) price in local currency |
| Lbl_UPC | Displays the item’s UPC based on the selected Barcode UM selected in the Tags & Labels Print Utility data grid |
Order Data Mapping
Order Data Mapping codes are specific to a particular sale, order, etc., and can appear in different parts of the data record. Some entries come from the saved data grid entries, entry folders, and some, such as delivery settings, are visible in the Delivery tab of the Process Document.
| Data Mapping Code | Description |
|---|---|
| OrdersDtl_PODocID | Purchase Order document ID of the transaction |
| OrdersDtl_QtyOrdered | Quantity ordered associated with the selected transaction |
| OrdersDtl_SOStaging | Special order staging notes saved in the Entry tab. Typically contains the location of the item to be delivered or picked up. |
| OrdersHdr_Account | The account ID linked to the transaction |
| OrdersHdr_DeliveryDate | The delivery date associated with the transaction |
| OrdersHdr_DocID | Document ID number of the transaction. |
| OrdersHdr_OrderUser | The user ID of the person assigned to the transaction |
| OrdersHdr_PhoneNumber | Phone number on the Delivery tab of the Process Document |
| OrdersHdr_ShippingName | Name listed on the Delivery tab of the Process Document |
There are fewer label options for a barcode, as you might expect. To learn more about Barcode settings, see What are the Settings for Barcodes? in the next section.
What are the Settings for Barcodes?
Barcode settings are very different from typical Tags & Labels Designer fields.

Tags & Labels Designer with Barcode Settings
Appearance setting options for barcodes:
-
Rotation
These options specify the rotation options for barcodes.
Options include: None, Rotate180Degrees, Rotate90Degrees, or Rotate270Degrees.
-
Visible
Determines whether the barcode is visible (True) or not (False).
Behavior setting options for barcodes:
-
CaptionPosition
This option defines where the caption for the barcode displays.
Options include: None, Below, or Above. -
CheckSumEnabled
This option indicates whether the barcode’s checksum is calculated and included in the barcode (when applicable).
Options include: True (checksum is calculated and included) or False (checksum is not calculated or included).
Data settings for barcodes:
-
BarcodeStyle
This option indicates the style used to create the barcode. Options include: Code_128_B, Code39, Code93X, EAN_13, EAN_8, QRCode, or UPC_A. -
DataMapping
This is the data mapping associated with the barcode control. From this list, you choose the source of the barcode. See the What is Data Mapping? section for more information. -
Text
Enter the source of the actual barcode text.
Adding a Tag or Label Template
Any template you have already created has been converted to a new format and contains your current Data Mapping code settings. It may make sense to play with your existing templates first to get a feel for the data mappings you already use. You can change these mappings by choosing a different option.
To add a new tag or label template:
1. From the Main Menu, choose Inventory > Utilities > Tags & Labels > Designer to display the Tags & Labels Designer form.
2. In the Templates Type List, choose the template type you want to create.
Options include: Price Tag, Bin Label, Special Order Item, Unit Tally Item, Price Update, or Sale Price.
3. In the Printer Type list, choose the printer type (Zebra, Dymo, or Laser) you use to print the new tag or label.
4. In the Print Output section, choose the format of the tag or label you are going to create from the Paper Type list.

Tags & Labels Designer Form > Print Output Detail
After you select these options, you are ready to get started.

Tags & Labels Designer with New Label Detail Template
5. In the Name field, type a name for the new template.
The Creating New Template message displays.
6. From the Toolbox, drag the Label and Barcode options you want to add to the detail tab first. You can add the TextBox, Shape, Picture, and Line options when the label and/or barcodes are positioned the way you want them.
7. When you drag a label option onto the Detail box, the Settings box updates the Appearance, Behavior, and Data settings for the label. Since we have a Zebra printer type selected, the design options are based on the Zebra settings.

Settings Box > Zebra Settings
8. Begin by choosing the Data Mapping to define the content of the tag or label you are creating. In the second column, select the down arrow at the end of the Data Mapping field to see the list of options.

Settings Box > Data Mapping List
9. Choose the data mapping code that contains the information you want to display on the label.
The label text updates to reflect the Data Mapping code you selected.
See What is Data Mapping? to learn more about the meaning of the options in this list.
10. In the Text field below the Data Mapping field, enter the text you want to use to refer to this label entry.
On the Detail Label Template, the Data Mapping code updates to reflect the text entry you added.

Template Detail with Detail Template Label Entry Renamed
11. To see how this new entry looks, select an Inventory item from the Preview Options list in the Print Output section and choose Preview (F7). The application displays the new label in the Viewer.

Label Viewer with Item ID
12. Click the X in the right corner of the Viewer page to return to the Designer form.
13. You can use the other Appearance features to choose the size of the font, the location of the text in the label, how the text wraps, and the text angle of the label. These features are described fully in Step 8 in the next section.
14. Drag and add the other labels and toolbox features you want onto this label and preview it before you print it.
15. When the template is complete, choose Save (F6).
Editing a Tag or Label Template
If you have a tag or label template that works for you and you want to make changes to it, you can use the Tag & Label Designer to make these changes. The design options are based on the Printer type you use (Zebra, Dymo, or Laser).
To make changes to an existing tag or label template:
1. From the Main Menu, choose Inventory > Utilities > Tags & Labels > Designer to display the Tags & Labels Designer form.
![]()
Tags & Labels Designer Form
2. From the Template Type list, choose the type of label or tag (Price Tag, Bin Label, Special Order Item, Unit Tally Item, Price Update, or Sale Price) you want to modify.
3. From the Printer Type List, choose the Printer used for printing tags and labels (Zebra, Dymo, or Laser).
Note: Your existing templates have a printer type associated with them.
4. From the Name list, choose the name of the template you want to modify. The options in the list depend upon the Template Type and Printer Type settings you selected. The label template you selected displays in the Design area.

Tags & Label Designer Form with Zebra-Based Bin Label Template Displaying
The Print Output section on the right side of the form updates the Paper Type field to reflect the existing label’s dimensions.
5. Select an inventory item from the Preview Options list to preview this label and choose Preview (F7). The application displays the sample.

Bin Label Preview (Original)
Click the X in the right corner to close the Viewer.
6. Click a field on the tag to see the field label boundaries.

Bin Label Field Selected
7. When you select a field, the Appearance, Behavior, and Data settings for that field display in the Details Section. These options change based on the type of field you select.

Designer Showing the Field-Specific Details (Zebra Label Format)
The default display for this tag/label is 100%, but you can zoom in or zoom out using the Zoom control.
8. Review these details to consider the changes you want to make to this template.
In the Appearance section, you can change the following for text or numeric-based fields:
-
Alignment
Use this option to define how the text displays within the field. Options include: Left, Right, Center, and Justified. -
BackColor
Use this option to choose a background color for the tag or label text. Dymo and Laser Printers only. -
Font
Use this option to choose the font (Arial, Calibri, etc.), the font style (Regular, Bold, Italic, etc.), and the size (8 pt. to 72 pt.) of the text for the selected tag or label. Dymo and Laser Printers only. -
FontSize
Use this option to select the font size of the text in the field. Options include: 8 pt. to 72 pt. font sizes. For Zebra Printers only. -
FontStyle
Use this option to choose whether the text is Regular or Bold. For Zebra Printers only. -
ForeColor
Use this option to choose the color of the text. For Dymo and Laser Printers only. -
OutputFormat
Use this option to choose the format of the entry for this field. Options can include regional currency settings (with or without symbols), extended or unit price, date and time settings, percent setting, quantity, or weight. -
VerticalAlignment
Use this option to specify whether the label should display at the Top, Middle, or Bottom of the label field you have drawn. Dymo and Laser Printers only. -
VerticalText
Use this option to specify whether to print the text vertically or horizontally (in the context of the Portrait printed label). Choose True to print the label vertically or False to print the label horizontally. Dymo and Laser Printers only. -
Visible
Use this option to indicate whether this field is visible (True) or not (False). -
WrapText
Use this option to indicate whether this field should wrap the text to another line (True) or not (False). For Zebra Printers only. -
WrapMode
Use this option to indicate whether the label contents should wrap to another line if needed. Options include: NoWrap, WordWrap, or CharWrap. Dymo and Laser Printers only.
9. In the Behavior section, choose the text angle that the label text should display. Options include: 0 (to indicate no text angle), 90, 180, or 270.
10. In the Data section, you can choose these options:
-
Data Mapping
Use this option to choose a control item from the list. In this case, InvCom_Item refers to the Item ID in the Item Maintenance window. Selecting a new data mapping control option can let you change pricing from local to foreign currency, change the unit of measure used for a specific item, or the applied tax values. See What is Data Mapping? to learn more about this setting. -
Text
Use this option to set a custom label for this data mapping. The label text in the Details box updates to reflect your entry. The application saves this text with the label.
11. To make any additional changes in the design and layout of this template:
-
Add/Remove Labels
From the Toolbox drag new labels onto the Detail box to add them; click the label entries on the Detail box and click the Delete button to remove them. -
Move Labels
Click and drag a label on the Detail box to move the label and reposition it on the form. -
Change Label Display
Use the options in the Appearance box to change the look of the labels in the Detail box. -
Add text, lines, and images that fit the label/tag
Drag Text, Line, Barcode, and Image options from the Toolbox as you need them and play with the Appearance options until they display the way you want them to.
12. When you are ready to save your template changes, choose Save (F6).
Note: To save this template as a new template, type a new name in the Name field before saving.
13. Choose Preview (F7) to display the updated sample.

Bin Label Preview (Updated)
Reference
There are four (4) form sizes. Each corresponds to the four (4) types of labels: bin tag (1 x 3), price tag (1 x 2), order (3 x 4), and unit (6 x 4). The sizes listed correspond with Zebra labels, not DYMO labels which have a maximum width (the vertical edge of the printed label of approximately 2-1/8 inches or 54mm. The largest size (6 x 4) is not available for use with DYMO LabelWriter printers.
|
SKU |
Description (Count) |
Size |
Uses |
|---|---|---|---|
|
30323 |
White Shipping Labels (220) |
2-1/8" x 4" (54mm x 102mm) |
|
|
30336 |
Multi-purpose Labels (500) |
1" x 2-1/8" (25mm x 54mm) |
|
|
30252 |
Address Labels (350) |
1-1/8" x 3-1/2" (28mm x 89mm) |
|
|
30327 |
File Folder Labels (2 Rolls of 130) |
9/16" x 3-7/16" (14mm x 87mm) |
Document Labels (Only) |
Sizes list the horizontal (height) first and the vertical (width) second.