Spruce eCommerce
Spruce eCommerce (SPEC) is our best-in-class ecommerce solution for Spruce and RockSolid MAX customers. It uses the best of the ecommerce API (SOAP) we have built over the last few years and is extended using the REST API features that we are building for the future.
When you choose the Spruce eCommerce solution, you will work with EvolutionX Developers to create the website you choose with state of the art design and security. Your customers can still access your website to submit orders, quotes, and account payments online. You use the same processes to import and submit orders, quotes, and payment information and use the same group notifications so your team can manage incoming work. You can still use incoming requests to manage quote and order information and to arrange for customer pickups and schedule deliveries. Account payments, submitted by your customers online, can be processed automatically or manually as works best for your business. Spruce eCommerce is designed to work the same way on all ECI LBMH platforms.
Note: We have shown the instructions using Spruce screen shots but they work the same way for RockSolid MAX-based businesses.
Setting up the Spruce eCommerce Infrastructure for LBMH Applications
Setting up the ecommerce processes is part ECI's Implementation/Support team's responsibility and part your team's work. In this section, we cover the content that you can see so that you know that the pieces are in place when you do your part.
Implementation and Support Set Up Responsibilities
Before you begin, the ECI Implementation and Support team enables the Ecommerce parameter and ensures that the Master Branch setting is populated in the Parameter Settings > Software tab. The team enables the SpruceWeb environment by setting up the URLs the website can use to access the application information. We create a unique API keys, to provide a secure identifier for the connection between the website and the application. We verify that SpruceWeb can connect to the website and verify that we have resolved any application synchronization issues. Finally, we share the public URL or IP Service address and the API key with you. Then, you are ready to set up your own Spruce eCommerce parameters.
Setting up your Spruce eCommerce Solution
There are several steps you need to take to prepare your system for the ecommerce order/quote/payment processes:
-
Set up the ecommerce parameters
We cover this in detail in the Ecommerce Tab Settings topic. Spruce eCommerce uses these same ecommerce settings in the same way as the Ecommerce API implementation, with some additional Spruce eCommerce-specific features. -
Set up the user permissions for team members who will process ecommerce requests.
This will give the team members you are trusting with these tasks the ability to handle the records that come in.
- See Setting up the User Records for Processing Ecommerce Requests. -
Set up the branches and branch-specific notifications.
Use these instructions to enable the branch to receive ecommerce requests and if needed, add branch-specific notifications for users or groups you want to handle these records.
- See Setting up Branches for Ecommerce and Branch Notification. -
Set up inventory for ecommerce orders and quotes.
To make the items in your inventory accessible to your Spruce eCommerce website, you need to enable it in the application. Any items you do not enable will not be visible to the website.
- You can enable individual items using the instruction in Enabling Items for Ecommerce Individually.
- You can enable items in specific group/sections for ecommerce using the instructions in Enabling Group/Section Items for Ecommerce. -
Set up Accounts for Online Payment Processing
In these instructions you can set the payment posting rule (that is, whether the payment is posted automatically as specified by the account member) to apply to accounts automatically either by selecting them globally or individually.
- See Setting Up Online Payment Processing for Accounts (Group) and
- See Set Up Online Payment Processing for an Account
Note: All online account payments require a Card On File to process. See Adding a Card on File to an Account/Job for these instructions. -
Complete Inventory Item Sync Settings for Managing Inventory Pricing and Quantity Changes
Work with your ECI Implementation team to set up your website to sync with any application inventory changes.
- See Setting up the Inventory Item Sync Process for these instructions. -
Set up an Ecommerce Cash Drawer for Tracking Online Order Deposits and Account Payments
When this set up is complete, you can use the Ecommerce Cash Drawer to track incoming online transactions by branch. You must have branch administration settings to make these changes.
- See Setting up the Ecommerce Cash Drawer for these instructions.
This should complete the set up required for managing inventory data, and processing online orders, quotes, and account payments.
Setting up the User Records for Processing Ecommerce Requests
Choose the permissions for ecommerce order processing carefully. There are specific user settings for ecommerce orders, which are described here. These users must have rights to manage Card On File payments, particularly in cases where the Card on File process fails. When the user ID settings for the person or persons that will be processing online orders, you can set up your notification information for the system and the branches.
To enable these permissions settings for a user:
1. From the Main Menu, choose Maintenance > Database > User IDs to display the User ID Maintenance form.
2. From the User ID list, choose the ID of the person or group to whom you want to give these permissions. The form updates to show the user’s existing settings.
3. Make sure the user’s Email address field has their current email address entered and the check box, Get notifications and messages via email is selected.
4. Choose the Application Security Settings ![]() icon to display the list of security settings.
icon to display the list of security settings.
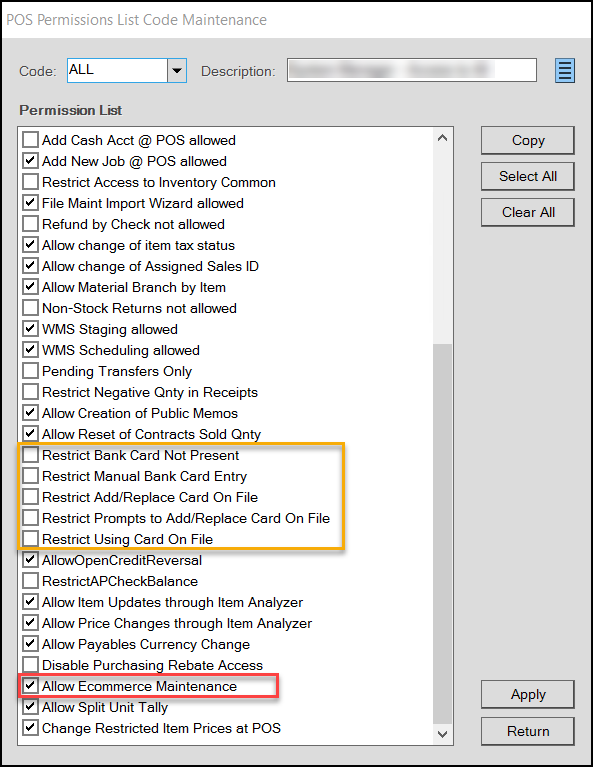
POS Permissions List Code Maintenance with Ecommerce-Specific Entries
5. Scroll down through the list and check the Allow Ecommerce Maintenance box.
This gives users the rights they need to modify incoming ecommerce records when needed.
6. Take note of the following bankcard entries for this user and ensure they are not selected for this user:
• Restrict Bank Card Not Present
• Restrict Manual Bank Card Entry
• Restrict Add/Replace Card on File
• Restrict Prompts to Add/Replace Card On File
• Restrict Using Card On File
7. Choose Apply and then Return.
8. Choose Process (F12).
9. Log out of the application and log back in using the User ID you just enabled so you can validate these entries.
Now this user is ready to process and close ecommerce orders or quotes.
Note: This user cannot void these orders, but you can reject and close them.
Deposit Note: If the user is closing an order and the order has a deposit associated with it, they need to process the refund on the account before they can close the order.
Setting up Branches for Ecommerce and User Notification
We have expanded our support for branch-based ecommerce options to allow branch personnel to process incoming orders/payments/quotes. To enable your branch to receive and process ecommerce business that is specific to their location, complete the following settings. You must have administrative permissions to access these settings. If you do not set branch-specific notification settings, the application uses the system settings described above.
1. From the Main Menu, choose Maintenance > Database > Branches to display the Branch Setup form.
2. In the Branch ID field, choose the branch you want to enable ecommerce processing for.
3. Choose the Ecommerce tab.
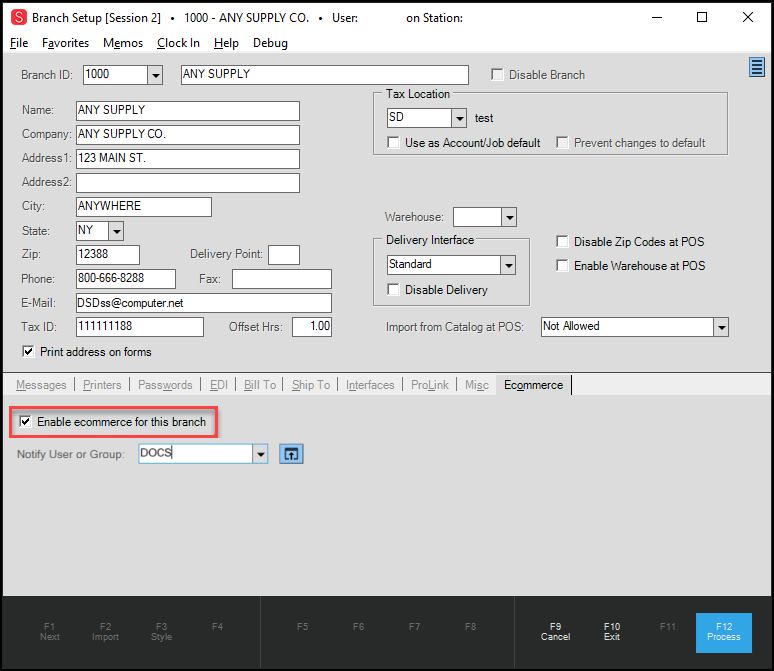
Branch Setup Form with Ecommerce Tab Options Displaying
4. Select the Enable ecommerce for this branch check box.
5. In the Notify User or Group list, choose the User ID of the person or group that you want to notify when the application receives ecommerce orders.
Note: The application will use the entry you have selected here when the incoming orders are specific to this branch. If you do not select this option for this branch, the application uses the parameter set in the Parameters > Point of Sale > Ecommerce tab instead.
6. When you have completed these entries, choose Process (F12) to save the settings.
Note: There are two notification option for the users specified in these fields. The application can use the email address of the user and send an email when new online requests come in for the current branch or the user can use the Messages feature to review incoming notifications that are assigned to them. To learn more about the Messages feature, see Reviewing Messages in the Notification Queue.
Reviewing Messages in the Notifications Queue
When you receive ecommerce request notifications, you can access them in a couple of ways. You can look them up in your email application or you can review the messages associated you their application login by clicking the Messages icon at the bottom of the Main Menu. This icon shows the number of messages to be processed.

Messages Icon
When you click the Messages icon, the Notification Queue displays the messages the application has sent based on your user notification settings. These messages in the queue are related to any system notification permissions for which you User ID is enabled, so it may not be just ecommerce orders, quotes, or payments processing.
Note: The application does not send user notifications for auto-processed payments or orders.
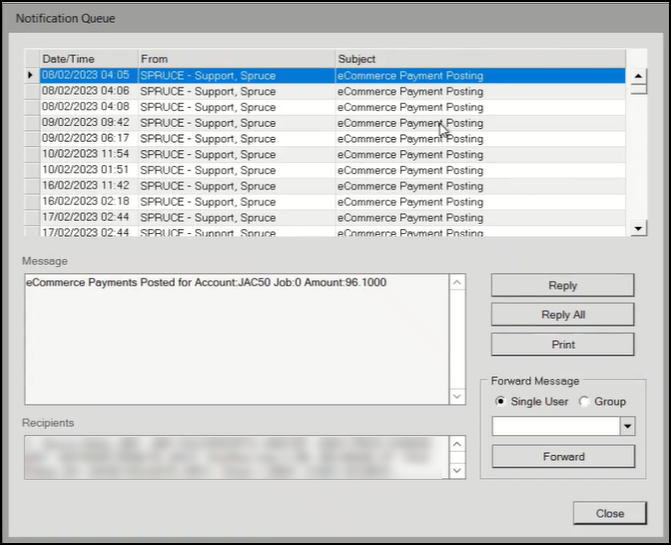
Notification Queue
Enabling Group/Section Items for Ecommerce Requests
You can enable stock for ecommerce requests by group and section and by selecting individual items.
To enable the ecommerce option for a group/section:
1. From the Main Menu, choose Inventory > Database > Parameters > Item to display the Item Maintenance form.
2. In the Group/Section list, choose the group and section you want to enable for ecommerce.
3. Beside the Group/Section list, choose Settings ![]() icon to display the Group/Section Maintenance box.
icon to display the Group/Section Maintenance box.
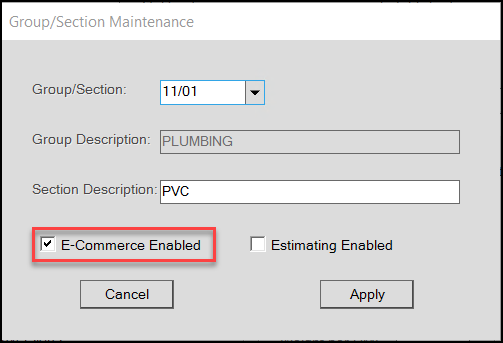
Group/Section Maintenance Box with E-Commerce Enabled
Note: To enable a subset of this group’s items for ecommerce, we recommend that you create a new ecommerce section to which you add only ecommerce-enabled items. Type a new name in the Section Description field to create this new section on the spot. Later they can reclassify the items they want to include using this new section name.
4. Select the E-Commerce Enabled check box to allow the items with the Group/Section settings specified to be sold online.
5. Choose Apply to redisplay the Item Maintenance form.
6. Choose Process (F12) to save this setting.
Enabling Items for Ecommerce Individually
Businesses can set up individual items for ecommerce orders as well. Any items that are not enabled for ecommerce should not be listed on the customer’s online store.
To set up an item for online sale:
1. From the Main Menu, choose Inventory > Database > Item to display the Item Maintenance form.
2. From the Item list, choose the item you want to enable for ecommerce (sale online).
3. Choose the Common tab and the ECommerce tab to display the ecommerce settings for this item.

Item Maintenance > Ecommerce Tab
4. Select the E-Commerce Enabled check box.
Note: Items that do not have this check box enabled are not eligible for ecommerce orders and do not appear in the list. This is set globally for items that are enabled by group/section as discussed in Enabling Group/Section Items for Ecommerce.
5. Consider whether you want to enable the Use POS Qty Default UM setting and enable it if you do.
See Understanding the POS QTY Default UOM Setting to learn more about this setting.
6. Choose Process (F12) to save this entry.
Setting Up Online Payment Processing for Accounts (Group)
If your business allows online payments, the application can process those payments automatically using the Payment Processing Rules. You can set this option globally and, for particular accounts, you can specify whether the payment is applied as the customer requests or not. This is true for both Balance Forward and Open Item accounts and allows for third-party payments to these accounts.
The application accepts payments for ecommerce orders for accounts with Card On File settings automatically. The customer may also apply Convenience Fees for this process, as allowing customers to pay online using a card on file incurs extra fees for their business.
To set the online payment posting rule for many accounts (globally):
1. From the Main Menu, choose Receivables > Utilities > Account Global Modify to display the Account Global Modify form.
2. From the Field Name list, choose Payment Posting Rule.
Note: Since this feature is new, there are no existing values.
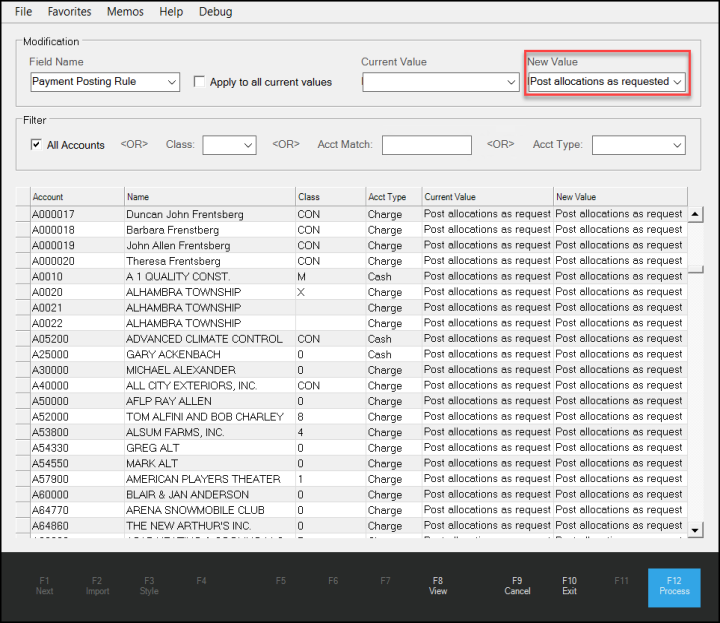
Account Global Modify with Payment Posting Rule Selected
3. In the New Value list, choose the value you want to apply to the selected accounts. Options include:
-
Post allocations as requested
Choose this option to post online payments to account balances automatically. -
Post ignore allocation request
Choose this option to prevent account payments using this posting process.
4. In the Filter box select the criteria for which this value should apply.
Here you are looking for the accounts you want this rule to apply to.
5. Choose View (F8) to collect the accounts that match the filter criteria.
6. Review the list to ensure that they include the accounts you want.
7. When the list of accounts is right, choose Process (F12) to save this setting to each account.
Setting Up Online Payment Processing for an Account
You may want to prevent a particular account from posting their payments online automatically. Typically, if there is a card on file problem for an account, this might be the case.
To set an account’s online payment handling:
1. From the Main Menu, choose Receivables > Database > Account to display the Account Maintenance form.
2. From the Account list, choose the account that you want to set the online payment handling for. The account details display.
3. Click the Ecommerce tab to display the Payment Posting Rule that is currently associated with the account.
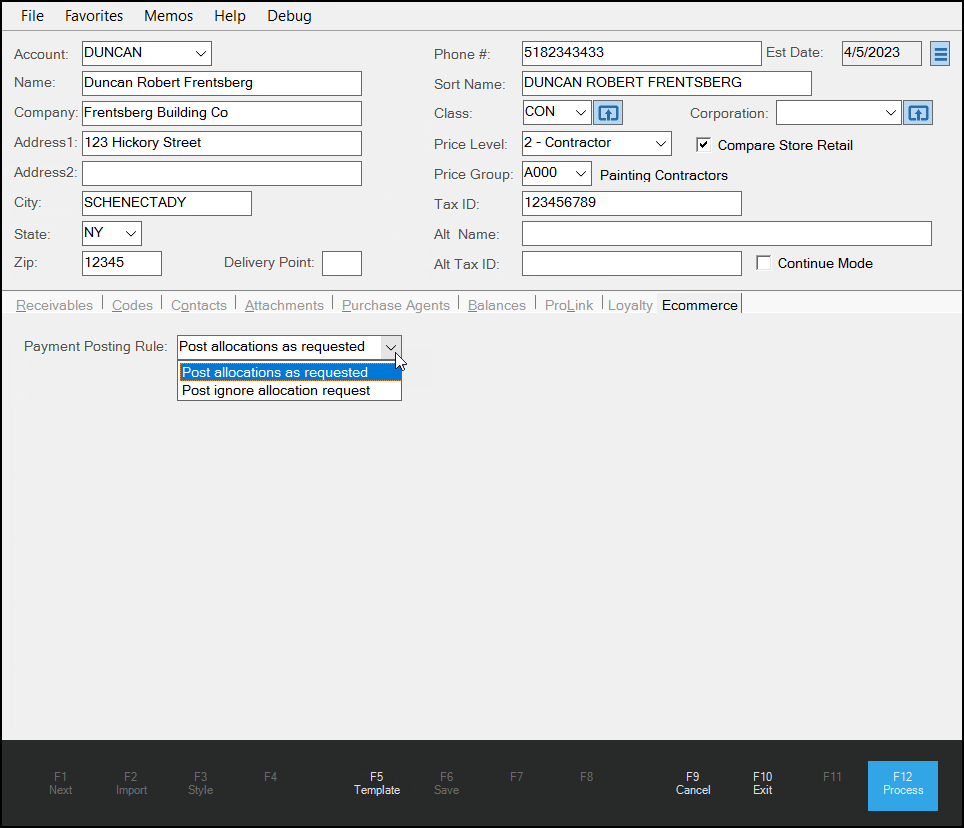
(Receivables) Account Maintenance > Ecommerce Tab > Payment Posting Rule List
4. Select the other ecommerce payment posting rule you want to use for this account.
5. Choose Process (F12) to save this setting.
Understanding the Use POS QTY Default UOM Setting when Importing Ecommerce Orders
When you sell construction materials, you know that you can categorize the amount of those materials in a variety of ways. When your customer orders materials online using a lineal unit of measure and you want to convert that order to a different unit of measure for the yard employees, there is now a process that ensures that the application converts this material and its associated pricing correctly. This new process ensures this conversion is successful and makes it easier to fulfill online orders.
For example, ABC Construction purchases boards by the lineal foot (or meters) online, but you want the inventory team to know how many boards that translates to in the yard.
This need requires a conversion process that takes into account the item pricing for both units of measure and ensures that the conversion doesn’t affect the order’s cost but respects the Default Unit of Measure for Point of Sale Quantities (as specified in the Branch > Codes tab).
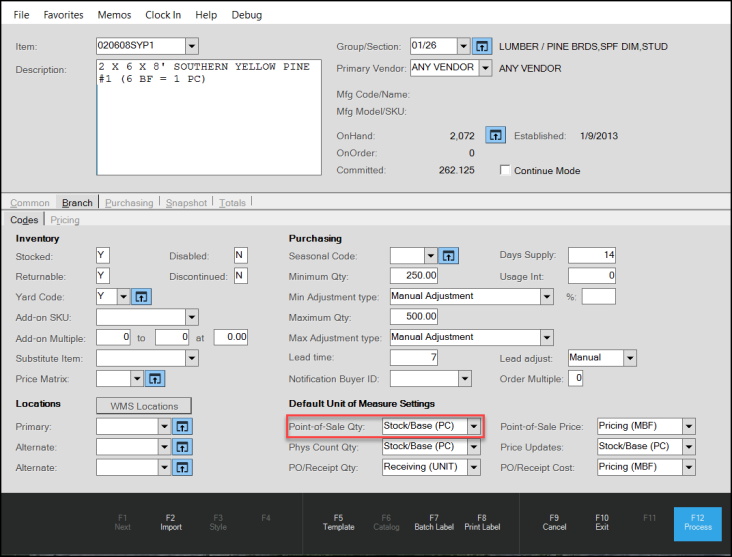
Item Maintenance > Branch > Codes > Default Unit of Measure Settings > POS Quantity
To ensure this works correctly, we have added a new import option on the Item Maintenance form in the Common > ECommerce tab: Use POS Qty Default UM.
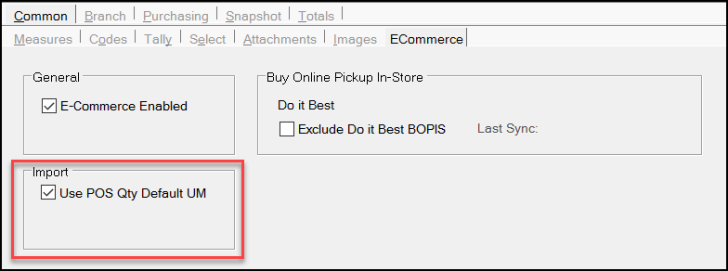
When this check box is enabled (checked) for a particular item, and you import an ecommerce order with that item using a different unit of measure than is stored in the Default Unit of Measure Settings > POS Quantity field, the application will convert that unit of measure and adjust the quantity for internal teams. This will not change the pricing values of the imported order. You can set this option for some items and not others, if you wish.
Note: This setting is not required unless you want to use this conversion process for the internal collection of order materials. This check box is not enabled by default.
Setting the Use POS Qty Default UM for Multiple Items
To set this option for multiple items in your inventory:
1. From the Main Menu, choose Inventory > Utilities > Maintenance > Item Global Modify to display the Item Global Modify form.
2. From the Field Name list, choose the Cmn – ECommerce Use POS QtyUM option.
3. In the Old Value field enter N for No.
4. In the New Value field, enter Y for Yes.
5. Use the Group/Section, Keyword, and Primary Vendor list entries to collect the items you want to apply this setting to.
You can remove individual items from the list if you do not want this new setting to apply.
6. When the list contains only the items you want this setting to apply to, choose Process (F12) to save the setting to the Common > Ecommerce tab for those items.
Processing Ecommerce Submissions (Orders/Quotes)
After a customer submits an order or quote online, the submission should be either processed or rejected by your company. The ecommerce order, quote, or payment doesn't become an actual transactions until someone at your company imports them and processes them. The process is the same for orders and quotes, so we show the order process here. Quotes don't have payments associated with them, typically, but essentially the process is the same. When a customer that does not have a receivables account submits an online order, you can use the Cash account to process the transaction.
To process an ecommerce order or quote:
1. From the Main Menu, choose Point of Sale > <Orders or Quotes>. The appropriate entry form displays.
2. Choose the required account or choose the Cash account and click Tab to add a new Order number. The Import (F2) key enables.
Note: For some accounts the Job # entry is required.
3. Choose Import (F2) and from the context menu, choose the E-Commerce menu item.
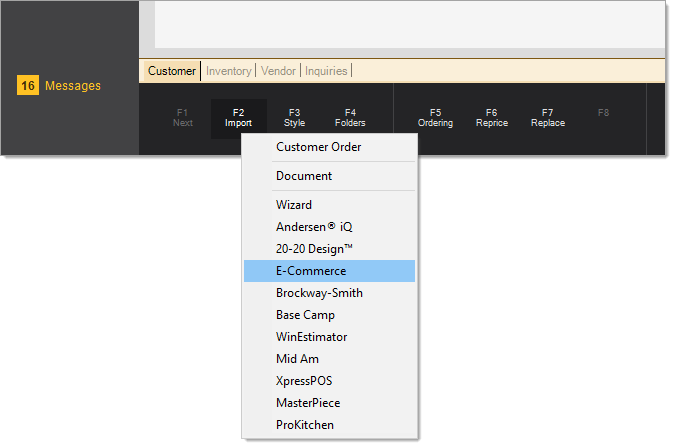
The Import E-Commerce Quote/Order dialog box displays. In the ID list, only orders or quotes that match the customer ID you selected display. If a particular submission is assigned to a job other than the transaction's current job selection, the application will update the transaction to reference the submission's job after the submission is complete.
For Cash accounts, you may need to obtain some order information from the customer to identify the order in the list.

4. From the ID list, choose the transaction you want to process.
A Note About Deleting an Ecommerce Transaction. You can delete a transaction at this point if you need to clear a duplicate submission or remove a canceled request at the direction of a customer. To delete an ecommerce request, click the Menu Marker  icon and select the Delete option.
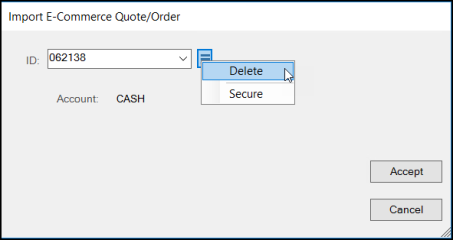
A confirmation prompt displays. Choose Yes to delete the order or quote. You must have specific permissions to perform this action.
You must delete an ecommerce submission before you accept it. This is not the same as rejecting an order or quote (see the IMPORTANT! message below).
5. To import the selected ecommerce transaction, choose Accept.
The items listed in the transaction populate the data grid. After you accept an order you have two options. You can reject the order/quote (as when you don't have the stock to fulfill the order) or you can process the order. If you need to reject the online ecommerce order, see Rejecting an Ecommerce Order/Quote.
6. Review the transaction details to see if there are any changes and to verify that the materials the customer has are the ones they ordered. Typically, online orders are paid in full using a third-party processor, so you do not need to process a payment for these transactions.
However, if the customer only paid a deposit, the application may prompt you to process the payment for the balance. In these cases, it is usually for an account that has a card on file, so you would process the payment using that payment method. You may also process the remaining payment to the account as a charge, if the customer wants to use that option. We recommend that you contact the account customers directly if you are not sure how this process should work for this transaction.
7. When you are ready to process the transaction, choose Process (F12). The appropriate process Document displays.
8. Complete any adjustments or delivery steps that are required for this transaction and choose Finish (F12) to complete the process.
A Note About Importing UOM Tally Items in Ecommerce Orders
When you sell UOM-based tally items online, how the application handles the order import process depends on the platform (Spruce eCommerce or Ecommerce API) you use to do business.
-
Spruce eCommerce
For this platform, the application only allows an overall tally quantity during the order process.
The application converts the tally quantity into the individual UOM quantities supported at Point of Sale. -
Ecommerce API
For this platform, the application only allows an overall tally quantity during the order process. The processing is managed slightly differently for manually processed and auto-processed orders-
If the order includes a UOM tally item and is auto-processed, the application saves the tally item quantity details with the customer order and displays these quantities in the item's Description field on the order document.
-
If the order includes a UOM tally item and is manually imported and processed, the application displays the UOM quantities and totals (in the Unit of Measure Tally box) when you click the Description field after importing the order into the data grid. This ensures the UOM tally item order details display correctly for internal picking teams and in the order document.
-
Rejecting an Ecommerce Order/Quote
Rejected submissions remain available for processing in the future. They display in the Import E-Commerce Quote/Order ID list with the reason selected in the Status column.
To reject an ecommerce transaction after accepting the transaction and displaying it in the data grid:
1. Click the Menu Marker  icon next to the data grid and choose the Reject E-Commerce Order option.
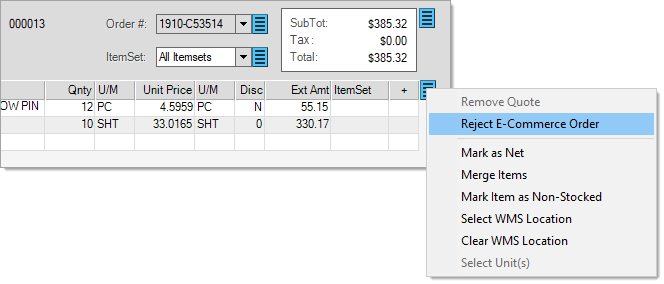
The Reject E-Commerce Quote/Order box displays.

2. From the Reason list, choose the reason for the rejection of the transaction and enter any detail needed in the Additional Comments field.
3. Click Accept to process the rejection.
The application saves the reason code and the message with the submission. The application sends a notification to the customer (if they have an email address associated with the account's billing contact) whenever an ecommerce submission is rejected.
|
Important! Deleting a submission is not the same as Rejecting a submission. Deleting does not send any notification to the customer and the submission is removed from the application permanently. Rejecting a submission notifies the customer that there is an issue and allows you to choose a reason and type in a message regarding the problem. Rejected submissions are not removed and do remain available for future processing in the event that the issue is resolved. For these reasons, deletion should only be used for clearing duplicate submissions, old rejected submissions, or removing an unwanted submission at the direction of a customer, for example. |
What if I accept an ecommerce request and then cancel the transaction (Cancel (F9))?
Canceling leaves the submission untouched. It will remain available for future selection and processing (or later rejection).
What happens if I reject an ecommerce quote or order?
The quote or order remains available for future processing, but the application updates the record with the rejection status and comment. The application sends the customer a notification (if the email address is available). They can also see that the order or quote was rejected in the ProLink app (under either Orders or Quotes). The application also updates the record for display in the website.
What happens after I process an ecommerce order or quote?
If the account's primary (billing) contact has an associated and valid email address, the application sends an email notification that their order or quote was processed (when you have enabled the Confirmation Emails settings in the Ecommerce parameters). In addition to this notification, the customer can check the website to see when their order or quote has been processed (approved).
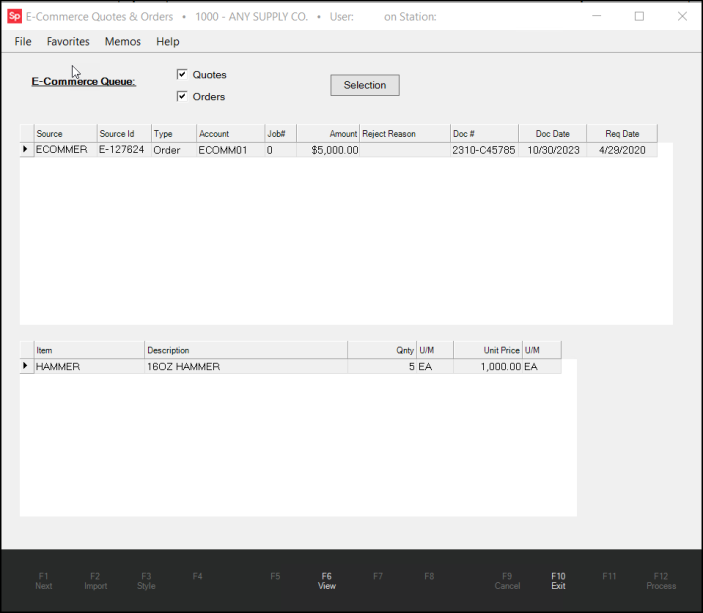
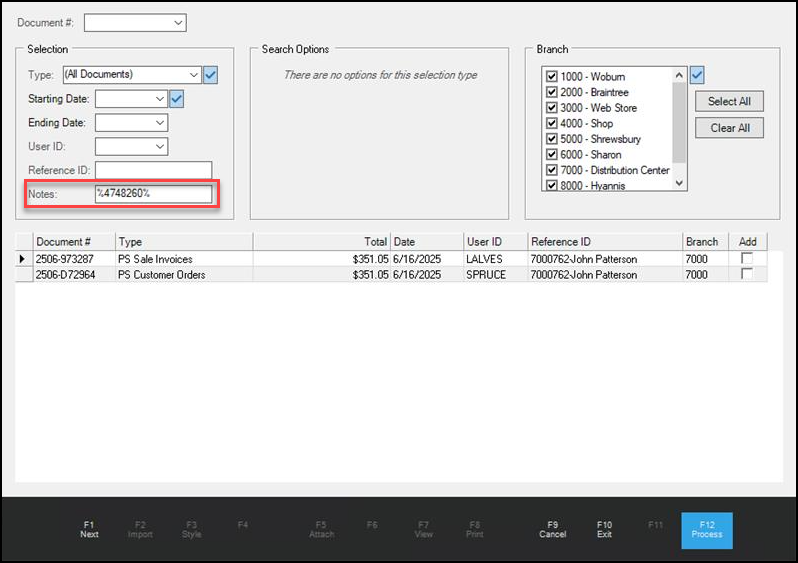
How can I view ALL ecommerce order/quotes?
Yes. Go to Inquiry > E-Commerce (E-Commerce Inquiry) to view all or selected order or quote requests with item details.
Note: If you are looking for a Spruce eCommerce order (with a SPEC-specific ID), we keep track of this information in the Order and Sale documents linked to the transaction. You can use the Document Viewer to search for the ID by entering the seven-digit ID in the Notes field between two % symbols.
Accessing your Spruce eCommerce Website from the Application
You can look up your Spruce eCommerce website from within the application using the setup procedure below.
To access to your Spruce eCommerce website from within the application:
1. From the Main Menu, choose Maintenance > Database > Parameters. The Parameter Settings form displays.
2. Select Point of Sale > Ecommerce to display the ecommerce settings.
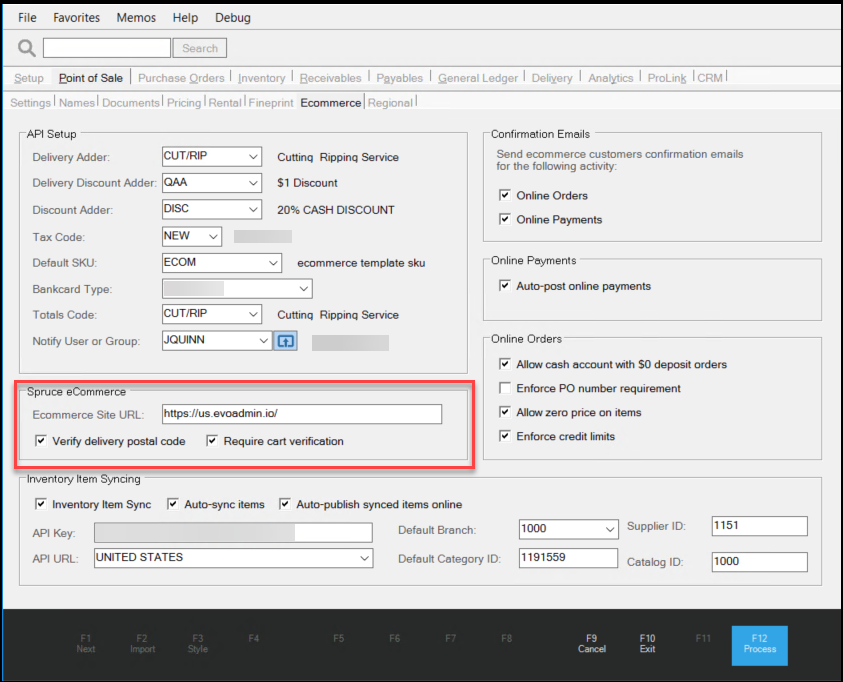
Parameter Settings > Point of Sale > Ecommerce
Important Note: Your EvolutionX API key must be active to display the Spruce eCommerce box shown in this figure. If these fields do not display, check with your ECI Implementation or Support Specialist to enable this setting.
3. In the Ecommerce Site URL enter the website URL.
Note: If you cannot access this field, reach out to your ECI Implementation or Support Specialist to complete it.
4. Choose Process (F12) to save this setting.
The application saves your ecommerce website to the application. You will notice that a new top menu option displays, Ecommerce.
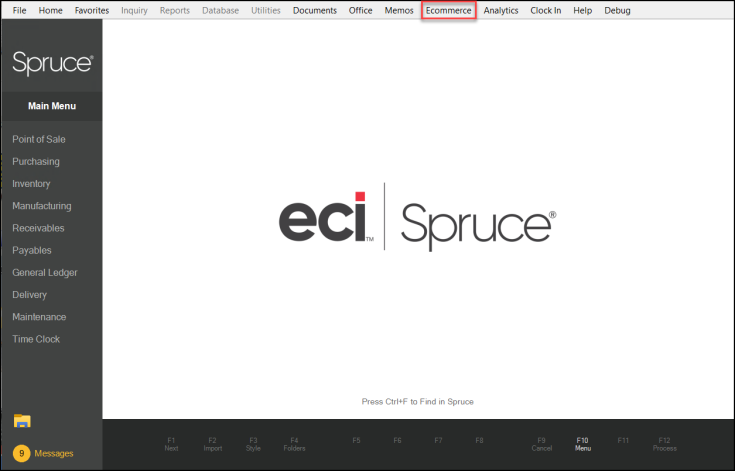
5. From the Top Menu, choose Ecommerce.
Your Spruce eCommerce website displays.

Spruce eCommerce Website
After you complete steps 1 through 4, the website will display whenever you choose the Ecommerce menu option.