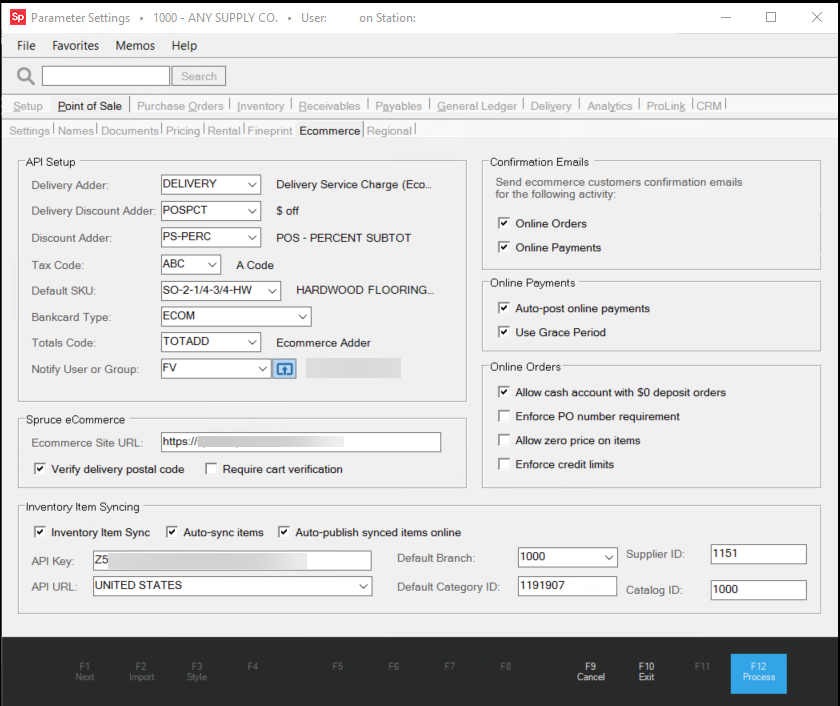
Parameters > Point of Sale > Ecommerce Tab
The ecommerce API and the ecommerce tools in the application allow you to sell your products to your customers (consumers and accounts) online and process those orders and quotes using the import function in Point of Sale. You can also process an account's payments submitted online. The instructions on this page are the same for both the Spruce and RockSolid MAX applications. To complete the setup process, you must have administrative permissions to the application. This section explains the parameter settings for ecommerce imports only.
For a comprehensive understanding of all of the required ecommerce set up, see the Special Topic on Ecommerce.
Note: The Spruce eCommerce-specific settings give businesses access to both the Ecommerce API and Spruce eCommerce-based methods and features.
A Note about Cloud Hosted and On Prem API Updates
When we upgrade the application in the Hosted environment, the application contains the new code to support the new API by default. On-prem systems rely on an automated process that is triggered nightly by the Spruce services running on their SQL server, which checks for, downloads, and installs updates to the SpruceWeb web service. This on-premise process is not always reliable, due to local environmental settings (including Servers and Network infrastructure), which can result in the SpruceWeb web service not being updated to the latest release.
Completing the Ecommerce Parameter Settings
Use the options in this tab to setup the adjustment codes, tax settings, default SKUs, bankcard types, and notification settings required to support the use of an API (Application Programming Interface) in processing incoming orders, quotes, and account payments. You can also specify confirmation email settings, define how to apply online account payments, and specify how online orders are managed using the parameters in this tab. After you save these settings, much of the ecommerce process runs as you have directed here.
The settings for Spruce eCommerce are slightly different than for businesses that use the Ecommerce API only. See the Spruce eCommerce topic here for more information.
ECI Support team members can help you set up the background options for your custom ecommerce website, but these settings you can complete on your own.
To set up the ecommerce parameters:
1. From the Main Menu, choose Maintenance > Database > Parameters to display the Parameter Settings form.
2. Choose the Point of Sale tab and the Ecommerce tab to display the ecommerce settings.
Note: The Spruce eCommerce and Inventory Sync settings only display for Spruce eCommerce customers.
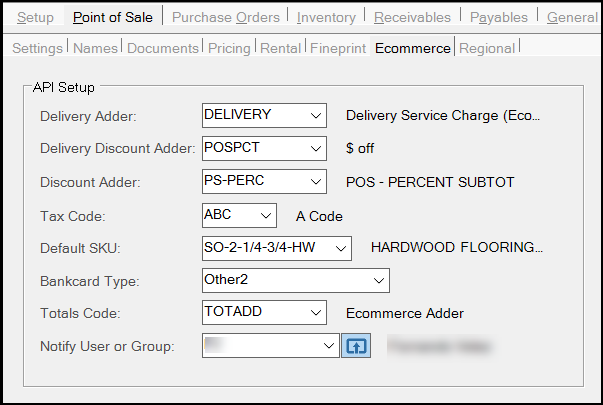
3. Complete these ecommerce setup options to manage incoming orders and quotes:
-
Delivery Adder
This adjustment code is used to either set or calculate the delivery charge for online orders. When you create the delivery adder code, it appears in this list.
For assistance in setting up this adjustment, see Setting up the Delivery Charge Adder Code.
-
Delivery Discount Adder
This adjustment code is used to either set or calculate the discount for the delivery charge, if applicable. When you create this discount code, it appears in this list.
For assistance in setting up this adjustments, see Setting up the Delivery Discount Adjustment Code.
-
Discount Adder
This adjustment code is used to apply a discount to an ecommerce order. It is not required. When you create a discount adder of any type, it appears in this list. For assistance in setting up this adjustment, see Setting up the Discount Adjustment Code.
-
Tax Code
Default tax code that is used to calculate the online order or quote's tax amount if there is no local tax amount applied in the response. When you create this tax code, it appears in this list. For assistance in setting up this code, see Setting up the Default Tax Code.
Note: This tax code parameter may require a different tax percentage than is used in the master branch. We recommend you follow local and regional tax guidelines to define this calculation.
-
Default SKU
Use this default SKU whenever the customer orders or requests a quote for non-stocked items. For assistance in setting up this code, see Setting up the Default SKU Requirements.
-
Bankcard Type
The bankcard type helps keep the incoming amounts separate from the store income. This is important for tax purposes. For assistance in setting up this card type, see Setting up the Ecommerce Bank Card Type.
-
Totals Code
When there is a discrepancy between the amount that is calculated during the online transaction and what the application calculates, the system uses the Totals code to manage the difference. Discrepancies usually have to do with tax and deposit differences or issues that occur during the import process. For assistance in setting up this code type, see Setting up the Totals Code.
-
Notify User or Group
After you train your staff how to import and process online orders, quotes, and payments, the system needs to be able to notify them when an online transaction arrives. This entry represents either the user ID of the person who is handling these transactions or the group of users who are notified when a transaction is submitted. For assistance in completing notification settings, see Setting up a User/Group for API Orders and Quotes Notification.
4. When you receive online orders and payments, you can let your account customers know that you have processed them via email using these settings.
-
Online Orders
Choose this check box to notify the customer (using their submitted email address) that you have received their online order. Leave this check box unselected if you use Spruce eCommerce for ecommerce processing. -
Online Payments
Choose this check box to notify the customer (using their submitted email address) that you have processed their online payment. Leave this check box unselected if you use Spruce eCommerce for ecommerce processing.
5. To process payments automatically, select this check box:
-
Auto Post Online Payments
Select this check box to post ecommerce customer-submitted payments to the specified account.
6. Choose one of these options to specify whether to use the Grace Period when calculating customers’ online payments.
-
Leave the Use Grace Period check box enabled (checked) to use the Grace Period to calculate the due date for receivable payments made online. This option is enabled by default.
-
Uncheck the Use Grace Period check box to prevent considering the Grace Period when calculating the receivable payment due date for online payments.
Note: See Understanding the Grace Period Parameter to learn more about this setting.
7. To set the Online Orders options, select the check boxes below to apply specific settings to incoming online orders:
-
Allow cash account with $0 deposit orders
Enable this check box when the business allows customers to purchase items online without paying a deposit.
Note: If the parameter is enabled, the payment bypasses the $0 payment validation processes. If the parameter is not enabled, the method uses the current validation process according to the account type and Card on File properties set for the account. This option is not required for Spruce eCommerce sites. -
Enforce PO Number Requirement
For accounts that have the Require PO setting enabled in Account Maintenance, selecting this check box ensures that each incoming online order has a Purchase Order number assigned to it. When you select this option, incoming ecommerce orders associated with these accounts that do not have a PO Number will result in an error. -
Allow zero price on items
Select this check box to allow incoming online order items to have a price of zero. This option can be applied to Spruce eCommerce sites.
-
Enforce credit limits
Enable this check box to prevent existing accounts from going over their established credit limit amount (auto-processed orders only). This check box is not selected by default. Orders that are not processed automatically will not consider the account’s credit limit.Note: If this option is checked and the order goes over the account’s credit limit, the application queues the order rather than remove it.
8. If you are using Spruce eCommerce to support your website, follow the instructions below:
Note: If you do not see an entry in the Ecommerce Site URL field, contact your ECI Support Specialist, so they can get it setup for you. If you have sufficient permissions, you may be able to add your URL to the field manually. Your EvolutionX API Key must be active as well.
The Ecommerce top menu option does not display if this entry is missing and the Active API Key check box is disabled.
-
Verify Delivery Postal Code Select this option if taxes for the delivery rates for online orders vary based on the customer's local postal code (specific to U.S. deliveries). When you select this option, the application searches for the delivery postal code and applies the tax rate for the delivery charge associated with that location. In some non-U.S. regions, delivery tax rates are uniform across postal codes, so this option is not required.
Note: You set the postal code options in the Zip Codes / Post Code Maintenance form (Maintenance > Database > Zip / Post Codes). See Zip/Postal Codes for these instructions.
-
Require Cart Verification
Select this check box to require the application to verify the delivery, discounts, adjustments, and totals in the online order.
This check box selection is required for Spruce eCommerce websites.
9. For Spruce eCommerce customers, complete the Inventory Item Sync settings and options as follows:
-
Inventory Item Sync
Enable this check box to display the other fields and check boxes related to this feature. The Inventory Item Sync process reviews this check box each time an update occurs. -
Auto-sync items
Select this check box to sync items you have enabled for ecommerce to the items stored in the Inventory Item Sync data store. Typically, this check box is enabled by default. -
Auto-publish synched items online
Select this check box to ensure that changes to the synced items are published when their pricing or inventory quantity information updates. -
API Key
Enter the EvolutionX API Key (not the Spruce -generated key) that links the application to your ecommerce website. This key is available from the Ecommerce Support team. We recommend you store this information offline, securely, in case you need it in the future. -
API URL
Choose one of the following, depending on the customer’s website location:
Note: This is the regional endpoint for the inventory item synch API.
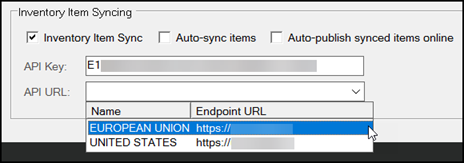
Parameter Settings > POS > Ecommerce Tab > API URL Regional Settings
-
Default Branch
Choose the default branch for the sync process. The application uses the Master Branch setting (from the Setup > Software parameter form) to confirm pricing, to identify whether an item is enabled/disabled, and to check the product’s inventory quantity status. -
Supplier ID
In this field, enter the primary vendor’s ID, which is provided by the Ecommerce Support team.
Note: This identifies the store’s default vendor catalog as set up in EvolutionX. This is not the ID the customer has set up in the application for their supplier. -
Default Category ID
Enter the ID of the category you use as the default, provided by the Ecommerce Support team. This allows customers to map items with no matching group/section IDs in EvolutionX to a default category for tracking and later sorting. -
Catalog ID
In this field, enter the Own Catalog ID established for your business on the EvolutionX platform. This is also provided by the Ecommerce Support team.
Note: To learn more about this process, see Setting up the Inventory Item Sync Process.
10. When you have completed these settings, choose Process (F12) to save them to the database.
Setting up the Ecommerce Adjustment Codes
There are several adjustment codes that the application uses to process incoming orders and quotes from the API. This section explains how these codes should be set up to ensure that they work properly and the positive and negative adjustments show up in the General Ledger accounts as expected.
Setting up the Delivery Charge Adder Code
The Delivery Adder is typically supplied to the application when the online order requires delivery. The amount supplied by the API is applied to the imported transaction using this adder code. Not all API orders have a delivery charge (as in the case of Buy Online, Pick Up in Store (BOPIS)), but when the delivery charge applies, the application uses this adder to apply it.
To set up the Delivery charge adder:
1. From the Main Menu, go to Point of Sale > Database > Adjustment Codes. The Adjustment Codes Maintenance form displays.

2. Complete the fields in this form as follows:
-
Adjustment Code / Description
Type the name of the Delivery Code adder in the Adjustment Code field and a description of its purpose in the Description field.
Typically, the entries are something like ECOMDEL (no spaces) and Delivery Adjustment for Ecom Orders.
-
Category
Choose Point of Sale in this field.
-
Adjustment Type
Choose Adder in this field. -
Method
Choose Manual Entry in this field. -
Pro-Rate By
Choose Invoice in this field. (Recommended)
Note: You may want to select a different Pro-Rate By option for this setting. See Point of Sale > Adjustments > Pro-Rate By to learn more about this option. -
Default Amount
If there is a default charge for delivery, enter it in this field.
If not, leave this field blank. -
Cost Percentage
If the charge is a percentage of the order, enter the percentage in this field.
If not, leave this field blank. -
Discountable
If you want to apply a discount to the delivery charge, select this check box.
If not, leave this box unchecked. -
Taxable Adjustment
If the adjustment is taxable, click this check box.
If not, leave this check box unchecked. -
Income/Cost/Payables
Choose the appropriate GL account for each of these options.
3. When you have completed these selections, click Process (F12) to save the adder.
This entry will display when the user selects the Adder Code option in the Ecommerce tab.
Setting up the Delivery Discount Adjustment Code
The Delivery Discount Adder allows you to refund the delivery charge amount if your business decides not to charge for delivery, but there is a delivery charge in the ecommerce order.
To set up the delivery discount adjustment code:
1. From the Main Menu, go to Point of Sale > Database > Adjustment Codes. The Adjustment Codes Maintenance form displays.
2. Complete the fields in this form as follows:
-
Adjustment Code / Description
Type the name of the new Delivery Discount Code in the Adjustment Code field and a description of its purpose in the Description field. -
Category
Choose Point of Sale in this field. -
Adjustment Type
Choose Discount in this field. -
Method
Choose Manual Entry in this field. -
Pro-Rate By
Choose Invoice in this field. (Recommended)
Note: You may want to select a different Pro-Rate By option for this setting. See Point of Sale > Adjustments > Pro-Rate By to learn more about this option. -
Default Amount
If there is a default discount amount, enter it in this field.
If not, leave this field blank. -
Cost Percentage
If the discount is a percentage of the delivery charge, enter the percentage in this field.
If there is no discount percentage, leave this field blank. -
Discountable
Leave this box unchecked. This is required. -
Taxable Adjustment
If the adjustment is taxable, click this check box.
If not, leave this check box unchecked. -
Income/Cost/Payables
Choose the appropriate GL account for each of these options.
3. When you have completed these selections, click Process (F12) to save the new discount.
This entry will display when the user selects the Discount Code option in the Ecommerce tab, so be careful that you choose this for the Delivery Discount list instead.
Setting up the Discount Adjustment Code
The Discount Adder allows you to apply any discounts included in the online order to the imported ecommerce transaction.
To set up the discount adjustment code:
1. From the Main Menu, go to Point of Sale > Database > Adjustment Codes. The Adjustment Codes Maintenance form displays.
2. Complete the fields in this form as follows:
-
Adjustment Code / Description
Type the name of the new Discount Code in the Adjustment Code field and a description of its purpose in the Description field.
Note: Make sure the adder name clearly distinguishes it from the other ecommerce adjustments. -
Category
Choose Point of Sale in this field. -
Adjustment Type
Choose Discount in this field. -
Method
Choose Percent of Subtotal in this field. -
Pro-Rate By
Choose Invoice in this field. (Recommended)
Note: You may want to select a different Pro-Rate By option for this setting. See Point of Sale > Adjustments > Pro-Rate By to learn more about this option. -
Default Amount
The entry in this field should be 0.00. -
Cost Percentage
Leave this field entry as 0. -
Discountable
Leave this box unchecked. This is required. -
Taxable Adjustment
If the adjustment is taxable, click this check box. If not, leave this check box unchecked. -
Income/Cost/Payables
Choose the appropriate GL account for this type of adder.
3. When you have completed these selections, click Process (F12) to save the new discount.
This adder entry will display when you select the Discount Code option in the Ecommerce tab.
Setting up the Default Tax Code
If the incoming order or quote comes in with a tax amount attached, the application uses the supplied tax code to calculate the taxes. If not, the application uses the tax code created here to calculate the applicable taxes for the transaction.
To create a default tax code for the ecommerce transactions:
1. From the Main Menu, go to Point of Sale > Database > Sales Tax. The Sales Tax Maintenance form displays.
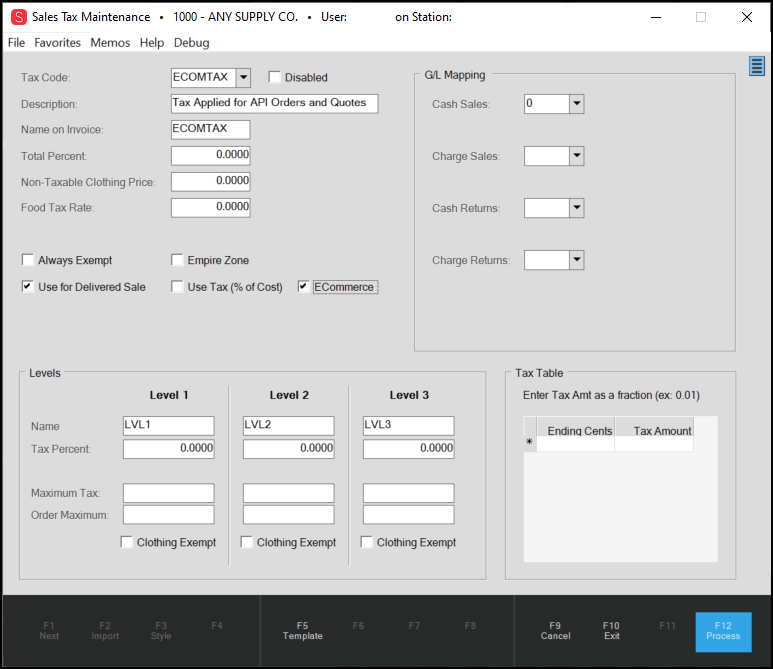
Sales Tax Maintenance Form with Default Tax Entries
2. Complete the fields in this form as follows:
Note: Any fields not mentioned can be left as they are, except when you are setting a code specifically for clothing or food tax rates or tax zones apply.
-
Tax Code / Description
Type the name of the tax code in the Tax Code field and a description of its purpose in the Description field. The Name on Invoice prefills with the entry in the Tax Code field. -
Total Percent
Leave the entry 0.0000 in this field. -
Always Exempt
This option cannot be selected/checked. -
Use for Delivered Sale
Select this check box if tax applies to deliveries. -
Use Tax (% of Cost)
Select this check box if it applies. -
ECommerce
Select this check box. This is required. -
Level 1\Level 2\Level 3
If different levels of tax apply (such as State, County, Municipal, etc.), complete these fields with the appropriate tax amounts. The system will use these fields to calculate taxes for incoming transactions. Select the Clothing Exempt check box for any level that applies. -
GL Mapping: Cash Sales, Charge Sales, Cash Returns, Charge Returns
Select the appropriate GL accounts to which each of these amounts should be applied. -
Tax Table
In some cases, sales tax is not calculated as an exact percentage based upon the transaction total. For example, some areas don't charge tax on amounts below a certain threshold and may also determine "break-points" specifying when tax is to be incremented. In these cases, a tax table is used to handle this situation.
3. When you have completed these selections, click Process (F12) to save the tax settings.
Setting up the Default SKU Requirements
The Default SKU is for non-stocked items and must be applied to all branches that participate in ecommerce.
To create a default SKU code for the ecommerce transactions:
1. From the Main Menu, go to Inventory > Database > Item. The Item Maintenance form displays.
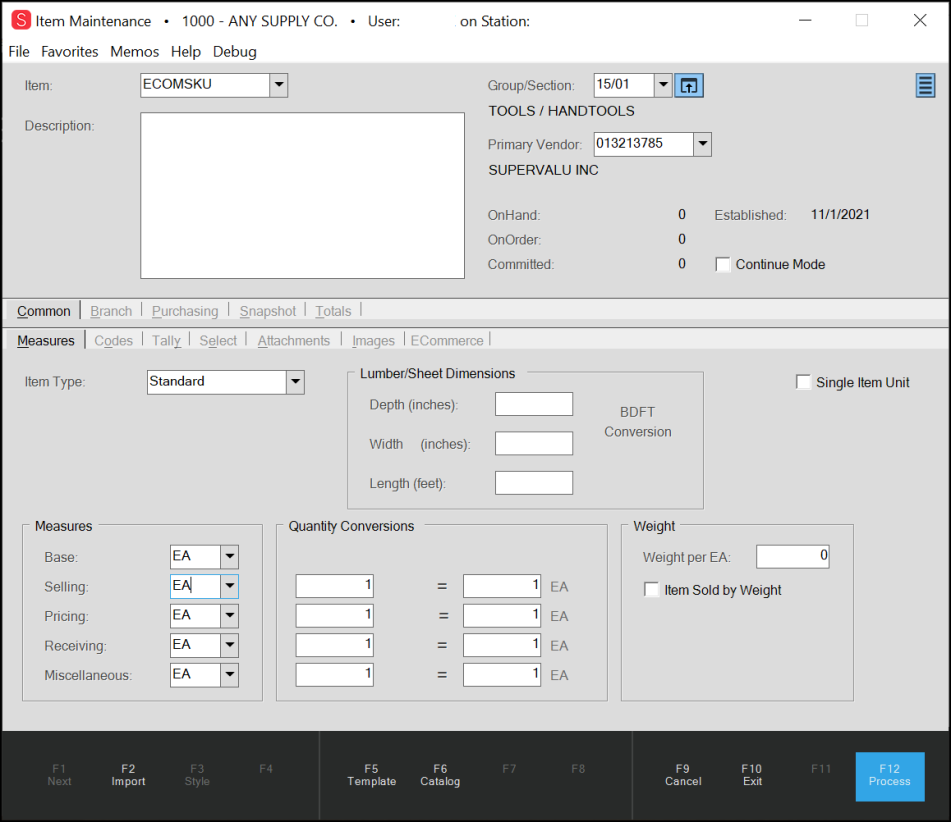
Item Maintenance Form with Ecommerce Measures Entries
2. Complete the fields in the Item Maintenance Common > Measures tab as described below:
-
Item
In this field, type the name of the default SKU for the ecommerce setup. -
Group/Section
Choose the group and section item type of the default SKU. -
Item Type
Choose Standard. This entry is required. -
Measures
Enter/choose the appropriate measure type for the default SKU. Typically, this entry is EA for Each. -
Quantity Conversions
Used when 1 means a pair, or a dozen, etc. Typically, these entries are 1 : 1 for the default SKU.
3. When you have completed the selections in the Measures tab, click the Codes tab.
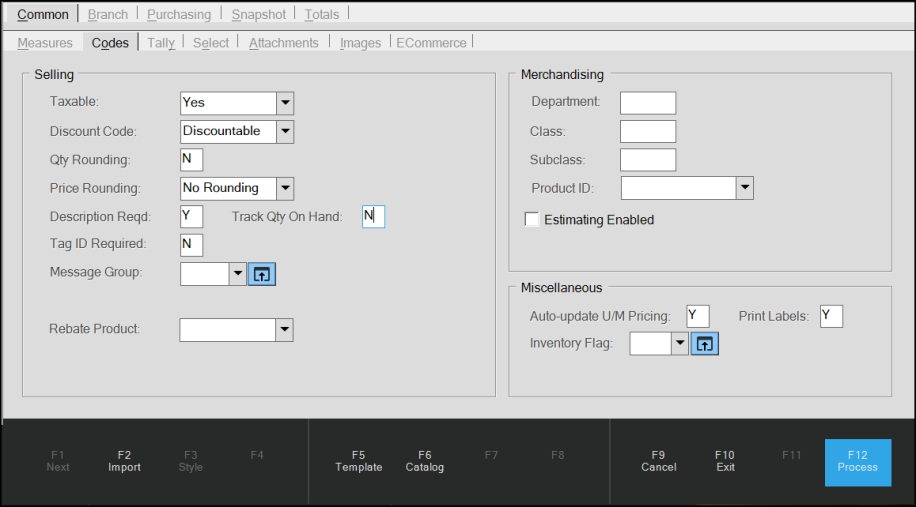
Item Maintenance with Codes Tab Options Entered
-
Taxable
Choose Yes or No, as appropriate for this SKU. -
Discount Code
Choose Discountable or Net, as appropriate for this SKU. This defaults to Discountable. -
Qty Rounding
Type N in this field. -
Price Rounding
Choose the appropriate option for this SKU. This defaults to No Rounding. -
Description Reqd
Type Y in this field. This entry is required. -
Track Qty On Hand
Type N in this field. Since this SKU is for a non-stocked item, this entry is N. This entry is required. -
Tag ID Required
Type N in this field. Since the Tag ID Required prompts requires that a serial number be entered for the item during sale, return, or rental, this entry is not needed.
Note: None of the other options in this tab are required for this type of transaction.
4. When you have completed your entries in the Codes tab, click the Branch tab and the Codes tab.
Note: All branches that accept ecommerce business must have the setting discussed in this section.

Item Maintenance Form with Branch > Codes Options Entered
-
Stocked
Type N in this field. This is required. -
Returnable
Type Y in this field. No other entries are required in this tab.
5. When these entries are complete, click the Pricing tab.
Note: All branches that accept ecommerce business must have the setting discussed in this section.
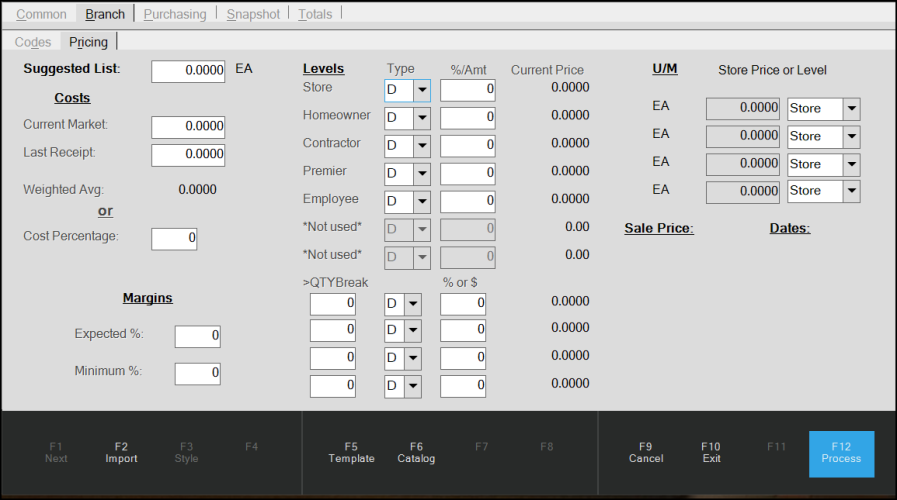
Item Maintenance Form > Branch > Pricing Options
IMPORTANT: No pricing or costs can be assigned to this SKU, but if discount amounts apply for a particular type of customer, complete the discount percentage amount entries before you move on.
6. When you have completed these selections, click Process (F12) to save the default SKU settings.
Setting up the Ecommerce Bank Card Type
This bank card setup must be unique to ecommerce and not be used for any other purpose. This bank card must not be integrated but must be enabled.
The application uses this code for all imported ecommerce transactions when the payment type is bank card (credit card).
Note: This setting must be completed by the ECI Implementation or Support team.
To create an ecommerce bank card:
1. From the Main Menu, choose Maintenance > Database > Parameters > Setup > BankCards. The Parameter Settings form displays.
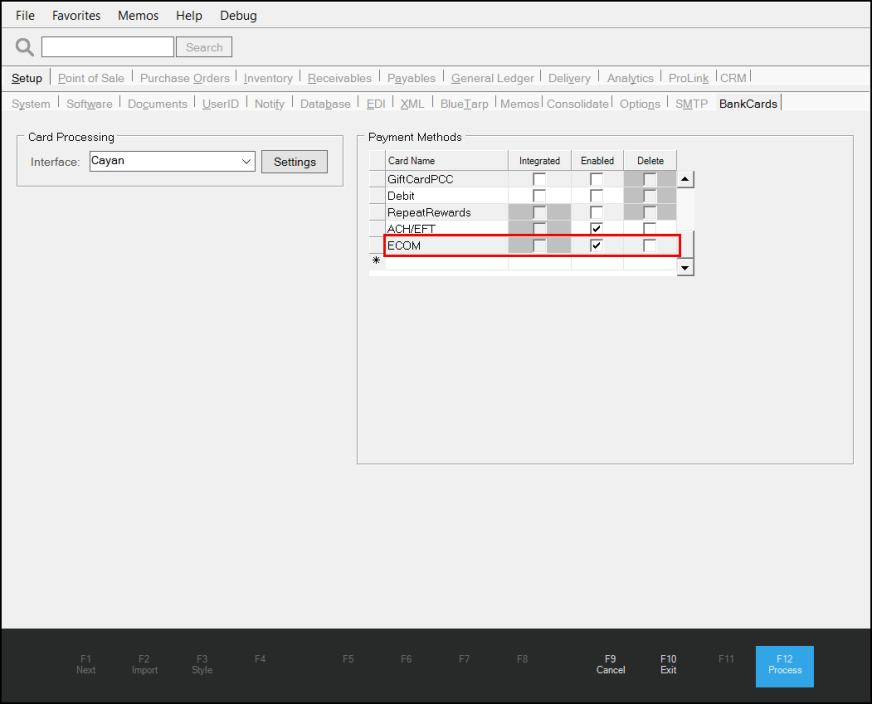
Parameter Settings > Setup > BankCards Options
2. In the Payment Methods box, scroll to the bottom and add a new row.
3. In the Card Name column enter ECOM and select the Enabled but not the Integrated check box.
4. When you have completed these entries, click Process (F12).
5. Return to the Point of Sale tab and choose the Ecommerce tab.
6. From the Bankcard Type list, choose the ECOM option from the list.
7. Choose Process (F12) to save this setting.
Setting up the Totals Code
The application uses the Totals Code when the calculation that is in the ecommerce request does not match the local calculation, and it serves to balance the difference, based on the available information.
To set up a Totals Code:
1. From the Main Menu, go to Point of Sale > Database > Adjustment Codes. The Adjustment Codes Maintenance form displays.
2. Complete the fields in this form as follows:
-
Adjustment Code / Description
Type the name of the Totals Code adder in the Adjustment Code field and a description of its purpose in the Description field. -
Category
Choose Point of Sale in this field. -
Adjustment Type
Choose Adder in this field. -
Method
Choose Manual Entry in this field. -
Pro-Rate By
Choose Invoice in this field.
Note: You may want to select a different Pro-Rate By option for this setting. See Point of Sale > Adjustments > Pro-Rate By to learn more about this option. -
Default Amount
Enter 0 in this field. -
Cost Percentage
Enter 0 in this field.
3. When you have completed these selections, click Process (F12) to save the new adder.
This entry will display when the user selects the Totals Code option in the Ecommerce tab.
Understanding the Totals Code
When a Consumer places an order or requests a quote through an ecommerce website or ProLink and the transaction contains a different tax code from the default tax code, the final tax liability can be different from the submitted tax calculation. When this occurs, the application calculates the new tax amount for the transaction, which can result in a discrepancy between the imported total and internally calculated transaction total. For some transactions, the system can apply an adjustment during the import process, using the Totals Code setting. For others, the user needs to add a manual adjustment to ensure the transaction is processed successfully.
We have developed new processes and alerts to help users manage these transactions with tax differences and help them add the appropriate adjustments during the import process. Since existing adjustment codes can manage some of these issues, these prompts and changes help users navigate these tax liability issues they could face.
Note: These changes do not apply to imported quotes/orders from ProLink or orders from DoItBest BOPIS. The application handles these transactions as it did before this enhancement.
There are three conditions where this tax liability discrepancy can occur. This is how the application helps users resolve these tax-related issues.
When there is a difference between the imported transaction total and the total calculated after the application imports the transaction due to tax calculation differences, consider these scenarios:
Scenario 1: If the imported transaction has a valid tax code (that is not the ECOM parameter tax code) and the order/quote does not contain a deposit, the application adjusts the tax amount internally, applies it to the transaction using the Totals Code, and the transaction does not require a manual adjustment.
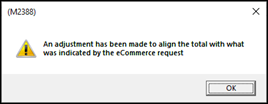
Scenario 2: If the imported order/quote has a valid tax code (that is not the ECOM parameter tax code) and the order/quote contains a deposit from the Consumer that does not pay the entire transaction balance, there is a manual process. When the user tries to accept the transaction, the application prompts them to remove the automatic adjustment. After the user clicks Yes, the following prompt displays:
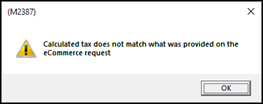
Scenario 2 Alert Message
After the user clicks OK, they review the transaction, identify the appropriate tax amount, and create an adjustment to pay the proper tax. After they click Process (F12), a new message displays:
Scenario 2 Resolution Message
The user clicks OK and applies the custom adjustment to the transaction.
Note: The business pays the difference in taxes for this transaction.
Scenario 3: If the imported order/quote uses the ECOM parameter tax code and the transaction contains a deposit amount, but the calculated transaction does not reflect the deposit paid, the application prompts the user to reject the standard adjustment code. The user adds the deposit amount in the appropriate field to the data grid, and clicks Process (F12). This message displays:
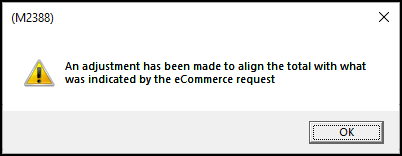
Scenario 3 Resolution Message
After the user clicks OK, the application applies the custom adjustment to the transaction.
When processing an imported order/quote that contains a deposit, but not the entire transaction amount, warning messages display to warn the user that the totals and subtotals do not match the transaction amount:
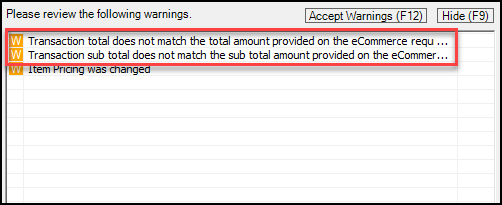
Scenario 4 Warning Messages
-
If the user is processing a quote, the user can accept the warnings and continue.
-
If the user is processing an order, since the Consumer will be resolving the transaction balance when they pick up the order, the user can enter the cash amount required to complete the transaction, and click Finish (F12) to process the transaction.
Setting up a User/Group for Handling Online Orders and Quotes
After you identify and train users on your staff to manage incoming online orders and quotes, you can set up an alert that notifies these users when these transactions arrive. It makes sense to create a unique user group for this purpose to ensure the right people are informed immediately. You can create this group directly in the Ecommerce tab.
To create a user group that for handling online transactions:
1. From the Main Menu, select Maintenance > Database > Parameters > Point of Sale > Ecommerce tab. The Ecommerce tab options display.
2. Beside the Notify User or Group list, click the Settings  icon to create a list of users you want to notify when ecommerce activity occurs.
The User Group Maintenance list displays.
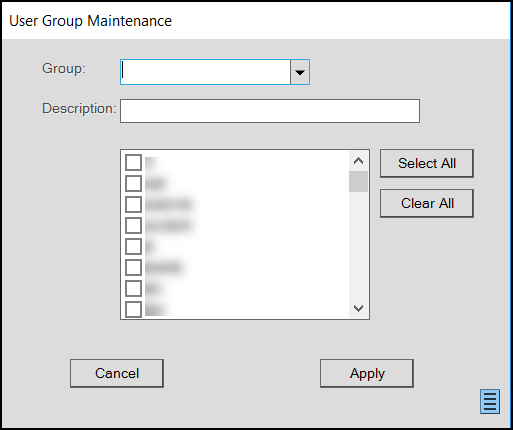
3. Use these fields to describe the group who will manage the incoming orders and quotes:
-
Group
In the Group list, type the name for the new group, such as ECOM. -
Description
In the Description field, type a description of the new group, such as Ecommerce Notification team.
4. Scroll through the list of user IDs and select the check box beside the ID of each team member who can respond to the notification.
5. Click Apply to save your entries and selections.
The Ecommerce subtab redisplays with the new group notification team name.
6. After you complete the other settings you need for processing incoming online requests, click Process (F12) to apply this group to the application.
If you do not add this notification group, the application reminds you to do so with a warning when you try to close the Ecommerce tab:
-
User or Group has not been defined
If you create the group or add a username to this list and then remove the group or the user from the application, a warning message displays when you access this tab:
-
User or Group no longer exists
Understanding the Use Grace Period Parameter
Originally, we added the Grace Period parameter (Parameter Settings > Receivables > Grace Period (Days)) to allow customers additional time to mail an account payment. The Grace Period allows your company to specify a number of additional days before a payment is due. This is particularly useful to customers because it extends the discount for the account payment by this number of days. The Grace Period only applies to account payments, not adjustments or credit memos.
For example, if the posting (or entry date if no post date was specified) is 5/7/2026 and the Grace Period is seven days, the new payment due date is 5/14/2026.
Some ecommerce customers noted that since online payments can be auto-posted, the Grace Period should not apply to these payments. To address this, we have added a new parameter that allows your business to choose whether to apply the Grace Period logic to auto-posted online payments, which is the default behavior, or to prevent this setting from extending the customer’s payment due date by unchecking the Use Grace Period check box.
Keep In Mind:
-
The Use Grace Period parameter does not apply to manually processed online account payments. If a customer submits a payment online, but your business does not have Auto-post online payments enabled for that account, the Grace Period applies, even if the Use Grace Period check box is unchecked.
-
When the Use Grace Period parameter is disabled, the Grace Period setting in the Receivables parameters still applies to your customers who make account payments using another payment method, whether in-store or by mail.
Completing the Spruce eCommerce Inventory Item Sync Process
The Spruce eCommerce data store contains and manages the updates you send to it, including your inventory, pricing, and ecommerce settings you share from your application database. Synchronizing the data in your application with the data store ensures that your customers have a secure access to the most current inventory and pricing information when making their ordering decisions.
Part of supporting your ecommerce website is ensuring that it accurately reflects the inventory and pricing changes you make in the application. When you receive new stock in the store, the website should reflect the new data and show any price updates you have assigned or that apply to this change. When you add new or remove old inventory from your stock, the website should accurately reflect those changes as well.
Using a third-party product to manage this data update process has proven expensive and some customers have reported that the updates are unreliable. To improve performance and increase security for Spruce eCommerce, we have added a new process called Inventory Item Synchronization (Inventory Item Sync), which updates a data store with changes to your Spruce eCommerce-enabled data. New processes monitor the changes you make to your inventory and pricing and transmit the updates automatically to the remote data store every few minutes. This keeps your application and your website in sync. We are using the EvolutionX ecommerce platform to support this change.
We have included the setup instructions for this feature below. The Inventory Item Sync feature is part of the Spruce eCommerce process and is not available to Ecommerce API-only websites. You can enable the inventory sync process for all ecommerce items or for only some of them. See Using Item Global Modify to Enable Ecommerce Sync for All Items and Managing the Sync Process for Individual Items for these instructions.
When you sync inventory using this process, the application adds any new items to the website that you have enabled for ecommerce since the last update, removes any items that you merged or disabled since the last update, and sends the following changes to the remote inventory data store:
-
Item pricing and cost pricing
-
SKU, description, barcode, keyword, lead time, item status (enabled or disabled for ecommerce), and returnability status
-
Changes to the item’s weight or dimensions or other unit of measure changes
-
Item tax category, tax location, or taxable status changes
-
Ecommerce setting changes
-
Inventory item flags that are applicable to the specified items
Note: This list will expand over time as we sync more information for Spruce eCommerce-based websites.
The last sync update information is stored in only one table to ensure there is only one source of truth on the date of the last synchronization between the application and the website.
We will add additional update types as time goes on to ensure that data like quantity on hand, stock images, and category mapping are part of the inventory sync process.
A Note about the Default Category ID
In the remote data store, we map group and section records to a particular category for display on your website. Items in the same category display in the same section (lumber, tools, appliances, etc.). There will be times when you add items to the site that may not fit into one of these assigned categories and have a group/section assignment that is not mapped. The data store uses the Default Category ID to reference these ecommerce-enabled items.
Using Item Global Modify to Enable Ecommerce Sync Items
To set the Enable Item Sync for all ecommerce items individually would be time-consuming, so we have added the Cmn – ECommerce Inventory Item Sync option to the Item Global Modify list so you can set this flag for all ecommerce-enabled items in your inventory. You must have Inventory Administrator permissions to complete this work. When you use the Global Modify tool to make these changes, the application synchronizes these changes with the remote data store.
To set the Inventory Item Sync flag for all ecommerce items in your inventory:
1. From the Main Menu, choose Inventory > Utilities > Maintenance > Item Global Modify. The Item Global Modify form displays.
2. From the Field Name list, choose Cmn – ECommerce Inventory Item Sync.
3. In the Old Value field, enter N.
4. In the New Value field, enter Y.
5. In the Group/Section list, choose the groups and sections that include ecommerce-enabled items.
6. Choose View (F8) to collect the matching items and add the new Inventory Item Sync value to the item record.
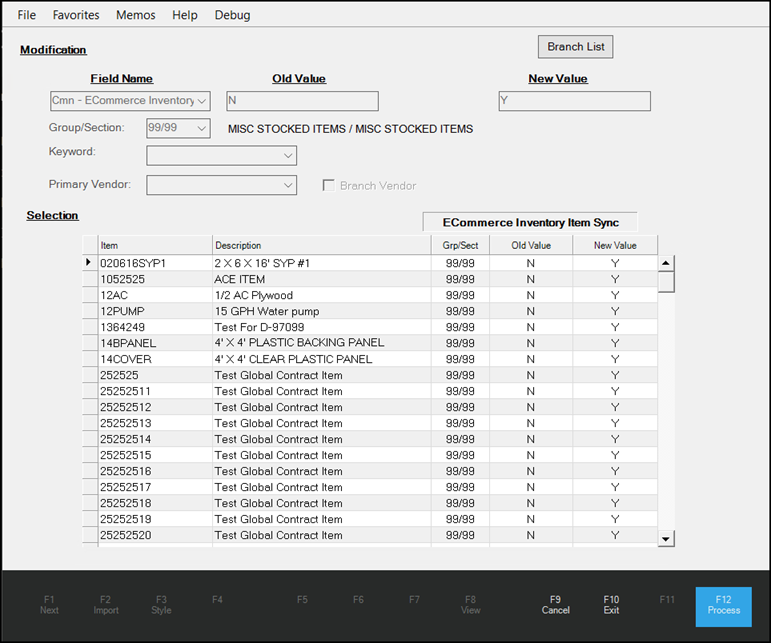
Item Global Modify > Inventory Item Sync Entries Collected
7. Repeat steps 5 and 6 until you have added all the ecommerce items you want to synchronize with your website.
8. Check the list carefully to ensure all the items you want to include in the sync process display in the list.
9. Choose Process (F12) to save the new inventory sync setting to the selected items.
Managing the Sync Process for Individual Items
When you have completed and saved your Inventory Item Sync parameters, you can also enable sync settings for individual items in your inventory. This setting is on the Item Maintenance form, ECommerce tab, and can be set separately from other ecommerce-enabled items in the same group or section. Specifically, this setting can be enabled for these item types: Standard, Lumber, Sheet Goods, Clothing, Hardwoods, Manufactured items, and Food. In this way, you can set the sync option for all items and disable this setting for individual ecommerce-enabled items in your inventory.
When the Item Sync Enabled check box is selected (checked), any changes you make (description, weight, etc.) to the item’s settings are synchronized with the website. When this check box is not selected, any changes to the item settings are not sent to the website.
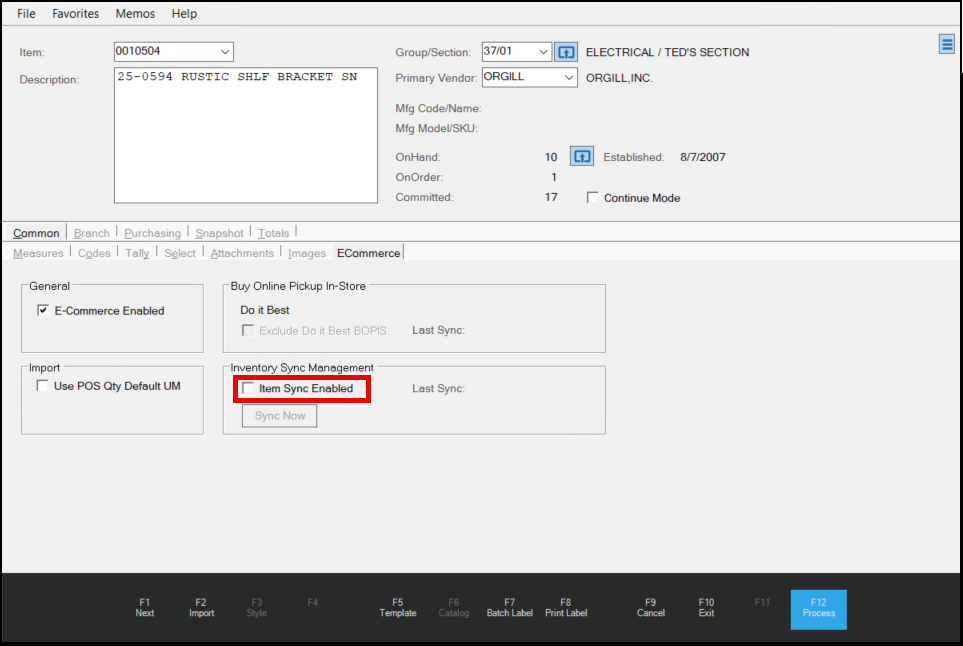
Item Maintenance > Common > ECommerce Tab > Inventory Sync Management Option
To learn more about the Inventory Sync process, see Spruce eCommerce > Inventory Sync.
Processing Ecommerce Submissions (Orders/Quotes)
After a customer submits an order or quote online, the submission should be either processed or rejected by your company. The ecommerce order, quote, or payment doesn't become an actual transactions until someone at your company imports them and processes them. The process is the same for orders and quotes, so we show the order process here. Quotes don't have payments associated with them, typically, but essentially the process is the same. When a customer that does not have a receivables account submits an online order, you can use the Cash account to process the transaction.
To process an ecommerce order or quote:
1. From the Main Menu, choose Point of Sale > <Orders or Quotes>. The appropriate entry form displays.
2. Choose the required account or choose the Cash account and click Tab to add a new Order number. The Import (F2) key enables.
Note: For some accounts the Job # entry is required.
3. Choose Import (F2) and from the context menu, choose the E-Commerce menu item.
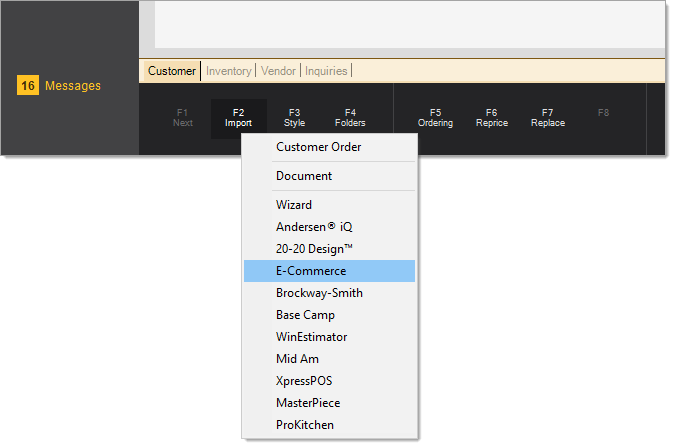
The Import E-Commerce Quote/Order dialog box displays. In the ID list, only orders or quotes that match the customer ID you selected display. If a particular submission is assigned to a job other than the transaction's current job selection, the application will update the transaction to reference the submission's job after the submission is complete.
For Cash accounts, you may need to obtain some order information from the customer to identify the order in the list.

4. From the ID list, choose the transaction you want to process.
A Note About Deleting an Ecommerce Transaction. You can delete a transaction at this point if you need to clear a duplicate submission or remove a canceled request at the direction of a customer. To delete an ecommerce request, click the Menu Marker  icon and select the Delete option.
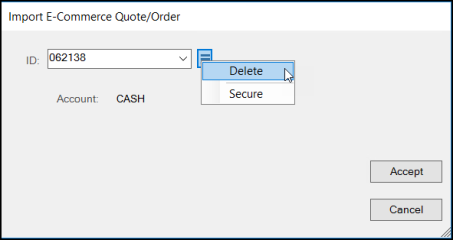
A confirmation prompt displays. Choose Yes to delete the order or quote. You must have specific permissions to perform this action.
You must delete an ecommerce submission before you accept it. This is not the same as rejecting an order or quote (see the IMPORTANT! message below).
5. To import the selected ecommerce transaction, choose Accept.
The items listed in the transaction populate the data grid. After you accept an order you have two options. You can reject the order/quote (as when you don't have the stock to fulfill the order) or you can process the order. If you need to reject the online ecommerce order, see Rejecting an Ecommerce Order/Quote.
6. Review the transaction details to see if there are any changes and to verify that the materials the customer has are the ones they ordered. Typically, online orders are paid in full using a third-party processor, so you do not need to process a payment for these transactions.
However, if the customer only paid a deposit, the application may prompt you to process the payment for the balance. In these cases, it is usually for an account that has a card on file, so you would process the payment using that payment method. You may also process the remaining payment to the account as a charge, if the customer wants to use that option. We recommend that you contact the account customers directly if you are not sure how this process should work for this transaction.
7. When you are ready to process the transaction, choose Process (F12). The appropriate process Document displays.
8. Complete any adjustments or delivery steps that are required for this transaction and choose Finish (F12) to complete the process.
A Note About Importing UOM Tally Items in Ecommerce Orders
When you sell UOM-based tally items online, how the application handles the order import process depends on the platform (Spruce eCommerce or Ecommerce API) you use to do business.
-
Spruce eCommerce
For this platform, the application only allows an overall tally quantity during the order process.
The application converts the tally quantity into the individual UOM quantities supported at Point of Sale. -
Ecommerce API
For this platform, the application only allows an overall tally quantity during the order process. The processing is managed slightly differently for manually processed and auto-processed orders-
If the order includes a UOM tally item and is auto-processed, the application saves the tally item quantity details with the customer order and displays these quantities in the item's Description field on the order document.
-
If the order includes a UOM tally item and is manually imported and processed, the application displays the UOM quantities and totals (in the Unit of Measure Tally box) when you click the Description field after importing the order into the data grid. This ensures the UOM tally item order details display correctly for internal picking teams and in the order document.
-
Rejecting an Ecommerce Order/Quote
Rejected submissions remain available for processing in the future. They display in the Import E-Commerce Quote/Order ID list with the reason selected in the Status column.
To reject an ecommerce transaction after accepting the transaction and displaying it in the data grid:
1. Click the Menu Marker  icon next to the data grid and choose the Reject E-Commerce Order option.
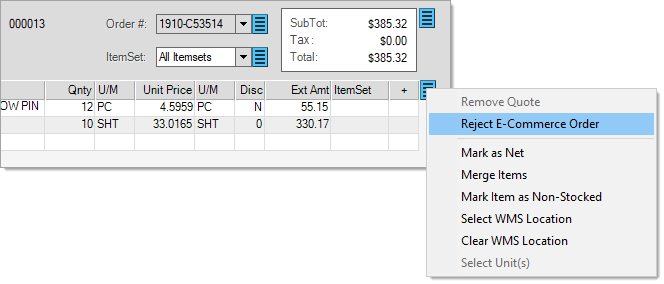
The Reject E-Commerce Quote/Order box displays.

2. From the Reason list, choose the reason for the rejection of the transaction and enter any detail needed in the Additional Comments field.
3. Click Accept to process the rejection.
The application saves the reason code and the message with the submission. The application sends a notification to the customer (if they have an email address associated with the account's billing contact) whenever an ecommerce submission is rejected.
|
Important! Deleting a submission is not the same as Rejecting a submission. Deleting does not send any notification to the customer and the submission is removed from the application permanently. Rejecting a submission notifies the customer that there is an issue and allows you to choose a reason and type in a message regarding the problem. Rejected submissions are not removed and do remain available for future processing in the event that the issue is resolved. For these reasons, deletion should only be used for clearing duplicate submissions, old rejected submissions, or removing an unwanted submission at the direction of a customer, for example. |
What if I accept an ecommerce request and then cancel the transaction (Cancel (F9))?
Canceling leaves the submission untouched. It will remain available for future selection and processing (or later rejection).
What happens if I reject an ecommerce quote or order?
The quote or order remains available for future processing, but the application updates the record with the rejection status and comment. The application sends the customer a notification (if the email address is available). They can also see that the order or quote was rejected in the ProLink app (under either Orders or Quotes). The application also updates the record for display in the website.
What happens after I process an ecommerce order or quote?
If the account's primary (billing) contact has an associated and valid email address, the application sends an email notification that their order or quote was processed (when you have enabled the Confirmation Emails settings in the Ecommerce parameters). In addition to this notification, the customer can check the website to see when their order or quote has been processed (approved).
How can I view ALL ecommerce order/quotes?
Yes. Go to Inquiry > E-Commerce (E-Commerce Inquiry) to view all or selected order or quote requests with item details.
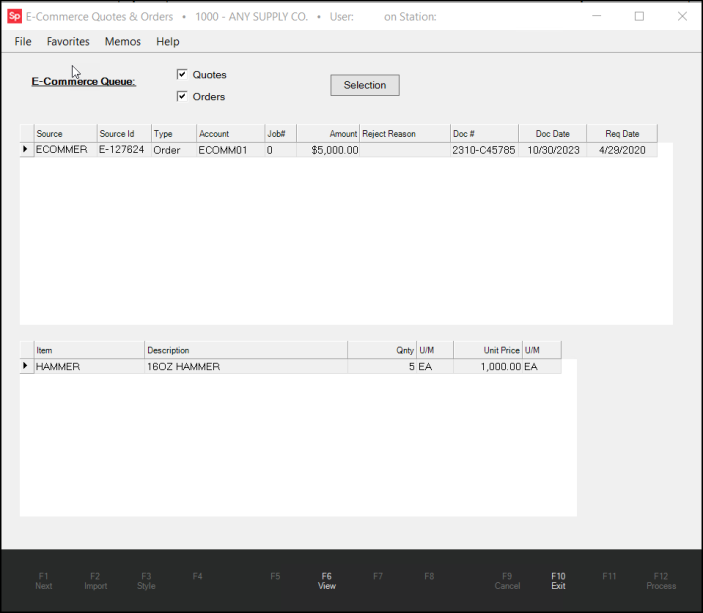
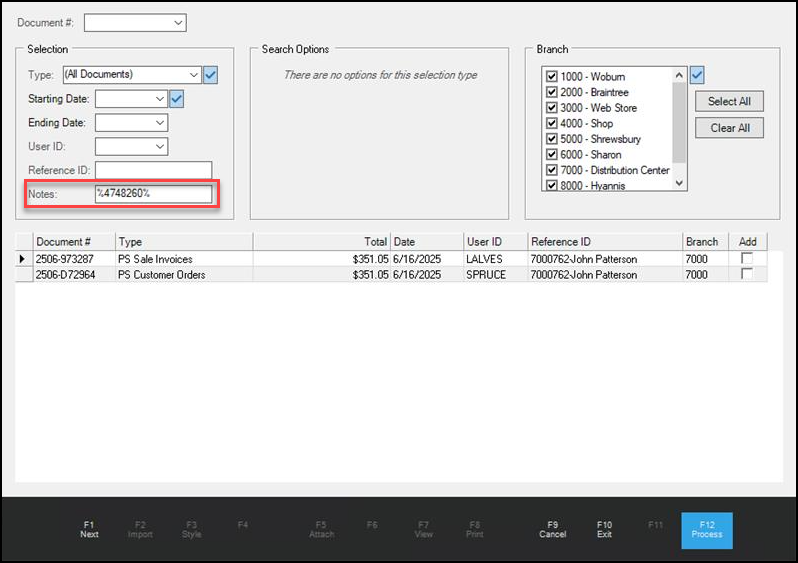
Note: If you are looking for a Spruce eCommerce order (with a SPEC-specific ID), we keep track of this information in the Order and Sale documents linked to the transaction. You can use the Document Viewer to search for the ID by entering the seven-digit ID in the Notes field between two % symbols.
Ecommerce API Documentation
As with all help documentation, the Ecommerce help topic is proprietary and is for ECI customers only. If you would like a third-party web developer or other non-employee to receive a copy of the API documentation, ECI requires a current, executed NDA to access this documentation; please contact your After Market Account Manager to make this request.