Codes Tab (Account Maintenance Form)
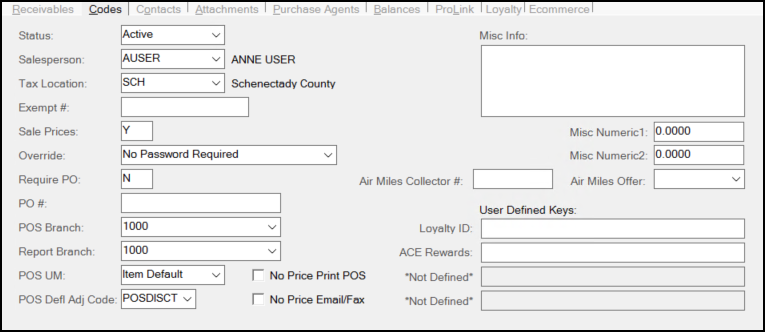
The "Codes" tab displays various information related to the account in general. Some brief descriptions follow:

Account Maintenance / Account Inquiry > Codes Tab
Note: If the software has been configured with multicurrency features, this tab will also have a Currency list for selecting the account's preferred currency type and a Pricing POS check box for specifying that the selected currency should be the preferred currency used for calculating amounts for Point of Sale transactions. These settings must be configured by Support for these parameters to display.
Status
There are five status codes that determine the account's activity level or credit standing; these are: Active, Inactive, Hold, Disabled, and Closed. We suggest that companies never modify the status on the system "CASH" account. The Cash account is used as a default in some cases for transactions and can produce "on hold" warnings or other issues with Point of Sale processing if you modify or remove it.
Active/Inactive
The codes Active and Inactive are classifications that don't perform any special function other than for reporting. Most accounts that are in good standing and being used on a regular basis are going to be Active. Accounts that may have been in good standing but haven't been used for a while might be labeled as Inactive, for example. A monthly procedure runs and compares the inactivity months parameter for accounts to the dollar sales totals for the period. Previously active accounts and/or jobs that have no sales activity for the "inactivity" period are automatically updated to a status of "Inactive" at this time. The status of an "Inactive" account or job will be updated automatically to "Active" when sales totals are updated for transactions involving the account or job. No other status types are automatically set or modified.
Hold
An account with Hold status is included in selection listings and allows selection for Point of Sale transactions; however, a warning is produced. Statements are still generated and printed for Hold accounts. These accounts will be assessed finance charges on outstanding balances. Balances will be aged the same as Active and Inactive accounts. Hold may be used in combination with credit override to block an account from charging. The "Hold" status is intended more as a way to warn the sales clerk that there is an issue with the account before they begin the transaction.
Disabled
Accounts that are Disabled stay on the system, but don't appear in selection listings or reports. To maintain links in documents and other data, accounts may not be deleted once added. Disabling an account is, therefore, a replacement for deleting. This option might be used in cases where an account is inactive for an extended period of time, or if a new account is set up to replace an existing one (marking the original account as disabled so that it's no longer used).
Closed
The Closed status is intended to be used for accounts that have been classified as bad debts. Closing an account essentially freezes all activity. Closed accounts will not print statements; however, if the account has a balance, a statement document is generated but is flagged so that it won't print with other statements. In this case, the statement can only be accessed using the Document Viewer. Closed accounts are not assessed new finance charges and their account balances are not aged. Important! Because closed accounts are not aged, we strongly suggest that users not mark any account as closed if there has been activity in the current billing period. If there has been activity, such as a balance adjustment (to write off the account, for example), wait until after the next cycle period begins before closing the account. Otherwise, the current activity won't be reflected properly on reports such as the trial balance, for example. It's OK to temporarily disable the account so that it isn't used in the meantime.
For more information about how account statuses are used in various areas, refer to the sub-topic "customer status."
Salesperson
Use this field to set the user "assigned" to this account. Assigned users are primarily done for the purposes of calculating commissions (if done).
Tax Location
Use this field to assign a tax location to the account for sales designated for delivery, as tax exempt, or to a business in a development zone ("Empire" zone). For companies operating in Canada, the account's default tax location should never be set to the "system" default GST tax location. If used, the tax location assigned should always be either a PST or HST tax code. We now prevent the GST tax location from being assigned to accounts through the Account Maintenance form. For accounts in some regions, this entry is affected by the Inc Tax and Ex Tax settings for this location.
Exempt #
If the account has a tax exempt identification number, enter it here. It may also be a good idea to use the attachments feature to associate a scanned copy of the account's tax exempt form with the account for easy reference. Assigning a tax exempt number to an account causes no sales tax to be charged at Point of Sale for "taxable" items. "Always" taxable items will be charged sales tax regardless of the account's exempt status (typically, this includes "luxury" type items such as candy, soda, etc.). If an accountis assigned to both a tax exempt number and a tax exempt default tax location, the account's tax location will be used for Point of Sale transactions. If the account has a tax exempt number but a "taxable" tax location, the account's tax location will only be used if the transaction involves a delivery.
 Tax Settings for Canada
Canadian settings are only available when the system parameter designates that the application is being used in Canada.
PST Exempt #
PST (Provincial Sales Tax) Exempt # field is used for accounts that have been issued an exemption certificate from retail sales tax normally paid by the consumer. It may also be referred to as RST (retail sales tax) or using other abbreviations based upon the province that the tax is collected by.

GST
This field is provided for a GST (Goods & Services Tax) exempt identifier. GST is a federal sales tax. In some cases, provincial and federal taxes are combined together (HST).
Sale Prices
Sale pricing can be either enabled (Y) or disabled (N) for an account. Accounts may have statement or other discounts, so a company may decide not to honor sale pricing when other special pricing arrangements have been agreed upon. If this field is set to N (No), items the account purchases will not be sold using sale prices, and will just be sold using the account's normal pricing. If Y (Yes), items will be sold and discounted (if applicable) using the item's sale pricing (if any). This setting only applies to Sale Pricing, not to the application's promotional pricing option or any third-party loyalty program such as ACE Rewards™.
Override
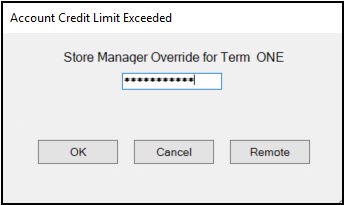
This setting determines when a credit override should be required. We should note that the "balance" override types prompt for an override when the account exceeds whichever balance is indicated; however, it also prompts anytime an account exceeds their limit regardless of their balances. Credit Overrides produce a window that requires either immediate or remote entry of a password before processing can continue.

Account Credit Limit Exceeded > Store Manager Override
Choices include the following:
•No Password Required
•Store Mgr (Manager) Password
•Credit Mgr (Manager) Password
•Credit Mgr Password if 30 + Balance
•Credit Mgr Password if 60 + Balance
•Credit Mgr Password if 90 + Balance
•Credit Mgr Password if 120 + Balance
The No Password Required option disables any override notice from appearing when the account exceeds the pre-set limit. Both the Store Manager and Credit Manager passwords are set at the branch level. These managers can issue the override permission remotely using the Credit Limit Override utility. For more detailed information about how credit overrides function, click here.
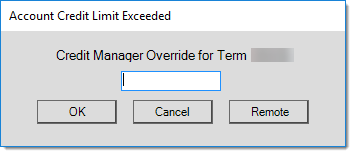
Using Credit OverridesYou can use Credit Overrides to prevent an account or job from charging amounts at Point of Sale that are over the amount stored in the Credit Limit field on the account's or job's Receivables tab. These account or job override settings determine if, when, and how an override prompt displays. These override prompts can display when the credit limit is passed during any type of Point of Sale transaction. The application uses the following calculation to determine if the account or job requires an override: (Outstanding Balance + Finance Charges - Credit Balance) + Charge Amount + Order Balance) > Credit Limit This calculation will be done at the "account" level for any account that does not maintain job balances and for accounts that use job-level billing, the application uses the job's balances instead. The Order Balance is always considered since an order is considered a commitment to purchase goods. Even if the account or job passes the initial test (based on the calculation above), the account or job can produce an override based upon a particular aged-balance. (60-Day Balance + 90-Day Balance + 120-Day Balance) - Credit Balance > 0 It's important to point out that the account may still have credit available when the balance trigger produces a warning. In addition, these balance messages don't bypass the more general check of the account or job balances, so if the account is charging more than their overall limit allows, the credit override will still display, even though they may not have a "60-Day" balance, for example. Messages produced at Point of Sale vary based upon the exact reason for the override. Here are some of the messages that you might see... "Account/Job Credit Limit Exceeded" "Job Credit Limit Exceeded" "Account Credit Limit Exceeded" "Job 60+ day Balance Exceeded" "Account 120+ day Balance Exceeded" When an override prompt appears during Point of Sale processing, the following form displays with one of these messages in the heading:
This box contains a label ("Credit Manager Override for Term..." or "Store Manager Override for Term..."), which explains the type of password required. There is a text area where the Point of Sale user can enter the override password, and there are three buttons: OK, Cancel, and Remote. There are several ways you can use this feature: •Manual Entry of the Password at Point of Sale
•Remote Override using the Credit Override Utility
If the override requires a Credit Manager-type override, the application sends an immediate notification via email to the Credit Manager's cell phone (if the Credit Manager has a cell phone and provider (carrier) designated in their User ID form). Otherwise, the application delivers the notification via either the notification queue or via email (if added in the User ID form). The notification is sent as soon as the dialog box opens and is not triggered by clicking the Remote button. "Store Manager" password type overrides can still be processed remotely; however, the application does not send an immediate notification. It may still be necessary for the Point of Sale user to contact the Credit Manager or another Manager independently of the notification such as if the party who would receive the notification isn't available, for example. 1The same security settings apply to both the Spruce application and the AnyWare app. 2The user must be logged into the software in order to receive standard notifications (does not apply to text messages or email). Understanding the Account Settings vs. Job SettingsJobs offer a variety of "override" options that determine whether to use the job's settings or the main account's. These "overrides" including options about when to trigger a credit override. It's important to point out that even if you choose to "override" the account's override settings on a particular job that the account is always checked for an over limit situation. If the account is over its limit (using the calculation shown above), its override settings are used in place of the job's in ALL situations. Only in cases where the account does not require an override but the job does indicate an override will the job's settings potentially be used. Another thing to consider is that jobs don't necessarily maintain independent balances. Account level billing customers won't have individual job balances, so any credit limit check is done at the account level in these cases. Conceptually, the account's credit limit should either match or exceed the total credit limit for all of the jobs assigned to the account. This is not enforced by code when assigning credit limits to jobs or the account since the status of jobs and number of jobs used with an account can change at any time; however, the override logic effectively does enforce this limitation. Even if a job's limit is set to an amount higher than its linked account's limit, any transaction that exceeds the account's limit will still produce an override using the account's settings. It is also not possible to have a job with the "no override" setting and a credit limit when the account has a zero limit and always requires an override, for example. Draw Down JobsIf the transaction's job is a "Draw Down PO"-type job, the application calculates the need for the override differently: (Credit Limit - Charge Amount - Job Order Balance) < 0 *The "Draw Down PO" type job automatically reduces the job credit limit each time a transaction is processed. Payments don't increase the job's available credit in this case. The credit limit is used as a maximum cap on total purchases by the job. Override TypesThere are a number of situations and factors that determine when an override is produced; however, once an override is indicated, there are two types: Store Manager and Credit Manager. Each is typically assigned a different password. Credit Manager is typically considered a "higher" level override than the Store Manager and often would be reviewed remotely using the Credit Override utility. Store Manager passwords are generally treated as a "lower" level override and often would be typed in during Point of Sale processing by a designated Manager at the Point of Sale station. Either type of override can be reviewed and optionally issued remotely using the utility, however. Just as with other aspects of the override logic, anytime the account triggers an override, its settings (such as the "type" of override) will be used instead of the job's. Disabling the OverrideAccounts or jobs can be set to "No Password Required." This effectively disables any overrides when applied at the account level. This might be done in cases where the account owner is completely trusted but is not suggested otherwise. If used, this setting will allow the customer to charge beyond any credit limit you have established. Once again, this setting is only applied at the job level when the main account does not meet the criteria for requiring an override. For example, setting the "No Password Required" on a job won't allow the job to charge beyond the account's credit limit if the account's override type is something other than "No Password Required." |
Require PO
This refers to a purchase order (PO) that the account supplies. Some accounts may require a purchase order be associated with any purchases their employees make on their behalf. If the account requires a PO for their purchases, set this field to Y (Yes). Purchase Order entry will then be required for this account during the processing of most Point of Sale transactions (the account's purchase order is designated on the Account tab of the Process (F12) form).
PO # (Number)
An account may use a single purchase order (PO) for their account or on specific jobs. A job's purchase order number can optionally override any default PO assigned to the account. Use this field to assign a specific PO number to all sales for the account if applicable to this account. This PO number will be printed on relevant Point of Sale documents. Emails originating with most Point of Sale transactions now include the account's PO number in the message notes and/or subject (depending on the transaction). The maximum length for the account's PO number is 20-characters.
POS Branch
This setting can optionally be used to limit the account's Point of Sale transactions to a specific branch or branch list. The account will only be available for selection in the branch (or branches in a list) from a station that is currently accessing an assigned location. It's important to point out that this setting is entirely optional and does not have to be used. There are company's with multiple locations that prefer to maintain separate groups of accounts. This setting is one way or part of handling this.
In addition to assigning one specific branch, users can set up a list of branches and assign that list to an account. Branch lists won't show up in the normal "branch" drop down. To designate a list, users much first choose "Branch List" from the alternate menu. Branch lists are defined from the "Branch Lists" database form available in the Maintenance area.
Report Branch
The Report Branch setting is similar to the POS Branch option explained above. In this case, assigning a branch (does not support branch lists) limits the account to that location for reporting purposes. For example, if an account is assigned to branch 2000, and an account-based report is run for only branch 1000, the account won't appear on the report. Report branch does not necessarily apply to every report and only applies to reports provided within the application. This would not apply to any third-party reports, such as those using ActiveReports® software, unless the report was specifically coded to consider this setting. The Report Branch entry is optional and would likely only be used in cases where a company intends to maintain a separate base of accounts by location.
POS U/M
The POS U/M (Point of Sale Unit of Measure) setting allows users to specify the default pricing measurement used for items in Point of Sale transactions involving this account. For example, if all of your lumber goods are normally priced by the MBF (thousand board foot), but you want a particular account's prices to instead show pricing by piece, use this setting to accomplish this. The "item default" setting allows the item's settings to determine which unit of measure to use for pricing, so it's essentially a "no preference" option.
No Price Print POS
This setting sets the document style for invoice and order documents processed from the Sales and Orders transactions to the "No Price" document style. This does not affect documents when viewed from the Documents Viewer (unless the "no price" style is selected). Select the No Price Print POS check box to enable this option.
No Price Email/Fax
This setting sets the document style for invoice and order documents that are sent via email or fax to the "No Price" style. Invoice reprints for statements do include pricing. Select the No Price Email/Fax check box to enable this option.
Currency
From this list, choose the currency the customer uses to pay this account's bill.
Pricing POS
Select this check box to display the customer's currency in the Point of Sale forms. If you select a currency different from the local currency, but do not select this check box, the local currency will display in Point of Sale forms only.
Misc Info (Miscellaneous Information)
The Miscellaneous Information text area is provided so that users may add notes about the customer account. These notes are available during inquiry and are also included on the Customer tab in the Activity folders (when applicable).
Misc Numeric1, Misc Numeric2
These fields are similar to the user-defined keys in that they may be used for any purpose; however, the difference is that these fields are limited to decimal (numeric) values. Since you can only enter decimal values, these fields are safe to use for figures that you might want to use for custom reporting and dashboards. The field labels for these keys are set in the Parameters form (Maintenance > Database > Point of Sale > Names tab). You can use these values for sales or margin goals or wallet figures (an estimate of the customer's total purchases that can be used to target sales goals).
User Defined Keys
These fields generally have no preset purpose and are provided so you can keep track of additional information to the account records. You can define labels for these fields in the Maintenance > Database > Parameters > Point of Sale > Names tab in the Acct/Job - User Key Names fields. When you complete these entries in Parameters, they display for all account and job records and users can begin to add information to these fields. You can define up to four keys. Keys that are defined here are available for accounts or jobs; the same labels are used for both.
You can also use the User Defined Keys for account selection (using the alternate menu) when applicable. Most standard application reports do not provide selection using these fields; however, a user-written report using third-party software could certainly do so.
Loyalty/Rewards ID Programs
Frequently, the User Defined Key fields are used to capture an account's or job's Loyalty or Rewards program IDs, particularly for certain supported EDI vendors (currently, Do it Best Corp. and ACE Rewards™). For Do It Best, the key's text must be set to the words "Loyalty ID" and this must be the first key only . For ACE Rewards, the key can be in any position and must include both the words "ACE" and "Rewards." The Rewards ID, when entered, is validated prior to processing. If you enter an invalid ACE Rewards membership ID a message appears. For more information about ACE Rewards click here.

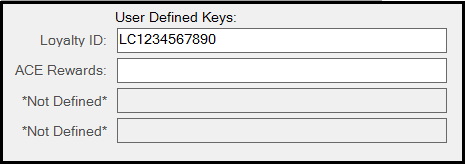
User Defined Keys (Loyalty ID)
If the customer's ACE Rewards ID card is scanned during a Sales transaction, the application will attempt to locate a matching key. If a match is located, the customer assigned to that key will be selected. Although keys can be assigned at the job level, only the master account's Loyalty ID key is used for this purpose.
Regarding the Do It Best® loyalty program (aka. Best Rewards™) specifically, it is not necessary to enter, scan, or select a customer using their Loyalty Rewards ID to associate the customer's purchases with the Loyalty Rewards program. As long as the ID is properly assigned to the customer's account (as described above), EDI will send the customer's loyalty ID along with their transactions in the daily update automatically (regardless of whether the card was scanned).
The Do it Best - Best Rewards feature allows you to add enrollments and updating of Best Rewards member information. When you do, the application includes this updated information in the daily transmission to Do it Best Corp. As part of this feature, Do it Best members now have the ability to associate a customer account with a Best Rewards ID directly from Point of Sale. The ability to add a new "cash-only" account is also provided. Best Rewards can also be used with the "system" CASH account with no direct association to a customer-specific account.
We currently use an algorithm to determine whether or not a Best Rewards ID entered is valid or not. This is done to prevent accidental entry errors by a user. The algorithm checks to make sure that the rewards ID begins with the characters "LC" and that it is followed by a ten (10) digit number where the last digit (check digit) matches a specific calculation.
True Value Rewards does not require any user-defined keys. In that case, membership information is stored entirely in a separate table.
Vendor-sponsored rewards integrations typically require some type of EDI (Electronic Data Interchange) configuration prior to use.
