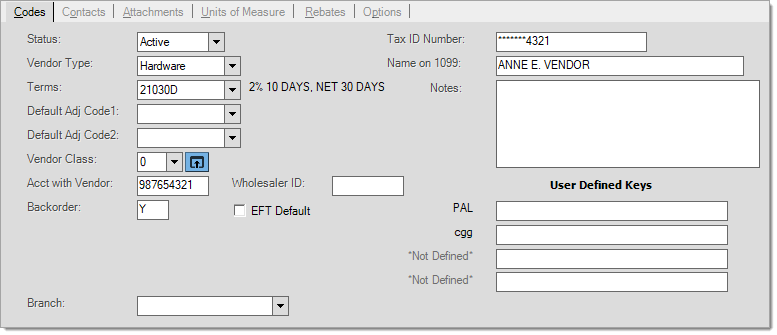
Codes
The Codes folder tab (Alt-C), contains most of the vendor settings such as status, terms, and tax information.
Status
There are four status codes that may be used with vendors: active, inactive, hold, and disabled. Vendors with a status of active or inactive currently have no use restrictions in the software. Vendors on "hold" and "disabled" status are limited. A monthly process can automatically change "active" status vendors to "inactive."
For more information regarding vendor status codes, click here.
Vendor Type
This is primarily a classification tool and is optional. Choices include: Hardware, Commodities, Wholesale, Other, and Pay To. The "Pay To" option is the only type that performs special functions.
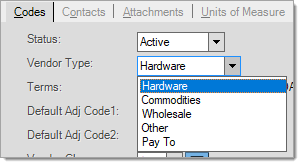
Pay To
This vendor type may be optionally used for vendors who solely operate as a "pay to" and are only indirectly involved in purchasing. For example, your company may belong to a buying group that does not provide products directly or maintain any inventory of its own. If a vendor is assigned to the "pay to" type, the vendor will not be available for selection in Item Maintenance (Primary Vendor), Point of Sale, Purchase Orders, and Receipts. This can prevent the vendor from being used inappropriately for purchasing.
Note: assigning an existing vendor to the "Pay To" type does not modify or remove the vendor on existing items, purchase orders, or receipts.
Terms
Terms codes must be set up prior to use. Terms are used to determine discount amounts and discount dates as well as the due date
Default Adjustment Code
Adjustment codes may be used to increase or decrease the cost of goods purchased or sell for a variety of reasons (freight charges, fuel surcharge, labor, etc.). If you specify a default adjustment code for the vendor, that adjustment code will automatically be linked with either the purchase order or receipt for the vendor. The type of adjustment determines whether it is applied to the purchase order or the receipt.
Vendor Class
Vendor class is another optional tool that may be used for categorizing vendors. The class code can be any 2-character combination of either letters or numbers. Use the maintenance form ![]() icon to add or modify class codes and descriptions.
icon to add or modify class codes and descriptions.
Account with Vendor
This text area is for your company's account number with the vendor (if any). The account number is printed on checks when this vendor is the "pay-to."
Wholesaler ID
If your company does EDI (electronic data interchange) with this vendor, a valid code/name must be specified here. The code required varies based upon the EDI provider/vendor. Normally, the trainer or support technician setting up the tie-in will fill this field in when applicable. Enabling each EDI option requires support assistance and a setup fee applies. In some cases, additional 3rd party charges and/or service fees may apply (depending upon the EDI service used). Effective use of any EDI option may require catalog loads (a billable service) and, in some cases, file maintenance changes to your existing inventory. A listing of the current codes is provided below:
ACE (ACE Hardware Corporation)
DOITBEST (Do it Best Corporation)
EMERY (Emery-Waterhouse Company)
FREEWAY (Freeway Commerce, LTD)
ORGILL (Orgill, Inc.)
TRUSERV (True Value using TruStart2... formerly and briefly named "TruServ Corporation")
TRUEVALUE (True Value Direct)
X12 (X12 is Standard Format not a specific company and is used by a large number of vendors.)
Backorder
When a purchase order is partially received, it's possible for the remaining items to be back-ordered. If done, this leaves the Purchase Order as open so that remaining goods can be received using the same purchase order in the future. Some vendors place goods on backorder automatically; others require that a new purchase order be placed to re-order any goods that were not shipped. If the vendor does back-ordering, enter a Y (yes) in this field. If not, enter N (no).
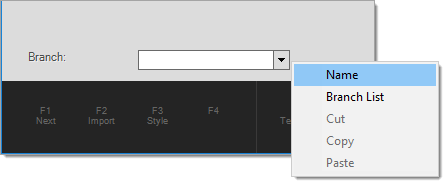
Branch
The branch drop down can be used to optionally assign a vendor to a particular branch location or branch list (branch lists are defined from the Branch List Maintenance form available from the Database menu in the Maintenance area). Assigning a branch or branch list to a vendor limits access to the use of that vendor to the locations specified. Assigning a branch or branch list also prevents Purchase Orders, Receipts, and Pay-to Vendors on AP vendors from being created; however it does not prevent the use of a vendor as an AP Material vendor in any branch.
Please note that although material vendors may be assigned to a different branch, Pay To vendors may not be assigned to a branch other than the one they are originally assigned to. Users who are signed into other branches won't be able select the vendor from drop downs. The listing defaults to individual branches only. To choose a branch list, use the control's alternate menu (usually a right-click) and choose "Branch List." If done, the list will only display branch lists.
Tax ID Number
Use this for the vendor's tax ID number (this is most often used for Federal 1099-MISC reporting). Because this information is considered sensitive, all but the last 4-characters are now masked with asterisks (******1234, for example) during maintenance and inquiry except when the user is a system administrator.
Name on 1099
This field is provided for use if the vendor's name should be represented differently on 1099-MISC forms (parent company name, etc.).
Notes
This area can be used to save additional text information about the vendor. Due to characters used to indicate the end of each line, up to 242-characters are now provided in the text area (increased from 180 with release 12.3.9). Notes can also be viewed in the Vendor tabs of the Purchasing folders. Use your arrow keys to view additional lines of text if entered. No scroll function is provided.
User Defined Keys (1 - 4)
User-defined keys may be optionally defined from the Purchase Orders tab of the Parameters form (Main Menu > Maintenance > Database). Once defined, labels reflect the name assigned to the key; otherwise, the text *Not Defined* is shown and the text areas are disabled (read-only). These might be used for additional information such as for designating buying groups or other miscellaneous information.