Unit Item Tally
To use the Unit Item Tally feature, an ECI Implementation or Support Specialist must select the Enable Unit Item Tracking check box in the Maintenance > Database > Parameters: Parameter Settings > Setup > Options > Point of Sale tab.
Prior to using the feature, set up the default units of measurement in the Units of Measure tab of the Code Maintenance (Definitions) form.
The purpose of this type is to provide a method for managing packaged "units" of product. Typically, the product is lumber; however, we are not limiting the feature to just lumber-type items. Although these instructions are written from a "typical" use perspective, it may be possible to adapt this feature to other types of materials beyond our examples.
To eliminate the possibility of a unit being used simultaneously by someone else, the application locks the unit when you add it to a sale/order/quote, and cannot be used unless it is removed from the transaction or until it has been processed. When you try to add a locked unit to a transaction the application displays a warning message to indicate that the unit is in use.
There are two types of unit item tally types: "Single Item" or "Multi-Item" (multi-SKU).
Single Item Units
Single item units refer to a single product (item) where quantities are received in units. This includes Standard, Lumber/Timber, Sheet Goods, and Hardwoods item types that:
-
Involve a single item.
-
Are ordered by overall quantity or volume.
-
Are either received as units or unallocated.
-
Sell by unit or quantities not allocated to units.
-
Can be transferred across branches.
-
Can be counted during physical inventory.
-
Can be returned.
Setting up Unit Item Tally Types
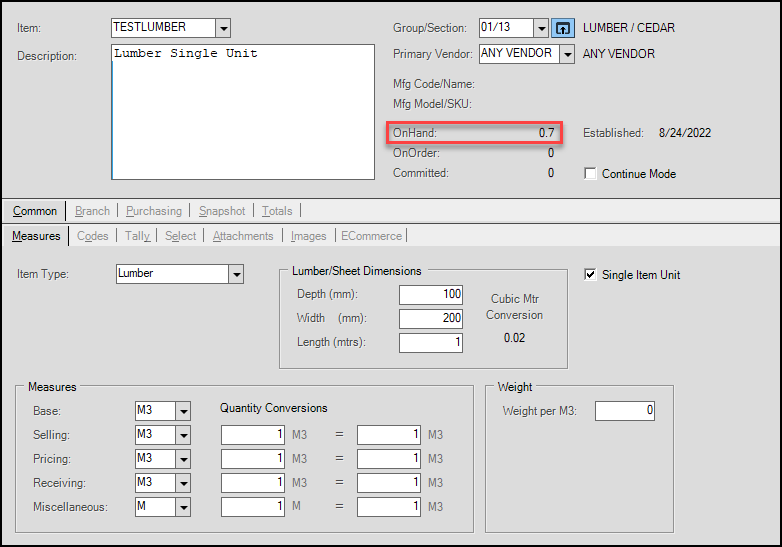
You can use either an existing SKU or new product to create a single-item unit tally. A current on-hand for an existing item will be considered unallocated initially (shelf or bin quantities). The "Single Item Unit" check box found near the "Lumber/Sheet Dimensions" area on the Common, Measures tab of the Item Maintenance form can be used to indicate that the item is a single item unit.

When the Single Item Unit check box is enabled (checked), you can sell or receive the item individually or as a bundle as a unit tally item. Unit allocation and selection is optional.
Ordering a Single Item Unit
Creating a purchase order for a single item unit isn't any different from normal item ordering. A company may or may not know how many units they will receive based on ordering. In some cases, you might be ordering a certain number of actual "units;" however, in others, it might be an overall volume (MBF) or length (LFT or MLF) that is designated. Item units of measure and defaults for quantities during ordering and receiving can vary.
The user can enter a number of units being ordered in the Qty field, and adjust the quantities when the PO is received. The user can also use the "Define Unit(s)" option from the Context Menu Marker  to enter specific requested quantities. This option is only enabled when a row in the data grid containing a unit has been selected (highlighted), and is more likely to be used on multi-item unites but is available for single-item units as well. Before choosing the "Define Unit(s)" option, you should check the Unit Cost of the item(s) in question. If the cost needs to be adjusted, it is easier to do this first (prior to allocating units); otherwise, you will have to set the cost for each unit individually after allocating quantities.
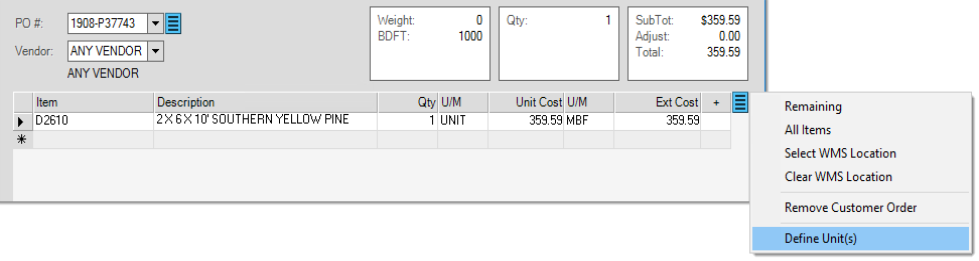
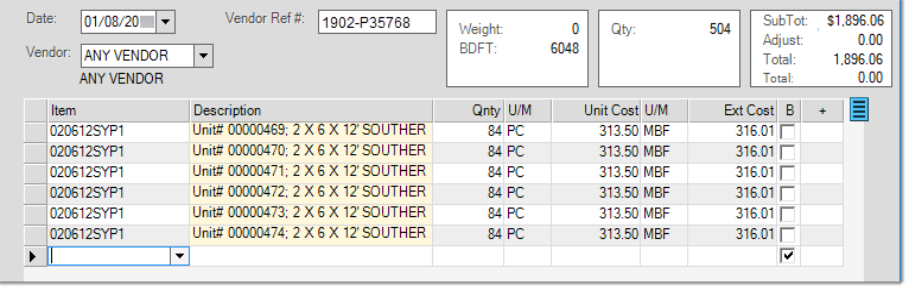
The "Define Unit(s) option will open the "Receive Unit" dialog, which is just for defining units when accessed from within a Purchase Order; it allows the allocation of overall requested quantities to units. The quantity is always entered in the item's BASE measure. More information on the Receive Unit functionality can be found in the Receiving section below.
Receiving
To receive (define) units, select a unit item from the data grid and then choose the "Define Unit(s)" option from the Context Menu Marker . This option is only enabled when a row in the data grid containing a single SKU unit has been selected (highlighted). Before choosing the "Define Unit(s)" option, you should check the Unit Cost of the item(s) in question. If the cost needs to be adjusted, it is easier to do this first (prior to allocating units); otherwise, you will have to set the cost for each unit individually after allocating quantities.
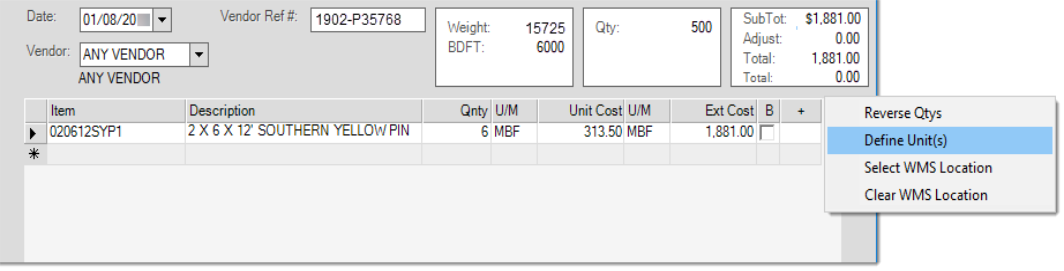
The "Receive Unit" dialog will open allowing the allocation of the overall quantity to units. The quantity is always entered in the item's BASE measure.

Should all or some of the units have the same quantity (in BASE measure terms), you can set the "# Units to Create" value to save time.
Please note: The fields in our example labeled "supplier," "mill," and "location" are user-defined miscellaneous-use fields. They may be labeled differently by your company and are never populated automatically (they can be used for anything). These are optional and are not required. The labels associated with the text areas are set by parameters.
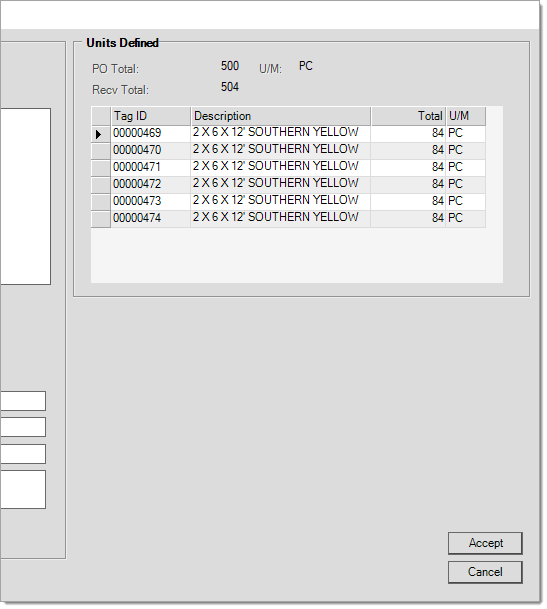
Click "Save" for each unit or group of units you are defining. The "Units Defined" group box below the "Save" button will populate with the units you define. Units are assigned a unique tracking number. Units aren't actually added until you choose "Accept" on the "Receive Unit" dialog. Choose Cancel to start over.
After choosing "Accept" from the dialog, the units are expanded in the Inventory Receiving (Receipts) data grid.
Once the user chooses "Process (F12)", the units and corresponding receipt document will be generated.
Receiving updates the item's on-hand, reduces on-order (if a PO was associated with the receipt), sets the last receipt cost, and recalculates the item's average cost for the branch in question.
Creating Unit Tags
A typical next step would be to print unit tag labels for the units to identify them. This can be done using the "unit tags" option found in the Tags & Labels transaction in the Inventory area. Tags can include a barcode for easy scanning of the unit's identifier.
Selling (Invoicing) Units
Once one or more units have been received for an item, those units can be selected individually for sale. There are two (2) ways to do this:
1. Scan the unit's barcode or enter the Unit ID directly
2. Enter the base SKU that the unit is associated with and then choose Select Unit(s) from the Context Menu Marker .
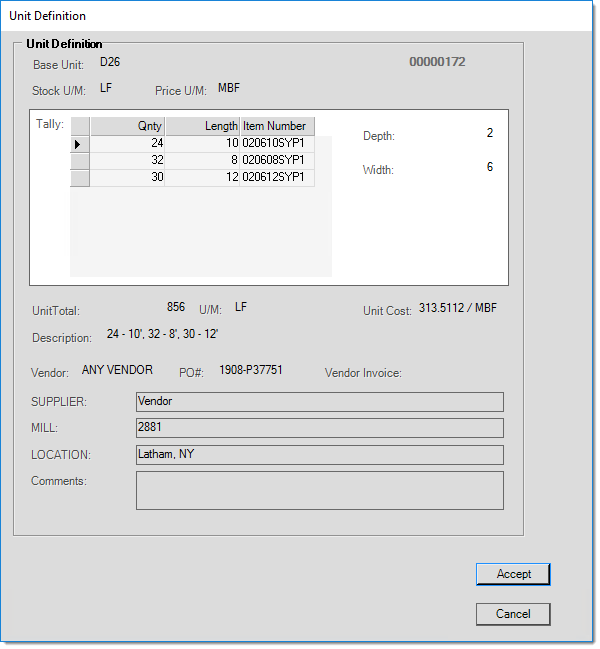
If you scan the unit's 8-digit barcode, and the unit tally feature is enabled (parameter), the "Unit Definition" dialog will display immediately after the scan. This provides the quantity, dimensions, unit cost, and other information (some information is optional and may be labeled differently for your company).

If you aren't scanning the unit barcode, unit selection requires additional steps:
1. Scan or enter the item associated with the unit.
2. Select the row containing the unit in the data grid.
3. Click the Menu Marker and choose Select Unit(s) from the context menu.*

The "Select Unit(s)" dialog opens (shown below).
")
4. Use the check boxes to choose the unit(s) to sell and then choose Accept.
*The "Select Unit(s)" menu item is only enabled when the unit item tally parameter is enabled (checked), the base item is set as a "single item unit," and there isn't already any unit tally data associated with the selected row (which would mean that the item row is already associated with a specific unit... selection has already been done).
Returning Single Unit Tally Items
A customer reported that they were having trouble handling returns of single unit tally items (standard, lumber/timber, sheet goods, and hardwoods). We have created the following process to facilitate these kinds of returns and make returned single unit tally items available for sale again. Items returned using this process are visible in the OnHand field of the Item Maintenance form for the item. To be clear, this process allows the return of multiple single unit tally items, we are just going to show you the process here.
To process a return for a single unit tally item:
1. From the Main Menu, choose Point of Sale > Sales to display the Sale Entry form.
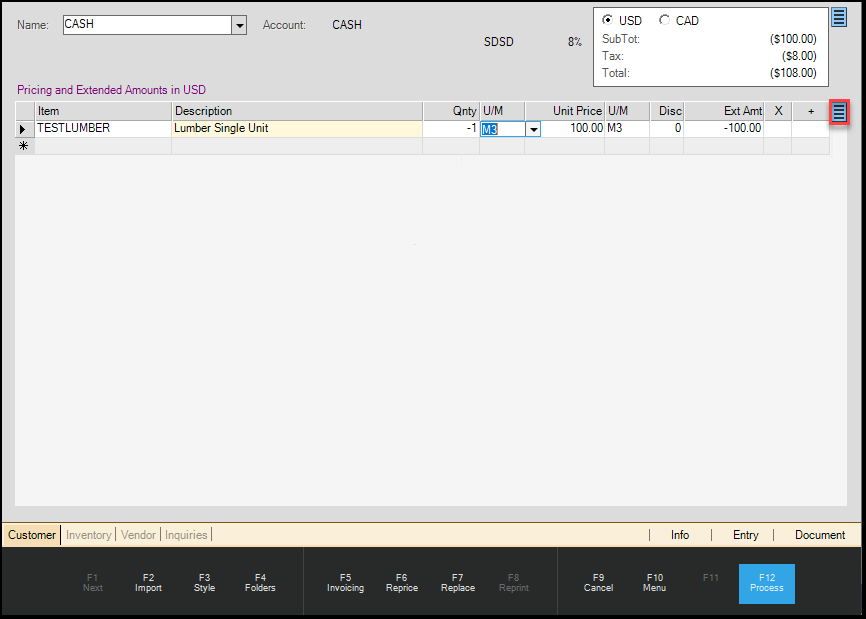
2. Enter the single unit tally item into the data grid and enter the negative quantity in the Qty field.
Sale Entry with Negative Quantity Single Unit Tally Item in Data Grid
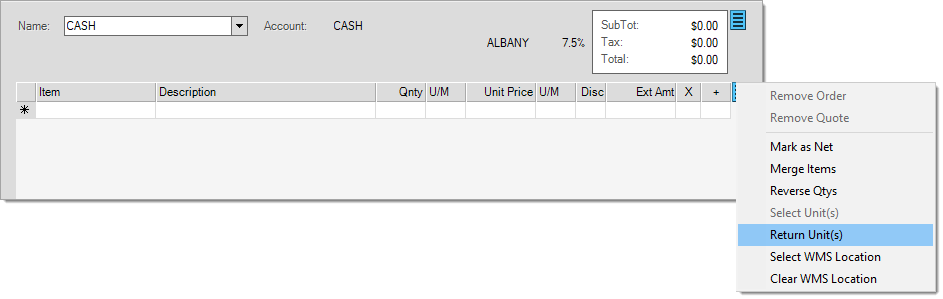
3. Right-click the Menu Marker beside the data grid to display the context menu.
Sale Entry Data Grid Context Menu
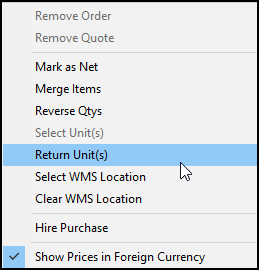
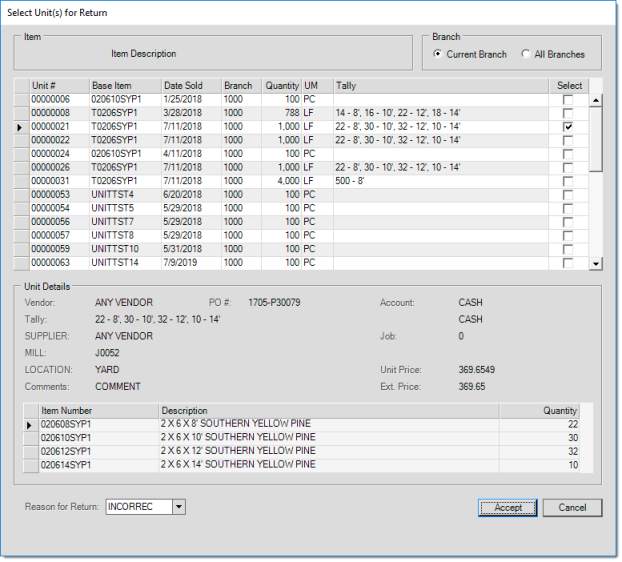
4. Choose the Return Units option in the list. The Select Unit(s) for Return box displays.
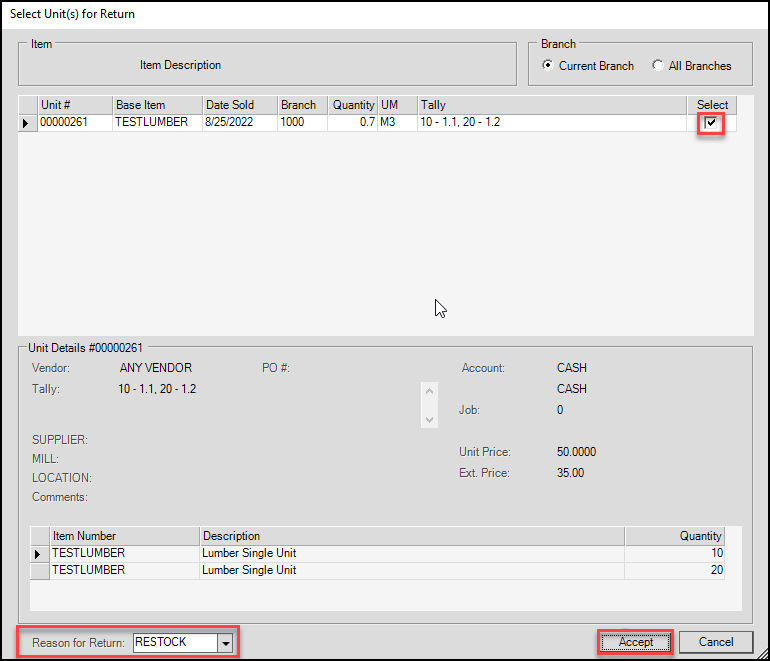
Select Unit(s) for Return with Required Actions Highlighted
5. Choose the Select check box to return this item to inventory.
6. In the Reason for Return list, choose the reason the customer is returning the item.
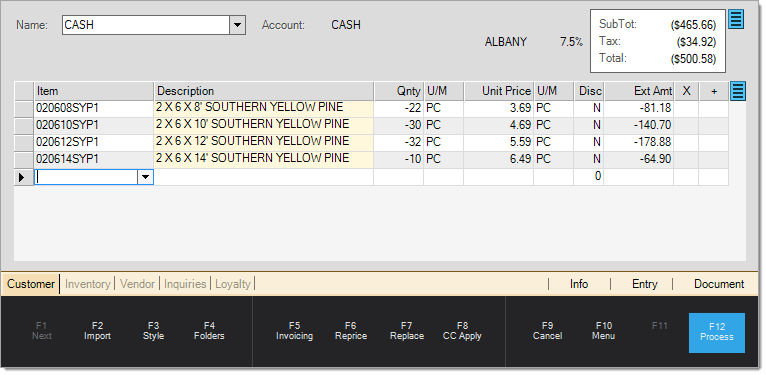
7. Click Accept to continue. The Sale Entry form redisplays.
8. Choose Process (F12) to process this return. Follow the typical protocol for finishing the transaction. When you look up the item in Item Maintenance, the item is replenished in the OnHand field.
Single Unit Tally Item Returned to Stock
Multi-Item Unit
This second type of unit item tally involves multiple items linked to a "base" unit tally SKU. The child or member items share at least two (2) common dimensions, usually the depth and width. The third dimension varies (length, typically). For example, a 2" x 6" lumber item stocked in common lengths of 8', 10', 12', and so on. These types of units would usually represent a collection of random lengths which are packaged together (strapped, wrapped, etc.).
The parent (tally) and child (member) items must share one unit of measure at a minimum. In most cases, this is some type of lineal measurement (LF, LFT, etc.).
Multi-Item units are never sold without tally functionality. Single item units can be sold using the tally feature or as individual items, so they don't automatically assume tally selection.
Setup
Just as with the single unit tally item, multi-item units begin with the addition of an item in Item Maintenance. For dimensional items, supply the two (2) dimensions that remain consistent for the tally leaving the third (typically length) blank. Units of measure should minimally be based on how quantities (total length, etc.) are entered as well as how the cost of the tally unit is represented such as thousand board feet (MBF), etc. You will link items to this tally SKU, so it's important to have at least one comparable measure defined for all of the items in question (a lineal measure is usually the one used since the items should share the other dimensions).

Next, options found on the "Tally" tab are used to define the list of items linked with the random length unit. A warning is provided if you attempt to associate any items that don't have at least one measure in common with the base measure of the unit SKU.

Make sure the "Track Qty On Hand" field from the Common, Codes tab is set to N (no). An error will be generated if this is not the case when you choose Process (F12) to save the item.
Assign a market cost, pricing (levels, etc.), margins, and any other settings as needed.
Choose Process (F12) to add the item to one or more branch locations.
Ordering a Multi-Item Unit
There isn't really anything special or different when ordering multi-item units (on a Purchase Order) from ordering a single unit item (see Ordering a Single SKU Unit for more details). Users would typically order a desired overall quantity (length) only, but the menu marker "Define Unit(s)" option allows a tally request to be part of your order. Once the materials are received, a more specific tally can be done and assigned to each unit; however it is possible to enter specific quantities when creating a PO if desired.
Receiving
When receiving from an existing purchase order, do the following:
1. Select the receive date and vendor.
2. Choose Receiving (F5), Purchase Order, and select the Purchase Order document the unit(s) were ordered on.
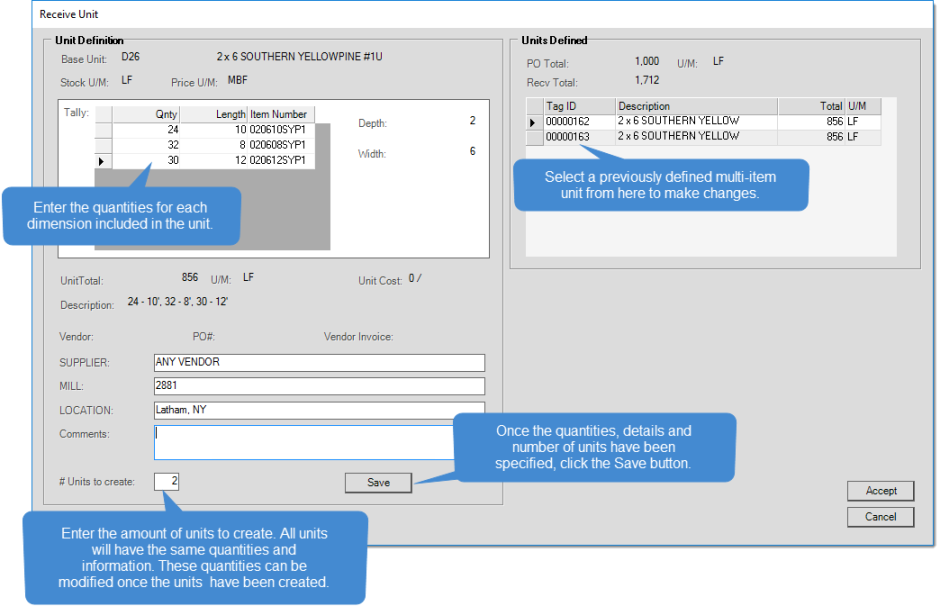
3. Once one or more random length units are listed in the data grid, click on each item's description to allocate the tally to one or more units or to update the requested tally to reflect what is actually being received. The description will have a yellow background to indicate that it should be expanded.
4. From the "Receive Unit" dialog, enter the quantities for each dimension included for the unit. The variable dimension (usually length) is listed in the middle column to the right of the quantity. If more than one of the units has the same quantity allocation, you can set the "number of units" to match the count of those units. Use the "Save" button to generate one or more units based on the quantities you entered. A "tag ID" will be automatically associated.
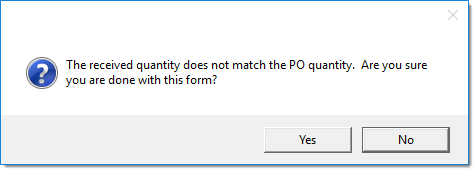
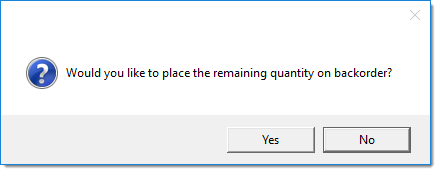
5. Choose Accept once the overall quantity has been allocated to units. A warning is provided if the total allocated to units does not match the total ordered (PO Total). The warning is only provided when the unit item tally is being received from a purchase order. If the quantities entered are less than the quantities ordered, an additional warning will appear asking if the remaining quantities should be placed on back order.
6. To complete the receipt, choose Process (F12).
It is also possible to receive a multi-item unit without an existing purchase order. In this case, you would just enter the base unit SKU in the data grid. This will automatically open the "Receive Unit" dialog. There will be no "PO Total" shown on the form in this case, however.
After units have been defined, you can view the details of those units individually by clicking the descriptions. Changes can be made to individual units prior to processing (completing) the receipt.

Selling (Invoicing) Units
Once one or more multi-item units have been received for an item, those units would always be selected individually for sale. There are two (2) ways to do this: (1) scan the unit's barcode or (2) enter the base SKU that the unit is associated with.
If you scan the unit's 8-digit barcode or hand-enter the Unit ID, and the unit tally feature is enabled (parameter), the "Unit Definition" dialog will display immediately after the scan. This displays the quantity, dimensions, unit cost, and other information (some information is optional and may be labeled differently for your company).
If you aren't scanning the unit barcode, unit selection requires additional steps:
1. Scan or enter the item associated with the unit. The Select Unit(s) dialog opens (shown below).

2. Use the check boxes to choose the unit(s) to sell and then choose Accept.
The details for each unit are displayed in the lower area of the form based on the current row selection in the data grid (upper area).
Once you click "accept" the multi-item unit SKU entered in the Sales data grid will be replaced by the items associated with the unit. The pricing, costs, and quantities for the linked items will be used and updated once the sale is completed.
Returning Units
If a customer wishes to return a unit(s):
1. From the Main Menu, choose Point of Sale > Sales to display the Sale Entry form.
2. Select the account.
3. Click the Menu Marker by the data grid and select Return Unit(s) from the list.
4. From the Select Unit(s) for Return form, select the unit(s) to be returned by selecting the check box in the Select column.
5. In the Reason for Return list, choose a reason for the return and choose Accept.
Unit items will be listed in the data grid.
6. Choose Process (F12) to return the units to inventory.
Counting Units (Physical Inventory)
Both single SKU and multi-item units can be counted. Counting is always done by the unit tag in these cases not by the item (SKU). Entering the "base" SKU for a single-item unit or random tally directly won't work. Counting units does not provide a way of "fixing" or adjusting the contents of the units; the goal is to easily include bulk quantities when counting (use the Unit Item Maintenance utility to correct unit makeup errors).
All inventory counts are cumulative until either (1) posting completes the process and makes final adjustments to on-hand or (2) initializing is done which clears counts and auditing information. For this reason, the ability to scan or enter the units, bringing in the quantities assigned to the unit can make counting units a quick process (assuming that the tallies are accurate).
Using Unit Item Tally Items in Work Orders
If you use the Manufacturing module, you may select and manage Unit Tallies on the Materials tab of the Manufacturing Work Order form. There are two (2) types of Unit Tallies (Single Item and Multi-Item); they are created in Purchasing or Receiving, and can be edited in Inventory > Utilities > Unit Item Tally.
-
Single Item Unit Tally: Consists of a base item with quantities of that item bundled as a stocked unit, such as lumber. Each bundled quantity is given a unit number. When the base item is pulled onto a work order, the user can select whether to use a single item or a bundled unit. In order to select the bundled unit, the item must have been set up as such in Inventory > Utilities > Maintenance.
-
Multi-Item Unit Tally: Consists of a base item template specifying tow (2) or more separate items than can be made into a unit. For example, the unit could consist of different lengths of lumber, such as 1x12x8, 1x12x9, 1x12x10, etc., and each item having a default quantity. Once a unit has been created, items can be added or removed, and quantities can be edited. The base item must be setup in Inventory > Utilities > Maintenance.
Transferring Unit Items
You can transfer Single Item and Multi Item units between branches by navigating to Inventory > Transfers.
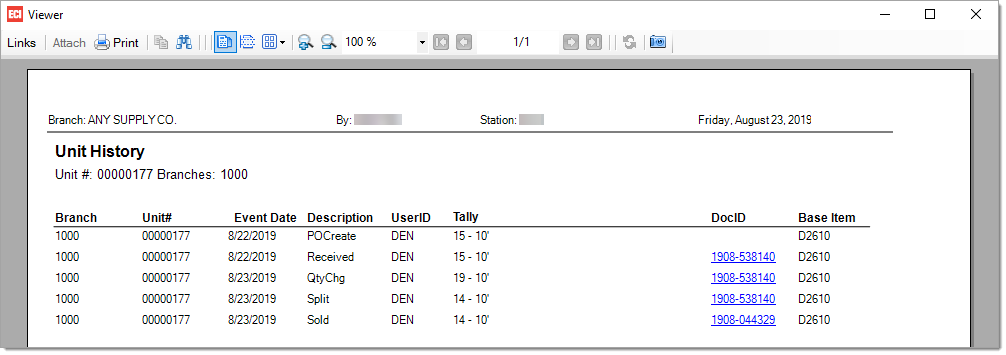
Reporting on Unit Item Tally History
The Unit History report found in Inventory > Reports will list information pertaining to a single item unit or multi-item unit. The report will provide a list of user actions that have affected a unit from the point of creation to its disposal whether it be through a sale transaction or breakage of the unit. The report can be filtered by Base Unit, Child Item or Unit #.
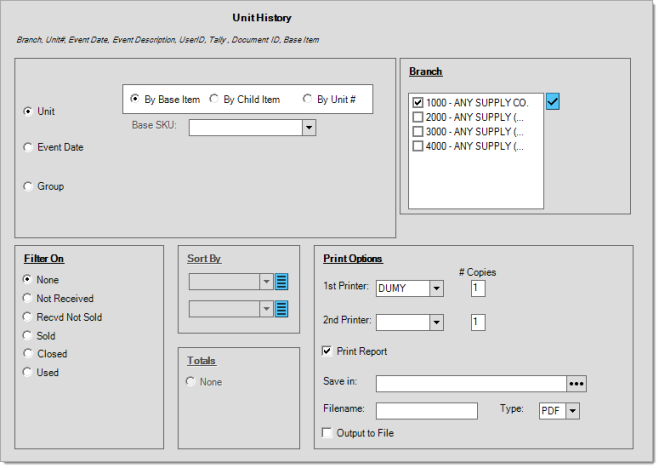
![]() Example of Unit History Report - By Unit #
Example of Unit History Report - By Unit #