ProLink > Home
The Home view displays the consumer's account summary as well as contact information for their assigned sales person (if any) and their currently selected store (location) including the address, phone number, and web site. The branch logo (top) and promotional banner (bottom) are displayed here if images have been designated in the Branch Setup maintenance form (located on the Database menu in the Maintenance area of the software). The promotional banner can be closed by the app user.
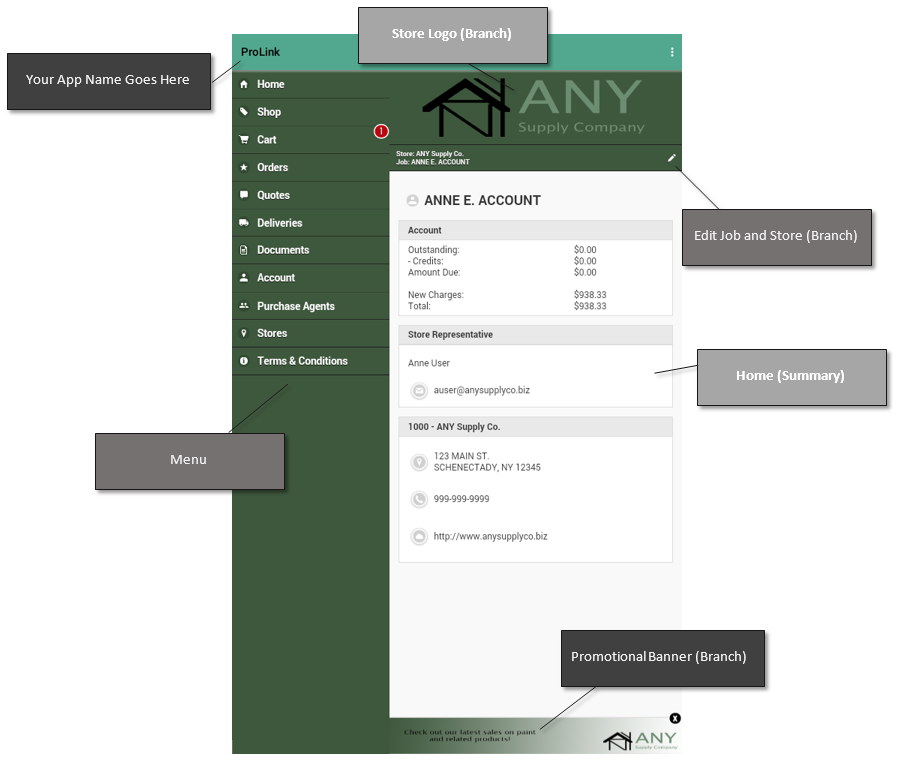
Account or Job Summary
This section of the home view displays a summary of the consumer's account balances and may allow them to submit a payment on account in some cases. Information displayed in this panel will vary based upon the billing level of the account (account or job).
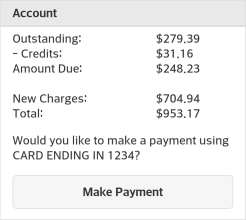
Outstanding
This is the sum of all aged balances including finance charges for the account or job (if job billed). Aged balances include the remaining amounts of balances that have been previously billed (meaning a statement has been generated). Balances are reduced when payments, credit memos, discounts, and/or credit adjustments are applied either manually via the Posting transaction on the Receivables menu or automatically when monthly billing processes. Open item accounts tend to require more manual maintenance (Posting) whereas "balance forward" accounts typically can be handled either manually or automatically by your company.
-Credits
This is the total of credits that have not yet been applied to balances and/or open items for the account or job (if job billed). This total reduces the amount due and total figures (shown below). Credits include the sum of payments, credit memos, and credit adjustments; however, it does not consider statement discount. If the customer is eligible for a statement discount, they would typically retain a credit on their account for any amount they overpay once their payment is applied.
Amount Due
This is the outstanding less credits total for the account or job (if job billed).
New Charges
New charges is the total amount due that has not yet been billed (current cycle) for the account or job (if job billed). This amount is not technically due yet; however, will be billed if not paid by the next statement. If the customer wanted to pay-off their account in total, they can submit a payment that includes new charges.
Total
This is the sum of the amount due and new charges for the account or job (if job billed).
Making a Payment
In order for a customer to make a payment, a number of conditions must be met. For more information about how payments work with the app, click here.
Accepting Payments from ProLinkThis topic section explains how payments are processed using the ProLink app as well as the post processing of those payments via the application. Some degree of post-processing is required for all payments submitted via the app. Requirements ProLink accepts two types of payments: •Payments on Account (aka. Received on Account) •Order Deposits In order for a customer to be able to submit any payments via the app, the following requirements must be met: ✓Your company must be using VeriFone® PAYware Connect (SIM), Verifone Point, or TSYS Cayan. ✓For VeriFone PAYware Connect only, the minimum VeriFone SIM version being used must support tokenization. ✓To use the latest VeriFone SIM features, your processor must be one of the following: TSYS®, Chase Paymentech™, or WorldPay® (RBS). The SIM version doesn't apply to Verifone Point or TSYS Cayan. ✓You must enable the ProLink parameter "accept online payments." ( Main Menu > Maintenance > Database > Parameters> ProLink tab) ✓For both Verifone Point and VeriFone PAYware Connect, you must use the merchant console to "add a contract" using the customer's card information. Secondly, you must associated the card with the customer's account (or a specific job) from the Account Maintenance form "card on file" maintenance form. ✓For TSYS Cayan, card on file records can only be established from a Point of Sale transaction where the card is physically presented. This is optional and security settings can prevent access by a cashier to add "card on file" for a customer. Once these requirements are met, the customer's card can be used via the app, but also as payment during Point of Sale transactions in the software. Submitting a Payment from the ProLink app There are three areas in the app where payments can be submitted. Payments on account can be submitted from both the home and account views. Order deposits can be submitted from the cart view when submitting an order request. Payments on Account Payments on account (aka. received on account) can be submitted from the app's home or account views. Job billed accounts display the job balances when a job has been selected, and in this case, payment functions at the job level. If no job has been selected, or the customer is billed at the account level, balances and payments reflect the overall account. The "Make Payment" button is only listed when the account has a card on file. Card contracts can be "consolidated" (all jobs) or for specific jobs only. If a specific job contract exists, it will be used; otherwise, the consolidated contract will be used.
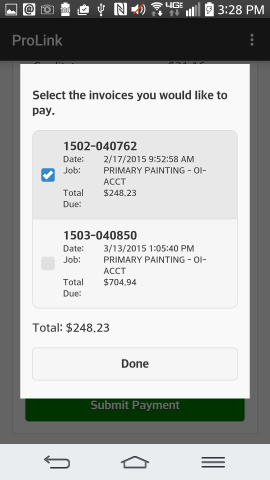
Account: Make Payment The message "Would you like to make a payment using" followed by the card contract's description is displayed. In our example (above), the card contract's description is "CARD ENDING IN 1234." Your card contract descriptions are determined by whomever at your company is responsible for their assignment. Once the consumer (end-user) taps the "Make Payment" button, a few different things can happen. Payments are handled differently for customers who pay by balance (balance forward) vs. those who pay by invoice (open item). Open Item Payments If the receivables type assigned to the account is "open item" (rather than "balance forward), an "Invoices" button is displayed. Open item accounts pay by invoice, so we provide them with a list of their open (unpaid) invoices for selection. No "invoices" button is provided for balance forward type accounts which pay by balance not individual invoices. 
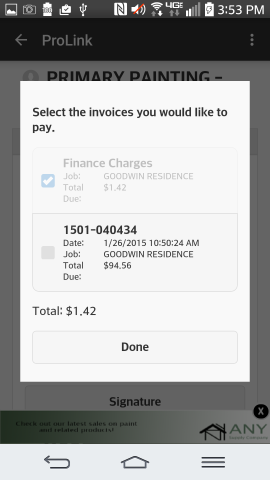
Submit Payment If the invoices button is displayed and once it is selected, a listing of the open invoices for the account (or job, if job billed) is shown. As invoices are selected (indicated by a checked box), or a previous selection is cleared, the total is updated to total the sum of all selected items. Once all invoices have been selected, choose "done" to complete the selection. If the customer is "open item" and has unpaid finance charges, the total finance charges due for the account (or job, if job billed) is displayed. If your company has the "pay finance charges first" receivables parameter enabled (checked), the finance charges will be automatically selected and disabled (requiring that the payment total include the finance charges). If the parameter is not set (enabled), the customer is not required to pay the finance charges and can either pay them or select other items.
If the customer has unapplied credit memos (returns) that are linked to open items (invoices), the amount (total) due displayed for those invoices will be reduced by the outstanding credit memos linked to the open item invoice. In cases where the invoice is fully paid by the unapplied credit memo, the invoice is not listed. Balance Forward Payments In the case of a Balance Forward account, there is no invoice selection required. Instead, the consumer enters the amount they want to pay up a maximum the "Total" in a text area. They can pay less than the total, such as the "amount due" or some other amount. ")
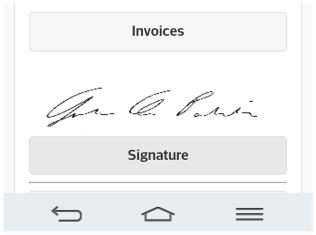
Payment on Account (Balance) Unapplied payments, such as by check, are not considered. It is possible for the consumer to select more invoices (open items) and submit payment for more than their total due in this case. If this happens, the situation can be resolved in post-processing via the application by either rejecting the payment or adjusting the payment amount to the total due. Payments can be rejected during post processing if necessary. The next step in Payment submission is a signature. ProLink changes to a landscape orientation when capturing a signature in order to provide sufficient room for the signature area. The consumer would choose "Done" if satisfied with their signature or "clear" to remove the current signature allowing them to resign. Choosing "done" returns the consumer to the prior view to complete their payment. 
Signature A smaller image of the signature is displayed on the payment submission view.
Terms & Conditions The final step in accepting payment or order submission is acceptance of the branch terms & conditions (aka. disclaimer). The terms & conditions text is determined by your company. The same terms & conditions are presented when submitting an order as those used for payment on account. For this reason, the party writing your terms and conditions should take both situations into consideration. To close the disclaimer, the consumer (end-user) would use their back button on Android™ platform devices or the "close" option that is displayed on iOS (Apple®) devices. In the event that your company enables ProLink app for a branch location without specifying your own disclaimer, a default disclaimer is used (shown in the image below). Your company is responsible for the content of the disclaimer regardless of whether you use your own disclaimer or not. 
Default Terms & Conditions The consumer must check the "I agree" check box before their payment or order request will be processed further; however, we don't require that the terms & conditions be viewed before a consumer checks the "I agree" check box. A confirmation dialog with the total of the invoices selected is displayed once the consumer selects "Submit Payment." 
Confirmation Dialog Assuming they answer "yes," a second dialog, "A payment has been submitted," appears confirming that their payment was submitted. After payment submission has been completed account summary displays the most recent payment amount and date submitted from the app for the account or job (if the account is job billed). 
Submitted Payment Only one pending on-line payment on account per account or job (if the customer is billed at the job level) is permitted at any given time. Once post-processing of the payment has been completed from the software, additional payments on account can be accepted via the ProLink app (the "make payment" button is shown). Rejected Payments There can be reasons why a customer's payment might be rejected such as card expiration or other reasons. If the payment is rejected from the application, the consumer (app user) is shown a message indicating that their payment was not accepted as well as any message that the user who issued the rejection provided. 
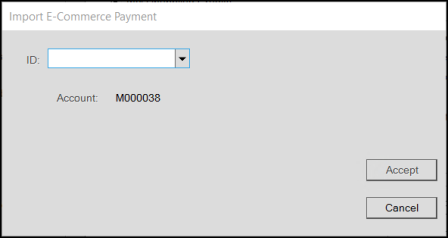
Rejected Payment Order Deposits Post ProcessingPost Processing procedures vary based on the type of E-Commerce submission. Each type is discussed in more detail below: Processing ProLink Payments on Account This topic section discusses what happens after a consumer (ProLink app end-user) successfully submits a payment on account via the app as well as how your company must process that payment to complete the process. Notification After a consumer submits an on-line payment on account, we attempt to send a number of notifications. Notifications are sent to the following: •The user assigned to the account. The notification method is determined by the user's notification settings (standard notification queue, Email, or text message). •The user assigned as the Receivables application manager (Main Menu > Maintenance > Database > Parameters, Setup, UserID). •The Notify Email, if any, indicated for the consumer's selected Branch (location) in the app (Main Menu > Maintenance > Database > Branches, ProLink (Tab)). •The Notify User, if any, indicated for the consumer's selected Branch (location) in the app (Main Menu > Maintenance > Database > Branches, ProLink (Tab)). The notification method(s) are determined by the user's notification settings (standard notification queue, Email, and/or text message). In some cases, the same user may receive the same notification more than once. An example of when this would occur is when the same user is assigned to the account but is also the notification user assigned to ProLink in the branch settings. Payment Processing After submission, the payment must be processed from the Payments transaction located on the Point of Sale menu. To process the payment, do the following: 1. From the Main Menu, choose Point of Sale > Payments and select the Received on Account radio button. 2. Select the customer account (and job if applicable) that the payment was submitted for. 3. Choose E-Commerce from the Import (F2) context menu. 4. From the Import E-Commerce Payment dialog, select the payment from the ID drop down control.
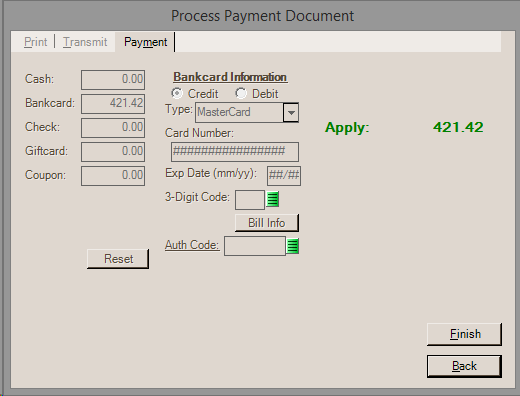
Payments are assigned an unique automatically generated temporary ID which is listed along with other information such as the job and amount. 5. After choosing the "Accept" form on the dialog, the "Amount to Apply" on the Payments form displays the payment amount. The amount cannot be modified. 6. When choosing Process (F12), the process form automatically sets the payment method to "bankcard" and the amount to match the customer's payment. The Payment tab, except for the Finish and Back buttons, is disabled (modal) to prevent changes to the card information or amount.
7. After you've processed the payment, the payment will be listed as an open (un-applied) credit for the customer. The Posting transaction found on the Receivables menu is used for posting (applying) payments to balances and open items. If the consumer's account type is "open item," their invoice selections via the app will be retained with the payment for Posting. When the payment is selected in the Posting form and open (unpaid) items are listed, invoices matching the ones selected by the user will be auto-filled with paid amounts. These selections can be overridden by the user. What happens if the card payment is rejected by the processor? If the card on file is rejected by the processor, the payment won't process in the software and you will receive some type of message from the PAYware Connect service providing a reason for the rejection. In this case, you would usually then reject the payment (read further for more on this) which provides a way of communicating the issue to the app user. Rejecting a Payment Submitted payments can be rejected by your company. This might be done due to an issue with the card on file or for other reasons. Rejecting an on-line (E-Commerce) payment does not remove the payment record and you can reprocess the same payment later. To reject an E-Commerce payment on account, choose "Reject Payment" from the context menu associated with the Menu Marker
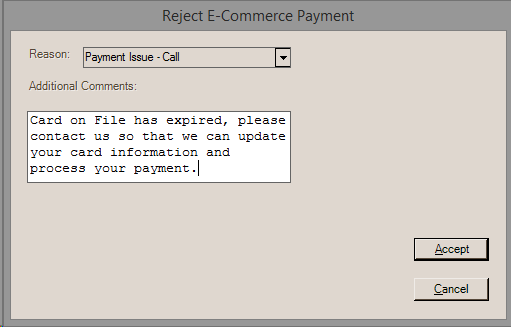
After choosing "Reject E-Commerce Payment" from the context menu, a dialog is shown that allows you to choose a rejection reason and type a message with further explanation. Two (2) reasons are provided for selection: "Account Issue - Call" and "Payment Issue - Call." The selection doesn't impact the handling of the rejection.
The message entered is shown to the app user (consumer) the next time they check their account summary using the ProLink app. Deleting a Payment Deleting a payment is not the same as rejecting the payment. Deleting a payment removes the payment permanently. Deleting payments may be done in cases where the consumer contacts your company to cancel an on-line payment or when attempts to process the payment or contact the customer have failed. Payments can be deleted from the Import E-Commerce Payment dialog. After selecting the payment, a Menu Marker
|
 on the Payments form (next to the account name).
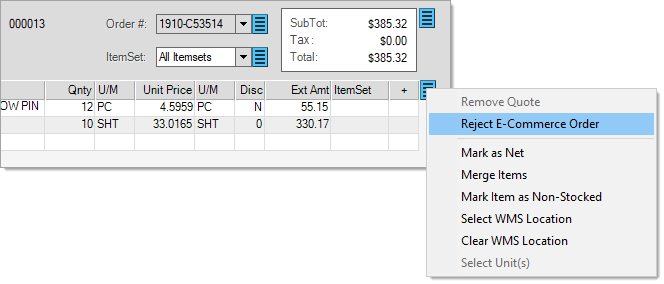
Store Representative
This section is only displayed in the home view if the consumer's receivables account has an assigned user (sales person). The sales person is designated on the Codes tab of Account Maintenance form. The information regarding the "store representative" comes from the User ID data. This information includes the user's first and last name as well as their Email and cell phone number if designated. If no Email or phone number are set for the user, nothing is displayed.
")
Store Representative (Assigned User)
Icons next to the Email and phone number are displayed and offer shortcuts to initiating either a new mail message or telephone call from your device (if your device is capable of either).
Location Contact Information
This panel on the home view displays information for the selected store location as well as the web site indicated in the ProLink parameters (if any). The address and phone number are listed for the location that the user has currently selected. If only one store location exists or has been enabled for ProLink, it is automatically the default selection and its information is displayed. The 4-character branch ID ("1000" in our example) is listed to the left of the branch's ProLink name in the title bar of the panel. This is followed by the primary branch address (not the billing or ship-to) and phone number. These branch settings are located in the Branch Setup form located on the Maintenance area's Database menu in the application. The web site (if any) is the "dealer web site" from the "ProLink" tab of the Parameters form, not the branch settings.

Location Information
The "map" icon can be used to open the device's default mapping app (if any) to find the address listed. If the device is phone-capable, the phone icon can be used to call the store from the device. If a web site is listed, it can be accessed by pressing the cloud (Internet) icon.