Parameters > ProLink Tab
This tab contains settings related to the ProLink in a browser app. ProLink is a separately priced and licensed product. Appearance and function can vary based on device brand, display size, and other factors. Saving these parameters after a change will immediately affect users of ProLink.
|
|
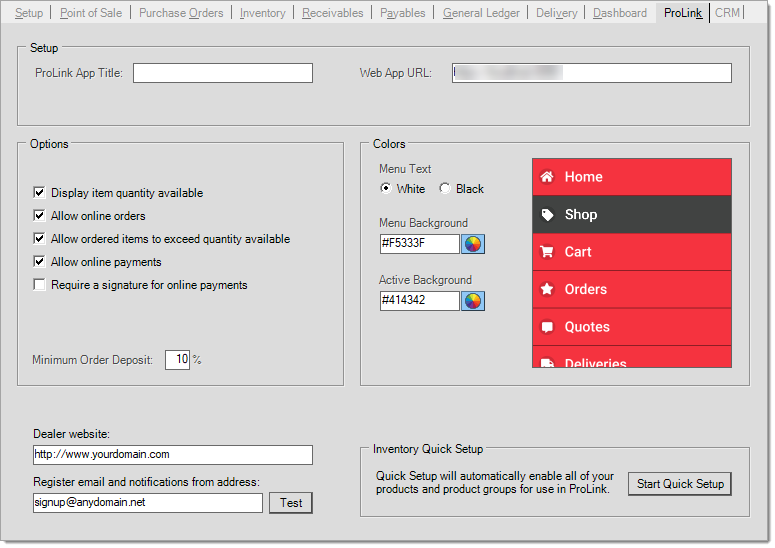
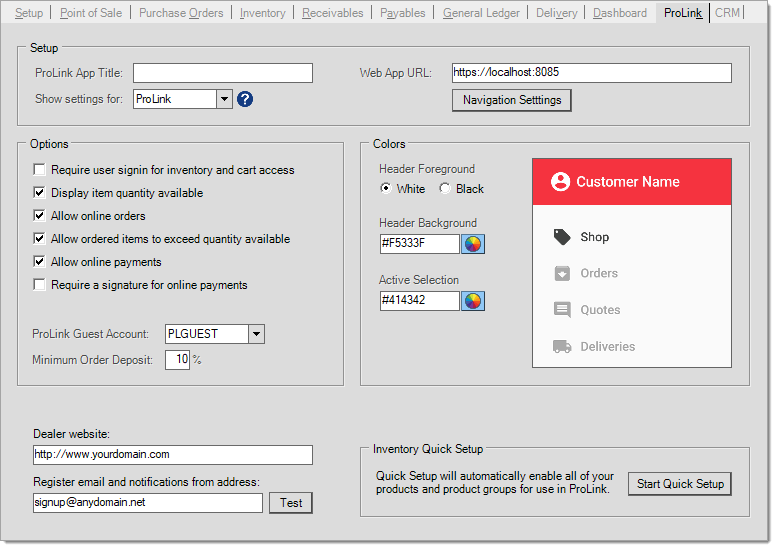
Setup ProLink Web
The "ProLink App Title" and "Web App URL" are settings for Support use only. These settings are hidden for security reasons and can only be changed by Support personnel. If you have additional questions, please contact us.
Navigation Settings (ProLink in a Browser)
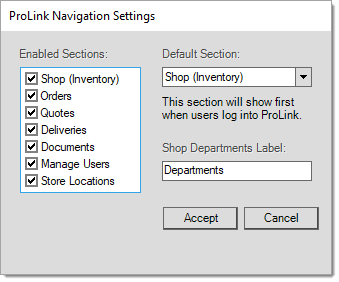
Enabled Sections: Only the selected sections will be enabled when users log into ProLink.
Default Section: The selected option will be the landing page when users log into ProLink.
Shop Departments Label: You can define the Shop Departments label you wish to display on ProLink.
Options
Most settings found on this tab can be modified by your company. These can be used to enable/disable certain features as well as customize the appearance of the app to some degree. Please read the following for more specific details:
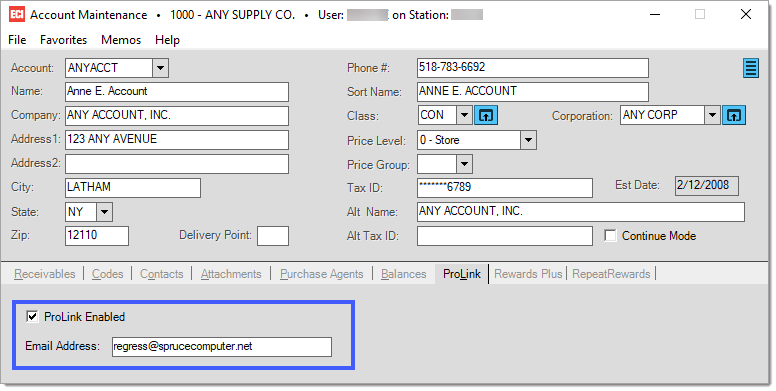
Require User Sign in for Inventory and Cart Access (ProLink in a Browser only)
The Require user sign in for Inventory and Cart Access check box determines whether ProLink users will be required to signin in order to access the inventory and their cart. When you check this option, the application will deactivate the "Guest account" field. User sign in is created from Account Maintenance by selecting the ProLink Enabled option. The application sends an email to confirm that ProLink was enabled for the account along with a password.
Display Item Quantity Available
The "Display Qnty Avail" check box determines whether ProLink should display the quantity available for sale to consumers. When enabled (checked), each item's available quantity will be listed in both the list of products and product details.
Allow Online Orders
This setting prevents or enables a user's ability to submit a new order or quote request from ProLink. Submissions from ProLink don't immediately become "live" orders and quotes, they must be reviewed and approved (or rejected) by your company. There are some appearance differences as well from the user's standpoint. "Allow Online Orders" determines whether or not the "Shop" and "Cart" menus and "Add to Cart" features in ProLink are shown. When disabled (not checked), the menu item named "Shop" is modified to say "Products." In addition, displayed items in the product listing offer no "add to cart" button.
This setting does not prevent ProLink users from viewing their existing orders and quotes. It only prevents or enable their ability to submit an order or quote request from ProLink.
Allow ordered items to exceed quantity available
This option determines whether ProLink should allow consumers to add items to their cart that are below their available quantity. This setting does not prevent the item from being listed, however. If the item is not available, the "add to cart" button will be disabled for the item and the message "This item is currently unavailable" is shown. Showing the quantity available is optional and controlled by the option "Display Quantity Available."
Allow Online Payments
The "allow online payments" setting determines whether ProLink users who have a "card on file" (tokenization) should be permitted to make payments on account (ROA) or use their card for order deposits. When this parameter is enabled (checked) and the customer has a "card on file," the consumer can make a payment from the Home page and when submitting an Order request via the
Require a Signature for Online Payments
The "Require a Signature for Online Payments" setting works in conjunction with "Allow Online Payments". Selecting this option will cause a pop-up dialog to appear at checkout prompting the user to sign using either a mouse or touch screen.
ProLink Guest account (ProLink in a Browser only)
If the option Require user signin for inventory and cart access check box is not selected, a "Guest Account" must be created in order for the customer to be able to add items to the cart and complete transactions. Enter a universal guest name in this field.
Minimum Order Deposit %
This parameter determines whether an order deposit is required and if so, the percentage that's required. If zero (0), ProLink assumes no deposit is required. If the consumer enters a deposit amount that is lower than the minimum required, a prompt appears.
Dealer Web Site
This is simply a way to link ProLink with your company's web site. The name is displayed as a hyperlink within ProLink (on the Home screen).
Register Email and Notify Address
This allows you to specify the "from" address to be used by
The address specified is also used for new user registration requests. If an address is specified here, ProLink users will be presented with a "Want to Sign up?" option on the Sign in form. If no address is designated, this option is not shown. If a user submits a request to join, the Email will be directed to this address.
| Always test changes to this setting (use the "Test" button). Later changes to your SMTP server or settings can also affect whether the address used here is still considered acceptable as a valid "from" address. |
Color Selection
These settings can be used to customize the appearance of the Spruce ProLink application's navigation menu. Logo and banner images can be specified separately by branch from the Spruce ProLink settings found in the Branch Setup form (Main Menu > Maintenance > Database > Branches). These settings do not alter the background and text color of the navigation bar that appears as a strip along the top of the app. Navigation bar background and text color are set based on your preferences when you first order the app. You choice of an icon image is also decided at that time and is not modifiable without our development team's involvement. Future changes to your icon or navigation bar colors (or other customization) may be billable depending upon the complexity of the request (these changes would also require an update to the native app and would not be automatic or immediate).
When settings are modified, a preview of the menu's appearance is shown to the right. Companies typically try to choose colors that match or compliment their company's logo or identity. These settings are for all app users and apply to all branch locations linked to your current application instance.
Menu Text
Use the radio buttons to choose either black or white as the text color for menu items. It is best to use white text for darker colors and black text for lighter colors. The same text color is used for both the default "background" color and the "active" menu item color. The appearance of your text color choice against both colors should be considered. For best results, we suggest that you not choose a very dark color for one and then a very light color for the other.
Background
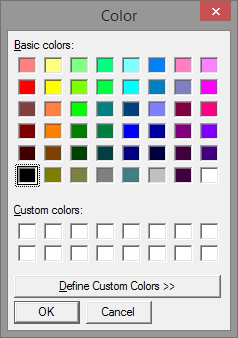
Use the maintenance icon ![]() to select a background color for menu items or enter the color name or code (HTML) in the text area provided. Color selection populates the text area with either the color name ("blue," for example) or HTML color code for your selection.
to select a background color for menu items or enter the color name or code (HTML) in the text area provided. Color selection populates the text area with either the color name ("blue," for example) or HTML color code for your selection.
Active
Use the maintenance icon ![]() to select a background color for menu items or code (HTML) in the text area provided. Color selection populates the text area with either the color name or HTML color code for your selection.
to select a background color for menu items or code (HTML) in the text area provided. Color selection populates the text area with either the color name or HTML color code for your selection.
|
Note: If your company has a web site (and you like the design), you may want to examine the "source" of one of the pages to find the colors (or color codes) used in the markup source (to do this, choose "view source" from your browser, often a right-click). In addition, there are a number of free on-line resources that provide color information and translation. |