Database > Jobs
All types of customer accounts have at least one job and all customer accounts can have a (more or less) unlimited number of associated jobs. Minimally, each account has one master job which is always job number zero (0). Additional jobs may be added as needed. Receivables settings for the linked (master) account don't prevent the use of jobs; however, they can affect how jobs are treated for billing purposes. Jobs allow for distinct delivery locations, separation of money spent, items purchased, tracking draw down purchase orders, or for any other reason.
For example, if a contractor, ABC Construction, is currently doing work for six (6) different homeowners, each homeowner could be a job on ABC Construction's account. This would allow ABC Construction to separately track purchases of materials and the amounts they spend for each homeowner's job. ABC Construction's account could optionally be set up to receive separate statements for each job or more of a summary listing all jobs.
Jobs are treated in varying degrees either more or less like a separate account. How much a job is treated independently is based upon the settings chosen for the main account. The billing level of the main account determines how all jobs function with regard to billing (receivables), balances, and payment processing. Accounts with a "billing type" of job maintain balances for each job; otherwise, balances are only maintained for the linked account in total.
Note: You can create job-level pricing to help you stay competitive and provide consistent pricing. See Job Level Price Groups for more information.
Account
This is the customer account that the job is associated with. Account selection is required prior to adding or modifying a job. Jobs always have an associated account. The account's settings can be used in place of many job settings at your discretion. When done, changes to the master account also would immediately affect jobs using the "master" account's settings.
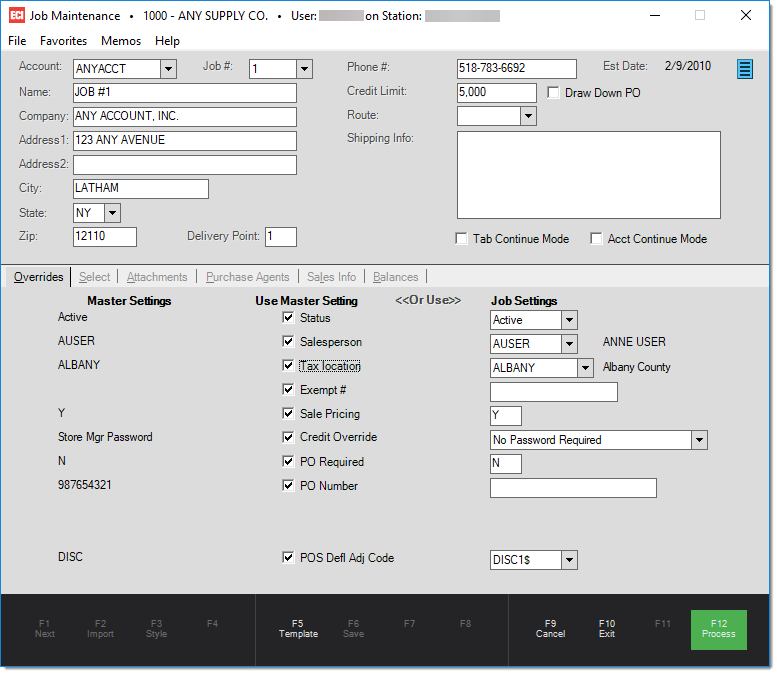
Job #
Jobs are numbered, but also have a name associated with them just like an account. Any given account may have an unlimited number of jobs, and all accounts have a job #0. Jobs maintain separate addresses, contacts, attachments, etc., and can even provide separate receivable aging. Some settings are always specific to the job such as the address, purchase agents, etc. Other information is flexible and can either default to match the master (main) account or be unique to the job. Choose the "<<<NEW>>>" option to automatically select the first available unassigned job number.
It's important to point out that the Job Inquiry form provides exactly the same information as the Job Maintenance form (given the same user security). In cases where a user needs access to this information without being allowed to change job information, consider providing them access to the inquiry instead.
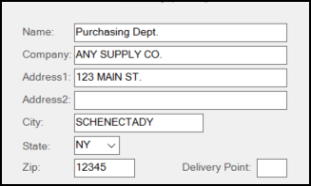
Address Fields
The format of the Address fields is determined by your application parameters and your system's region and language settings. The Address fields are different if you are located in the United States, Canada, Australia, or the United Kingdom. The application uses the same address control in a wide range of transactions and forms; however, each area may use the address differently. Branches, accounts, contacts, jobs, and vendors all have associated address data.
Name
This is the name of the person associated with the address and is typically the first (top) line when an address is printed or displayed. This part of the address can be up to 50-characters long.
In some cases, the Name field performs additional functions that might not be obvious. For example, when you are adding a new account, the Name becomes the default for the Sort Name field and the name of the primary contact for the account. You can modify this entry in a context form so it is different from the default address "Name;" however, any changes you make to the Name field entry or to the name associated with contact zero, automatically update to keep both fields the same.
Company
This is the company name associated with the address (if any). If supplied, the company prints/displays below the Name entry and above the Address 1 and 2 lines. This part of the address can be up to 30-characters long.
|
Note: If the Company and Name entries for an address match exactly, the text value is only printed once on documents to avoid unnecessary repetition. |
Address Line 1 and Address Line 2
These are the local/street address lines for business. Both are optional. Usually, when the application displays the address or prints it on a document, these address lines only show when they are filled from the account or branch settings. This is done to avoid unnecessary blank spacing between address lines. These lines can be up to 30-characters long.
City
This field is reserved for the "city" (city, town, village, etc.) part of the address and can be up to 30-characters long.
State or Province (Code)
This field length varies based on your regional setting in Parameters (United States, UK, Australia, or Canada). When shown, it is a postal abbreviation used for the state, province, or territory where the address is located. Depending upon your settings, entering a zip/postal code (in the Zip or Postal Code field) can result in this field automatically updating to match the database settings. Listings of state and province codes also include territories. This part of the address can be up to two- or three-characters long. In some cases, the printed address will only show the state/province if the City field is also complete.
Upon request, Support can enable a parameter to include country codes in addition to the state / province codes.
States, provinces, and country codes are grouped together. If your company is located in Canada, this list field displays the province codes first, followed by state codes, and then country codes (if enabled). In the United States, this list displays the state codes first, followed by Canadian provinces, and then country codes (if enabled). If your company is located in the United Kingdom (UK), this field does not display, nor is it typically printed. There is no "UK" parameter setting. If you are located in the United Kingdom, the software uses the region and language settings of your computer as well as the database region (in certain cases).
Zip / Postal Code (or Postcode)
In certain cases, changes you make to a postal (Zip) code can trigger other changes, such as setting the sales tax location. This part of the address can be up to 10-characters long. In the United States, the zip code is numeric and is listed to the right of the city and state code. The Postal Code in Canada is alphanumeric and also displays to the right of the province code. In the United Kingdom, the postcode is printed as a separate line (the last or bottom line of the address). In Australia, the postcode is four-digits long and displays to the right, after the name of the city/suburb/town, and the state or territory code.
Delivery Point
The United States Postal Service (USPS) assigns delivery points in addition to the zip + 4 codes to differentiate delivery points at the same address (as when there are four offices in the same building or multiple apartments in the same house, for example). Delivery points are not typically printed (except for Canadian regions in certain cases) but are included when POSTNET barcoded mailing labels are printed. Usually, this is a single digit added to the end of the ZIP code, ZIP+4 code, or a combination of both codes when printing a barcode. Typically, the application adds a check digit after the delivery point (if included). This part of the address can be up to four-characters long.
For Canadian users, the Delivery Point field has an alternate use (see below):
 Delivery Point Settings for Canada
If your company is located in Canada (and assigned to the Canada regional parameter), you can use the Delivery Point field to add a country notation to document addresses. If the Delivery Point entry is US, USA, or CAN, the application prints these codes as part of the address on documents.
Job Credit Limit
Each job has its own credit limit as does the main account. A job's credit limit is only enforced if the account uses job-level billing --or-- the job has a "draw down PO" limit. Only those accounts assigned to job-level billing maintain separate balances for jobs, so if account level billing is used, there is no way to know what portion of the account's balance is for any given job. Any credit limit assigned to a job that is associated with an account-level billing customer is ignored and only the main account's limit is considered.
When a job limit is applicable (job-level billing customers), the sum total of all job credit limits should not exceed the overall account's limit, nor should any given job's limit exceed the overall account. Why? The master, or main,account's credit limit is considered over any specific job's limit, so anytime if the account's limit is exceeded, the job's limit is not considered.
Draw Down PO
This setting indicates, if checked, that the job is to function as a draw down credit limit. This is used in cases where an overall limit is being set on total charges to the job regardless of any payments made. The intention of this feature is in cases where a customer provides a purchase order that is for a specific amount only. The job is used to track the purchases made and each purchase immediately reduces the job's credit limit. Payments (received on account) do not increase the job's credit limit.
Note: the standard methodology is used for providing over limit messages and prompting for credit overrides. If a "no override" type option is assigned, it would defeat the purpose of the draw down since no warning would be produced when the customer reaches the end of their draw down. The override type assigned to the job needs to be considered when using the draw down option as well as the "use master" setting.
Under normal circumstances (when this option isn't being used), only the job's available credit would be affected by transactions, the credit limit would remain unchanged, and the job's available credit would increase whenever payments were applied to job balances.*
Credit memos (returns) and transaction deposits (includes deposit refunds) involving receivable "charge" as a payment method do affect the credit limit. Credit memos processed for the job increase the credit limit accordingly as do deposit refunds. Deposits charged to the job decrease the credit limit just as a sale would.
Route
Originally, this was just a text field and accepted any value. Route codes link with a database table and have their own file maintenance form (located under the Delivery and Database area). Route codes that have not been specified in the Delivery area's Route Codes maintenance form may still be entered. If a route code is entered that hasn't been added in the file maintenance form, a warning appears upon processing; however, the route code is still saved for the job. If you are using the Spruce Delivery Dispatch option, route codes that haven't been added permanently (in the file maintenance form) won't be available, so if you plan on using this optional feature, you should add all route codes in Delivery.
Shipping Info
Also referred to as delivery instructions, this text area allows you to save any special delivery or drop instructions along with the job. If used, these instructions will be the "delivery instruction" defaults on the Delivery tab of the Process (F12) form for applicable Point of Sale transactions. Up to 272-characters (including spaces) are allowed for the instructions.
POS Default Adjustment Code
Just as with accounts, jobs may be assigned a specific adjustment code that if used, will be automatically added to Point of Sale transactions associated with the job. Check the box to use the master account's default adjustment code setting (if any) or don't check the box and specify another code for the job (or leave blank to not add an adjustment for the job).
Tab Continue Mode
This option may be useful when adding or modifying multiple jobs. If checked, continue mode maintains the current tab selection after choosing the Cancel (F9) or Process (F12) functions. For example, if you are modifying the "invoice delivery" options on a series of jobs, this would prevent having to re-click the "Select" tab after each job is processed (or if choosing Cancel).
Account Continue Mode
This option is useful when adding or modifying multiple jobs for the same account. If checked, continue mode maintains the current account selection after choosing Process (F12). This eliminates the need to reselect the same account after each change.
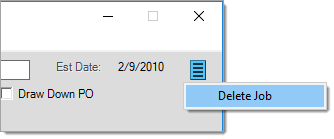
Deleting a Job
Under certain circumstances, a job may be deleted using the "delete job" selection found on the context menu available from the menu marker ![]() . User security can limit a user's ability to view menu markers as well as any associated options. When choosing the Delete Job option and the job, a confirmation prompt is provided. In addition, if there is some reason that a job cannot be deleted, the
. User security can limit a user's ability to view menu markers as well as any associated options. When choosing the Delete Job option and the job, a confirmation prompt is provided. In addition, if there is some reason that a job cannot be deleted, the
The following criteria must be met before a job can be deleted:
✓If the linked account is assigned a billing level of "job," the job being deleted cannot have any non-zero balances.
✓There can be no invoice documents for the job except for "canceled" types,.
✓There can be no order or quote documents for the job (of any type, including direct ship and online).
✓There can be no open credits, receivable adjustments, payments, or posting details involving the job.
What information is deleted?
Deleting a job removes all attachment links for the job, memos, purchase agents, statement documents in addition to the job itself. The data, if any, linked with job attachments may be deleted as well depending upon whether the same attachment is shared with other records or not. Deleting a job won't affect documents (except statements) as well as the related data.
What if I can't delete a Job due to activity?
If you can't delete a job, but you don't want it to be used, you can change the status of the job. A status of either "disabled" or "close" will effectively prevent the job from being used for new transactions. Disabling prevents the job from appearing in selection listings in most areas (except Job Maintenance). Closing is similar but also has implications if the job maintains its own receivables balances.
Folders
There are a number of static folders provided in the Jobs Maintenance and Inquiry forms:
*Payments received may affect a job's available credit immediately or not. This depends upon the settings for the account and how payments are entered. For example, a job billing-level account would maintain separate job balances and aging, so if a payment was entered for that specific job, the job's available credit would increase immediately even prior to posting. However, if a payment isn't entered for the specific job or the overall account doesn't operate at the job level, the payment would have to be applied (posted) to job balances before the job's available credit is affected.
Functions
There are several standard functions available in this form as well as one that only applies to maintenance type areas. Standard functions include Cancel (F9), Exit (F10), and Process (F12). There is also one additional function, Template (F5), explained below:
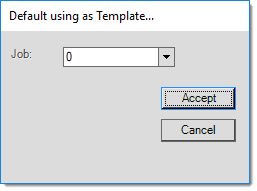
Template (F5)
The Template (F5) function is used when adding a new job and you want to use the settings of another job. The template function will use most of the selected job's settings with some exceptions. Warning: the Template (F5) function should be used at the very beginning of job entry. Any previous changes made will be lost and overwritten with the template job's information.