Delivery Overview
You can use the Spruce Delivery feature to manage deliveries directly from the application.
Using the Delivery application is entirely optional, and is not enabled by default. There is no additional charge or support fee for the Delivery module; however, training is a billable service and can be arranged upon request.2
Important! After Implementation or Support enables the Delivery option (Maintenance > Database > Parameters > Software Tab), you will notice changes in the Point of Sale process document to include the Delivery tab. You should complete the REQUIRED file maintenance options (listed below) in each branch that will use delivery BEFOREyou request to enable the Delivery parameter. (Branch locations that will NOT use delivery should disable the Delivery option. Complete your file maintenance tasks and entries before enabling the Delivery option.
Please don't request that Support enable Delivery until you have completed all of the required setup as discussed in the Before You Get Started and Setting up the Delivery Infrastructure sections below!
Companies should seek training and request to have Delivery enabled in either their training or test systems prior to implementing on the live system. Use of the Delivery option is flexible, so establishing your own procedure for delivery management is important. Furthermore, procedures and use of this application can vary based upon the size of your business (# of deliveries). In this documentation, we'll provide a suggested work flow to help guide you.
Big News: Spruce Mobile Delivery is Coming Soon!
In response to your requests for a modernized delivery solution, we are building a new mobile delivery platform based on the JumpTrack Driver app! If you are interested in learning about the future of mobile delivery on this platform, see the topic, Spruce Mobile Delivery Overview. For more about these new features, review the Special Topics section below.
Before You Get Started with Deliveries
You can manage Deliveries by each location (branch) or by one or more designated locations. The Inventory Provided by Branch option on the Branch (Alt-R) tab of applicable Process (F12) forms in Point of Sale determines which branch location's Delivery settings are used for the Delivery selections (on the Delivery (Alt-D) tab on the Process (F12) form).
The Branch Setup form has an option for setting a warehouse branch. All this option does is set the default warehouse location for the branch. This is never used automatically. If a branch is assigned to a warehouse and the user selects the "warehouse" check box on the Branch tab of a Point of Sale Process (F12) form, the "inventory" branch is changed to match the warehouse. When the inventory branch is modified to another location (either manually or by clicking the "warehouse" check box), all delivery related fields are changed to reflect the delivery selections of the "inventory" branch, not the current branch. Otherwise, the warehouse setting has no effect on delivery.
It is possible to disable the delivery option by branch. This is done in the Branch Maintenance form (available from the Maintenance area's database menu). Delivery should be disabled for any location that will not use it for two reasons:
-
To prevent the delivery queue from accumulating deliveries that won't be processed and
-
To ensure that setup does not have to be done for a branch that won't use the option.
In addition, you can assign and use zip/postal codes for sales and delivery to specific inventory branches. When you make these zip/postal code assignments, you can choose the "inventory supplied by branch" automatically option, which also affects the delivery selections provided.
Setting up the Delivery Infrastructure
Before enabling Delivery at Point of Sale, you need to complete the following definitions using the Delivery > Database menu. Delivery setup is branch-specific (must be done for each location that will deliver goods). Delivery should be disabled in any branches that it will not be used for (from the Branch database). We suggest you follow these steps, in this order, to complete the delivery infrastructure.
Route Codes
Route Codes describe the areas or routes where you intend to make deliveries. These involve a short code and longer description. How your company defines and uses codes is flexible. Possible ideas for codes include zip/postal codes or another system representing larger area or regions that your company defines. Add as many or as few route codes as you need to serve your customers. Route codes are likely to vary by branch location, so each location has its own separate list of codes (although the codes themselves could be the same). Usage of route codes is optional.
Truck (Lorry) Types*
Truck/Lorry types are intended to describe the type of delivery vehicle your company uses. A short code and longer description are provided for each type. For example, a type might be "boom" or "van." These vehicle types are branch specific; however, you can save the list of Truck/Lorry codes for all locations at the same time if you want to share them. Your company may have multiple vehicles of the same model/type, so it's possible to assign the same type to as many vehicles as you like. This setup is required.
*The term "truck" is used in the United States (US), Canada (CA), and Australia (AU), and "lorry" is the term used in the United Kingdom (UK). Certain labels, forms, and text change in the software based upon your operating system's regional settings.
Trucks (Truck/Lorry Codes)
The Trucks (Lorry) Maintenance form is used for defining the specific delivery vehicles for each branch. Each vehicle is assigned a truck/lorry (code), a type (defined above), a default driver, maximum weight, maximum cubes (cubic weight) and maximum board footage. The application compares Max weight, Cubes, and Board Footage with the load factors assigned to products being delivered by the vehicle. If the load exceeds the vehicle's maximum weight, the code weight displays in red in the Load Schedule form. Setup of Truck (lorry) Codes is required.
Drivers and Dispatch
The listing of default drivers is created from users who are assigned a type of "dispatch" and who have permission to access the branch where the truck/lorry is being added. These records are created by administrators who have access to User ID Maintenance (Maintenance > Database > User IDs) and are set up as either Dispatch (for the person who is managing the delivery schedule) and Drivers.
Time Intervals
The Time Intervals form is used for defining the number of delivery runs that can be scheduled during a given day. In most cases, a company has a limited number of delivery periods. The actual number may vary based on the distance between stops and number of stops for each delivery run on a given day. To generalize, there are typically between 2 and 3 runs per day, per truck. The first run is often in the early morning and would be loaded the previous evening. After the truck returns from the early morning delivery, a second and possibly third run might follow, for example. A maximum of 8-characters per code is allowed. These appear in Point of Sale when users indicate delivery on the Process (F12) form as well as in the Load Schedule area. Setup of Time Intervals is required.
Slot Reserves
This allows the definition of the number of "slots" available for individual truck and time interval combinations. For example, each time a truck goes out on a particular route, you may define a maximum number of slots (deliveries) that truck has time to make. These "slots" may be reserved by a Point of Sale user for their particular delivery transaction. When all the slots available have been reserved, users will no longer be able to reserve additional slots for that truck, time interval, and date combination. Slot reserves are optional. If they have not been setup, there won't be a limit to the number of reserves allowed.
Overview of the Delivery Modules
The delivery application area helps you manage the delivery of your products to your customers. This section contains these additional topics:
Load Schedule
Load Schedule is the primary tool used for managing deliveries when using the Delivery feature. We suggest that you limit access to this area to as few users as possible because delivery changes by multiple users can potentially conflict with each other. Delivery was designed with the assumption that most companies would have one primary dispatcher (per branch location) responsible for the bulk of the delivery scheduling. Despite this, we do not prevent multiple users from accessing this area at the same time.
Truck Assignment
Truck Assignment gives you a way to assign a particular load or manifest document to a truck and driver. You can also do this from the Load Schedule form, but is provided for cases where the assignment of the truck and driver is not being managed by the dispatcher but another party.
Status Update
Status Update gives you a way to track the status on either an individual delivery document or for an entire load (manifest). The ability to update status is also available in the Load Schedule form; however, we've provided this specific function separately so that a company may provide status updates to users who may not be the dispatcher.
Delivery Settings in Point of Sale Transactions
The Delivery tab on Point of Sale Process Document forms changes somewhat after Implementation or Support enables the Delivery option in the Parameters form. Delivery tabs exist on Process (F12) forms for many different transaction types including: Sales, Orders, Tickets, and Charge Returns, but does not apply to Direct Shipments. Installed Sales don't directly access the delivery management feature but are linked to orders and tickets that may have a scheduled delivery.
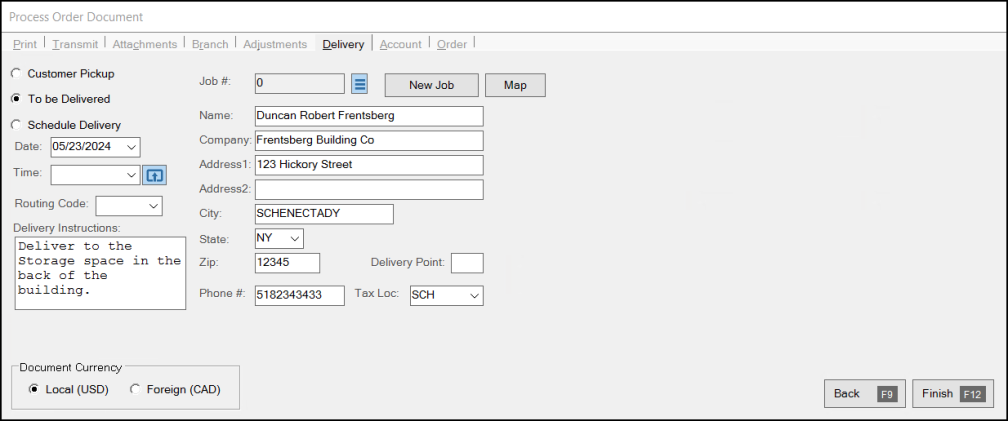
Delivery Enabled
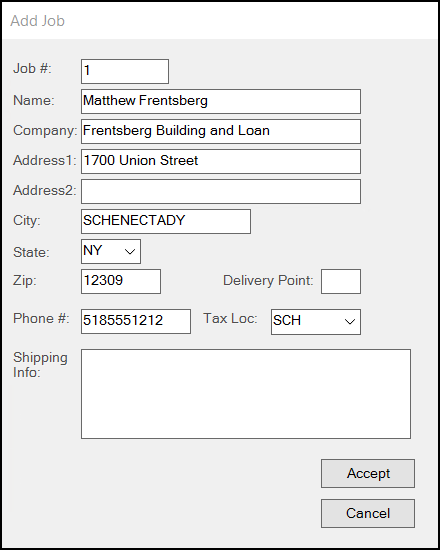
New Job Note: You can use the New Job button to add a new job to the existing account, including a new job number, and address information. Click Accept when you have completed your entries.
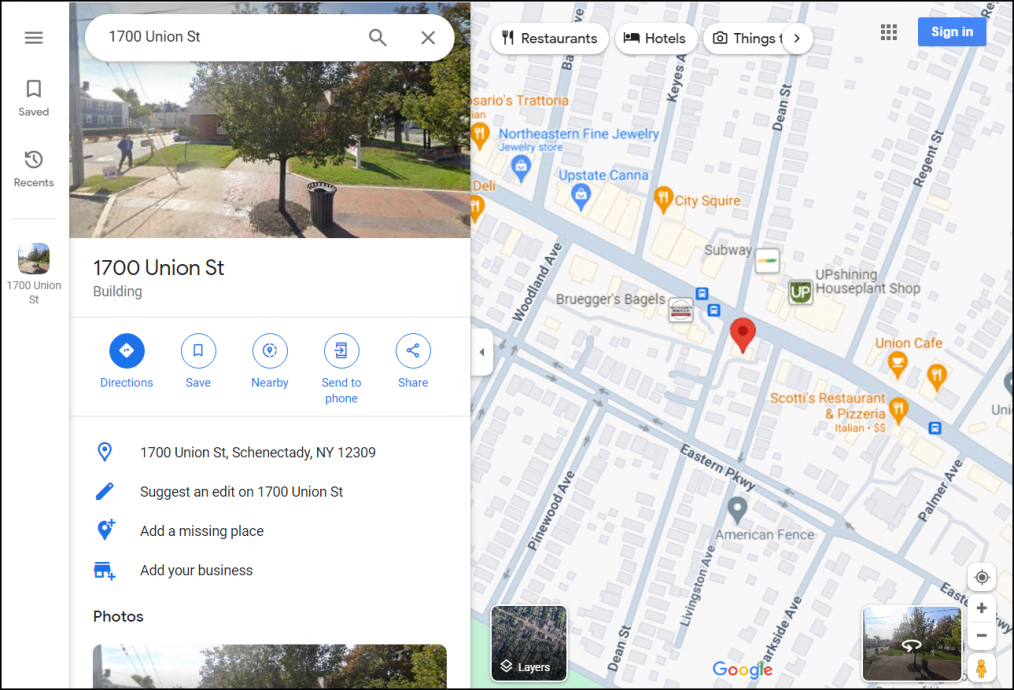
Map Note: When the address fields are complete, you can use the Map button to display the location and the street map of the delivery address via Google Maps.
After enabling the Delivery option, a Time list appears with a Settings ![]() icon to the right. The Time list displays the current branch's assigned Time Intervals. Click the Settings
icon to the right. The Time list displays the current branch's assigned Time Intervals. Click the Settings ![]() icon to open the Delivery Type form. Use this form to reserve a delivery slot on a specific truck on the user-selected date.
icon to open the Delivery Type form. Use this form to reserve a delivery slot on a specific truck on the user-selected date.
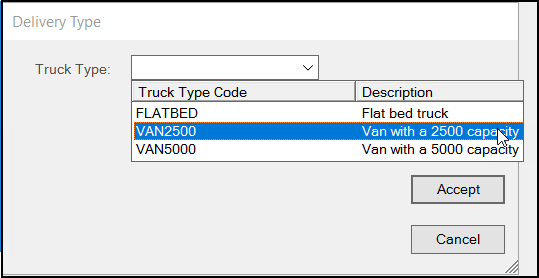
If all the available slots for the selected truck (lorry), time interval, and date have been reserved, you cannot reserve additional slots and need to choose a different truck (lorry) and/or date. The calendar indicates unavailable dates in gray text and will not allow selection when this is the case.
Once a transaction designated for delivery is processed, the application adds the transaction to the delivery queue (table).
Note: If the Zip Code database is in use and "sold by" and "inventory" branches are specified for some or all zip/postal codes, this can affect delivery processing. Assigning branches to a zip/postal code limits all deliveries to that code to a specific store location. When the delivery address includes a code mapped to a specific branch, the transaction can automatically change to use that branch's Delivery settings (the branch tab in the Process (F12) form is also affected).
Managing Deliveries
The primary tool for managing deliveries is the Load Schedule area available from the Delivery menu. When designing the Delivery module, our developers researched how users might manage their deliveries. For most companies, deliveries are scheduled by a single dispatcher at each location. This employee would be responsible for scheduling and updating most staging and deliveries. We do allow multiple users to access the Load Schedule area at the same time; however, be aware that both users would be able to make changes to the same loads concurrently and this may not make procedural sense. Individual transactions are temporarily locked as a dispatcher uses the Load Schedule area to prevent conflicting changes.
The Load Schedule form offers two distinct methods for managing deliveries: clipboard and summary. The clipboard is intended for the majority of scheduling, the summary for review and minor updating.
Clipboard
Use the Clipboard to drag and drop loads and use an automatic refresh timer. You can drag documents in the Delivery queue (left-hand panel) and drop them onto the selected day's schedule. This removes them from the queue and associates them with the load. There's no need to select Process (F12) as updating occurs immediately. Documents associated with a load may be removed and placed back in the queue or moved to another load. The load panel (right) defaults to list the loads for the current date (today). This date can be modified by using the arrow buttons on either side of the "Today" button or by using the drop down calendar control.
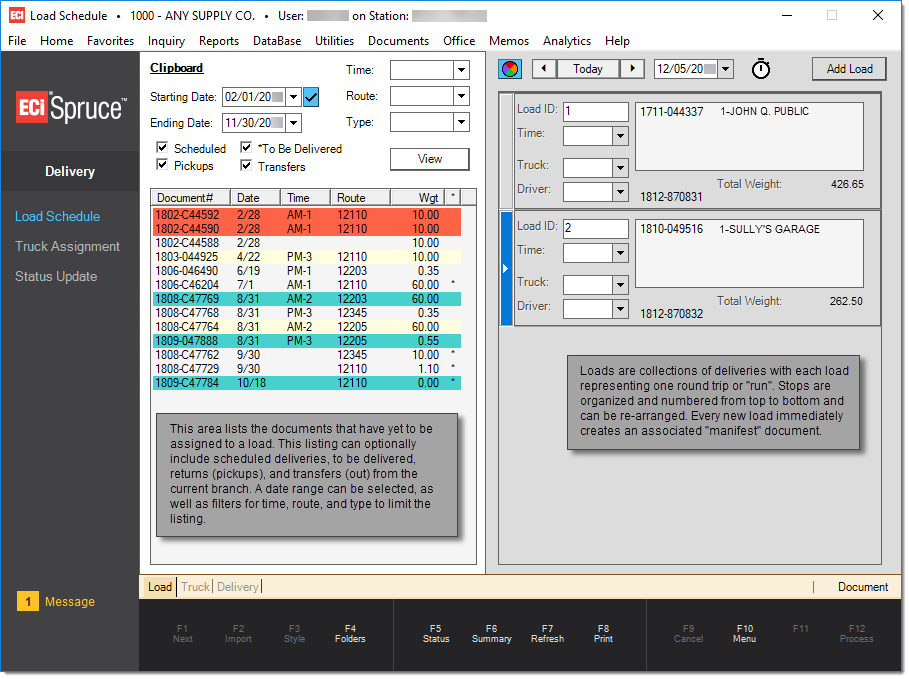
Each load added must be associated with one time interval and truck (lorry). Specifying a driver is optional. Every time a load is created, a "manifest" document is also created. If weight/load factors are assigned to the goods being delivered and the total weight of the deliveries assigned to a load exceeds the load truck's assigned maximum load weight, the "Total Weight" figure for the load will change to red text as a warning. These documents are also updated whenever changes are made to a load.
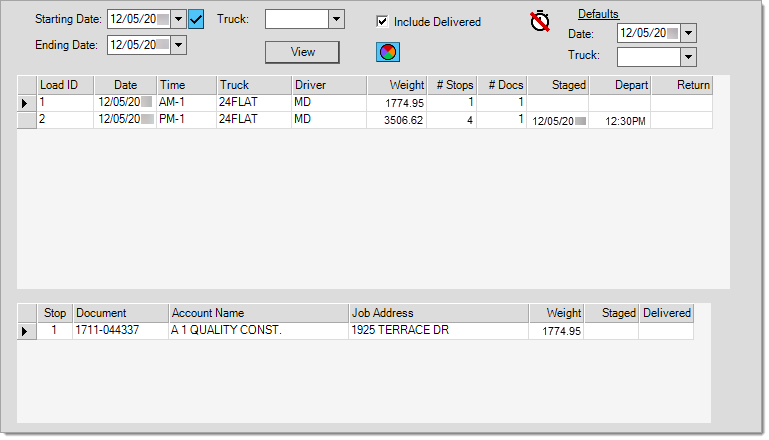
Summary
The Summary increases the number of loads that can be viewed at one time. The summary has a lot of the same abilities as the Clipboard form but some differences too. To view deliveries using the summary format, users must press or select the Clipboard (F6) function to change the format. The Summary form has two grids. The upper grid lists the deliveries (loads) for the date range specified. The lower grid lists details regarding deliveries for any load selected in the upper grid.
Some differences between these formats are listed below:
✓The auto-refresh timer is not automatically enabled in the Summary. It can be enabled (turned on) by using the Refresh (F7) function (both grids are made "read-only" while the auto-refresh timer is running).
✓There is no drag and drop in the Summary view.
✓New and existing queued delivery items are not listed; however, these may be assigned manually.
✓New loads are added by inserting a row in the upper grid (alternate mouse menu). There is no "add" button.
✓Loads for a range of dates may be viewed and scheduled at the same time.
✓New deliveries are associated with a load by selecting the load in the upper grid then inserting/adding rows in the lower.
✓The Summary format allows multiple deliveries to be assigned to the same stop. This is not possible in the clipboard format.
✓Details of a load's deliveries are only visible for the currently selected row (load) in the Summary format.
The Summary format was designed for companies who need to manage a larger number of deliveries and loads at the same time. The "clipboard" format is intended for smaller delivery operations. Feel free to use whichever works best for your company. Either or both may be used.
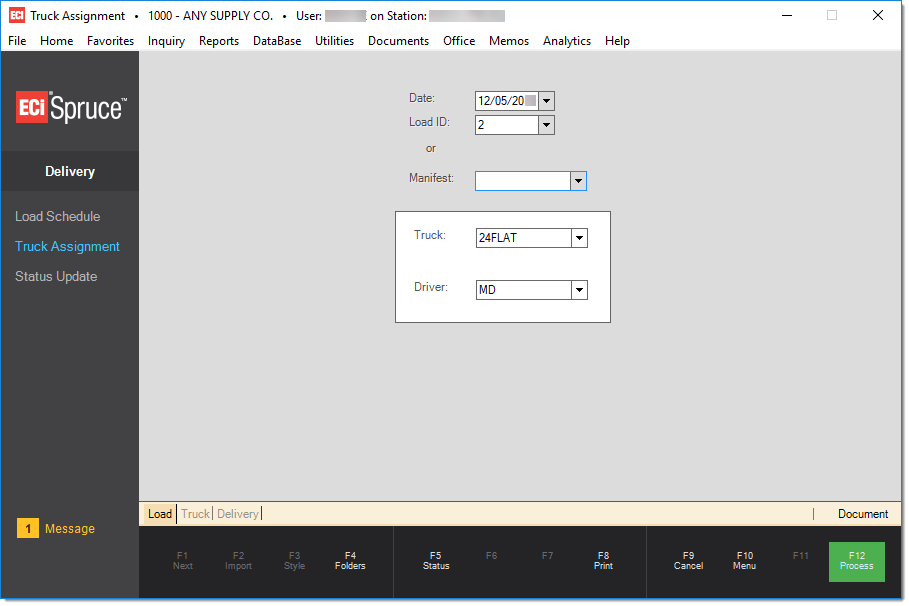
Truck (Lorry) Assignment
Trucks (or Lorries) may be assigned in a few different places. For example, a Point of Sale user can reserve/request a slot on a particular lorry/truck when specifying that a transaction for delivery (this can be overridden by the dispatcher). Alternatively, the delivery dispatcher can use the load schedule screen to assign a load (manifest) to a particular truck/lorry and driver. This form just offers another option for assigning deliveries to a vehicle.
Why? Delivery is meant to be flexible to adapt to a number of scenarios regarding how companies manage their deliveries. Your company may just have the dispatcher assign deliveries based upon location (for example) but have another person responsible for deciding which vehicles and drivers are used. This form provides a user the ability to assign a previously added load (or manifest document) to a truck (or lorry) and driver; however, it does not provide the full capability of the Load Schedule screen. An alternate scenario might be to allow the personnel staging deliveries to make changes if a particular vehicle cannot be used (due to the size of other loads, etc.).
The easiest way to update either a manifest or delivery document is to scan the document's barcode. This requires a compatible barcode scanner.
Adding/Reviewing Cubes Settings for Deliveries
Now that the customer has purchased the items you have cube information settings for, you need to quantify the cube space available on your vehicles. We have updated the Truck/Lorry Maintenance form to add the columns Max Cubes and Max Board Footage to accommodate these new settings. The name of this form is specific to the region you are working in.
To see these changes and add cubes information to vehicles:
1. From the Main Menu, choose Delivery > Database > Trucks/Lorries. The Truck/Lorry Maintenance form displays.
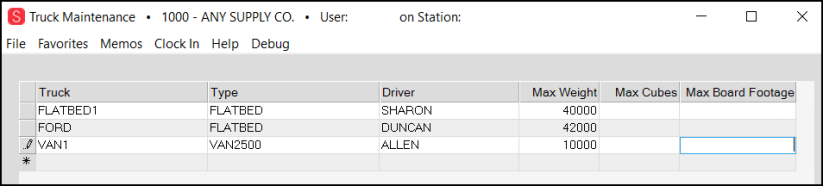
Truck Maintenance with Max Cubes and Max Board Footage Fields
2. In the Max Cubes field, enter the maximum cubes values available in the vehicle.
3. In the Max Board Footage field, enter the maximum board footage values available in this vehicle.
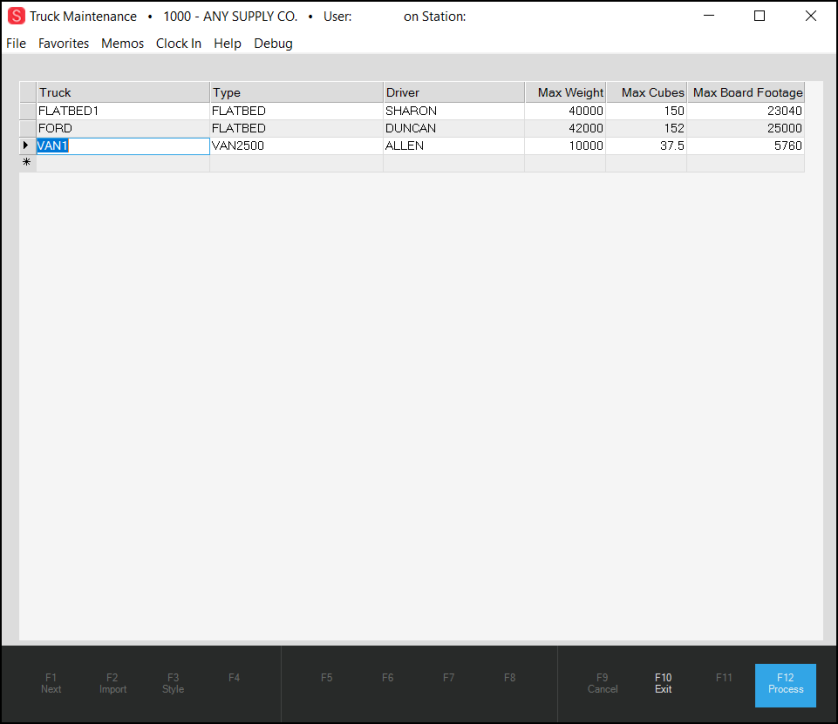
Truck Maintenance with Max Cubes and Max Board Footage Entries
4. Choose Process (F12) to save these settings.
After you store these settings for your vehicles, you can use the Delivery Load Scheduler to determine the right vehicles for your deliveries.
Scheduling a Delivery using Cubes and Board Foot Measurements
After you have your Weight and Cubes settings for the materials you are delivering set up in Item Maintenance, and the customer has purchased those items and asked for delivery, and you have updated your vehicle settings to include Cube and Board Foot measurements, you are ready to use the Load Scheduler to determine the right vehicles for the deliveries you have.
To use the new entries to create the delivery schedule:
1. From the Main Menu, choose Delivery > Load Schedule to display the Load Schedule form.
2. On the Clipboard, choose the Scheduled check box and select the Starting and Ending Dates for delivery.
3. Click View to see the scheduled deliveries for the date you selected.
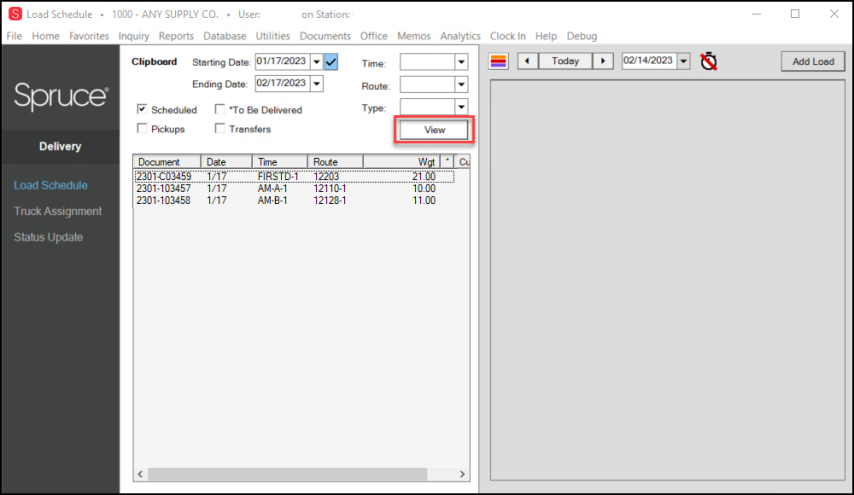
Load Schedule with Delivery Entries Showing
4. Choose the Add Load button and drag the first delivery you want to add to the second column list. The details of that delivery display.
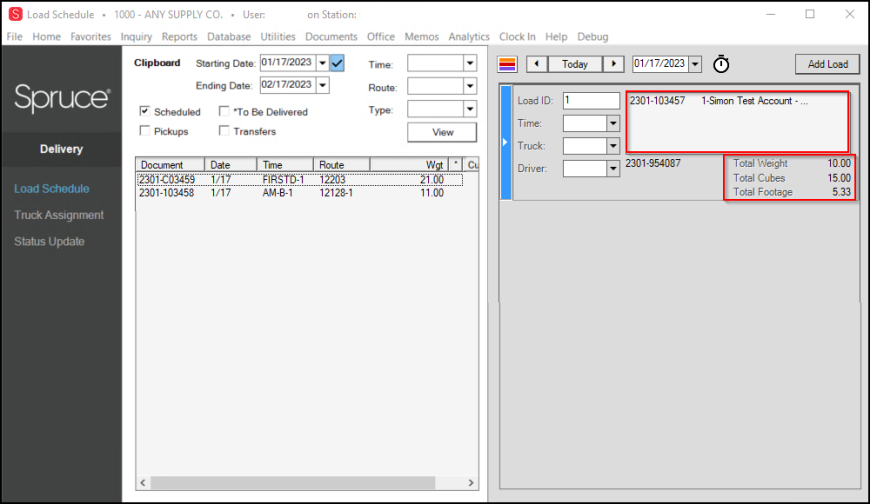
Load Schedule with Selected Delivery Loaded
5. Drag another delivery document to the right column and the application adds the new delivery to the existing Load ID, totaling the weights, cubes, and footage.
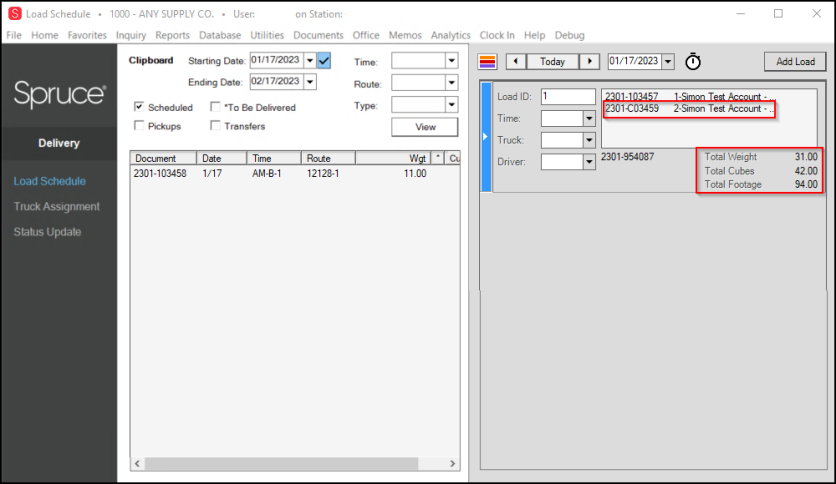
Load Schedule with Updated Delivery Information Loaded
6. From the Truck (Lorry) list, choose the vehicle you want to use to perform the delivery.
7. Choose Process (F12) to complete the schedule. The Delivery Manifest reflects the total Board Foot and Cubes amounts as well.
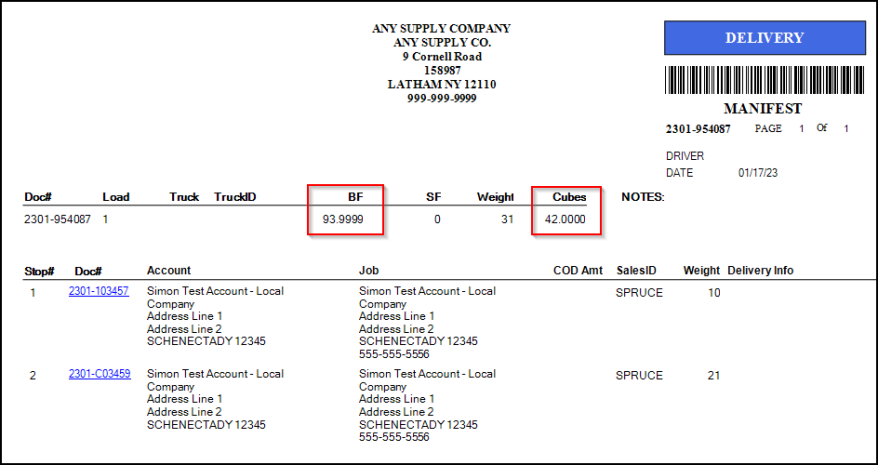
Delivery Manifest for Scheduled Delivery
The scenario above shows what happens when the load fits on the vehicle. The application also highlights the Weight and Cubes amounts in red when the load values exceed the capacity of the vehicle.
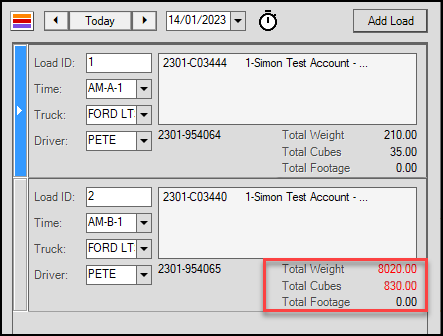
Load Schedule with Weight and Cubes Values Overloads
Status Update
A few status updates are automatic, but most are manually assigned. Assigning statuses is entirely optional. They are provided in order to help the dispatcher and delivery staff keep track of the progress of both individual deliveries (stops) and loads (delivery runs). Again, the degree to which your company utilizes statuses or not is entirely flexible. Statuses can be modified from both the Load Schedule form and the Status Update area. Access to the Status Update form can be provided to users who need to be able to update delivery statuses but not necessarily need to have access to the full functionality of the Load Schedule area.
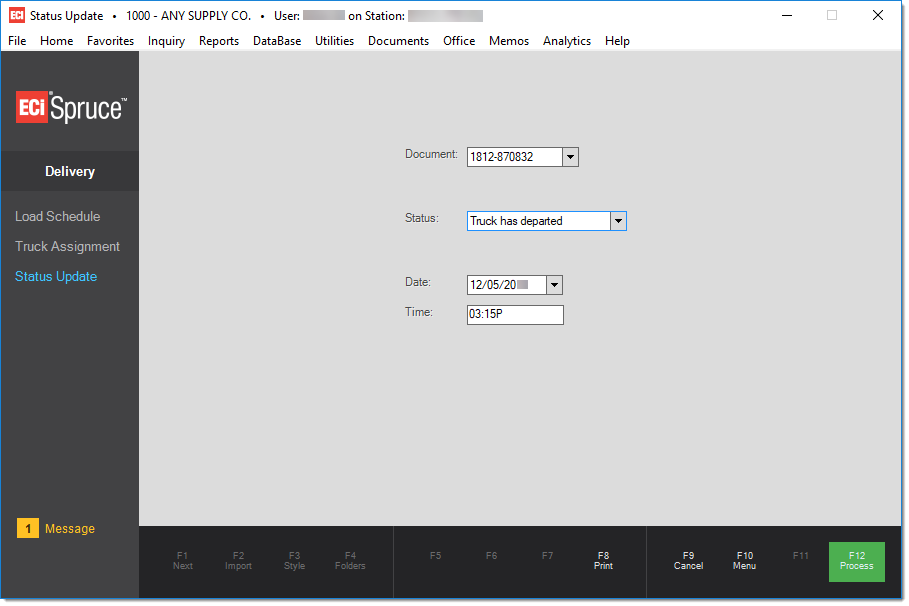
Two categories of documents can be updated in this area: manifests (documents that represent an entire delivery or load) and individual deliveries (invoices, orders, tickets, and returns that represent a single stop). We suggest using this form along with a barcode scanner to quickly update the status of documents. Manifests and delivery documents each have a separate set of statuses.
Delivery Work Flow
Here is one example of using the Delivery feature.
➢Either the evening before the deliveries occur or early on the morning of the delivery, the Dispatcher uses the Load Schedule area to review the deliveries queued for delivery day.
➢Beginning with the earliest delivery run, the Dispatcher creates loads for each delivery truck that will be making the deliveries.
➢Deliveries in the queue that have been earmarked for early morning delivery (optional) would be assigned to loads first. Remaining loads (those without a slot reserved) would then be assigned to remaining slots, if any.
➢Stops would be arranged based upon the truck type and how it was loaded (if applicable). Any pick-up (returns) would typically be the last stops on the delivery.
➢After the Dispatcher assigns the loads and stops for the first delivery run (Early Morning deliveries), they print the manifest and delivery documents. The Dispatcher passes these documents on to the staff responsible for staging the deliveries.
➢As deliveries are staged, the staging personnel can update the status of each delivery document from the Status Update area by scanning the barcode.
➢Once the delivery has been staged and loaded onto the truck, the manifest document would be updated to "has left" (truck or lorry).
➢While the vehicles are out on delivery runs, the delivery documents for the next delivery period are printed. These are used for staging deliveries for the next load (or loads) to be loaded and delivered when the vehicles return.
➢The driver makes their deliveries and has the customer's sign each delivery document (you may give a copy to the customer possibly).
➢When the delivery vehicle returns, the manifest document is returned to the dispatcher and is updated as "has returned."
➢Either immediately after or at the end of the day, the dispatcher (or another user) uses the Invoice Load utility to invoice all the deliveries for the day. C.O.D. sales would require payment processing as a separate procedure (Invoice Loads does not apply to C.O.D. sales).
Each company will use some variation of this process. This is just provided as a starting point to help users determine their own procedure.
1Both DQ and Spruce Delivery should not be used or enabled simultaneously (they share some functions but use them differently). If both are enabled, only the Spruce delivery option will function, DQ will not. DQ users should not enable Spruce Delivery for this reason.
2Training is a billable service except for regularly scheduled on-line training courses. These courses are usually held monthly and cover a variety of topics. Registration is required. See this topic to learn more about the training schedule.
Special Topics
This section provides additional topics related to Delivery that may be useful to you. These topics include: