Setting up Spruce Mobile Delivery
Spruce Mobile Delivery (Powered by JumpTrack) is available to all customers in the United States, Canada, the United Kingdom, and the Caribbean. Contact your ECI Aftermarket Sales Representatives to discuss your needs. After you purchase you licenses and the affiliate settings are complete, you are ready to begin the Spruce Mobile Delivery setup process.
To set up the Spruce Mobile Delivery (Powered by JumpTrack) process, begin with what you already have installed.
-
If your business has never used the .Net Delivery feature before or you are transitioning from another delivery platform, you need to build the infrastructure before the Delivery parameter can be enabled.
Follow this process here. -
If you have been using the .Net Delivery feature and understand how it works, follow this process here.
Complete Before the Delivery Parameter is Enabled
We recommend that you complete these settings before the .Net Delivery setting is enabled.
Setting up the Delivery Settings for a Branch
Some businesses manage their deliveries through a warehouse, while others send deliveries directly from the branch (store) location. This selection can be chosen during the Point of Sale transaction in the Branch tab, but first, you should set those options for each branch in the Branch Setup tab.
Branch setting changes require system administrator permissions. These settings must be completed for each branch that will be adding delivery information at Point of Sale.
To define the Delivery settings for a branch:
1. From the Main Menu, choose Maintenance > Database > Branches. The Branch Setup form displays.
2. From the Branch ID field, choose the branch you want to set the delivery settings for and press Enter.
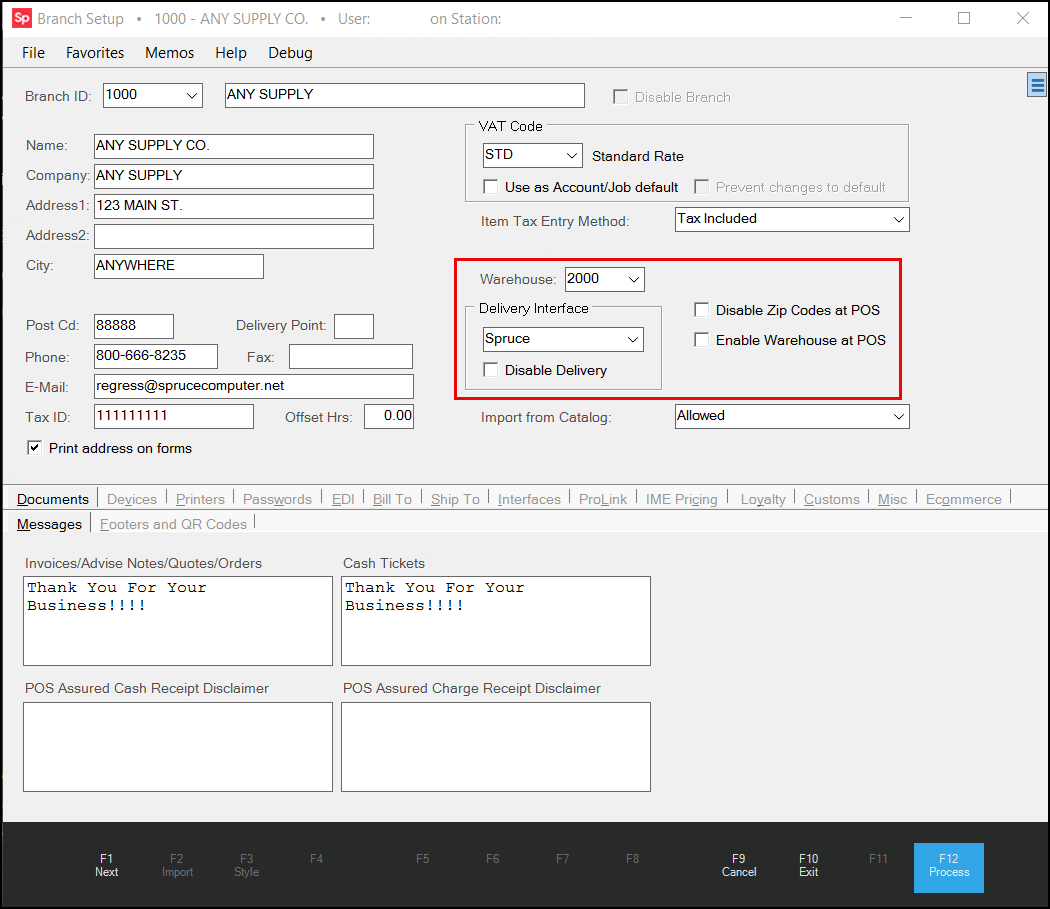
Branch Setup > Branch Selected > Delivery Settings
3. If your business uses a warehouse for some deliveries, choose the branch ID of the warehouse from the Warehouse list. You can leave this blank if you only deliver from the store.
4. From the Delivery Interface list, choose Spruce. This setting is required for branches that will be processing deliveries for transactions. You can leave this entry blank if the branch will not use the delivery feature.
5. Consider whether you want to disable the ZIP code setting at Point of Sale or use the ZIP code setting of the delivery location to assign the sales tax.
In the U.S., sales and other taxes can be defined by the ZIP code entries of the delivery location. You can disable the store location tax setting by selecting the Disable Zip Codes at POS check box. This is not required.
Warehouse Delivery Note: If you want to enable a Warehouse for deliveries for the current branch by default, select the Enable Warehouse at POS check box. This is not required otherwise.
6. When you have completed these settings, choose Process (F12) to save them to the database.
Adding the JumpTrack Delivery Setting for a Branch
When the Spruce setting for delivery is complete, you can enable the JumpTrack delivery setting for the first branch. You may want to start with one branch, and after the process is working well, you can enable this setting for additional branches. You can rely on the Support team to advise you when to add additional branches.
Your System Administrator can select the initial branch for the Spruce Mobile Delivery process.
To specify the branch(es) that will use JumpTrack in Spruce:
1. Log in using your system administrator permissions.
2. From the Main Menu, choose Maintenance > Database > Parameters. The Parameter Settings form displays.
3. Click the Delivery tab. The Delivery tab displays.
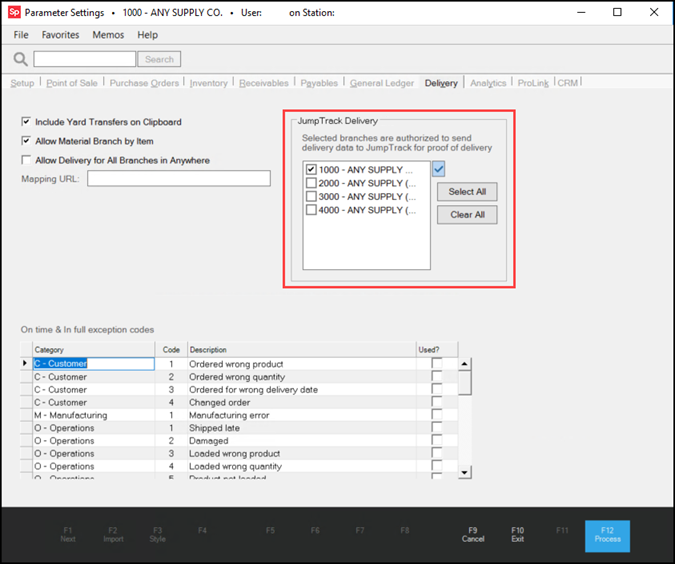
Parameter Settings > JumpTrack Delivery
4. Review the delivery settings and enable the settings that are useful to your business:
Note: If you have completed these settings before, they do not need change, except for the Allow Delivery for All Branches in AnyWare, which should be unchecked.
-
Include Yard Transfers on ClipboardWhen you select this option, transfers not set to "auto receive" are added to the Delivery Queue after processing. Pending transfers are never queued. Transfers are color-coded, and Dispatchers can filter them from the queue.
-
Allow Material Branch by ItemThis setting is one factor in determining whether can choose material branches by item on a customer order (Point of Sale, Orders). You need to add an application security setting (same name) for the user so they can make this choice. When enabled, the user is provided with additional options on the Branch tab of the Process (F12) form during transaction processing.
-
Allow Delivery for All Branches in AnyWareDisable this setting to prevent Spruce from using AnyWare for delivery.
-
On Time & In Full Exception Codes (OTIF)You can use these settings to define the delivery performance codes. This is covered in detail in the Delivery Parameters help topic here.
5. In the JumpTrack Delivery box, select the check box beside each branch that will submit delivery data to JumpTrack.
6. Choose Process (F12) to save these settings.
Adding Drivers and Dispatchers
Administrators with access to the User ID Maintenance form can set up the required Dispatchers and Drivers records for this process. You will need to refer to these settings for MyJumpTrack later.
Dispatchers have access to the Load Schedule function in the Delivery area to set up deliveries and receive notifications related to deliveries. They also have follow up and reporting responsibilities in the application.
Drivers appear in the Delivery area in the Driver lists and can be tied to a particular truck/lorry.
Multi-Branch Driver Note: If your Drivers deliver from more than one branch, they will need a specific setup in the MyJumpTrack Portal. Please discuss these Driver settings with your Support person before you go-live to ensure the accounts are configured correctly.
To add a Driver or Dispatcher to the Delivery process:
1. From the Main Menu, choose Maintenance > Database > User IDs. The User ID Maintenance form displays.
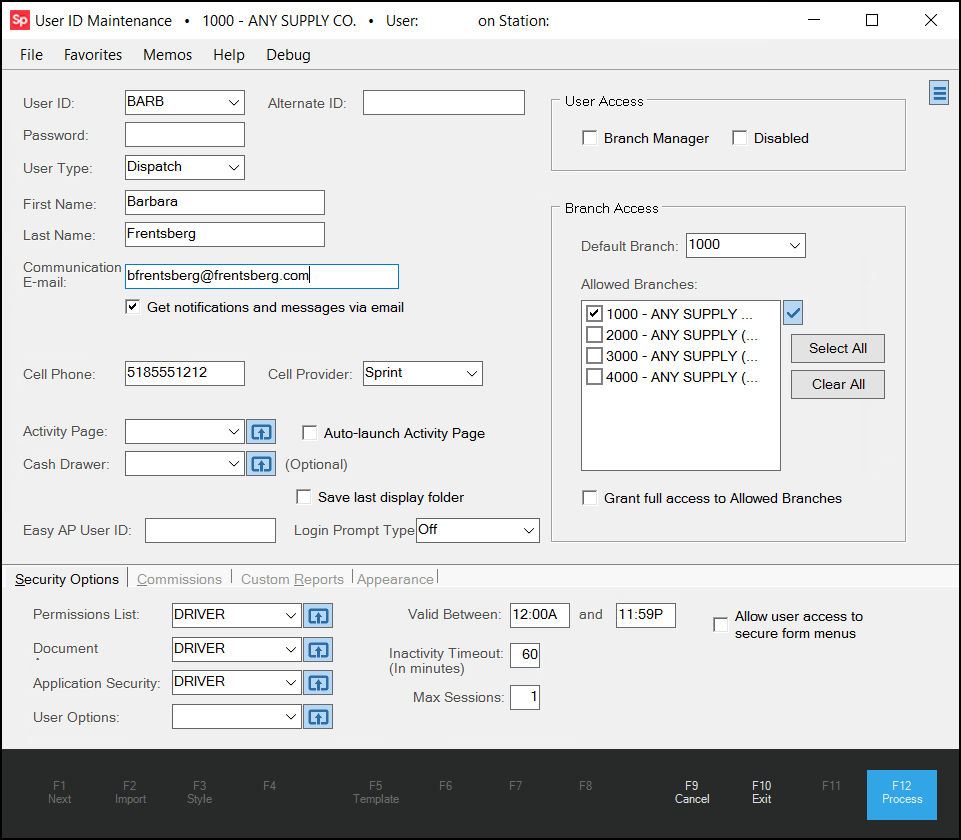
User ID Maintenance > Dispatch/Driver
The application uses the user ID to identify the user across documents, reports, delivery documents, and associated transactions.
2. Complete the fields in this form for the Dispatcher or Driver you are adding to the application.
-
User ID
Enter a user ID of up to six characters (letters and numbers allowed) to identify the user in the application. This field is required. -
Password
Enter an initial password for the Driver or Dispatch user when you create the user account. This field is required. Users can modify their password independently when prompted by the application or manually using the File > Update Password option. Passwords can be up to 24 characters long. -
User Type
Use this field to specify the type of work (Driver or Dispatcher). This field is required. -
Default Branch
Drivers typically are restricted to one branch, so complete this entry to ensure that the Driver does not appear in another branch’s driver list. -
Allowed Branches List
For Dispatchers, you may want to allow them to review delivery data for other branches, so here you can enable those branches in this list.
3. In the Security Options tab, choose the Permissions ListSettings  icon to display the areas of the application the user has access to.
-
Typically, the Driver settings are restricted to Delivery settings like Inquiry and Database, so they can look up delivery information in the application without changing the transaction details.
-
Dispatchers have access to more settings, including Utilities and Reports, as their work requires more in-depth access to the customer information.
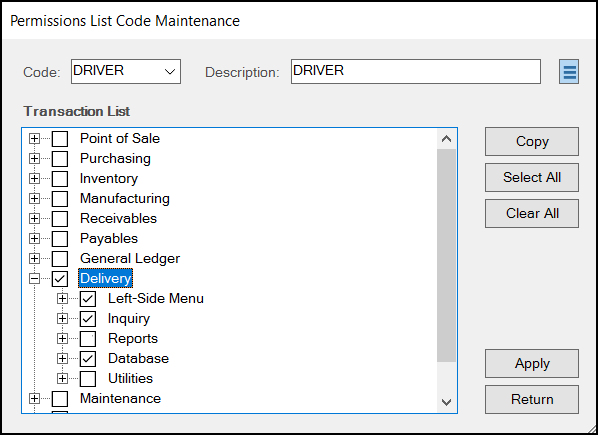
User ID Maintenance > Permission List Code Maintenance > Driver Settings
4. When you have completed the changes to the user settings based on the Driver’s or Dispatcher’s role and click Apply and Return.
5. In the Document section, click the DocumentSettings icon to define the types of documents Drivers and Dispatchers have access to. Typically, Drivers have access to Delivery and Point of Sale documents, but Dispatchers may have access to other areas based on their responsibilities. You can make changes by selecting the check boxes beside the document types the user needs and choosing Apply and Return to save the changes.
6. In the Application Security section, click the Application SecuritySettings icon to define the permissions specific to the Driver and Dispatcher roles. Review the permissions list entries and select the appropriate check boxes beside the permissions you want to add. Then click Apply and Return to save the changes.
7. In the Valid Between fields, enter the earliest time and latest time in the day this Driver or Dispatcher will work. This entry is required.
Note You may want to enable the Allow user access to secure form menus for the Dispatcher for circumstances where materials being delivered are dangerous and potentially toxic.
8. When you have completed these settings, choose Process (F12) to save the user permissions for a Driver or Dispatcher.
Setting up the Delivery Infrastructure
Before you enable .Net Delivery, complete the following data definitions. Delivery setup is branch-specific (must be done for each location that will deliver inventory items). Delivery should be disabled in any branches that will not use it (from the Branch database). We suggest you follow these steps, in this order, to complete the delivery infrastructure. Not all of these settings are required, so you can choose what works for your business. The settings that are required are noted in this section.
Setting up Truck (Lorry) Types
Truck/Lorry types are intended to describe the type of delivery vehicle your company uses for deliveries. A short code and longer description are provided for each type. For example, a type might be "boom" or "van." These vehicle types are branch-specific; however, you can save the list of Truck/Lorry codes for all locations at the same time to share them. Your company may have multiple vehicles of the same model/type, so it's possible to assign the same type to as many vehicles as you like.
*The term "truck" is used in the United States (US), Canada (CA), and Australia (AU), and "lorry" is the term used in the United Kingdom (UK). Certain labels, forms, and text change in the software based upon your operating system's regional settings. Truck types are required for the Send to JumpTrack process.
To add Truck Types to Delivery:
1. From the Main Menu, choose Delivery > Database > Truck Type.
The Truck Type Definitions form displays.
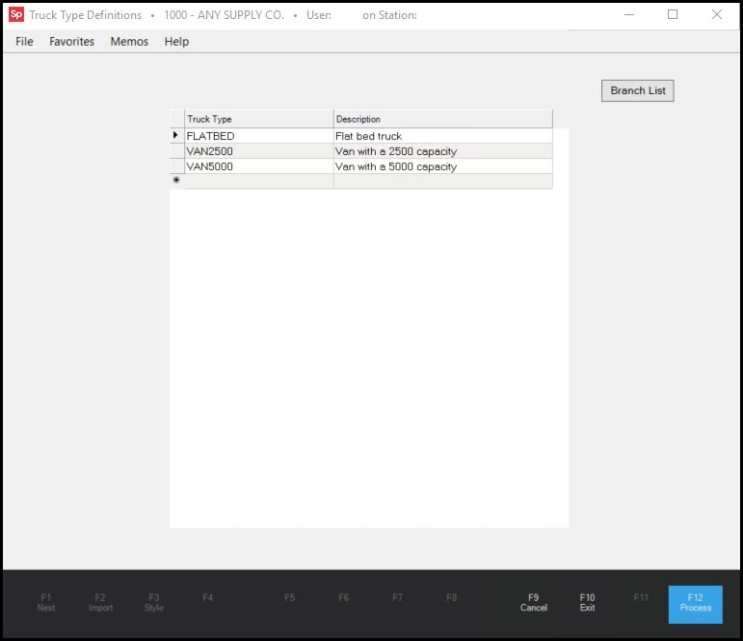
Truck Type Definitions
2. In the Truck Type column, enter the defining code for a particular truck type you use for deliveries.
We recommend adding truck types for each vehicle type that makes deliveries and carries the same types of items.
3. In the Description field, enter the type of vehicle it is and its load capacity, if needed, to distinguish vehicle types that are similar.
4. Click the Branch List button to display the list of branches and choose the check box beside the branches that will use this truck type for deliveries.
5. Repeat steps 2 through 4 for each truck type you want to add to each branch.
6. When you have added the types you need, choose Process (F12) to save the changes.
Choose Exit (F10) to close the window without saving changes. Use Cancel (F9) to clear any unsaved changes and reload the listing of saved truck types.
Setting up the Truck/Lorry Codes
Trucks (Lorry) Codes define the specific delivery vehicles for each branch. Each vehicle is assigned a truck/lorry (code), a truck/lorry type (defined above), a default driver, the maximum weight, the maximum cubes (cubic weight), and the maximum board footage. The application compares the Max weight, Cubes, and Board Footage with the load factors assigned to products being delivered by the vehicle. If the load exceeds the vehicle's maximum weight, the code weight displays in red in the Load Schedule form. We recommend you set up the Drivers before this process. You can add Drivers and Dispatchers in the User ID Maintenance form, which is covered here. Truck Codes are required for the Spruce Mobile Delivery process.
To associate a truck/lorry with a truck type, Driver, and specify the vehicle’s capacity:
1. From the Main Menu, choose Delivery > Database > Trucks.
The Truck Maintenance form displays.
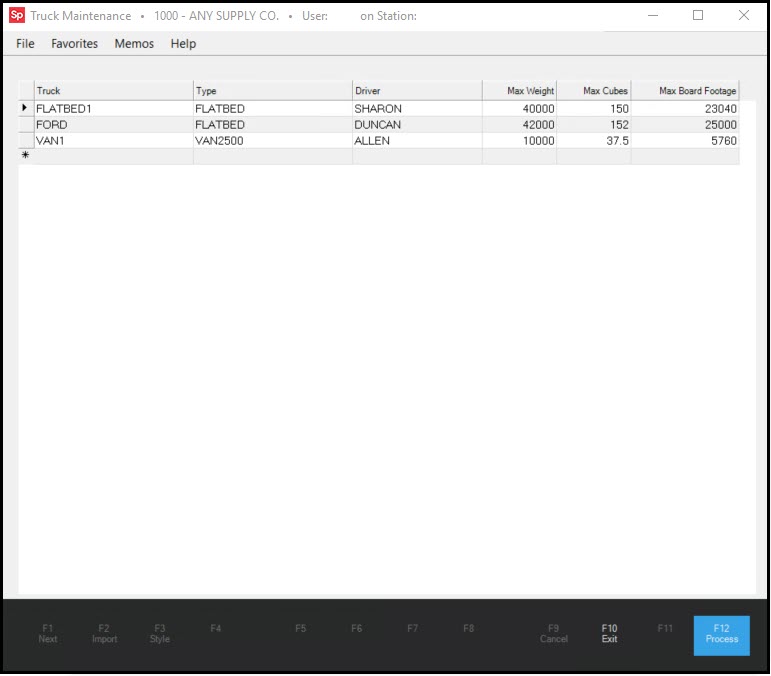
Truck Maintenance Form
2. In the Truck field, enter the name you use to identify the truck/lorry.
Each truck (or lorry) in this list represents an individual delivery vehicle. Dispatchers assign each vehicle to delivery runs (referred to as either a "load" or "delivery load" in the software). Each vehicle must have a unique code. If you try to re-add an existing truck in the same branch location, the software will not save it (and no warning displays).
3. From the Type list, choose the Truck Type that represents the truck/lorry you specified. The Truck Type is a more general classification for delivery vehicles. Some types might be flatbed, dump truck, box van, etc. These types will appear at Point of Sale and Salespeople can select the general type of truck needed for a particular delivery. Truck types are defined separately in the Truck Types Maintenance form.
4. From the Driver list, choose the driver who usually drives this vehicle. The users in this list have the Driver user type in the User ID Maintenance form and are assigned to the default branch. Assigning a Driver to a truck is not required, but when you assign a driver, they become the default driver for that vehicle and will automatically be selected whenever the vehicle is assigned to a delivery.
5. In the MAX Weight field, enter the maximum weight the vehicle can safely handle. As the Dispatcher adds items to the load, the application calculates the weight of the items to be delivered for each delivery document, based on the weight load factors in the Item Database (if used).
Note: These numbers are only accurate if your company maintains these values and applies them consistently. If the load exceeds the truck's maximum weight as specified in this field, the Truck Code will change to red in the Load Schedule form.
6. If your business uses Cubes or Board Foot measurements for quantifying weight for delivery, use these fields to define the maximum quantities for this vehicle.
7. When you have completed these entries, choose Process (F12)to save them.
Choose Exit (F10) or close the window to cancel any changes.
Repeat these steps for each vehicle you use for delivery.
Modifying and Deleting Delivery Vehicles
To modify an existing delivery vehicle entry in this list to change the truck type, Driver, or weight values, edit the existing entries and choose Process (F12). You cannot modify a truck ID except by deleting and re-adding the truck with a different ID (this does not change the vehicle on existing deliveries). We do not recommend doing this as it affects the delivery records that the truck was assigned to in the past.
You can delete a truck in the list by selecting the row and pressing the Delete key (or right-clicking the highlighted row and choosing Delete from the context menu). Then choose Process (F12). If you modify or remove a truck from this list, the software will not update existing loads or deliveries that were already assigned to the deleted truck.
Checking the Customer's Email Settings for Delivery
For Customers to receive emails with the delivery data the driver captures (including signatures, pictures, etc.), their email settings must be reflected in their Account and Job settings in the application.
Begin by adding the job email settings to the Account Maintenance form's Contacts tab using the instructions in the Adding a Contact using the Contacts Tab topic. Add email addresses for each job associated with the account to ensure that the delivery information goes to the right contact.
Note: In the Email field in the Contact record, you can add additional email addresses by entering the first email address, typing a comma, and then adding one or more additional email address(es). If the Customer wants delivery job-specific emails to go to more than one email address, add the multiple addresses here so they show up correctly in the Job Maintenance > Select list discussed below.
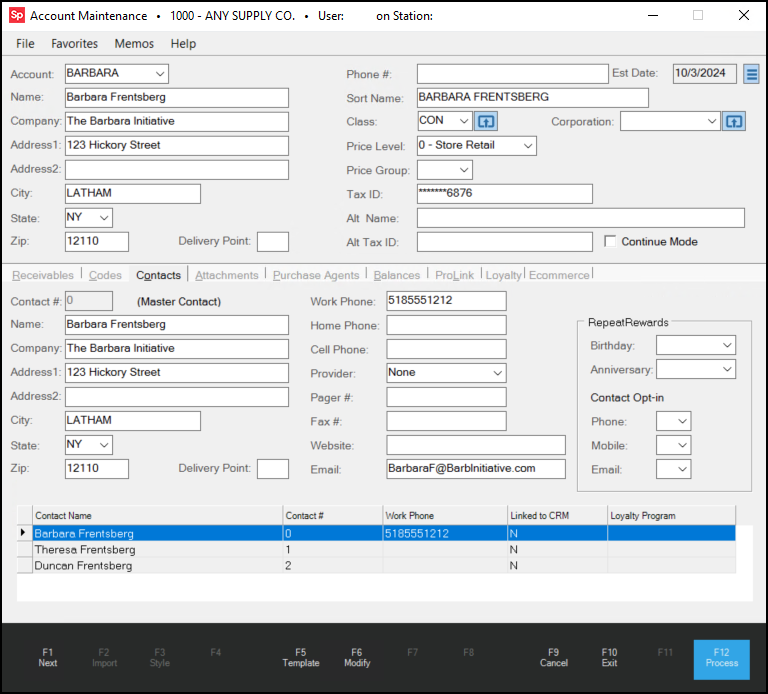
Some delivery customers may already have email settings for individual job sites, but without those settings, you cannot choose them in the Job Maintenance form. When these email settings are saved, you can follow the instructions below to select the email address settings for the customer's job.
Make sure you choose the job associated with the current transaction, so the email settings are correct for that job.
Note: You can look up the job ID setting for a transaction by double-clicking the Document in the Clipboard or the Load areas of the Load Schedule form.
To select the Customer’s email settings for delivery:
1. From the Main Menu, choose Point of Sale > Database > Job. The Job Maintenance form displays.
2. In the Account field, search for the customer’s account and press Enter.
3. In the Job ID field, choose the job ID associated with the delivery. The form updates to show the current job settings.
4. Click the Select tab to display the Delivery Email settings.
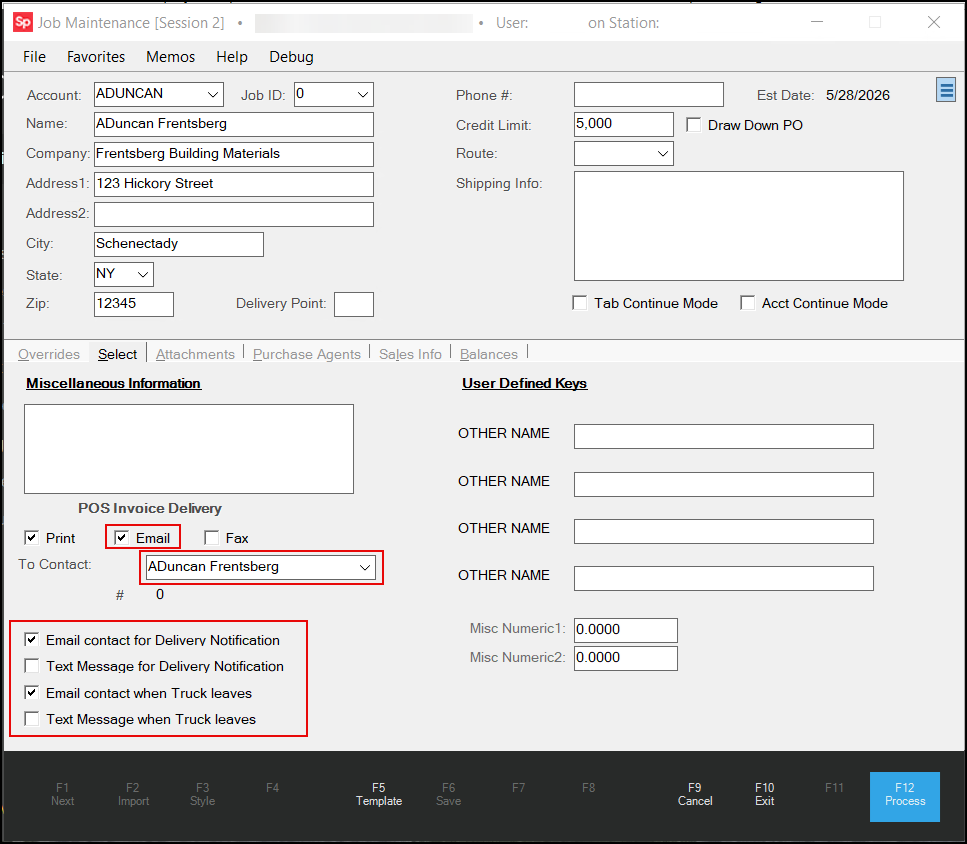
Note: If there are multiple email addresses associated with the selected record, the additional email addresses will display in the To Contact list entry.
5. Complete the following settings for this job:
-
From the To Contact list, select the email contact(s) for this job's deliveries.
This is a setting is from the customer's Account Maintenance > Contacts tab and affects the email settings for deliveries and for Point of Sale invoice emails. -
Enable (check) the Email contact for Delivery Notification check box.
6. Choose Process (F12) to save these changes.
Setting up the Branch in the MyJumpTrack Portal
In the MyJumpTrack portal, new Region and Distribution Centers settings link your branch data to JumpTrack and the MyJumpTrack portal. Complete the branch (Distribution Center) entries before you add the user records. The first user set up in JumpTrack is typically the Admin user for your business and can complete the remaining settings.
Important: We recommend that you send your first delivery from JumpTrack before beginning the set up process in MyJumpTrack. Some of the settings will be completed automatically.
To set up a branch and Truck Code settings in MyJumpTrack:
1. Log in to MyJumpTrack using administrative permissions. The Home page displays.
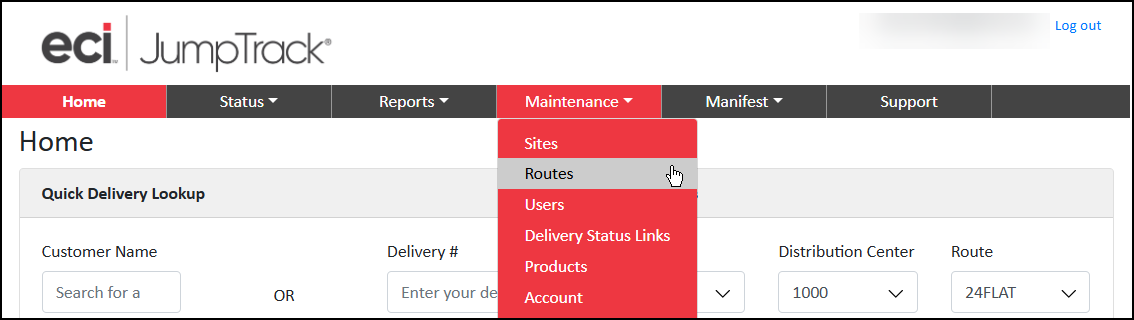
2. From the Maintenance list, choose Routes. The Route Maintenance page displays.
3. Click the Regions tab. The Region settings display.
4. Click the Add Region button to display the Add Region box.
Note: If you are updating these settings after the first delivery is complete, the Region and Distribution settings may be in the system already.
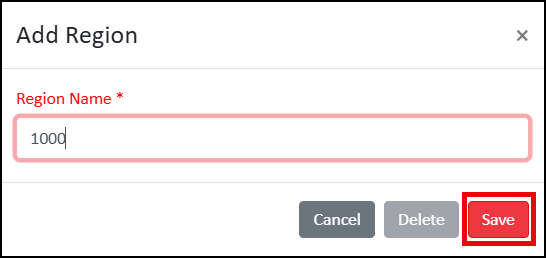
5. In the Region Name field, enter the ID you use in Spruce to refer to the first branch and click Save. Initially, you will add only one branch for the Beta.
6. To define the details of your branch, click the Distribution centers tab.
This is where you add the branch location details.
IMPORTANT: Wait until you have processed your first delivery to complete these settings.
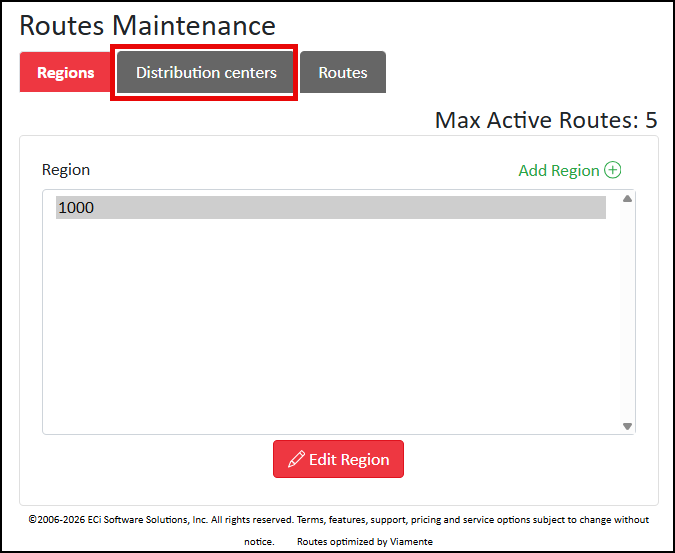
7. Click the Add Distribution Center button to display the Add Distribution Center box.
Note: If you are updating these settings after the first delivery, you just need to add the address to the Distribution Center (Branch) record so you can take advantage of the GPS tracking features.
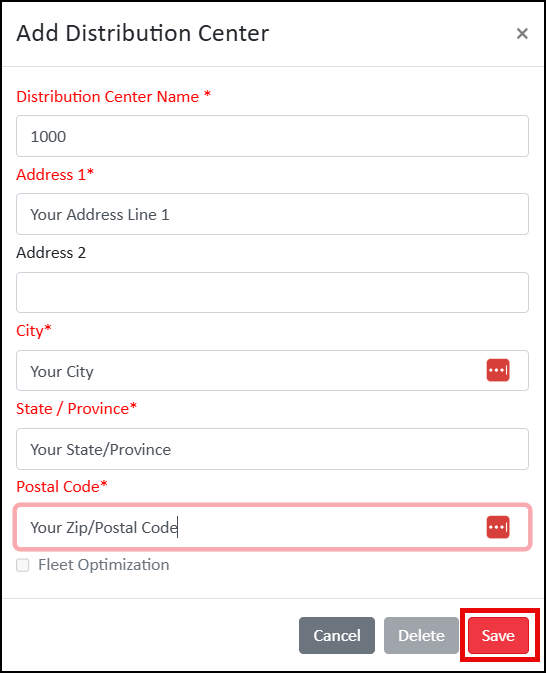
8. Complete the settings that are appropriate for this branch and click Save.
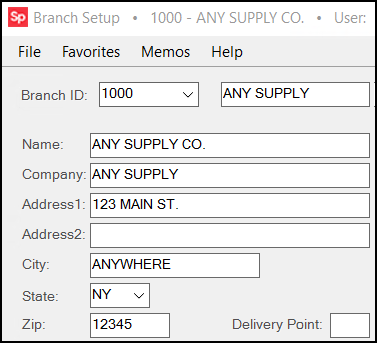
Leave the Fleet Optimization check box unselected at this time. These settings should match the address settings from the branch’s Branch Setup form in Spruce:
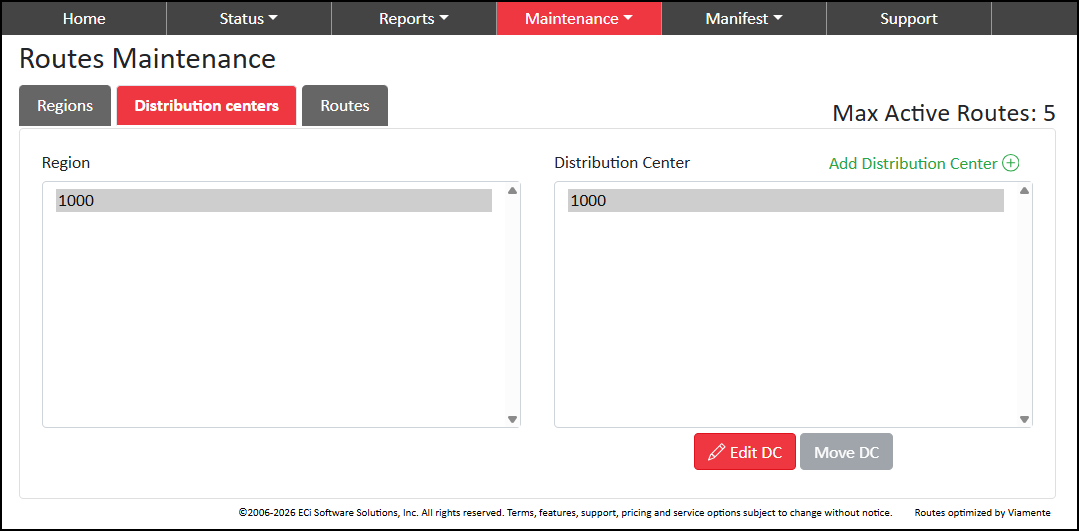
9. After you click Save, the Routes Maintenance page redisplays with both the Region and Distribution Center settings.
Adding Users to the MyJumpTrack Portal
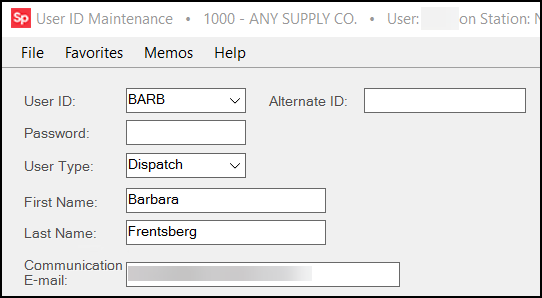
You can add new user records for the Dispatchers, Drivers, and other team members who need access to MyJumpTrack. The settings in this form should be based on the user’s settings in the User ID Maintenance form in Spruce.
To add a new Driver, Dispatcher, or other user using the MyJumpTrack portal:
1. Log in to MyJumpTrack using administrative permissions.
2. From the Top Menu, choose Maintenance > Users. The User List Maintenance page displays.
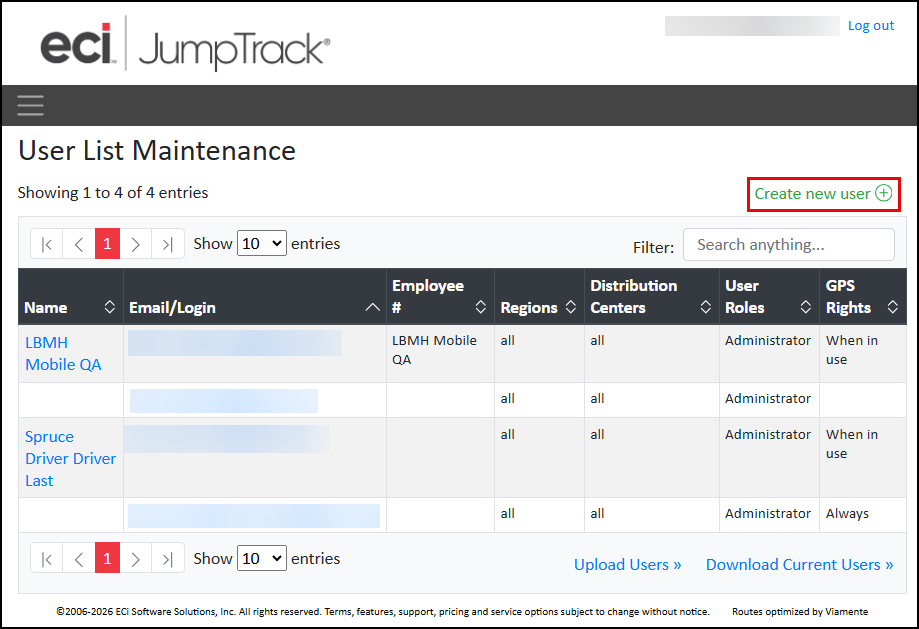
3. Click the Create new user icon. The User Maintenance page displays.
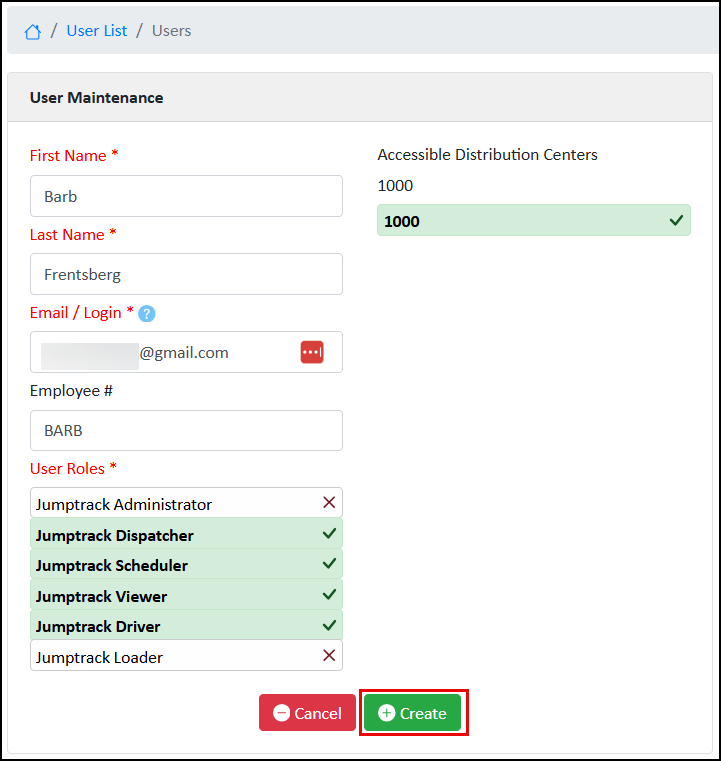
4. Enter the user's name in the First and Last Name fields.
5. Enter the user’s email address in the Email/Login field.
This email address must be the same as the entry in the User ID Maintenance form, as this is used to identify the Driver in the Truck Code/Route process.
6. In the Employee # field, enter the user’s User ID from the User ID Maintenance form in Spruce.
7. From the User Roles list, click the user roles that are appropriate for this user.
8. Click each branch (Distribution Center) in the Accessible Distributions list that the user should be able to access. In this case, there is just one.
9. When you have completed these entries, click Create.
Adding Truck Codes to MyJumpTrack
You can add Truck Codes as Routes in MyJumpTrack using the instructions below. This is how MyJumpTrack keeps track of the deliveries that a truck makes during a run. The Branch (Distribution Center) and Driver’s User settings must be complete in MyJumpTrack before you can add the Truck Code.
To add a Truck Code to MyJumpTrack:
1. From the Home page, choose Maintenance > Routes and click the Routes tab. The Routes page displays.
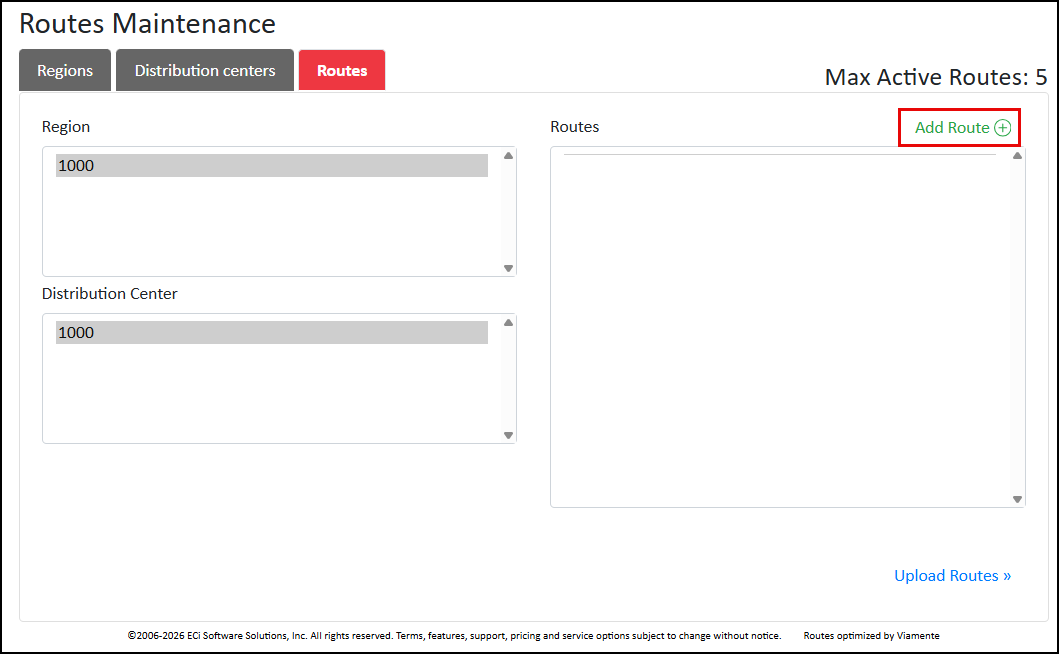
2. Click the Add Route icon. The Add Route box displays.
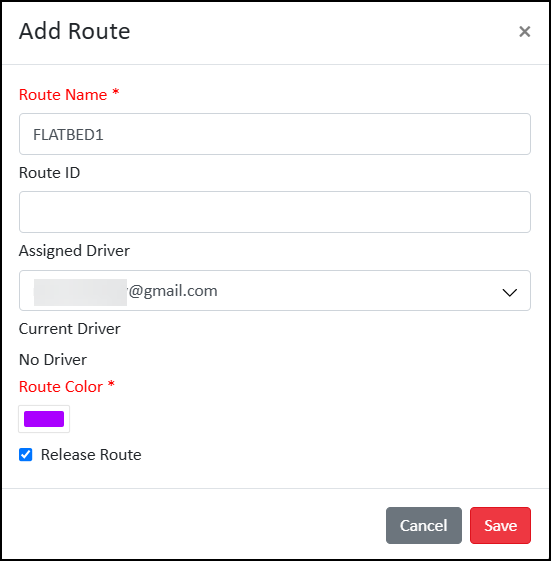
3. In the Route Name field, enter the Truck Code from Spruce.
4. From the Assigned Driver list, choose the email address of the Driver associated with this Truck.
You can leave this field blank if you do not want to tie a Driver to a truck.
5. Choose the Route Color you want to associate with this Truck Code.
This is required.
6. Select the Release Route check box.
7. Choose Save to save this record.
Complete this process for each Truck Code in your fleet.
You are now ready to process deliveries using JumpTrack.
Completing the Account Info and Settings in MyJumpTrack
Now you are ready to define the settings the system will use to manage and GPS track the JumpTrack deliveries.
To complete the account settings for deliveries in MyJumpTrack:
1. From the Main Menu, choose Maintenance > Account. The Account Info tab displays.
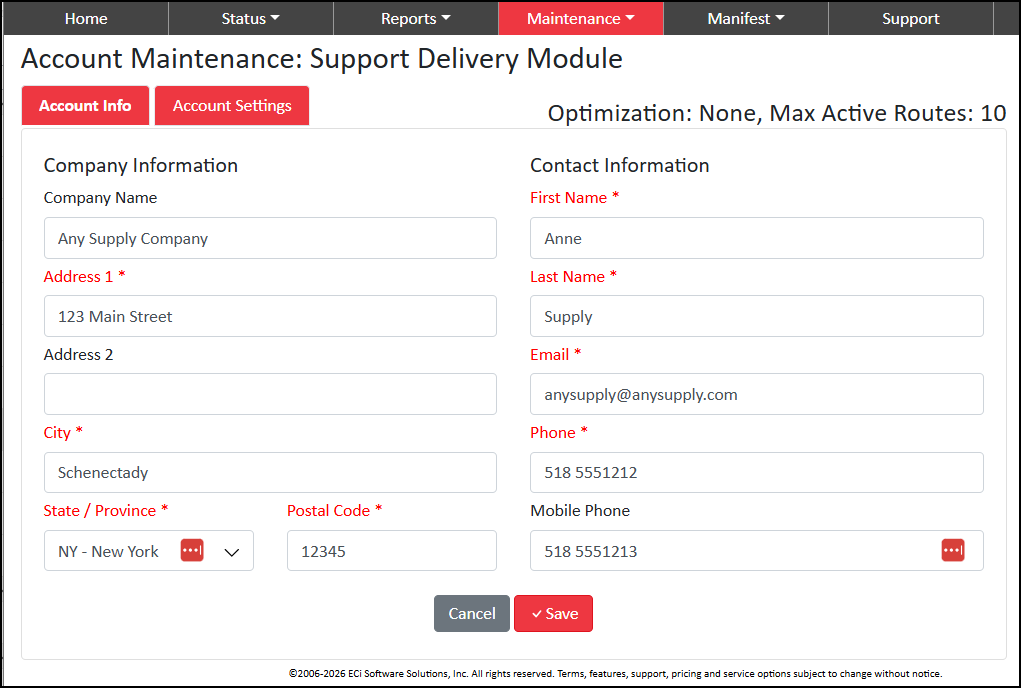
2. Complete the settings in this tab before moving on to the Account Settings tab.
Only the fields that have red labels are required.
3. Click Save.
4. Click the Account Settings tab.
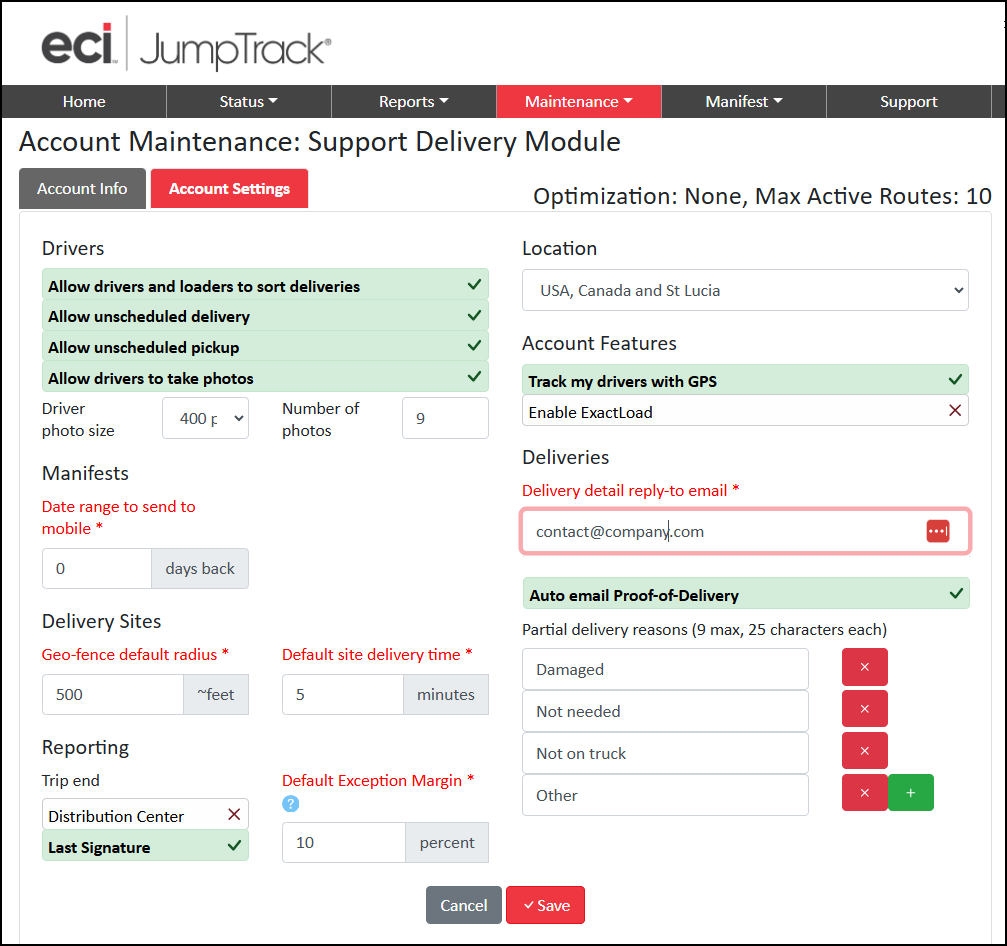
5. Complete the settings in this tab based on the needs of your business:
-
Drivers
Review the settings in the list and complete the appropriate settings to define the permissions the Drivers should have in JumpTrack. We recommend you check all of them. -
Driver photo size
Select 400 px from this list to ensure the best quality images for delivery photos. -
Number of photos
The maximum number of photos is 9. Please select a number between 0 and 9. -
Manifests (Date range to send to mobile)
This entry specifies how many days in the past the Driver can view their deliveries.
We recommend setting this field to 0 so they see only their currently assigned deliveries. -
Delivery Sites
This setting helps define the geo-fencing radius, which you can use to track the driver's location and stop time between deliveries. You can use this setting for reporting and to monitor route efficiency. The existing values are provided as a default, but you can update them to suit your business needs. -
Reporting: Trip End
This report setting defines when the truck's route deliveries are complete.
You can define this by choosing the time of the Last Signature or by the time of the return to the branch (Distribution Center). -
Reporting: Default Exception Margin
This setting defines the Driver's exception margin (timing) for on site deliveries. By default, this setting is 10%. When the Driver's delivery time exceeds this percentage, it is noted in red in reports. -
Location
Choose the appropriate location setting for your business. MyJumpTrack uses this for GPS tracking. -
Account Features: Track my drivers with GPS
We recommend you enable (check) this option. -
Account Features: Enable ExactLoad
This option is not currently available; please leave it disabled. -
Deliveries (Delivery detail reply-to email)
In this field, enter the email address you want customers to use to contact you about their deliveries. -
Auto email Proof-of-Delivery
Enable this setting to send a proof-of-delivery email to your Customers when their delivery is complete. -
Partial delivery reasons list.
This is a default list of partial delivery reasons. You can update these entries to reflect your own reasons and click the green + button to add additional reasons, if needed.
6. When you have completed these settings, click Save.
See Also:
Setting up Cubes to Quantify Deliveries
Using Cubes to Manage the Delivery Load
Managing Deliveries with Spruce Mobile Delivery
Spruce Mobile Delivery FAQs