Setup Branch Accounts Utility
After you have set up your system journals and detail mapping, you can use the Setup Branch Accounts utility to create branch-specific accounts automatically using the department code you enter in the utility form. This utility only adds accounts when you have selected the Branch check box for the account in the System Journal or Detail Account Mapping instructions. Typically, you use this utility when you add a new branch, but you can also use it to distinguish the books for businesses that run out of the same branch location. Adding branches using this utility does not affect other branch accounts and you can run the utility any time you need to add new branch accounts. It could not be easier to use this feature.
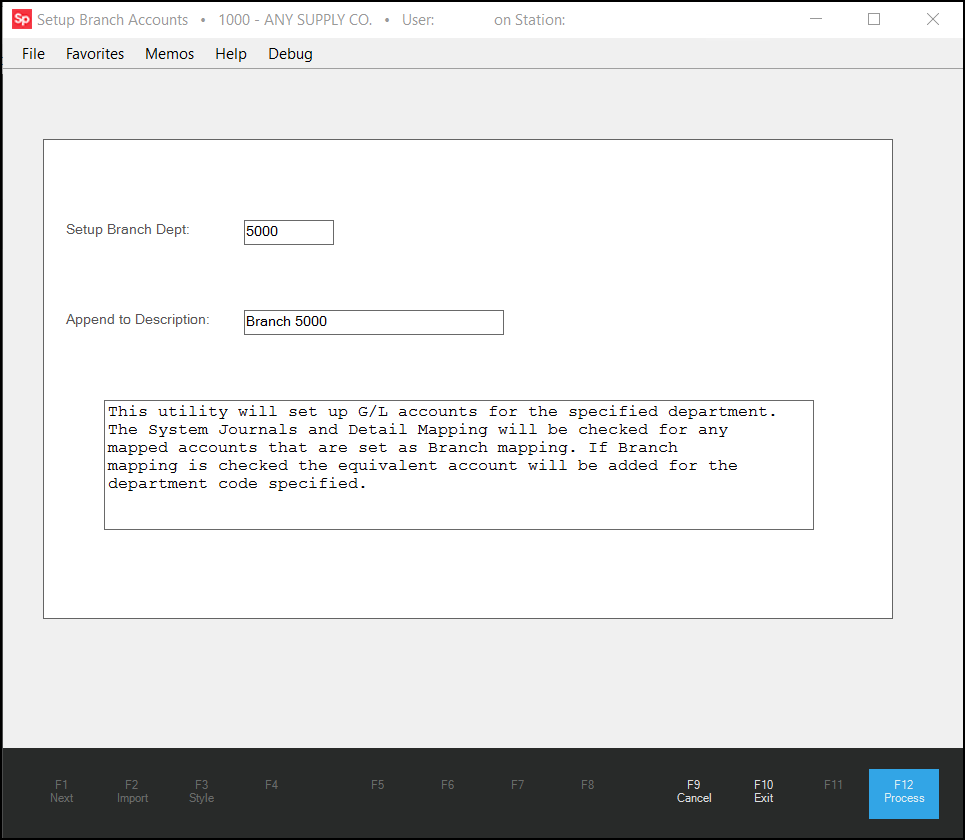
Setup Branch Accounts Utility Form
Understanding Ledger Departments
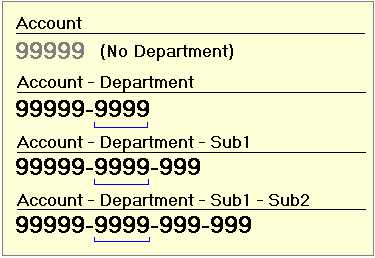
In most account schemes, a department code is provided as the second set of numbers in a ledger account, which is defined in the GL Parameters tab. In Spruce, there are four possible ledger account formats, and department codes apply to three of them. Companies choose one format for all accounts. It's possible to change from a format with less digits to one with more; however, it's not possible to change to an account format with less digits than your current choice.
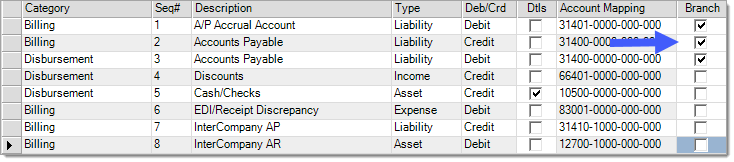
When this utility adds new "branch" accounts, it searches the existing Chart of Accounts for posting-type "base" accounts which have been specified for "branch" mapping (a ledger account can be designated for branch mapping from either the System Journal or Detail Mapping Database forms). Unless your mapping specifies an account should have branch entries generated, the base account is used (even if you've added accounts with "branch" departments).
There are Parameters which determine two things regarding department codes:
-
The number sequence used to identify "base" departments and
-
The offsets applied to base departments that are used to identify a branch location.
Base departments specify the department codes used for general accounts (0 would be a department code that appears as "0000"). Branch offsets determine the department codes for when branch accounts are used with an account matching any accounts matching one of the "BASE" departments listed.
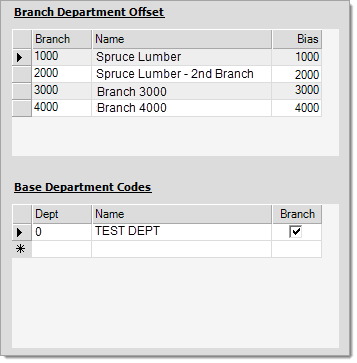
Using the example shown above, the base department code is 0, so each branch's offset would be added to the base department to determine (calculate) that branch's department code:
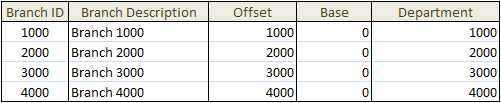
This can get trickier, however. Your company can choose any base and any offset. Here's an example of how using a BASE of 1,000 and offsets of single digits would work:

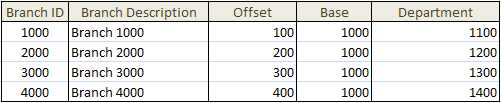
Here's another example, using the same base, but offsets using hundreds:
There are a few other considerations as well. For instance, your company's branch ID scheme may not be numbers, it could be letters such as "ABCD." In this case, you'd need to determine what numbers make sense. Furthermore, you can have multiple BASE departments which means you could have more than one department number used for the same branch. For example, if you have two base departments of 0 (zero) and 1000, and a branch with an offset of 10, you might wind up with branch departments of 0010 and also 1010 for the same location.
Adding New Branch Accounts using the Setup Branch Accounts Utility
Make sure you have completed your branch-specific accounts before using this utility. If you add additional accounts subsequently, you will need to add them manually.
To add a new set of accounts that are specific to a new branch:
1. From the Main Menu, choose General Ledger > Utilities > Setup Branch Accounts. The Setup Branch Accounts form displays.
2. In the Setup Branch Dept field, enter the department sequence (branch ID) based on your company's base and offset settings.
3. In the Append to Description field, enter the department sequence (branch ID) description in this field. The application adds the text you enter here to each base accounts' description that involves this branch.
4. When you have completed these settings, choose Process (F12) to build the accounts matching the criteria entered.
Important! Accounts you add to the General Ledger using this utility cannot be removed other than by individual deletion, which is time consuming. Add new branch accounts using this utility carefully.
To close the utility form window without processing choose Exit (F10), or to clear any entries to start over, choose Cancel (F9).