Scanning
Most transactions that support item entry allow either manual entry or scanning. Some transactions allow you to scan items at any time; however, others require other entries before scanning is allowed. Scanning isn't just for items, scanning can be used with documents, gift cards, and certain rewards programs as well.
Scanning from a Data Grid
Using a supported bar code scanner is one of the easiest way to enter items into a grid. When a grid is involved, scanning a barcode produces one (1) of three (3) possible results:
-
A matching item is found and added as a new row in the grid. The default quantity will be one (1) except when the item is a credit-type SKU. In the case of a credit SKU, the default quantity is negative one (-1).
-
The selected row or prior row (row above the selected row) matches the item scanned. If true, the existing row's quantity is usually updated. Credit-type SKU item quantities are reduced by one (qty - 1) each time for each successive scan. Other item types with an original positive (+) quantity are increased by a quantity of one (qty + 1) for each successive scan. Other item types that have an original quantity that is negative are not adjusted. In these cases, a new row is added with a default quantity of one (1).
-
The item is not found and no item is added to the grid. The user may be prompted to add the barcode in certain cases (see more below).
During a sale, the software recognizes the signal from the scanner and will place the scanned items in the grid regardless of your active position in the activity. For example, if the "name" field is active and an item is scanned, the item will appear in the grid, not the name field. In this case, users still are able to select a customer at any point before processing. This is also true of some other areas such as receiving; however, there are also other activities that do require form completion prior to scanning (or grid entry).
Items that are scanned will default to a quantity of 1, and after scanning, the user is placed on the quantity field automatically so that a quantity can be typed in when needed. If the quantity of 1 is correct, immediately scan the next item. There is no need to press TAB or the enter (or return) key. When there are multiple quantities of the same item, either repeatedly scan the item or enter the quantity by hand.
Use whatever method makes more sense based on the situation. For example, scanning small quantities of the same item is often easier than specifying the quantity manually; however, scanning larger quantities is usually not as easy as simply modifying the quantity in the grid one time.
Adding New Barcodes
For scanning to function as a method for item selection, one or more barcodes must be first be associated with the item. There are a number of ways this may be done. Barcodes can be individually assigned to items from the Item Maintenance form (done from the Common and Select tabs under the "Bar Codes" label). The software also offers a Barcode Entry utility program allowing users to associate barcodes with items all at one time by using a file that contains a delimited listing of item numbers (SKUs) and associated barcode numbers. EDI may also keep barcode information up to date for you. In some cases, support staff may also be able to assist to load barcode information from external data.
Once the item database has barcodes, existing codes will occasionally change and new items may be added without any barcode. When a new barcode is encountered, a form will pop-up notifying the user that the scanned code was not found.
Barcode Not Found
When scanning, if an item that matches the barcode scanned is not found, users who have permission to access the Barcode Entry Utility (Point of Sale) will be prompted to enter the SKU of the item to associate with it. This function is only provided when a scanner device has been assigned to the station being used (note: it's possible for a scanner to function even if it is not assigned to the station). Security is controlled by the user's assigned "Permissions List" which sets navigation permission to various areas in the application.

Barcode Not Found
If you are not sure of the item number, you can try using the alternate menu to locate the item or choose Cancel (Alt-C) and find the item's stock number using some other method. This alternate menu is available from most drop down type selections throughout the software.

Barcode Not Found: Context Menu
Barcode Formats
There are a wide variety of barcode formats in existence. The
-
Documents user the "39 Extended Format."

Sample 39 Extended
-
Labels printed through the software vary based upon the length of he barcode:
- Lengths of 12 use UPCA (If there is a valid check digit). * This format only supports numeric barcodes.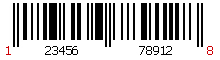
Sample UPCA
- Lengths of 13 use EAN13 (European Article Numbering System).
Sample EAN13
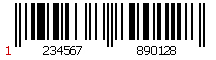
- Lengths of 14 or more or codes that don't meet the requirements for UPCA or EAN13 use 128B (this format supports upper- and lower-case characters, punctuation, and numbers).

Sample 128B
Random Weight Barcode Scanning
Random weight barcode scanning is a custom feature where the content of the barcode itself determines the output of the scan into Point of Sale forms, such as Sales. UPC-A (12 digits) barcodes are used for weighted items, and the following formatting must be used:

Sample UPCA Produce
-
The first digit must be a 2.
If it isn’t, the barcode will be treated as a regular barcode, and the software will attempt a normal lookup by barcode. -
The next five digits (“98765”) correspond to the item SKU.
This is why the item being set up must have a 5-digit number for a name. If an item isn’t found from these five digits, the barcode will be treated as a normal barcode. -
The seventh digit serves no purpose.
That could change depending on future requirements, but as of now it doesn’t affect anything but still must be included. -
The next four digits (“8799”) correspond to the extended price of the item, with a decimal point inserted in the middle.
In this example, the extended price is $87.99. -
The final digit is a check digit that all UPC-A barcodes have.
The first 11 digits must conform to a formula whose result is the final digit – otherwise, the barcode is invalid. This digit has no impact on the feature itself.
Items to be used for this feature must first be setup in Item Maintenance. Click here for help on setting up items for Random Weight barcode scans.
Random Weight Barcode Setup
To setup up items to use the random weight barcode:
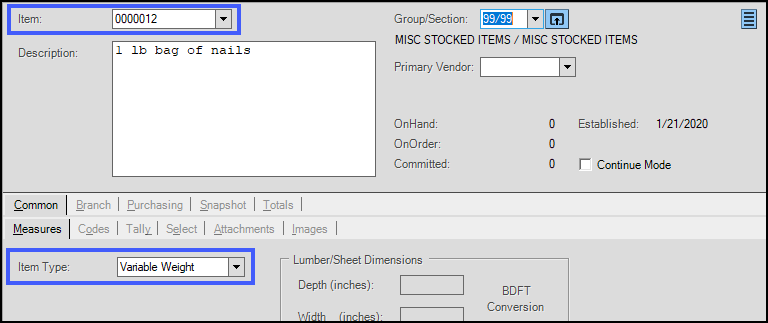
1. Navigate to Item Maintenance (POS > Database > Item). The Item must be given a five (5) digit name, and the Variable Weight must be selected for the Item Type.
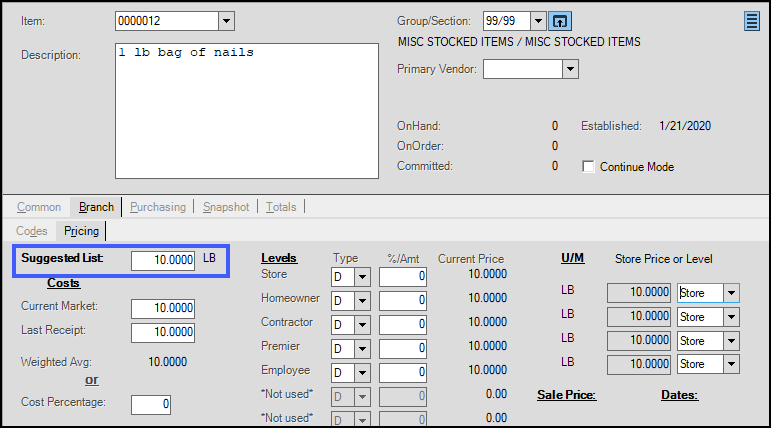
2. On the Branch > Pricing tab, assign a unit price. No Price Levels are permitted for these items.
3. Press Process (F12).
Supported scanners programmed according to our specifications should be able to scan any of these formats. We don't support all the possible formats available. It may be possible to program a scanner to accept other formats or to ignore certain digits of a barcode; however, your company is solely responsible for this effort if your barcodes don't match one of our supported formats.
*For 12-digit UPCA barcodes, the first digit indicates the number system (or type of code) and the last digit is a check digit that is calculated from the other eleven (11) digits. If a barcode is 12-digits, but the check digit isn't valid, the UPCA format won't be used. 128B is used in this case.