Making Payments using ProLink
The ProLink app gives customers a way to submit payments to their accounts, orders, and jobs remotely. You import them into the application either automatically or manually as you decide. Some degree of post-processing is required for all payments submitted via the ProLink app.
ProLink can allow your customers to submit three types of payments:
-
Received on Account payments (Open Item and Balance Forward)
-
Order Deposit payments
-
Payments for a specific job
To manage payments submitted using the ProLink app, you must have the following in place:
-
Enable the ProLink parameter Accept online payments in the Maintenance > Database > Parameters > ProLink tab and setup your ProLink instance.
-
Enable the ProLink branch parameters and set the appropriate option in the Maintenance > Database > Branches > ProLink tab
-
Enable the ProLink setting on the customer's account and enter a valid email address to send the customer the initial password.
(Point of Sale > Database > Account > ProLink tab) -
Add Card on File to accounts and/or jobs that the customer wants to use ProLink to pay for.
If the account has a Card on File but the job does not, the payment cannot be submitted for the job
Additionally, you should have one of the following payment processes set up to handle tokenized (Card on File) payments:
-
Your company must use VeriFone® PAYware Connect (SIM) or TSYS Cayan.
-
For PAYware Connect only, the minimum VeriFone SIM version being used must support tokenization (versions 2_4_0_7 and later).
-
To use the latest VeriFone SIM features, your processor must be one of the following: TSYS®, Chase Paymentech™, or WorldPay® (RBS).
The SIM version doesn't apply to Verifone Point or TSYS Cayan. -
For both Verifone Point and VeriFone PAYware Connect, you must use the merchant console to "add a contract" using the customer's card information. Secondly, you must associated the card with the customer's account (or a specific job) from the Account Maintenance form "card on file" maintenance form.
-
For TSYS Cayan, card on file records can only be established from a Point of Sale transaction where the card is physically presented. This is optional and security settings can prevent access by a cashier to add "card on file" for a customer.
-
In the UK, you can use the FiServ-Clover devices for customers with tokenized Card on File settings using the Hosted Integration Page
Once these requirements are met, the customer's card can be used via the app, but also as payment during Point of Sale transactions in the software.
Making Payments using the ProLink App - Balance Forward Accounts
In ProLink, the process for making a payment on a Balance Forward account is slightly different from Open Item accounts. For Open Item accounts, customers need to choose the items (invoices) they are paying. The requirements for both account types include:
-
One or more jobs must be associated with the account
-
A Card On File must be set for the Job/Account for which they are making the payment
-
The Job/Account you are paying must have an open balance or items
-
The Account must have completed at least one end-of-month cycle
Note: If you have selected a Consolidated Billing Level, and you want to pay by job, the application displays the message, Select a job to make a payment. If you select a job that does not require a payment, the Make a Payment button does not display.
Your customer can then make payments by following these instructions:
To make a Balance Forward payment on ProLink:
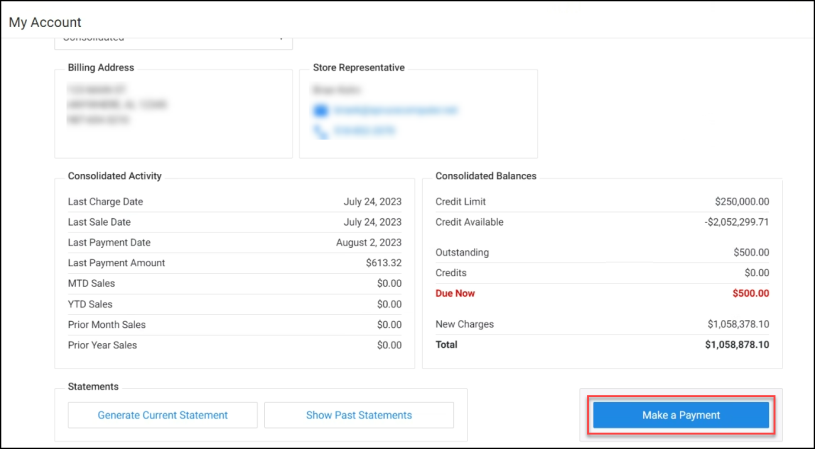
1. Log into ProLink and click the My Account link to display the My Account page.
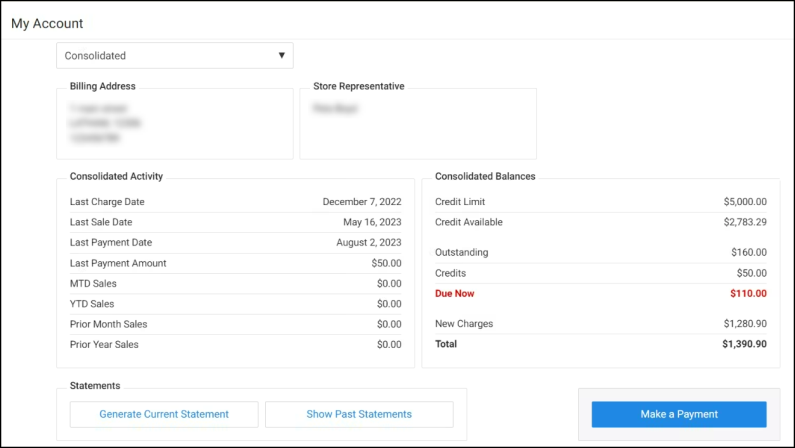
Note: The My Account page above shows a Consolidated Account.
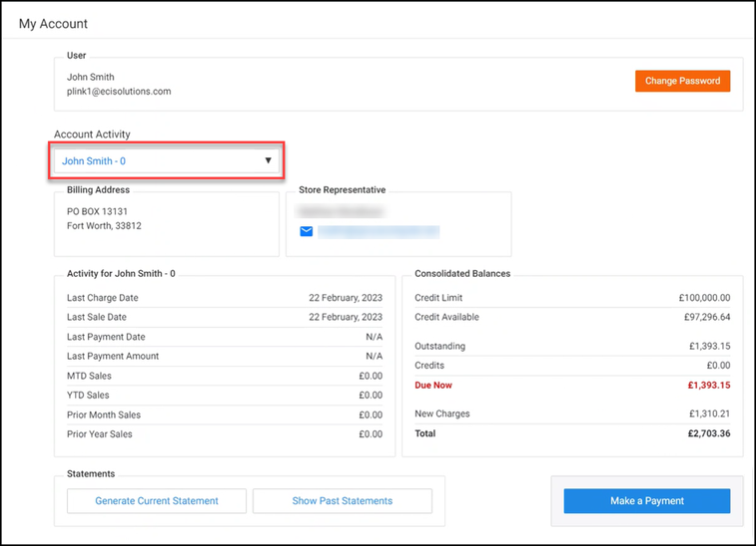
When the account is job-based, an Account Activity list displays (shown below) so you can choose the job you wanted to make a payment on. After you make this choice, the Make a Payment button enables.
2. Choose the Make a Payment button to display the Card On File and payment amount options.
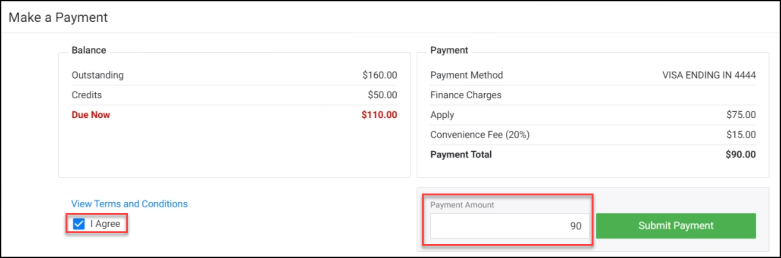
3. Review the Terms and Conditions information and click the I Agree check box.
4. In the Payment Amount field, enter the amount of your payment. The application may apply a convenience fee to your payment , which will change the amount.
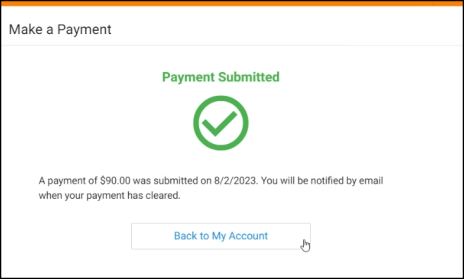
5. Choose Submit Payment to complete the job payment. A confirmation message displays to allow you to reset the payment amount.
6. Do one of the following:
-
To agree to the payment amount, click OK.
-
To change the payment amount click Cancel. Then enter a new amount in the Payment Amount field and follow step 5 again.
7. If the Signature Required box displays, provide your signature and click Accept.
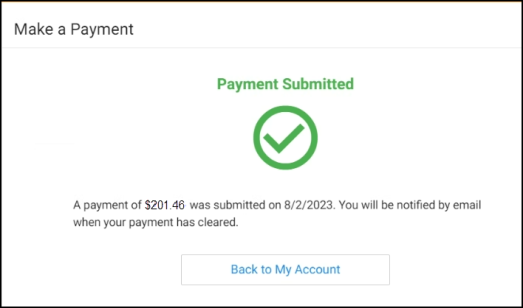
When the payment process is complete, a confirmation message displays:
Note: Customers can only make one account payment at a time using ProLink. This gives the business time to process the payment and update the account balance. If your customer returns to the My Account page looking to make another payment, a message like this displays:

Making Payments using the ProLink App - Open Item Accounts
To make a payment for an Open Item account, customers need to choose the items (invoices) they are paying.
Note: If you have selected a Consolidated Billing Level, and you want to pay by job, the application displays the message, Select a job to make a payment. If you select a job that does not require a payment, the Make a Payment button does not display.
To make a payment on an open item account using ProLink:
1. Log into ProLink and click the My Account link to display the My Account page.
Note: This My Account page shows a Consolidated Account.
When the account is job-based, an Account Activity list displays so you can choose the job you want to make a payment on. After you make this choice, the Make a Payment button enables.
2. Choose the Make a Payment button to display the open item payment options.
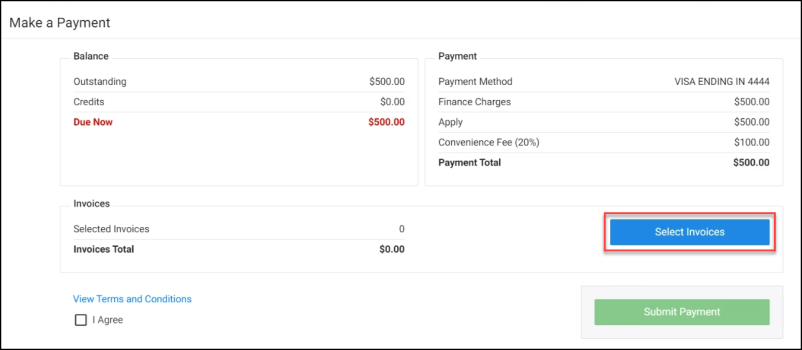
3. Click the Select Invoices button to display a list of open invoices for the selected account or job.
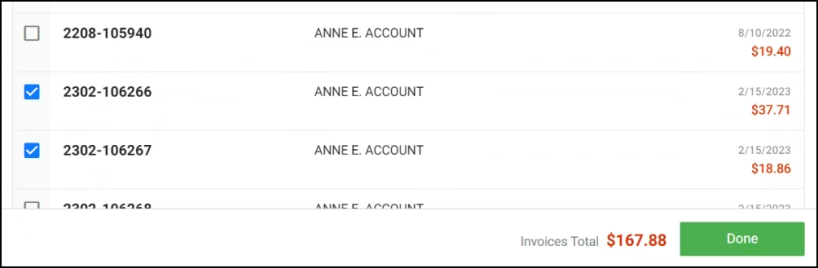
4. Beside each invoice you want to pay, click the check box. The Invoices Total amount updates to show the total.
5. Click Done to redisplay the Make a Payment box.
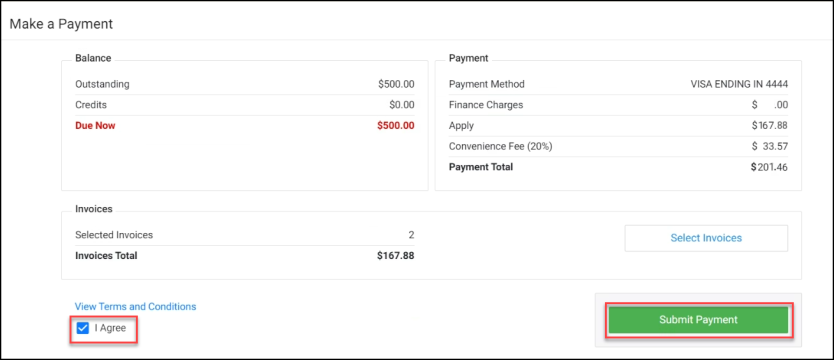
The application may apply a convenience fee to your payment , which will change the amount.
6. Review the Terms and Conditions information and click the I Agree check box.
7. Choose Submit Payment. A confirmation message displays to allow you to reset the payment amount.
8. Do one of the following:
-
To agree to the payment amount, click OK.
-
To change the payment amount click Cancel. Then choose different invoices and follow step 3 again.
9. If the Signature Required box displays, provide your signature and click Accept.
Submitting a Payment from the ProLink App
There are three areas in the app where payments can be submitted. Payments on account can be submitted from both the home and account views. Order deposits can be submitted from the cart view when submitting an order request.
Terms & Conditions
The final step in accepting payment or order submission is acceptance of the branch terms & conditions (aka. disclaimer). The terms & conditions text is determined by your company and may vary by branch based on your branch settings. The same terms & conditions are presented when submitting an order as those used for payment on account. For this reason, the party writing your terms and conditions should take both situations into consideration.
To close the disclaimer, the consumer (end-user) would use their back button on Android™ platform devices or the "close" option that is displayed on iOS (Apple®) devices. In the event that your company enables ProLink app for a branch location without specifying your own disclaimer, a default disclaimer is used (shown in the image below). Your company is responsible for the content of the disclaimer regardless of whether you use your own disclaimer or not.

Default Terms & Conditions
The consumer must check the "I agree" check box before their payment or order request will be processed further; however, we don't require that the terms & conditions be viewed before a consumer checks the "I agree" check box.
Rejected Payments
There can be reasons why a customer's payment might be rejected such as card expiration or other reasons. If the payment is rejected from the application, the consumer (app user) is shown a message indicating that their payment was not accepted as well as any message that the user who issued the rejection provided.

Rejected Payment
Order Deposits
Post Processing
Post Processing procedures vary based on the type of E-Commerce submission. Each type is discussed in more detail below:
Processing ProLink Payments On Account
When a customer submits a payment on account using ProLink, follow these instructions to process the payment. Because these payment types cost you more, you might want to consider applying a Convenience Fee for this service.
Setting Up Notification when ProLink Payments are Received
After a consumer submits an on-line payment on account, you can use a variety of methods to notify your team that the payments are pending:
-
The user assigned to the account. The notification method is determined by the user's notification settings (standard notification queue, email, or text message).
-
The user assigned as the Receivables Application Manager (Main Menu > Maintenance > Database > Parameters, Setup, UserID).
-
For branch-specific notifications, specify the Notify Email, using the consumer's selected Branch (location) in the app (Main Menu > Maintenance > Database > Branches > ProLink (Settings Tab)).
-
For branch-specific notifications, specify the Notify User, if any, indicated for the consumer's selected Branch (location) in the app (Main Menu > Maintenance > Database > Branches > ProLink (Settings Tab)). The notification method(s) are determined by the user's notification settings (standard notification queue, email, and/or text message).
In some cases, the same user may receive the same notification more than once. An example of when this would occur is when the same user is assigned to the account but is also the notification user assigned to ProLink in the branch settings.
Processing a Payment on Account Sent from ProLink
After the payment is submitted, you can process it using the Payments transaction type located on the Point of Sale menu.
To process the ProLink account payment:
1. From Main Menu, choose Point of Sale > Payments to display the Payments options.
2. Choose the Received on Account radio button. The Accept Payment form displays.
3. Select the customer account (and job, if applicable) that the payment was submitted by.
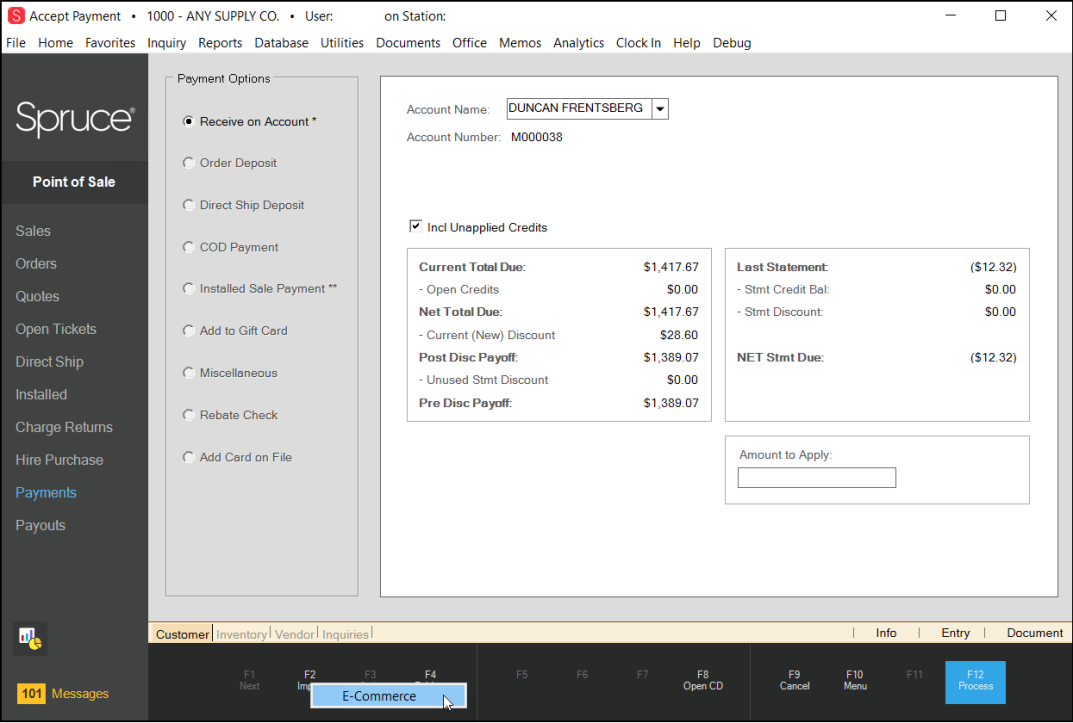
4. Choose the Import (F2) option and then choose E-Commerce from the context menu. The Import E-Commerce Payment box displays.
5. From the ID list, choose the account's ProLink payment.
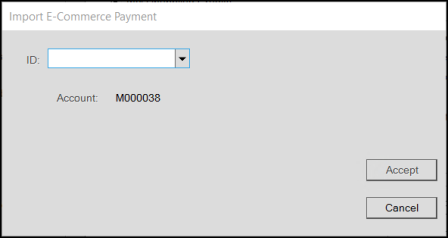
Payments are assigned an unique, automatically-generated temporary ID, which is listed along with other information such as the job and amount.
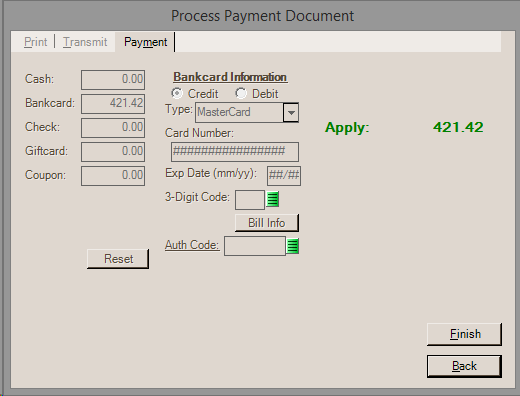
6. Choose Accept form on the dialog. The application updates the Amount to Apply field with the payment amount. The amount cannot be changed.
7. Choose Process (F12) to process the payment. The process form automatically sets the payment method to "bankcard" and the amount to match the customer's payment. The Payment tab, except for the Finish and Back buttons, is disabled (modal) to prevent changes to the card information or amount.
8. After you've processed the payment, the payment will be listed as an open (un-applied) credit for the customer. The Posting transaction found on the Receivables menu is used for posting (applying) payments to balances and open items.
If the consumer's account type is "open item," their invoice selections via the app will be retained with the payment for Posting. When the payment is selected in the Posting form and open (unpaid) items are listed, invoices matching the ones selected by the user will be auto-filled with paid amounts. These selections can be overridden by the user.
What happens if the card payment is rejected by the processor?
If the card on file is rejected by the processor, the payment won't process in the software and you will receive some type of message from the PAYware Connect service providing a reason for the rejection. In this case, you would usually then reject the payment (read further for more on this) which provides a way of communicating the issue to the app user.
Deleting a ProLink Payment
If you attempt an e-commerce payment that fails, you can delete the submitted e-commerce payment, if you need to. The customer needs to resubmit the payment later, if you choose this option.
Note: This process works for ProLink and any other e-commerce orders that a customer submits.
To delete an e-Commerce payment:
1. From the Main Menu, choose Point of Sale > Payments to display the Order Entry form.
2. Choose Import (F2) and import the ProLink payment. A Menu Marker  displays beside the ID field.
3. Choose the Menu Marker to display the context menu.
The options are either Delete or Secure.
4. Choose Delete. A confirmation message displays.
5. Select Yes to delete the entry. A confirmation message displays when processing is complete.
6. Click OK.
Important Note: Deleting a payment submitted by a customer does not inform them that the payment failed. It makes sense to reach out to the customer to discuss an alternate payment arrangement as part of this process.
Notes about Deleting a Payment
Deleting a payment is not the same as rejecting the payment. Deleting a payment removes the payment permanently. Deleting payments may be done in cases where the consumer contacts your company to cancel an on-line payment or when attempts to process the payment or contact the customer have failed.
Deleting an e-commerce payment does not notify the consumer. After removing the payment, the consumer (app user) will be able to submit another payment as long as a card on file is still linked to their account.