Using the AP Batch Utility
You can use the AP Batch utility to collect and update payable invoices by batch or other criteria. As you review and update these invoices you can process (pay) them one at a time.
Note: You can only access this utility if your user ID in the User ID Maintenance form has the Process AP Batch utility setting enabled.
You can review groups of records at the same time rather than one-at-a-time as you would using Billing Entry. This utility does not give you a way to create new invoices.
To use the AP Batch Utility to review, update, and process payable records:
1. From the Main Menu, choose Payables > Utilities > Process AP Batch. When the form first opens, a selection dialog box displays.
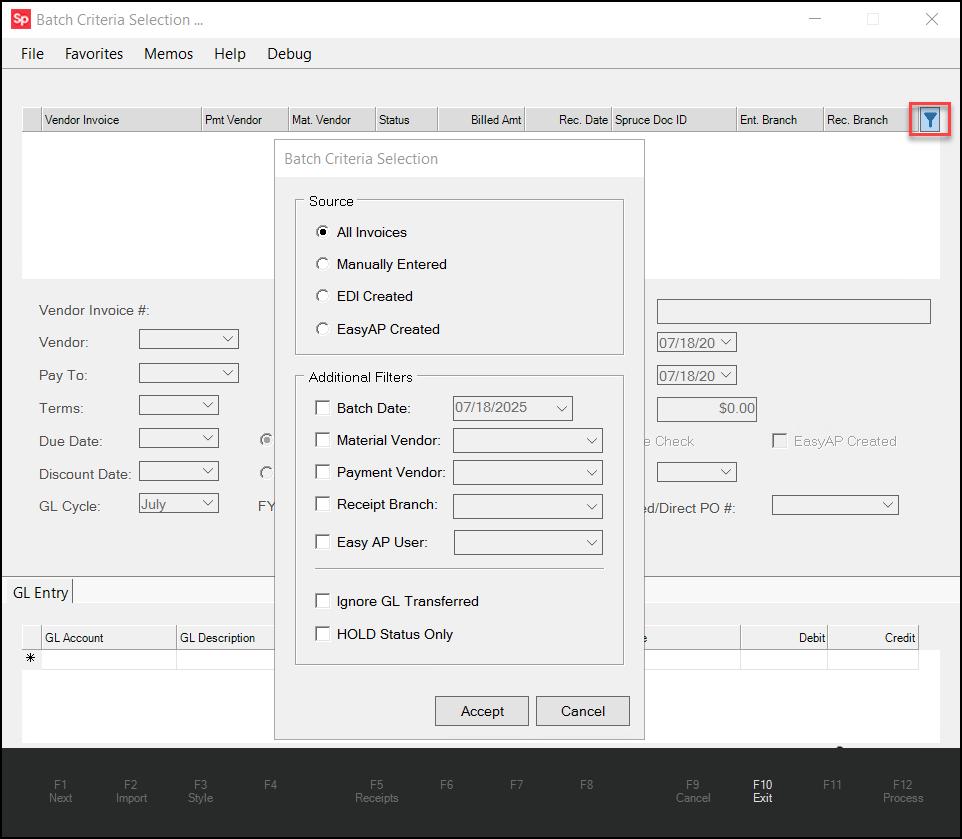
Note: If you click Cancel or need to make changes to selection criteria, you can use the Filter  icon to redisplay this dialog box. This icon is located at the end of the header row of the top data grid.
2. Begin by specifying the source for the outstanding invoices you want to process.
-
All Invoices
Includes all payables regardless of their source. -
Manually Entered
Only includes payables that weren't added by EDI or Instant AP. -
EDI Created
Only includes payables that were generated by Vendor EDI processing. -
EasyAP Created
Only includes payables generated by third-party document conversion.
3. Select one or more check boxes below and enter the criteria associated criteria to filter the selected results. You must choose at least one of the filters below.
-
Batch Date
Select this check box and choose the batch date from the list. The application will only collect the payables matching the batch date you select. -
Material Vendor
Select this check box and choose the material vendor from the list. The application will only collect the payables that match the material vendor you select. -
Payment Vendor
Select this check box and choose the pay-to vendor from the list. The application will only collect the payables that match the payment vendor you select. -
Receipt Branch
Select this check box and choose a receipt branch. The application will only collect the payables matching the receipt branch you select. -
Easy AP User
Select this check box and choose the EasyAP user ID for this process. The application will collect the records submitted by the EasyAP user you specify.
4. Select the Ignore GL Transferred check box to include payables that have NOT been transferred to the General Ledger.
5. To include the payables with a Hold status, select the HOLD Status Only check box.
6. When these settings are complete, choose Accept. The application collects the records that match your criteria and displays the details of each record one at a time.
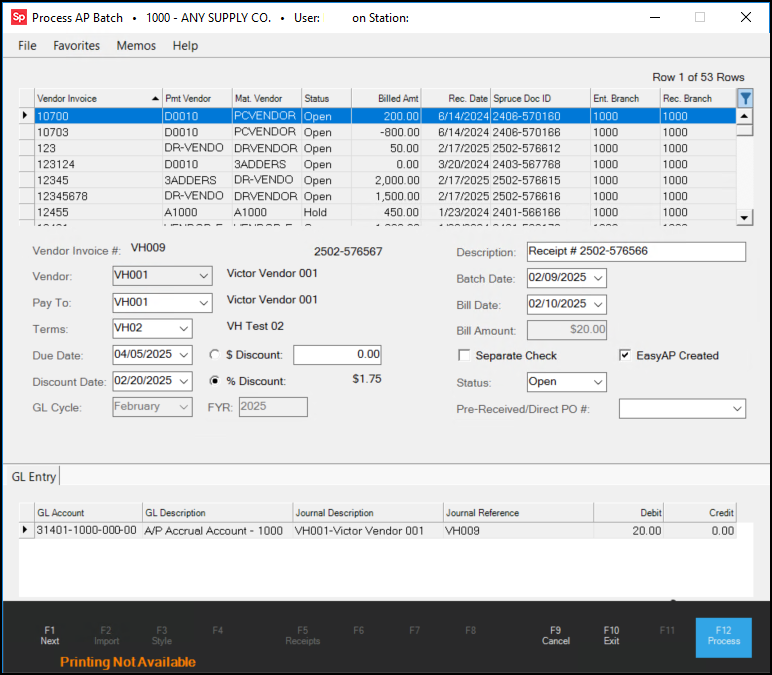
7. Review each record in the list to determine which records are ready to process.
8. If you need to make changes to the record update the record using the fields and lists provided. When the row you are working on changes, the application enables the Process (F12) key to prepare for processing.
9. When you are satisfied with the changes you have made to the invoice, choose Process (F12). The application processes the payable, updates the general ledger journal with this change, and removes it from the list.
10. Continue steps 7 through 9 for each payable record you want to process.