Custom Report Library
In the Custom Report Library, located at the bottom of each application area's Reports menu, you can import ActiveReports® templates to create custom reports based on your application data. There are custom reports for each application area, which you can download for free from the Customer Portal.
For the Custom Report Library option to be available, the user must have a custom report's path name saved for their ID, and the station must have custom reporting software enabled, which can be completed by the System Administrator. When these steps are complete, each application area's Reports list displays the Custom Report Library option at the bottom.
Note: ActiveReports software is not a product of ECI Software Solutions, Inc. nor is the maker of ActiveReports associated or affiliated with ECI Software Solutions, Inc. in any way.
To identify the area of the application that each report has been designed for, we use specific prefixes for the reports that are saved in the user's report directory. Custom Point of Sale reports have the prefix, PS, where custom Receivables reports have the prefix AR instead. The naming convention has nothing to do with the function of the report, so you can make copies of the same report and add a new name to allow access across application areas. A list of current application report template prefixes follows:
| Prefix | Application Templates |
|---|---|
| PS | Point of Sale |
| PO | Purchase Order |
| IN | Inventory |
| AR | Accounts Receivable |
| AP | Accounts Payable |
| GL | General Ledger |
| MI | Miscellaneous |
| MN | Maintenance |
Custom Report Setup and Requirements
Access to the Custom Report Library form is limited to:
(a) Users that have a Custom Reports Folder set up in their User ID permissions (Maintenance > Database > User ID > Custom Reports tab), and
(b) Stations that have the Custom Reports Access check box enabled in the Device Maintenance form (Maintenance > Database > Devices > Station selected).
A user must also have supported custom reports software installed (only file extensions ending in .rpt or .rpx are currently supported). Without this software, reports won't be usable.
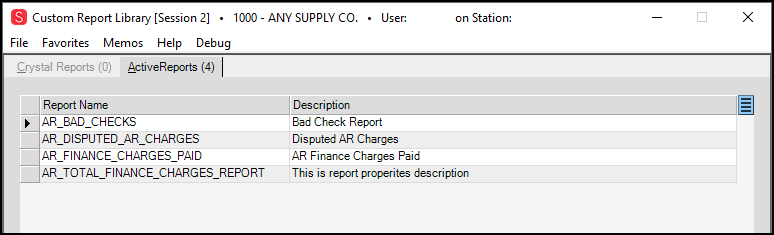
Custom Report Library > ActiveReports tab with Account Receivable Reports Imported
When this setup is complete, you can click on the report files listed to open them in the reporting application. The Custom Report Library is provided as a convenience for users who integrate custom reporting software along with the software. We don't provide support for third-party reports provided by ActiveReports software.
ActiveReport templates are created, imported, or exported onto your system by an ECI Implementation or Support team member or someone with administrative privileges in your business.
Generating a Custom Report
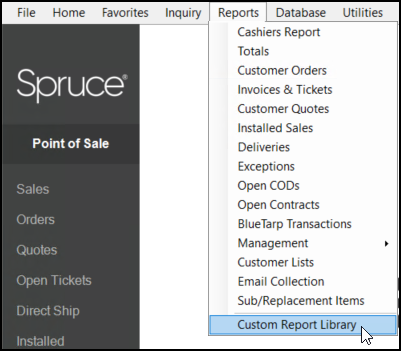
To access the custom reports for a particular application area, from the Main Menu, choose the application area that contains the report you want (Point of Sale, Purchasing, Inventory, etc.) and click the Reports option from the toolbar. At the bottom of each Reports list is the Custom Report Library.
From here, the instructions below explain how to generate a custom report.
To generate and display a custom report:
1. From the Report Name list, choose the report you want to generate.
2. Choose Preview (F7) to specify the report parameters. The Report Parameters box displays.
Note: The Entries in this box depend on the data needed to run the report you selected.
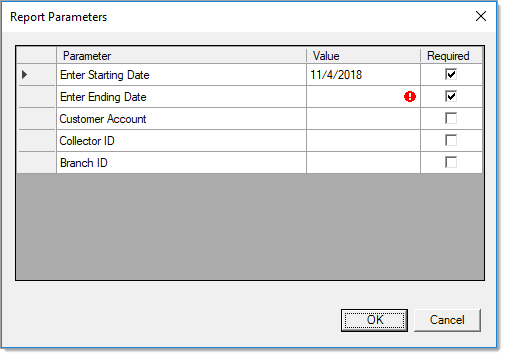
Custom Report Parameters (These are specific to the type of report you are running)
3. In the Value field, enter the data you need to produce the report.
If data in a field is missing or incorrect, a red exclamation will appear next to the field. If no parameters are required, the report appears in the Viewer.
4. Complete all of the relevant fields for your report.
Required fields are indicated with a check mark in the Required column.
5. When you have completed your entries, choose OK to generate the report preview.
From here, you can print or save the report as needed.
Generating and Sharing or Saving a Custom Report
You can share a report by printing it, or by sending it via email or fax. You can also save it locally for your own use or distribution later.
To generate and share or save a report:
1. In the Report Name list, click the report you want to share or save.
2. Choose Print (F8) to display the Document Print box.
Using this box you can print, save the report locally, email, or fax the report.
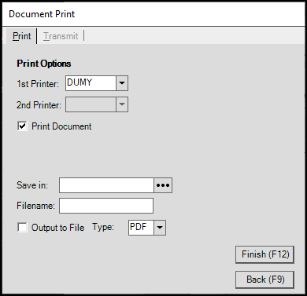
Custom Report Library - Document Print Box
3. Do one (or more) of the following:
-
To send a report directly to the printer without viewing it, choose the print options and choose Finish (F12).
Note: The Print Document check box is selected by default. If you do not want to print the report, uncheck this box.
If you do not and choose some other report sharing or saving option, leaving this check box selected results in printing the document as well. -
To save the report locally, choose the Output to File check box and choose the type of file you want to create.
Then, click the Ellipsis button and choose the location to save the file to. In the Filename field, enter the name for the report. We recommend you enter the report date as well.
 -
To email or fax the report, click the Transmit tab. This tab has two subtabs with specific options for emailing and faxing the report.
Fill out all the required fields for each type, depending upon the type of transmission you want to complete.
Email: For this option, the Email To, From Addr, Subject and Notes field entries are required.
Fax: For this option, Fax To, and Fax # field entries are required.
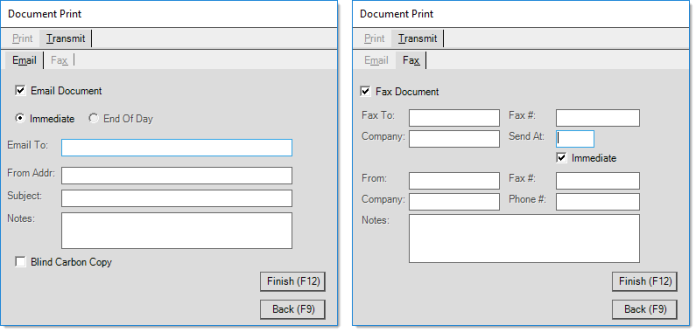
IMPORTANT: If you check more than one box (Print Document, Output to File, Email Document, or Fax Document) the application will perform all of them, if their required fields are filled. Make sure you only select the check boxes you want before going to the next step.
4. When you have completed your entries and selections, click Finish F12.
If the report has required parameters, the Report Parameters box displays:
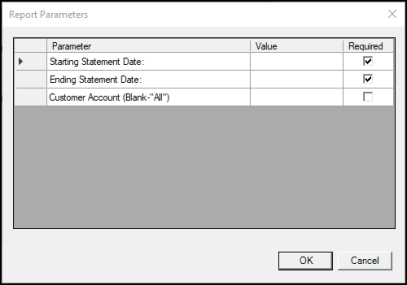
4. In the Value column enter the required report values and click OK.
The application generates the report and sends it or saves it according to your entries.
See Also:
Downloading Custom Reports Library Templates from ECI