Parameter Settings > Setup > EDI > General Tab
This tab is used by support for enabling EDI options and features. Settings found here are typically disabled (read-only) when accessed by non-Support personnel.

Other Uses for these Options
In addition to Wholesaler data management, there are additional tools for processing bank transfers and purging archive information.
The Bank Transfer option is for Australian/New Zealand companies only; see Paying_Vendors_using_Bank_Transfers_(AU) for more about this option.
The Purge Archive feature is available to all businesses; see Purging_Audit_Archives.
Installed Wholesaler Tie-ins
This lists either the companies or data format (in the case of X12) currently available for use with the software.
For a summary of features, please refer to the following topics:
LBM Advantage (formerly ENAP)
LMC (Lumbermen's Mutual Corporation)
X12 Data Format (Various Vendors)
Please also refer to the EDI section under Special Topics for additional information.
Auto UpdateA few EDI tasks can be done automatically without user intervention. Currently, this only applies to Do it Best Corporation, ACE Hardware Corporation, and True Value Company. Two (2) specific functions are listed below: sending POS sales data and updating warehouse quantities in the vendor's catalog (no other file maintenance operations are performed as part of this function). If the "Run Nightly EDI" option is selected (checked) and the options listed below, these are enabled and functioning. Otherwise, all updating is done manually. Contact support if you need to change these settings. Run EDI NightlyFor Do it Best, this enables (when checked) "automatic inventory data send" which runs at approximately 6PM (EST) and sends Do it Best Corp. information about your company's inventory items that has changed throughout the day. Generally, you would send a complete "refresh" to Do it Best Corp. and this function would then keep that information up-to-date. In addition, for the POS Data Send and Warehouse Quantities options to function, this option must also be checked. For True Value Company, this enables (when checked) a similar "automatic inventory data send" that runs on Saturdays at approximately 8PM (EST). This is supported by both the truStart2 and direct methods for communications with True Value Company. For vendors who support Bulk Apply (aka. Bulk Recv), this enables hourly Bulk Apply processing. For ACE Hardware Corporation, this enables an automatic apply of ACE promotions (when checked). Any eligible promotions that have been received, but not yet applied are applied on an hourly basis. This also sets the "active" flag to false on promotions that have expired or no longer exist. This is only done for branches with an "ACE" wholesaler record that is enabled and when ACE Rewards is enabled for the company. POS Data SendThis option sends Point of Sale data to the vendor. This may be used by the vendor for loyalty programs and coupon reimbursement, etc. depending on the vendor. The type of data and method of sending can vary by vendor. Warehouse QuantitiesThis option retrieves warehouse quantities from the vendor and updates those quantities in the vendor's catalog. This typically runs during the following times: 4:35 AM - 5:35 AM, 12:05 PM - 1:05 PM, 3:05 PM - 4:045 PM, and 9:05 PM - 10:05PM. This schedule is based on the times of day that Do it Best makes their warehouse updates available; however, the same timing is used by other vendors supporting this feature. |
ACE Rewards™
This check box is used to enable the ACE Rewards feature by support. ACE Rewards is a loyalty and promotions program offered by ACE Hardware Corporation to its dealers. Additional settings are found on the ACE Rewards tab also available from the EDI tab in Parameters.
True Value® Rewards
This enables the True Value Rewards loyalty program and features for the application. This should only be enabled along with EDI (Electronic Data Interchange) with True Value Company and cannot be used without supporting data (Catalog, etc.) retrieved using EDI services. Additional settings are available from the True Value Rewards tab; however, this is accessible by support personnel only.
Do it Best Rewards (Best Rewards)
This parameter enables or disables the Best Rewards loyalty program for Do it Best Corp. dealers. This check box is automatically enabled for Do it Best members already participating in the loyalty program. Moving forward, this would need to enabled for new Do it Best members who plan on using the Best Rewards program.
Loyalty Rewards
This indicates whether your company operates its own loyalty rewards program. When specifying sale pricing, and the "loyalty rewards" parameter is checked, the data grid will display a "loyalty" check box that can be used to indicate which sale prices are for loyalty members only. For sale prices that are flagged as "loyalty," customers will only receive those cards if a loyalty membership is being associated with the Sales transaction. Self-managed loyalty members can be identified by assigning the label "loyalty ID" to one of the account-job keys and then populating the key's value with the account's loyalty ID. The format of the loyalty ID is up to your company; however, it's probably best for it to be numeric to allow for bar-coded membership cards for easy scanning at Point of Sale.
Only Match Vendor-Item
This parameter is only considered for File Maintenance updates (includes Price Updates). If enabled (checked), file maintenance operations will only be done for items where the item is linked to a vendor-item record matching the EDI vendor in question. Other EDI operations will use additional look-up methods if a matching item is not found such as the SKU and barcode.
Rewards Item Prefix
This is currently only used for Do it Best Corp. rewards credit SKUs. The prefix (if any) is appended to the reward item's SKU in order to help distinguish the credit SKU (used for coupons, etc.) from other items in your inventory. Use of a prefix is especially important if there is a chance that any of your company's item numbers might match the credit SKU used by the vendor. If this happens, matching items that are not actually credit SKUs will be updated to match the vendor's credit SKU information. Having a prefix prevents this from happening.
When you are converting data to use it in the application and your company has existing credit vendor SKUs, you should tell your Implementation team contact this information.
Disable Best Rewards Loyalty Accounts after _Days of Inactivity
Enter the appropriate digits in this field to specify the number of days after which a Best Rewards Loyalty accounts should be disabled. If you leave this field blank Best Rewards accounts will not be disabled.
Purging Audit Archives
We have added the following purge tools to help you schedule and manage the number of files that you purge or retain as part of your use of the EDI tools. The purge process runs nightly, based on the purge options you select. Resetting this option requires administrative privileges.
Important: This feature is enabled by default, so if you do not want to purge archive EDI archived files, you need to disable this feature.
To use the new EDI purge archive options:
1. From the Main Menu, choose Maintenance > Database > Parameters to display the Parameter Settings form.
2. From the Setup tab, choose EDI > General to display the Purge Archive options.
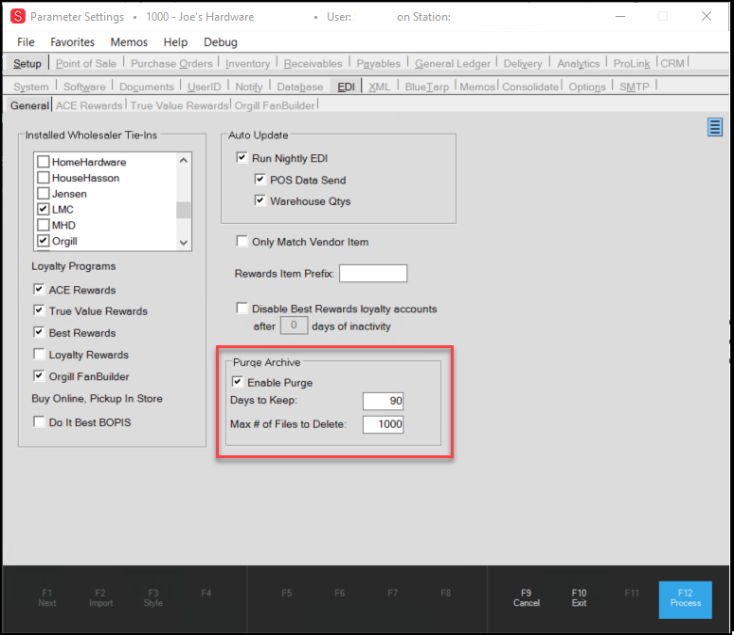
Parameter Settings > Setup > EDI > General Tab with Purge Archive Options Highlighted
2. Make sure the Enable Purge check box is enabled.
3. In the Days to Keep field, enter the number of days after which you want the application to purge the archive of files. By default, this setting is 90 days.
4. In the Max # of Files to Delete field, enter the number of files you want to delete during each nightly purge. By default, this setting is 1000 files.
Note: We recommend this file limit. Setting a maximum will prevent potential system performance issues resulting from the purge command.
5. When you have completed your entries and selections, click Process (F12) to save your changes.
Paying Vendors using Bank Transfers (AU)
Australian businesses typically pay vendors and suppliers directly from their bank accounts, so we have added this capability to our applications. Your business now has the tools to generate an ABA file that you can transmit to your vendor or supplier’s bank to facilitate these payments. While the cheque account settings can be added by a user other than the Branch or Payables Manager, once added, the account-specific entries are only viewable by users with administrative permissions.
Note: The Payables Manager permissions are set in Maintenance > Database > User IDs > Permissions List > Payables list.
Here are the steps for setting up the Bank Transfers process:
-
Establishing the user ID permissions required; this includes permissions for a Branch Manager and a Payables Manager.
-
Setting up the EDI Tie In EDI. Work with your ECI Implementation or Support team to set up these options. Make sure you tell them:
-
The bank you do business with (they need to know so they can choose the right ABA file format)
-
The ABA Bank File name you want them to use.
-
-
Setting up cheque account options for the transmission files (both your own for the branch accounts making the payments and the account settings for your vendors
When you have completed the setup processes, you can process payments easily. Currently, this is only established for Australian businesses.
Setting up the Nightly Process for Bank Transfers
The EDI setting, Bank Transfer, allows you to set up the nightly bank transfer process for vendor payments. You also need to set up a secure folder for each branch that will be performing vendor bank transfers. This folder will store the ABA transfer files. If you do not have access to this parameter setting, reach out to your ECI Support team for assistance.
To set up the EDI Tie In:
1. From the Main Menu, choose Maintenance > Database > Parameters to display the Parameter Settings form.
2. Choose the EDI subtab to display the General tab options.
![]()
Parameter Settings Form > Setup > EDI > General > Bank Transfer Highlighted
3. In the Installed Wholesaler Tie-Ins section click the Bank Transfer check box.
4. Choose Process (F12) to save this setting.
5. Go back to the Database menu and choose Branches to display the Branch Setup form.
6. From the Branch ID list, choose the branch you want to set up the ABA folder for. The record details display.
7. At the bottom of the form, choose the EDI folder to display the EDI entries.
8. In the Settings for list, choose Bank Transfer to display the available folder options.
9. In the Base Pathname field, choose the Ellipsis  button and select the path the customer wants to choose to save the bank transfer files.
10. Choose Process (F12) to save this entry.
Repeat steps 6 – 10 for each branch that will be performing bank transfers.
Adding Your Bank Settings to Pay Vendors
Before you set up the account settings for vendors, it makes sense that you have added your own settings. The ABA file requires both your file settings and the vendors to ensure a secure transfer.
To add your bank settings to the account:
1. From the Main Menu, choose Payables > Cheque Register to display the Cheque Register form.
2. Beside the Account field, click the Settings ![]() icon to display the Cheque Account Maintenance options. There are some new fields in this list.
icon to display the Cheque Account Maintenance options. There are some new fields in this list.
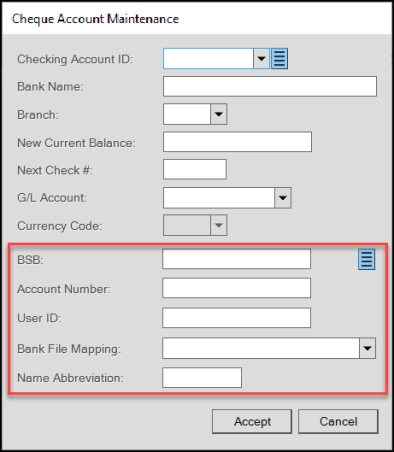
Cheque Account Maintenance with ABA File Specific Fields Highlighted
The Menu Marker  allows you to display or hide the text of the entered bank data.
3. In the Cheque Account Number field, choose the first account you will use to pay vendors from. The entries specific to that account display.
4. In the empty fields, enter the account information specific to this checking account:
-
BSB
Enter the bank routing (BSB) number in this field. -
Account Number
Enter the bank account number you want to pay from. -
User ID
Enter the User ID of the person allowed to perform this task. -
Bank File Mapping
hoose the ABA or ABA-SGE bank file format, depending upon the bank you use to send the payment. -
Name Abbreviation
Enter the name of the account.
5. When you have completed these entries, choose Accept.
6. Choose Process (F12) to save these settings.
Repeat this process for each bank account that you will be paying vendors through bank transfers from.
Adding the Vendor’s Bank Settings
To pay the vendor’s account directly, enter the account details in the new Vendor Maintenance fields. This ensures that when you add a vendor payment to the ABA file, the application routes it to the vendor’s bank account correctly.
To add the vendor’s bank account information to the application:
1. From the Main Menu, choose Purchasing > Database > Vendor to display the Vendor Maintenance form.
2. From the Vendor list, choose the vendor you are adding the bank code information for.
3. Choose the Options tab to display the vendor’s banking detail fields:
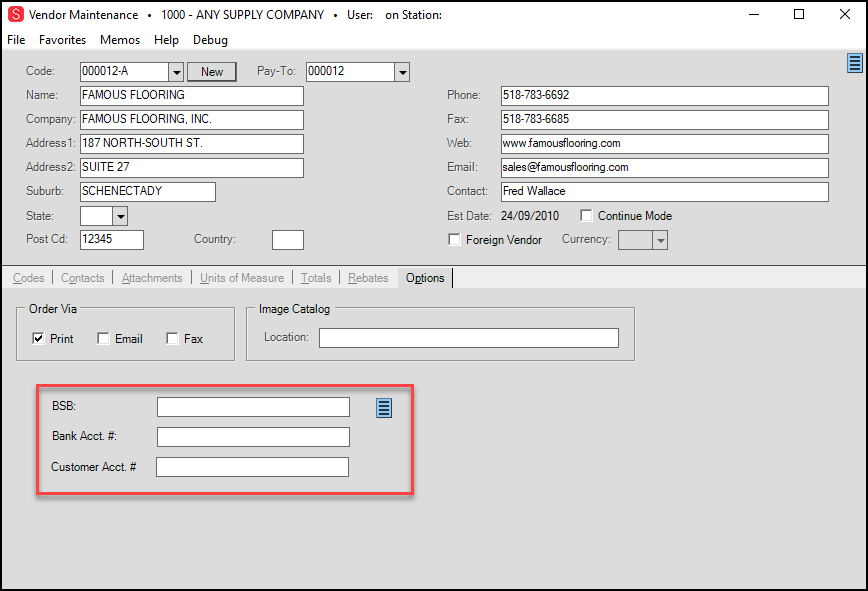
Vendor Maintenance Form > Options Tab > ABA File Entries
The Menu Marker allows you to display or hide the text of the entered bank information. The vendor bank account information is encrypted so that only users with appropriate permissions (Branch and Payables Manager) can see them. Users without these permissions cannot see these entries specifically, but they can change them.
4. In the ABA file fields, enter the vendor’s bank file information:
-
BSB
Enter the vendor’s bank routing number in this field. This entry is usually up to seven characters in Australian banks and has a dash in the middle. This field is known as Bank Store and Branch in Australia. -
Bank Account #
Enter the vendor’s account number in this field. -
Customer Account #
Enter the vendor’s ID with the bank in this field.
5. Choose Process (F12) to save these entries.
Creating an AP Invoice and Paying it with a Bank Transfer
After the setup is complete, you can pay the invoice through the new process as shown below. We assume that the setup for you and for the vendor is complete.
To create an AP Invoice and pay it through the bank transfer process:
1. From the Main Menu, choose Payables > Billing Entry to display the Billing Entry form.
2. From the Vendor Invoice # list, choose the invoice you want to pay.
3. Choose the payment amount and the other settings you normally would in this form and choose Process (F12).
4. Choose Payables > Disbursements to display the check run selection options.
5. From the Cheque Account list, choose an account you set up to pay using bank transfers. A new check box displays.
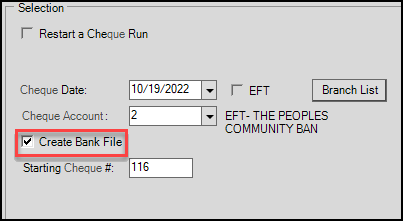
Disbursements > Selection with Create Banks File Check Box
6. Select the Create Bank File check box.
7. Select Process (F12). The application verifies the bank details entered.
-
If the verification process succeeds, the Save As dialog box displays. Continue to the next step.
-
If the verification process fails, a message displays explaining which fields did not validate. Correct those fields in the vendor or your own records, and try the disbursement process again.
![]()
Save As (Bank Transfer Bank File Name)
8. Update the file name, if needed, and choose Save.
The EDI process sends the file(s) you create each day during the nightly upload process.
Note: It is important to distinguish bank files that are processed on the same day so you are not overwriting them. We recommend that you archive these files in case you need to refer to them later.
Processing a Vendor Bank Payment Manually
There is a manual process to run bank transfer payments to vendors manually. This process assumes that you have already created the ABA file.
To send a bank transfer payment to a vendor’s bank manually:
1. From the Main Menu, choose Purchasing > Vendor EDI to display the Vendor EDI Communications form.
2. From the EDI Interface list, choose Bank Transfer.

Vendor EDI Communications > EFT Bank File Selected
3. From the Vendor list, choose the vendor to whom you are sending the payment.
4. In the bullet list, choose the EFT Bank File entry. The list of check run files for the selected vendor displays.
5. From the list, choose the Select check box beside the file you want to process.
6. Choose Transmit (F6) to process the payment. The Save As box displays.
7. Update the bank file name in the field provided as you need to, to ensure that the filename is unique.
8. Choose Save to save the file.
Note: We recommend that you archive these files in case you need to refer to them later.