Grid Selection and Functions
Data grids contain information throughout the application that you can you can group for a variety of purposes. Typically, the data grid provides a clear picture of the items you have in inventory or you have available to you through your vendor's catalogs. Using the tools in the data grid you can group items into itemsets for packaging and delivery, experiment with pricing, and verify that you have the stock you need to provide for your customers needs.
You can also use the grid selection tools to copy data into a spreadsheet, so you can experiment with pricing to prepare for a contract conversation or to evaluate how profitable a new order might be. Items which are selected can be repriced independent from other items in the grid as well.
This topic discusses the grid selection tools and function you have access to so you can get the most out of the application.
Selecting Rows in a Data Grid
This section describes some features that allow you to work with rows in the data grid to group them, move them, and manage them for any task. These instructions work for any data grid in the application, regardless of the type of information that data grid might contain.
Selecting All Rows in a Data Grid
To select ALL rows in a data grid, do one of the following:
-
Click anywhere in the grid and press the Control (Ctrl) key and the letter A <Ctrl A>, or
-
Right-click anywhere in the data grid and choose Select All from the context menu.

Figure 1: Data Grid with Right-Click Menu
When you choose one of these options, the application selects all of the rows in the data grid.

Figure 2: Data Grid with All Rows Selected
Selecting a Range of Rows in a Data Grid (Sequential)
To select a range of consecutive rows in a grid:
1. Identify the first row in the range of rows you want to select and click the box just to the left of the row. An arrow displays to the left of the row and the application highlights the whole row.

Figure 3: Data Grid with First Row Selected
2. Hold down the Shift key and click the box to the left of the last row in the range you want to select.

Figure 4: Data Grid with Consecutive Rows Selected
After you select the first row, you can also use the Page Up and Page Down keys on your keyboard to select the next consecutive rows, by holding down the Shift key.
Selecting a Range of Rows in a Data Grid (Non-Sequential)
To select rows that aren't next to each other:
1. Click the box to the left of any row you want to select.
2. Hold down the Control (Ctrl) key and click the box to the left of any other rows in the grid you want to select to highlight them.

Figure 5: Data Grid with Non-Consecutive Rows Selected
Once rows are selected, you can use the right-click context menu (as shown in Figure 1) or the Menu Marker  options (shown below) to make additional options available.
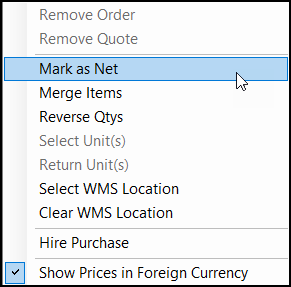
Figure 6: Menu Marker Menu
Using Keyboard Shortcuts in the Data Grid
Keyboard shortcuts give you access to many of the context menu options and the application follow the typical Windows-standard rules for using these features.
For example, to select ALL rows in the data grid, press and hold the Control (Ctrl) key and type the letter A (all) or <Ctrl A>. The standard shortcut for the Copy function is <Ctrl C>, although you have to select the rows before you can copy them. There are currently no keyboard shortcuts for the cut or paste options.
The standard data grid context menu displays options that give you tools for managing the rows in the data grid throughout the application.
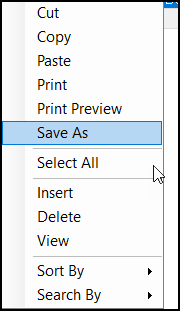
Figure 7: Data Grid Context Menu
For users unfamiliar with these common features, here are some brief explanations:
Cut
This option removes the selected rows from the grid and places them in the clipboard where you can paste them into the same data grid, a different data grid, or to another application, such as a spreadsheet. Each time you cut information and add it to the clipboard, the new data replaces the data you previously saved there.
Copy
This option is similar to cut except it does not remove any rows from the data grid. The application places a copy of the data you selected into the clipboard so you can paste it into the same data grid, a different data grid, or into another application, such as a spreadsheet. Each time you copy data into the clipboard, it replaces any data you previously cut or copied there.
Paste
Use the Paste option to take the data in the clipboard and insert it into a data grid or spreadsheet. Within the application, pasting can only be done for the same activity. Pasting data does not clear the clipboard. The data remains in the clipboard until it is cleared by another "cut" or "copy" selection. If information remains in the clipboard when you close the application, the clipboard is cleared.
Print, Print Preview
Use these functions to print or preview the selected rows in the data grid.
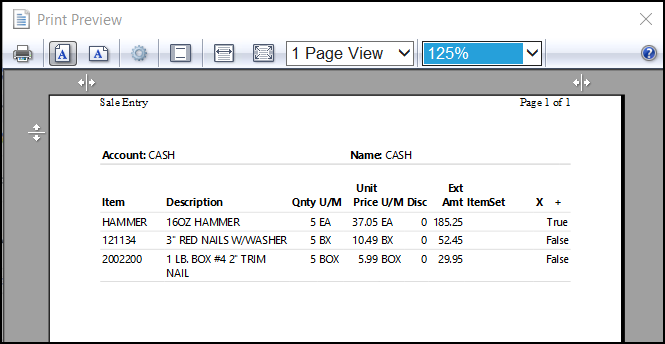
Figure 8: Print Preview of Rows selected in a Data Grid
Save As
You can use the Save As option to save the row information in the data grid as a file using several formats. The default save format is an MHT file (Microsoft HTML Archive).
The application will save the information you selected in the data grid to a folder you choose in the format you select.
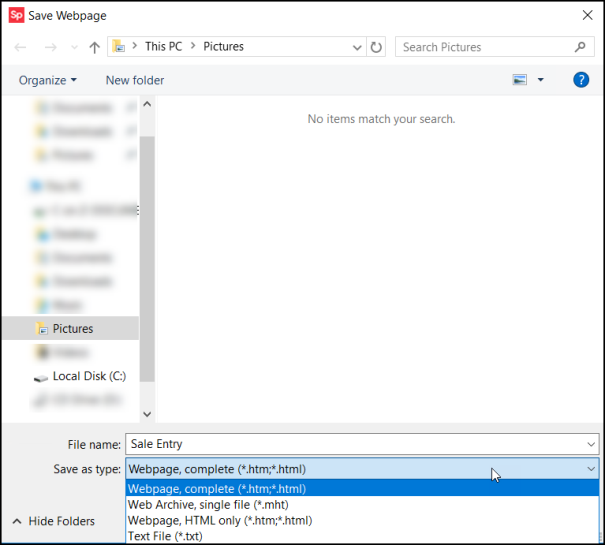
Figure 9: Save Webpage Settings
Insert
You can use the Insert feature to add one or more rows to the data grid.
To add one or more blank rows to the data grid, do one of the following:
-
Click the box to the left of one or more rows in the data grid where you want to add the row(s). Right-click to display the context menu and choose Insert to insert the new row(s).
-
Click the box to the left of one or more rows in the data grid where you want to add the row(s). Press the Insert key on your keyboard to insert the new row(s).
Delete
You can also delete one or more rows from the data grid whenever it is necessary using the Delete feature.
To delete one or more rows from the data grid, do one of the following:
-
Click the box to the left of one or more rows in the data grid where you want to delete the row(s). Right-click to display the context menu and choose Delete to remove the selected row(s).
-
Click the box to the left of one or more rows in the data grid where you want to delete the row(s). Press the Delete key on your keyboard to remove the selected row(s).
View
You can see all of the data attached to information in the data grid using the View option. This includes information that is not visible in the data grid, such as market cost, any add-ons associated with the entries, original retail costs, etc.
To display the database information associated with the entries in the data grid:
1. Place the cursor anywhere in the data grid and right-click to display the context menu.
2. Choose the View option in the list to display the Cascading DataViewer window.
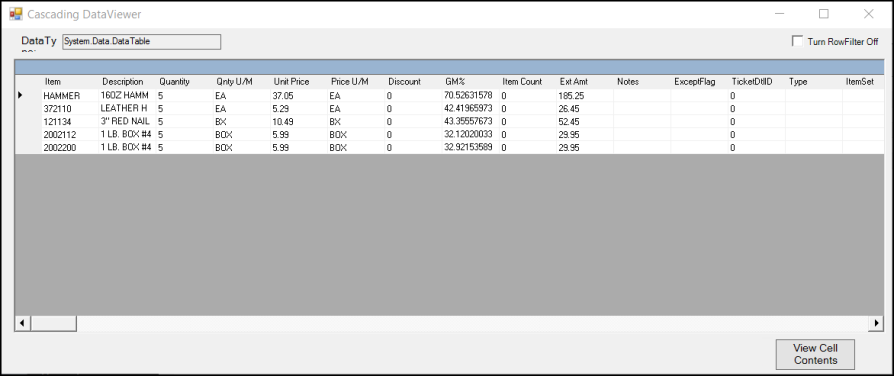
Figure 10: Cascading Data Viewer
Sort By
You can sort the entries in the data grid by a variety of criteria using the Sort By feature.
To sort the rows in the data grid:
1. Place the cursor anywhere in the data grid and right-click to display the context menu.
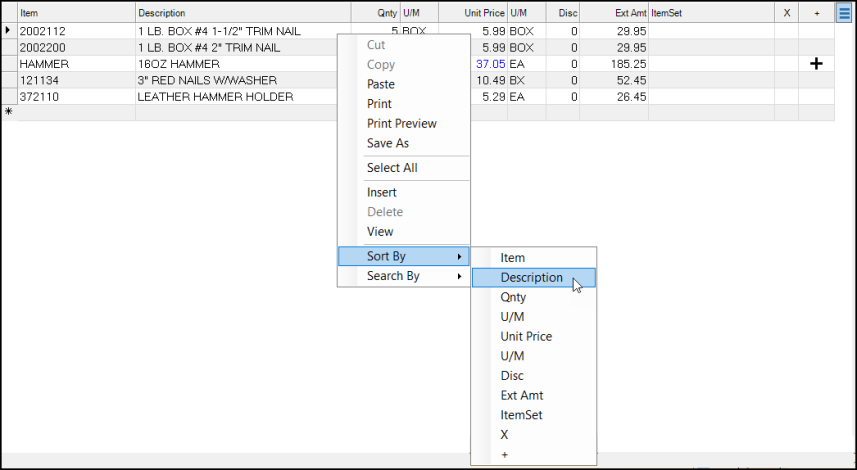
Figure 11: Data Grid Context Menu with Sort By Options Displaying
2. Choose the Sort By option from the list and choose the sort criteria in the cascading list.

Figure 12: Data Grid Sort Results
Search By
If the data grid you are working with has a lot of entries, you may need to look for a specific entry in the list. The Search By feature allows you to search for particular text in the data grid.
To search for specific text or numbers in the data grid:
1. Place the cursor anywhere in the data grid and right-click to display the context menu.
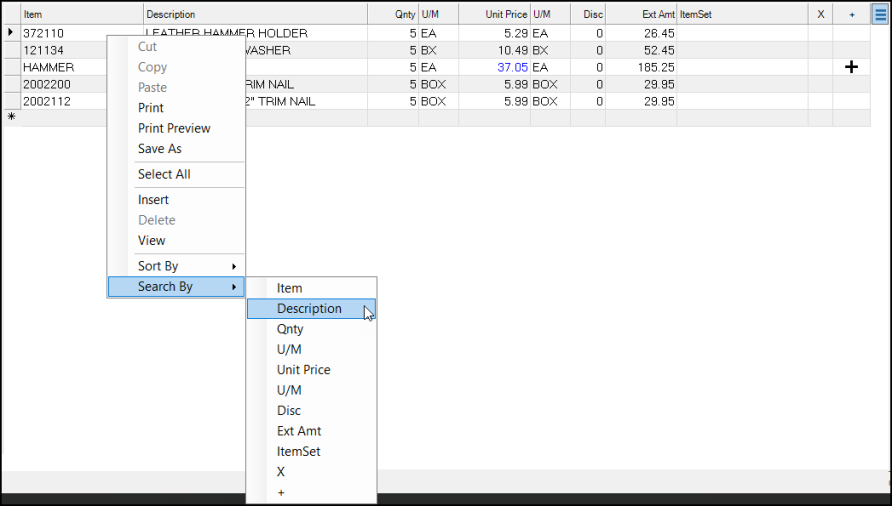
Figure 13: Data Grid with Search By Options
2. From the context menu, choose Search By and choose the search by criteria from the cascading list. Depending upon the criteria you choose, a Search box displays.
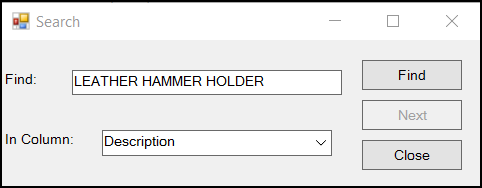
Figure 14: Search By Box Options
3. In the Find field, enter the text or numbers you are searching for and change the In Column entry if needed. Then choose Find.
The application looks for the criteria you entered and highlights the next matching entry in the data grid.
4. If the entry that displays does not match what you are looking for, choose Next.
5. Choose Close to complete the search process.