Blue Tarp Transaction Summary (Report)
This report provides a way to research BlueTarp transactions for a selected day, a selected month, or a selected date range. You can choose the branch for the report, the sort options, the way the totals display, and the Print/Output options.
If you have produced this report before and want to use the same settings, choose the Select (F5) function at the bottom of the page and choose the report you want to copy the format of.
![]()
BlueTarp Transaction Report Options
Selection Options
There are three (3) formats available and you can choose only one:
•Selected Day
Choose this button to search for BlueTarp transactions associated with a specific day. The field defaults to the current day, but click the list button to display the current month. Right-click the Blue Check icon ![]() to choose from the options Today or Yesterday.
to choose from the options Today or Yesterday.
•Selected Month
Choose this button to search for BlueTarp transactions associated with a particular month.
You can enter the two-digit month and two digit year in the available field or you can right-click the Blue Check icon ![]() to choose from the options Current Month or the Previous Month. From here, you can only choose the month and the year and the report will include all BlueTarp transactions from the first day of the selected month to the last day of the selected month.
to choose from the options Current Month or the Previous Month. From here, you can only choose the month and the year and the report will include all BlueTarp transactions from the first day of the selected month to the last day of the selected month.
•Date Range
Choose the Date Range button to select a date range for the transaction report. Right-click the Blue Check icon ![]() to choose from a wide range of options, including: Today , Yesterday, Tomorrow, Current Month, Last Month, Current Year, Last Year, Last 30 Days, Current Fiscal Year, Last Fiscal Year, or Last 365 Days.
to choose from a wide range of options, including: Today , Yesterday, Tomorrow, Current Month, Last Month, Current Year, Last Year, Last 30 Days, Current Fiscal Year, Last Fiscal Year, or Last 365 Days.
Branch Options
This report allows for branch selection (when applicable). If your company has more than one location using the application, select the branches that should be included on the report. Use the selection marker ![]() to choose either the current branch, all branches, or a branch list (when defined).
to choose either the current branch, all branches, or a branch list (when defined).
Filters
There are no filters for this report.
Sort By Options
This report has a two levels of sort options. When you select two options, the application uses the first option to group the records using the first criteria and the second groups the transactions within the first criteria by the second criteria.
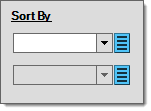
Sort options for both lists include:
-
DocType
Select this option to display report results by document type, such as Invoice, Order, etc. -
Document #
Select this option to display the results of the report in the order the BlueTarp transactions occurred (by document number). -
Date
Select this option to display the results of the report in date order (earliest to latest). -
User
Select this option to display the results of the report by the user ID of the person who processed the transaction. -
Branch
Select this option to display the results by branch ID. -
Amount
Select this option to display the results by the amount of the transaction. -
Account
Select this option to group the BlueTarp transactions by account ID. -
CashDrawer
Select this option to group the BlueTarp transactions by the CashDrawer that the transaction occurred at.
Data that meets the selection and filter requirements will be ordered based on the user's selection (if any). Sorts can be done in either ascending or descending order. Ascending order sorts data alphabetically A-Z (numbers are sorted 0-9 before letters, but not based on their numeric value, they are treated similar to letters). Descending order sorts reverse-alphabetically Z-A (numbers are sorted in reverse order after letters 9-0... again, not based on numeric value, but treated as though they were letters being alphabetized).
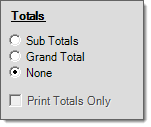
Totals Options
You can choose from the following total types for this report. Totals (if enabled) key off of the selections made in the Sort By area, so if the sort by is "account" and "sub-totals" is selected, a sub-total will print at the end of each account's list of orders, for example.
Print and Output Options
The report can be printed to either 1 or 2 printers, and multiple copies for each printer can be designated. You can use the Page break check box to add a page break after each Subtotal. The page break feature is based on your selection of both the Sort by field and the Sub Totals options. The report relies on the Print Report check box when you select the Process (F12) option.
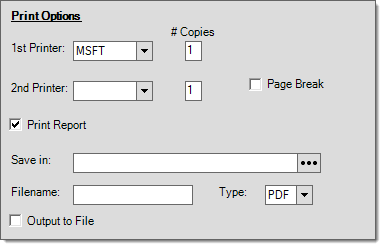
If you would prefer to save the report as a file, select the Output to File check box and click the Save In  button to choose a file location for the report. In the Filename field, enter the name of the report and in the Type field, choose the file format type for the report. Options include: PDF, Excel (.xls), HTML, TIFF, CSV, or Excel (xlsx).
Completing the Report
After you have selected the format, the scope, the sort, the total options, and the print/output options you are ready to produce the BlueTarp Transactions Summary Report. You have several options now.
-
Save (F6)
Choose this option to save the report settings you selected so you can use this same format again later. Not all reports have this option. -
Preview (F8)
Choose this option if you want to see the results of your selections before printing or saving it to a file. This is a good idea if this is the first time you are generating this report because you can review how the report is organized before you generate it. -
Process (F12)
Choose this option when you are ready to print or save the report to a file. -
Cancel (F9)
Choose this option if you don't like how the report turned out and you want to start over.
![]()
Note: When you use the Preview option, you can click the DocID link to access the Point of Sale document associated with the transaction.