Aggregator Maintenance (Utility)
You can use the Aggregator feature to quantify your inventory for many different purposes. The Aggregator Maintenance utility gives you a way to tie inventory to the aggregator types you have created. You should create the aggregator types before you populate them with inventory using the Aggregator Maintenance Utility. This utility creates multipliers to help you quantify your inventory based on one of five types:
In general, the multiplier is determined by the base unit(s) of measure of the item, as follows:
-
Number of Items: For items that are sold by the piece, each, or box, the multiplier is always 1.
-
Lineal/Length: Typically, Lumber, Timber, or Hardwood Items
For lineal (length)-based aggregator types, the length value defined in the Item Maintenance form determines the multiplier. In the next figure, the length is 8, which would be the default multiplier for this item.
Note: If you add this item to the data grid, but the unit of measure is thousand board feet instead, the application uses the quantity conversion listed (5.333) x the default length (8) and the multiplier would be 42.664.
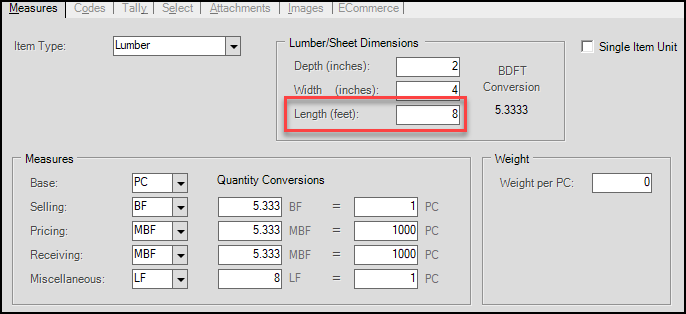
Lineal/Length Measures in Item Maintenance Form
-
Area: Typically, Sheet Goods
For area-based aggregator types, the items’ length x the width values in the Item Maintenance form determine the multiplier. In the next figure, the length is 8 x the width, 4, so the default multiplier for this item would be 32.
Note: If this item is added to the data grid with a square foot or thousand square foot measurement, the calculation becomes length x width (32) times the multiplier, which in this case is also 32 to equal a multiplier of 1024.
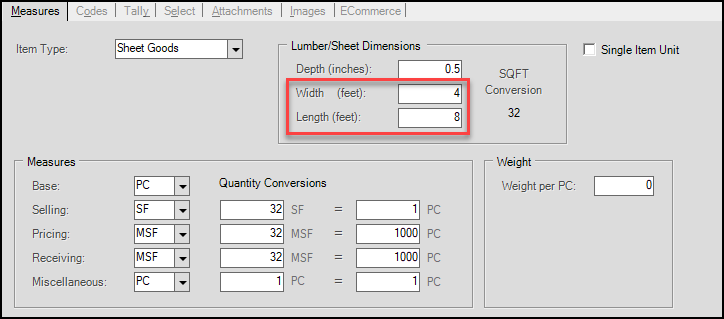
Area Measures in Item Maintenance Form
-
Volume: Typically, Lumber, Timber, Hardwood, Liquids
For volume-based aggregator types, the length x the width x depth values in the Item Maintenance form determine the multiplier.
In the next figure, the length is 8 x the width, 4 x the depth, which is 2, so the default multiplier for this item would be 128.
Note: If this item is added to the data grid with a unit of measure other than the base unit of measure, the calculation becomes length x width x height (128) times the quantity conversion, which is 5.333 to equal a multiplier of 682.624.
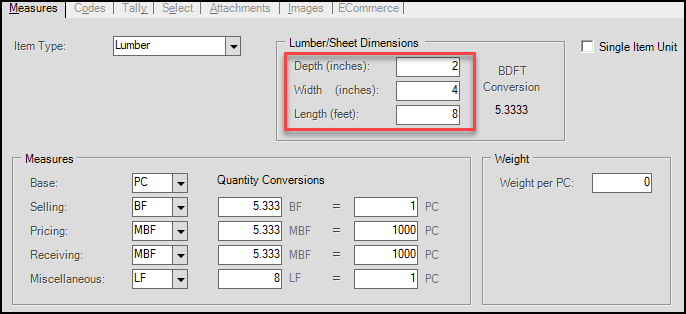
Volume Measurements in Item Maintenance Form
-
Weight:
For weight-based aggregator types, the weight value is the multiplier. In the next figure, the weight is 11.5 per gallon, so the default multiplier for this item would be 11.5.

Weight Measurement in Item Maintenance Form
IMPORTANT: For any item where the default unit of measure cannot be reconciled with the aggregator type’s unit of measure, the multiplier is 0. You either have to assign these multipliers manually, or remove them from the aggregator type list.
Building an Aggregator SKU
To add inventory to the aggregator item and create an Aggregator SKU:
1. From the Main Menu, choose Inventory > Utilities > Aggregator Maintenance. The Aggregator Maintenance form displays.
2. In the Aggregator list, choose the aggregator type you want to add items to and press Enter.
The Aggregator Maintenance fields update with the information added earlier.
![]()
Aggregator Maintenance Form with Aggregator Type Loaded (Empty)
You can add items manually, but it probably more efficient to use the import feature.
3. Choose Import (F2) and from the local menu, choose Inventory to display the Inventory Copy box. Choose the criteria for importing the items that match the selected aggregator type.
Note: You can also import from a document by selecting the Import Wizard option, see Using the Template Feature to Add Inventory to the Aggregator SKU.
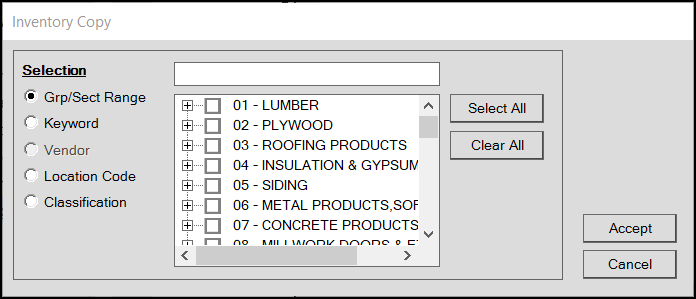
Inventory Copy Box
4. Consider the Inventory Item Type measurement value (piece, weight, area, etc.) and select the check box beside the inventory that applies to that type in the list.
5. Choose Accept to import the items you selected. The data grid fills up with the inventory items you imported. When you import more than 1000 items, a confirmation message displays. Choose Yes to continue.
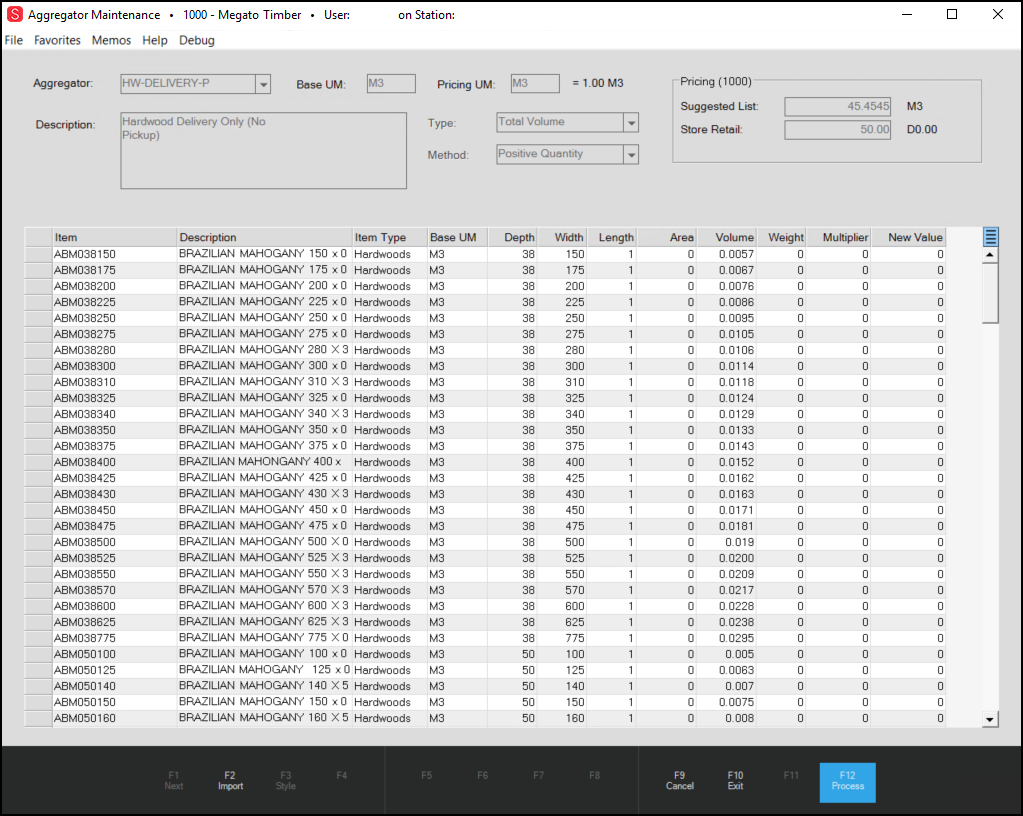
Aggregator Maintenance Form with Entries
A message may display after the import is complete to display the number of items (usually duplicates) that were ignored and not imported, if any. Choose OK to clear this message.
After the import is complete, you cannot change the Item identifier in the first column of the data grid. You can delete an item and re-enter it if you need to. The application does not import any disabled items from inventory, nor does it allow you to enter them. If you decide to disable an item, you should delete it from the Aggregator first, to avoid errors.
6. Review the items in the data grid and add or remove items that do not fit the Aggregator SKU criteria:
-
To organize the list, right-click the row header and click Sort to sort by that type. It might be useful to sort by Base UM so you can ensure these item entries match the default for the aggregator item.
-
Delete any items that you want to measure a different way by highlighting the record and pressing the Delete key on your computer.
-
Repeat steps 4 and 5 (or use the Import Wizard) to add any new items that belong in the list.
-
Press <Ctrl Insert> to add a blank line to the data grid and enter an item manually.
After you have finalized the list of items you want to associate with this aggregator type, you are ready to calculate the Multipliers.
Aggregator Context Menu
7. When you are sure you have the list you want, you are ready to calculate the multipliers.
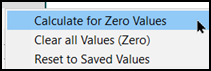
In the upper right corner of the data grid, choose the Menu Marker to display three options:
-
Calculate for Zero Values
Select this option to calculate the Multiplier for all items that have a zero value in the New Value field. The application takes into account the Aggregator Type (length, area, volume, weight, quantity) when making this calculation. -
Clear All Values (Zero)
Select this option when you need to reset the Multiplier for all items in the list to zero. -
Reset to Saved Values
Select this option to reset the New Value entry to the value in the Multiplier column.
8. Select the Calculate for Zero Values option to generate the New Value for each item in the data grid. The application calculates the New Value based on the following:
-
If the Type = Total Quantity, the New Value = 1.
-
If the Type = Total Length (Lineal), the New Value = item’s length.
-
If the Type = Total Area, the New Value = item’s length x width.
-
If the Type = Total Volume, the New Value = item’s length x width x depth.
-
If the Type = Total Weight, the New Value = item’s weight.
Note: The application multiplies the Weight values times the BASE quantity.
IMPORTANT: For the application to perform a calculation, all required values must be in Item Maintenance. An error message displays to explain the values needed for the calculation.
9. Review the New Value entries and replace any value if you decide you do not want to use a calculated value for an item.
The value in the New Value field determines the Multiplier the application uses at Point of Sale. New Value entries cannot be 0.
10. After you have updated any remaining New Value fields with non-0 entries, choose Process (F12).
The application updates the Multiplier column with your new values and closes the Aggregator Maintenance list.

Aggregator Maintenance Form with Updated Multipliers
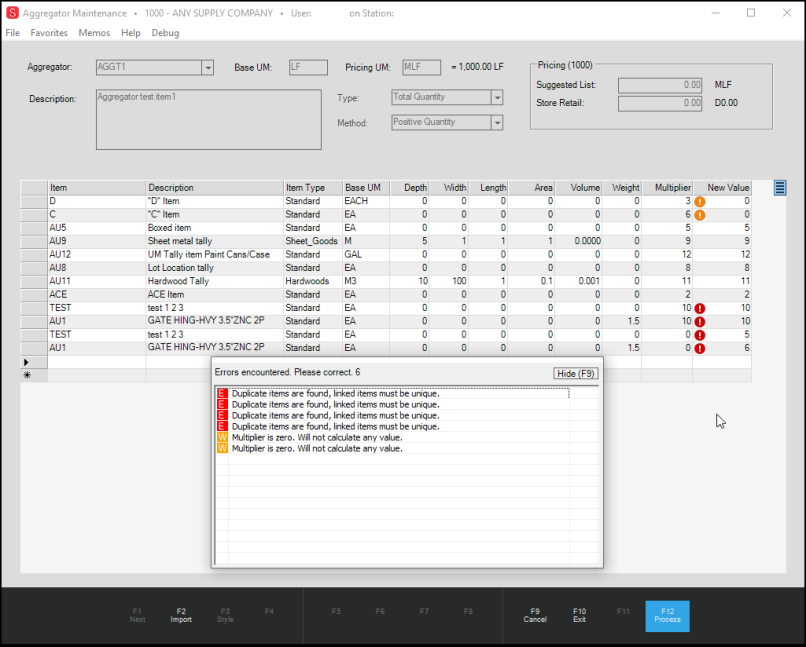
If you attempt to save the aggregator SKU when the New Value column is 0 or a negative number, an error message displays and an icon displays next to the items that need to be corrected.

Aggregator Maintenance Form with Errors Highlighted
If you attempt to save the aggregator SKU when the New Value column is 0 or a negative number, an error message displays and an icon displays next to the items that need to be corrected.
11. Update any entries with errors in the data grid and choose Process (F12) again to create the aggregator SKU.
12. Repeat steps 2 – 11 for each aggregator SKU you need to create to quantify delivery charges in Point of Sale.
The application does not lock down the units of measure, because you know your stock better than we do and you know what unit of measures work for your inventory. Please be aware that the units of measure on the aggregator SKU won't matter to the calculated quantity. At Point of Sale, the quantity you enter in the data grid affects the total that is calculated for the linked items. You can base the pricing using some different measurement if you prefer, for example, SF (square feet) but price is per MSF (thousand square feet) which may not work for you.
Using the Aggregator SKU to Calculate Delivery (Cartage) Charges
After you add the customer’s items to the data grid, you can add the corresponding aggregator SKUs. Your customer can see the charges by item type, and the Point of Sale documents also display the delivery/cartage charge information. You can apply aggregator SKUs to sales, orders, quotes, direct shipments, open tickets, and charge return transactions.
You cannot enter the same aggregator SKU to the data grid more than once in a single transaction. If you enter items into the data grid for delivery without adding their defined aggregator SKU(s), a message displays pointing out which items are missing their SKUs.
To add Aggregator charges to a transaction:
1. From the Main Menu, go to Point of Sale, choose the transaction type, and add the customer’s items to the Point of Sale data grid as you usually would.
2. To choose the appropriate aggregator SKU(s), consider the aggregator SKU(s) make sense:
-
What materials determine the aggregator SKU(s) I need?
For example, for SKUs based on the type of material (Hardwood, Lumber, Sheet Materials, etc.), look for those types of SKUs.
-
What type of delivery charges determine the aggregator SKU(s) I need?
For example, is this a delivery only, a pickup only, are we charging for delivery and pickup, or are we charging for delivery and crediting for pickup?
3. In the data grid, enter the appropriate aggregator SKU(s) based on your assessment. The Qnty column updates to show the aggregator total based on the item quantities associated with that SKU. You can update this quantity manually if you need to.
Note: If you manually change the aggregator SKU quantity and then later update the item quantity values in the data grid, the application recalculates the aggregator SKU value and replaces your manual entry. For this reason, it is best to add the aggregator SKUs at the end of the data grid list.
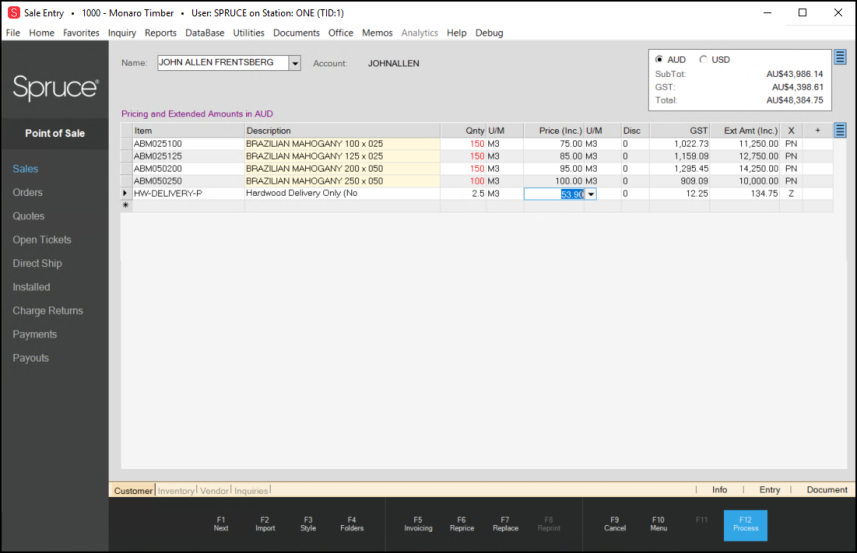
Sale Entry Form with Aggregator SKU Entered
When you make changes to the items in the data grid, such as adding new items, changing the quantities of existing items, or removing items from the data grid, the application updates the aggregator SKU(s) to reflect any changes that affect the multiplier value.
Note: Repricing items in the data grid does not affect the pricing in the aggregator SKU. Only changing the item quantities or adding new items change the aggregator SKU values.
4. In the Price field for each aggregator SKU, review the default price. Continue based on what you decide:
-
If you want to keep this price, for example, to a round number, continue to the next step.
-
If you want to change this price, enter the unit price you want to apply to the aggregator SKU and press Enter.
The Extended Amount field updates with the Aggregator charge.
Note: You can change this value to arrive at the amount you want display.
5. When you import a quote or an order into the data grid, the application preserves the original quantities and amounts from the Point of Sale record.
If you reprice the SKU entries in the data grid (that is, you change the SKU price from the amount listed in the order or quote) or change the quantities of the items in the data grid, the application will prompt you to choose whether to update the aggregator SKU.
-
If you choose Yes, the application updates the aggregator SKU with any new values that apply.
-
If you choose No, the application leaves the imported quantities and items as they are.
6. When you are happy with the Delivery (Cartage) amount, select Process (F12) to process the transaction. If the aggregator SKU(s) are not at the bottom of the list, the application moves them there.
The application evaluates the items in the data grid to determine whether there are duplicate items, duplicate aggregator SKUs, or to check if there are deliverable items not listed in the aggregator SKUs. When the application finds any of these conditions, a task list displays, listing each issue based upon the severity. The application shows an icon in the data grid beside the items you need to correct / remove.
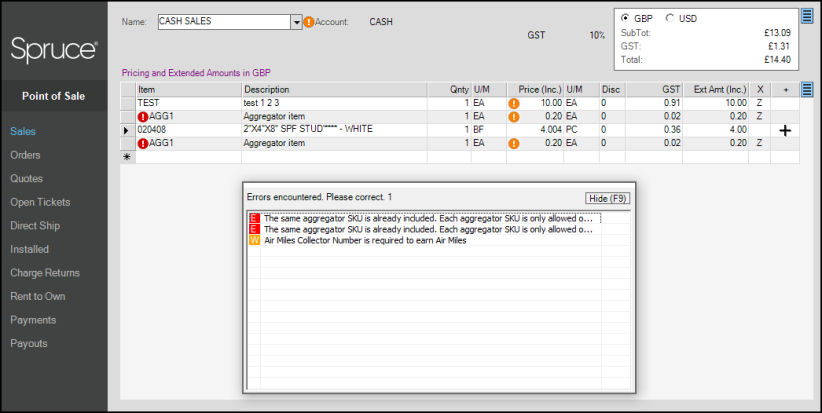
Sale Entry Form with Aggregator Error and Warning Messages
Note: Sometimes, you cannot tell that items in material lists (BOM) are part of an aggregator calculation. The Aggregator still considers them part of the delivery and includes these items in its calculation, even if, due to Bill of Materials setup, the items do not display individually in the data grid.
7. After you correct any errors and the transaction can proceed, select Process (F12) to display the Process Invoice Document form, which displays the transaction total, including tax.
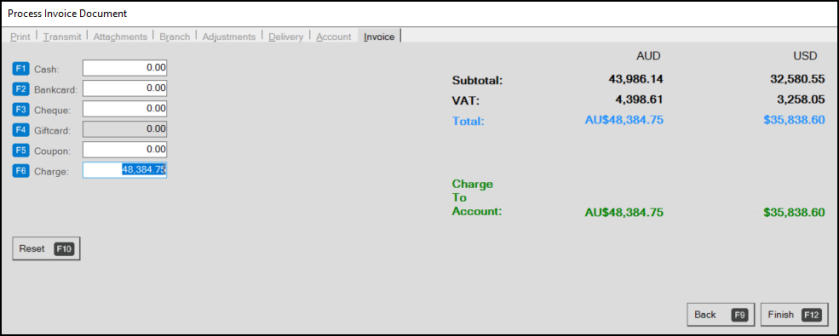
8. When applicable, complete the Delivery tab tasks and select Finish (F12) to process.
9. Check the printed document or go to Documents and look up the transaction to view the itemized delivery information.
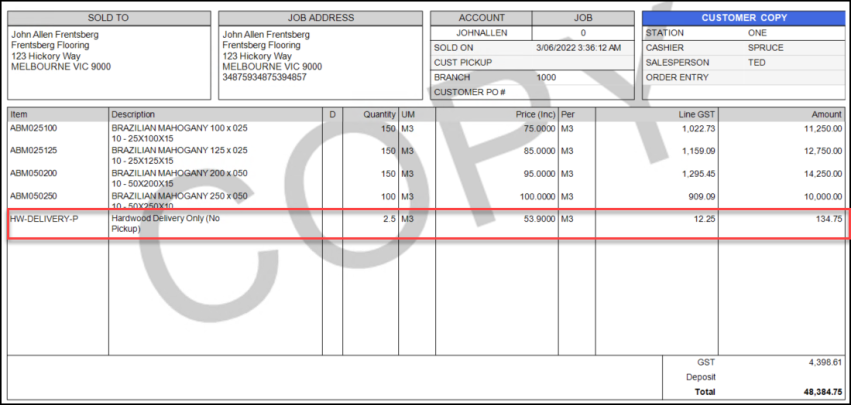
Invoice with Delivery Charge Highlighted
Notes about Aggregator SKUs Created using Aggregator Maintenance
Here are some rules about using aggregator SKUs that may not be obvious:
-
After you create an aggregator SKU and use it in a transaction, you cannot delete it or merge it.
After you use an aggregator SKU in a transaction, deleting or merging this SKU would make it difficult to track the pricing in the future. We recommend that you create new SKUs and use those instead if you decide to change the nature of a SKU. -
When you rename an item, the application updates that item name in the aggregator SKU. When you review deliveries that have the old item name/ID, the application displays the new name/ID instead.
-
When you rename an aggregator SKU, the application maintains the list of items associated with that SKU and updates the SKU in the records of previous transactions.
-
You cannot use aggregator SKUs in Manufacturing and Purchasing at this time.
Understanding the Aggregator Type and Method
Aggregator SKUs use a Type to quantify the delivery size and a Method to specify how to handle the charges for the load back and forth. There can be several similar Aggregator SKUs that represent the same items but for different delivery conditions.
Aggregator SKUs allow your business to group items you need to deliver/pick up by Type based on their physical characteristics using:
-
Total Quantity for any items whose delivery charges would be determined as a piece/box/each.
-
Total Lineal (Length) for any items whose delivery charges would be determined by their length.
-
Total Area for any items whose delivery charges would be determined by their area.
-
Total Volume for any items whose delivery charges would be determined by their volume.
-
Total Weight for any items whose delivery charges would be determined by their weight.
Aggregator SKUs use the Method to specify whether/how to account for the delivery/pickup of the transported items by:
-
Positive Quantity > Use this method when you are delivering items only or you do not intend to charge for pick up (negative quantities).
-
Negative Quantity > Use this method when you are picking up items only or you do not intend to charge for delivery (positive quantities).
-
Absolute Quantity > Use this method when you are charging for item delivery and pick up.
-
Net Quantity > Use this method when you are charging for item delivery and crediting the account for pick ups.
Your inventory is assigned to aggregator SKUs so their quantities are included in the deliver charge calculation. So, after you add the items to the data grid, and add the aggregator SKU(s) for those items, the application can calculate a default delivery charge. You can adjust this amount in the Point of Sale when necessary.
Setting Up the Aggregator
You can use the Aggregator feature to quantify your inventory for many different purposes. In this section, we cover how to use it to set up delivery charges only.
To use the Aggregator to calculate delivery charges, you create Aggregator Types that combine the way inventory is quantified with the method your business uses to charge for delivery and pickup. By adding your inventory to these aggregator types, you create Aggregator SKUs that define the multipliers the application will use in Point of Sale transactions to calculate the delivery charges for the materials your customers are purchasing. This section describes how to use the Aggregator to create those Types and SKUs.
The Aggregator setup requires additional security. To specify the user(s) who will create and support this feature, follow the instructions in Granting User Permission for Creating Aggregator Records. Then, these are the Aggregator tasks:
-
Create the aggregator types for each branch that combine the type and method settings, the item measures, and the delivery prices for the materials you need to transport. See Creating the Aggregator Type.
-
To keep track of the inventory and delivery accounting, create a new Group/Section type and add the appropriate GL mapping for the delivery/cartage amounts and asset values. See Setting the GL Mapping for the Delivery Group/Section.
-
Use the Aggregator Maintenance Utility to tie the aggregator types to specific inventory items. See Adding Inventory to the Aggregator Type.
-
Educate the Point of Sale team on the use and rules associated with delivery charges (cartage) and show them how to add the appropriate aggregator SKUs to the data grid. See Using the Aggregator SKU to Calculate Delivery (Cartage) Charges for these instructions.
Warning: In the Point of Sale data grid, if you set the Aggregator's quantity to LF (linear feet), but the multipliers on the products associated with the Aggregator are based on MLF (thousand linear feet), the application does not correct for that. The application will calculate the quantity based on MLF, not LF, and the wrong unit of measure will display. There is no fixed or direct relationship between the Aggregator's units of measure and the linked items; it's just a multiplier associated with the base unit of measure on the linked items only.
To learn more about how the application uses the Aggregator in Point of Sale, see Adding Delivery/Cartage Fees to Point of Sale Transactions.
Granting User Permission for Creating Aggregator Records
Users must have specific permissions for creating and modifying Aggregator records. You must complete the steps below to see the Aggregator Maintenance option in the Inventory > Utilities list.
To update a user’s permission to create and manage Aggregator records:
1. From the Main Menu, choose Maintenance > Database > User IDs. The User ID Maintenance form displays.
2. In the User ID list, choose the User ID of the person or group you want to grant the Aggregator creation/management rights to.
3. In the Security Options tab, choose the Settings ![]() icon next to the Permissions List option. The Permissions List Code Maintenance pop up box displays.
icon next to the Permissions List option. The Permissions List Code Maintenance pop up box displays.
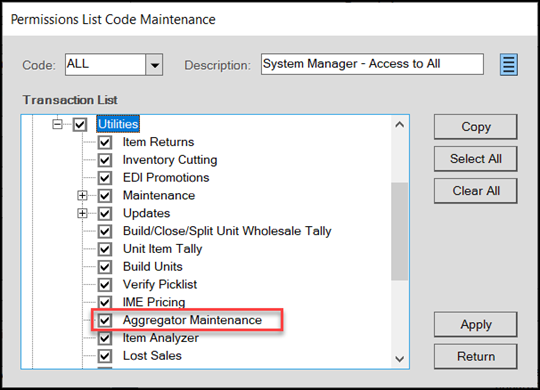
Permissions List Code Maintenance (Aggregator Maintenance Checked)
4. Navigate to Inventory > Utilities > and choose the Aggregator Maintenance check box and choose Apply. The database updates.
5. Choose Return to return to the User ID Maintenance form.
6. Choose Process (F12) to save this change.
Understanding Aggregator Types
You can create Aggregator Types in the Item Maintenance form to quantify the inventory you need to deliver and establish pricing for these deliveries and pickups. Aggregator types are a combination of aggregator item types, which define the how the items are measured (by length, area, volume, weight, or by piece) and aggregator methods, which define how your business charges for the transportation of those items. You create as many aggregator types as you need to cover the inventory you need to deliver.
Aggregator item types, such as Lumber, Sheet Goods, and Hardwoods, for example, have different units of measure, which you quantify by length, area, volume, weight, or by piece in inventory. Consider how you quantify delivery charges for these materials and choose one of these aggregator item Types. If you charge for delivery based on the items’:
-
Number, choose Total Quantity. The Aggregator will use the number of items purchased as the multiplier.
-
Length, choose Total Lineal. The Aggregator will use the items’ length as the multiplier.
-
Area, choose Total Area. The Aggregator will use the items’ length x width calculation as the multiplier.
-
Volume, choose Total Volume. The Aggregator will use the items’ length x width x depth calculation as the multiplier.
-
Weight, choose Total Weight. The Aggregator will use the items’ weight as the multiplier.
The multiplier times the number of each item the customer purchases, gives you a way to quantify the amount of material you are transporting. Each aggregator type should be associated with a base unit of measure so the quantity calculation is consistent.
After you choose how to quantify your items, you pair this with the Method of delivery so, at Point of Sale, you can choose the delivery calculation method that is appropriate for the circumstances. If you:
-
Charge for items’ delivery only, choose Positive Quantity
-
Charge for items’ pick up only, choose Negative Quantity
-
Charge for items’ delivery and for pick up, choose Absolute Quantity
-
Charge for items’ delivery and credit for items’ pick up, choose Net Quantity
Keep track of these two pieces of information, as you will need them in step 7 in the instructions below. You only need to create aggregator types for your chosen delivery methods and materials.
Creating Aggregator Types
When you create an aggregator type, it remains in inventory for any transaction you need to process. Though aggregator types are saved globally, these types are specific to a branch based on the branch’s tax settings. They form the basis for the Aggregator SKU, which pairs the type with the actual inventory covered by the SKU.
If you are using this feature for delivery, and you have a charges group already, we recommend that you create a new section for Delivery Charges (Cartage) to track the income/payments associated with this service. A new section can help you manage and track this income and inventory assets (sold and returned) separately.
Note: There are many different ways you can use Aggregators. Depending on how you use this Aggregator, you will want to map this appropriately to your general ledger accounts.
To create an aggregator type:
1. From the Main Menu, choose Inventory > Database > Item to display the Item Maintenance form.
2. In the Item field, type the name of the Aggregator item and press Enter.
This will be used at Point of Sale to identify the items and type of delivery that is occurring, so consider that when you choose a name.
3. In the Description field, enter a description for this aggregator type:
-
You may want to enter the type of material used for this type
-
You might want to include the Type and Method values
Item Maintenance Form with Aggregator Item Name, Description, and Group/Section
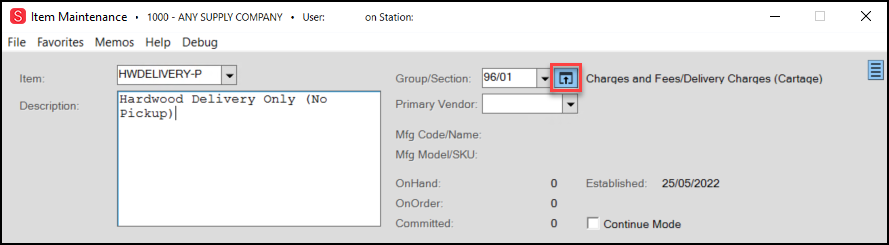
4. Beside the Group/Section field, choose the Settings ![]() icon to display the Group/Section Maintenance box.
icon to display the Group/Section Maintenance box.
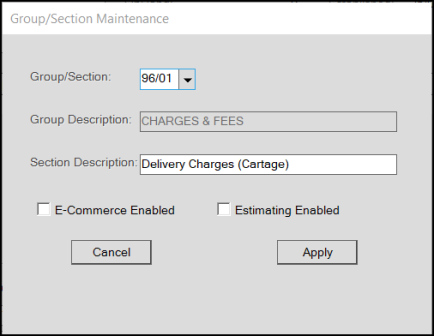
Group/Section Maintenance with Entries
You only need to create this Group/Section entry the first time you use these instructions. Next time, you can just select the defined delivery charges entry.
5. In the Group/Section Maintenance box, add a new entry for Delivery Charges (Cartage) and leave the E-Commerce Enabled and Estimating Enabled check boxes unselected. Then, choose Apply. The Item Maintenance form redisplays.
6. In the Common > Measures tab, select Aggregator from the Item Type list. A new Aggregator section displays.
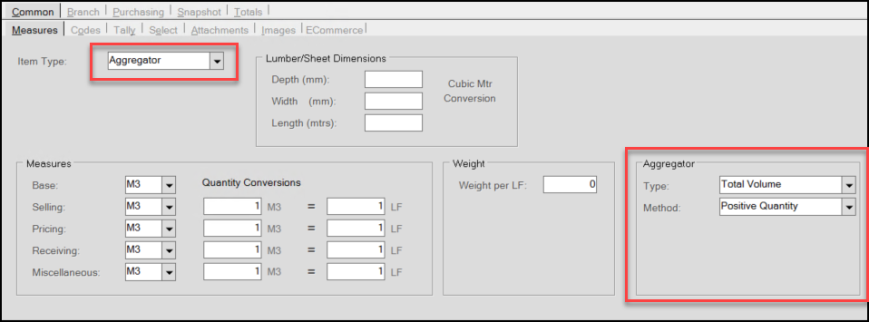
Item Maintenance with Aggregator Type and Method Displaying
7. In the Aggregator box, select the appropriate Type and Method for this aggregator type.
Type options. To measure the delivery of these items by:
-
Number of Items, choose Total Quantity.
-
Length, choose Total Lineal.
-
Area, choose Total Area.
-
Volume, choose Total Volume.
-
Weight, choose Total Weight.
Method options. If you want to:
-
Charge for delivery of these items only, choose Positive Quantity
-
Charge for pickup of these items only, choose Negative Quantity
-
Charge for delivery and for pickup of these items, choose Absolute Quantity
-
Charge for delivery of these items and credit for pickup of these items, choose Net Quantity
8. In the Measures section, enter the measurements you want to associate with this aggregator type. This measurement should be the type associated with the type of items you want to deliver.
9. When you have completed these entries, choose the Codes tab.
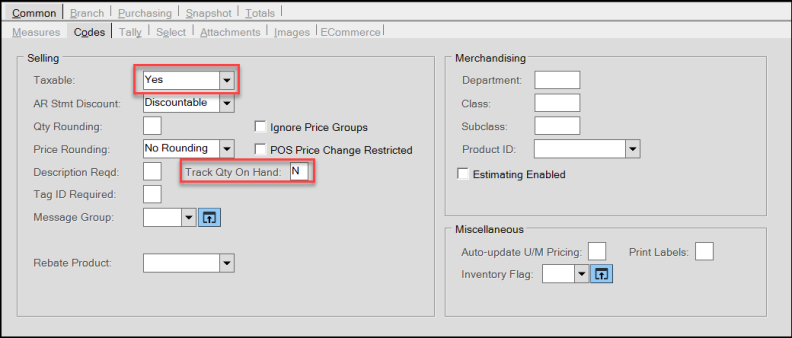
Item Maintenance > Common > Codes Tab with Settings
The settings in this tab may be different, depending upon your region.
10. Select the appropriate tax options for this aggregator type and enter N in the Track Qty On Hand field. Sometimes, the taxable setting is branch-specific.
11. Next, choose the Branch tab and a new Branch Codes tab displays.
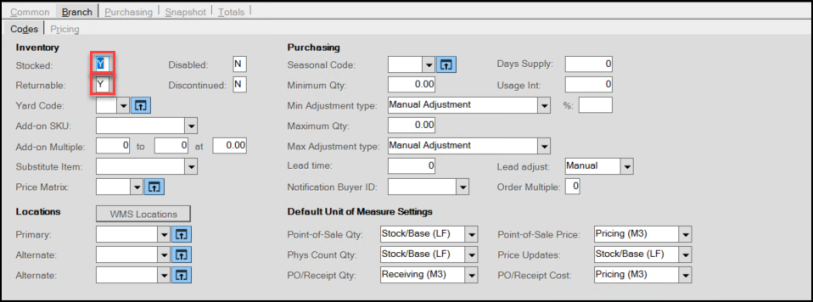
Item Maintenance > Branch > Codes Tab with Settings
12. Make sure that the Stocked and Returnable fields contain a Y. You can leave the quantity amounts untouched.
13. Choose the Branch > Pricing tab.
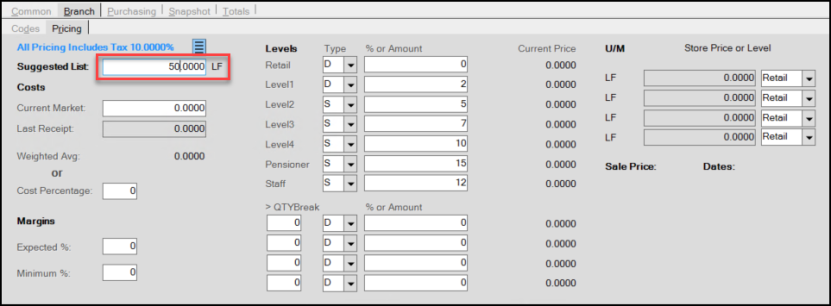
Item Maintenance Form with Branch > Pricing Tab
14. In the Suggested List field, consider what you normally charge for delivering these items and enter that amount in this field. You may want to consider labor costs for this type of delivery.
15. When these entries and selections are complete, choose Process (F12). The Warnings Popup displays.
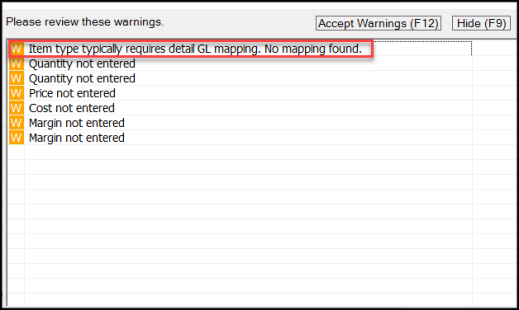
Item Maintenance > Warning Messages
Most of the warnings in this list are not needed for the Aggregator, but take note of the first entry:
-
Item type typically requires detail GL mapping. No mapping found.
This entry reminds you to set up the GL mapping for the new Group/Section entry. See Setting the GL Mapping for the Aggregator Group/Section for these instructions.
16. Select Accept Warnings. The Branch List displays.
17. Choose the branch(es) for this aggregator type and select Accept.
18. Repeat this process to create any additional aggregator items for different delivery methods and for any additional branches that have deliveries.
You won’t have to create the Group/Section entry again, you just need to select it from the list.
Setting the GL Mapping for the Delivery Group/Section
It makes sense to create detailed GL maps for the new group/section record for each type of Inventory Mapping type that applies to these delivery and asset transactions.
Note: Typically, users map non-inventory items to non-inventory accounts such as income or expense accounts (or both) and sometimes liabilities (gift cards, deposits), etc. If you don’t set the appropriate GL mapping, the aggregator type might appear as inventory in the general ledger but not show up on inventory subledger reports. This could cause discrepancies when assessing sales and performing inventory GL reconciliations.
To assign the GL mappings for the new Aggregator Group/Section:
1. From the Main Menu, choose General Ledger > Database > Detail Mapping to display the Detail Mapping Setup form.
2. In the Mapping Type list, choose the first mapping type you want to add.
3. In the Mapping ID list, choose the Group/Section entry combination you added in the first Aggregator Item Maintenance form.
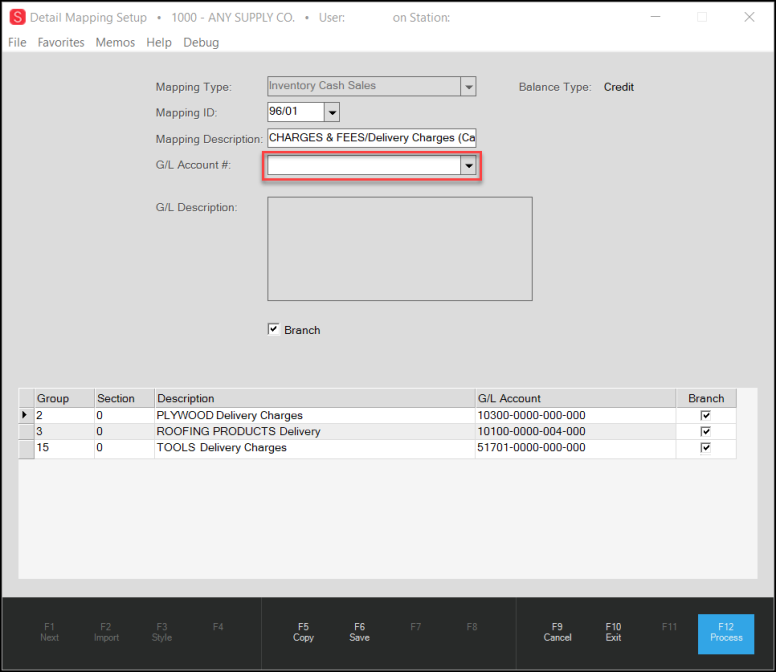
Detailed Mapping Setup Form with Entries
4. In the GL Account # field, select the appropriate GL account number for this aggregator item.
5. Check the Branch check box if the mapping of this entry is department (branch)-specific for your business.
6. Choose Save (F6) to save the Group/Section record to the data grid.
7. Choose Process (F12) to process the GL mapping type for the Group/Section.
8. Repeat steps 2 – 7 to add other Group/Section GL mapping types that apply to the aggregator SKUs for your business:
-
Inventory Cash Returns
-
Inventory Charge Sales
-
Inventory Charge Returns
-
Inventory Exempt Cash Sales
-
Inventory Exempt Cash Returns
-
Inventory Exempt Charge Sales
-
Inventory Exempt Charge Returns
-
Inventory Issues
-
Inventory Cost
Assigning Inventory to Create Aggregator SKUs
By associating your inventory with one or more aggregator types, the application can use the item’s default unit of measure to calculate the delivery cost (or other Aggregator uses). The Aggregator Maintenance Utility helps you create this link between the aggregator types and your inventory. When you add inventory to the aggregator item, the application uses the default unit of measure you choose to create a multiplier for each item. In the Point of Sale data grid, these multipliers, times the quantity of units to be delivered, determine the delivery price.
Aggregator Maintenance Form with Entries
Keep in mind that you set the default units of measure for lumber/timber (volume), sheet goods (area), and lineal (length-based) goods in the Code Definitions table (Inventory > Database > Code Definitions); these entries vary based on whether you use a metric or imperial system of measurement.
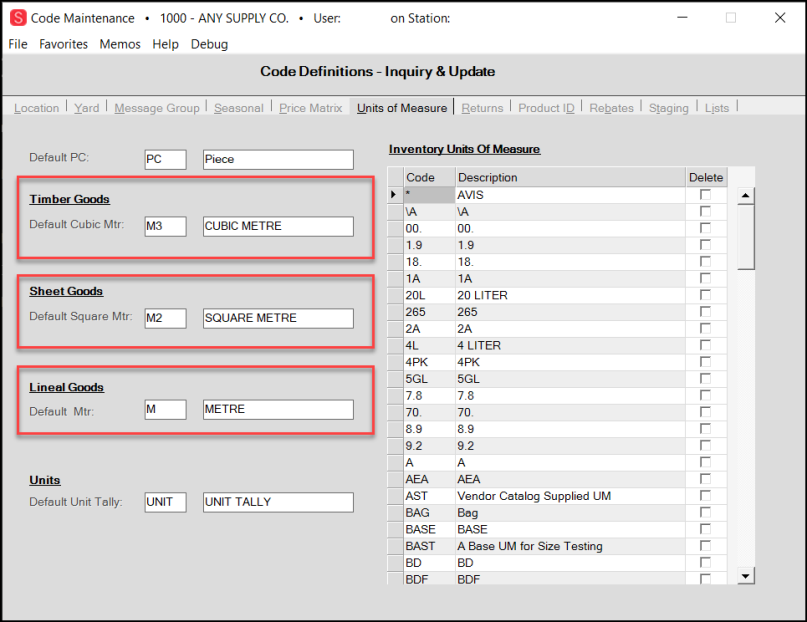
Code Maintenance Form with Lineal, Sheet Goods, and Timber/Lumber Goods Default Settings
So how are the item’s multipliers determined?
In general, the multiplier is determined by the base unit(s) of measure of the item, as follows:
-
Number of Items: For items that are sold by the piece, each, or box, the multiplier is always 1.
-
Lineal/Length: Typically, Lumber, Timber, or Hardwood Items
For lineal (length)-based aggregator types, the length value defined in the Item Maintenance form determines the multiplier. In the next figure, the length is 8, which would be the default multiplier for this item.
Note: If you add this item to the data grid, but the unit of measure is thousand board feet/meter instead, the application uses the quantity conversion listed (5.333) x the default length (8) and the multiplier would be 42.664.
Lineal/Length Measures in Item Maintenance Form
-
Area: Typically Sheet Goods
For area-based aggregator types, the items’ length x the width values in the Item Maintenance form determine the multiplier. In the next figure, the length is 8 x the width, 4, so the default multiplier for this item would be 32.
Note: If this item is added to the data grid with a square foot or thousand square foot measurement, the calculation becomes length x width (32) times the multiplier, which in this case is also 32 to equal a multiplier of 1024.
Area Measures in Item Maintenance Form
-
Volume: Typically, Lumber, Timber, Hardwood, Liquids
For volume-based aggregator types, the length x the width x depth values in the Item Maintenance form determine the multiplier. In the next figure, the length is 8 x the width, 4 x the depth, which is 2, so the default multiplier for this item would be 128.
Note: If this item is added to the data grid with a unit of measure other than the base unit of measure, the calculation becomes length x width x height (128) times the quantity conversion, which is 5.333 to equal a multiplier of 682.624.
-
Weight:
For weight-based aggregator types, the weight value is the multiplier. In the next figure, the weight is 11.5 per gallon, so the default multiplier for this item would be 11.5.
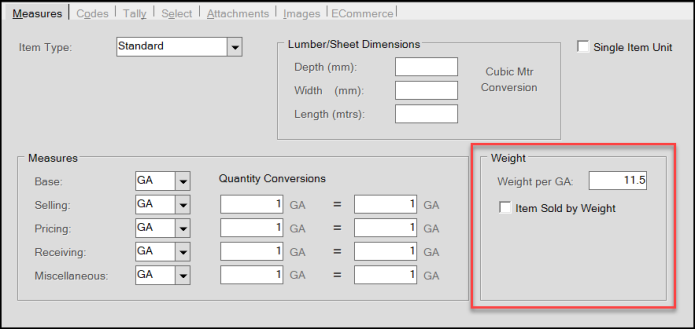
Weight Measurement in Item Maintenance Form
IMPORTANT: For any item where the default unit of measure cannot be reconciled with the aggregator type’s unit of measure, the multiplier is 0. You either have to assign these multipliers manually, or remove them from the aggregator type list.
Items to Add to Aggregator Types
The aggregator types are designed for these types of items:
-
Standard Items, Lumber/Timber, Sheet Goods, Clothing, Rental Charges, Hardwoods, Food, Resale Items, Renumbered Items, Manufactured Items, and Variable Weight Items
-
Tally types included:
Lineal Tally Items
Lot-Location Tally Items
Sheet Metal Tally Items
Random Length Tally Items
Unit of Measure Tally Items
Unit Tally Items (Single Item Units only)
A Note About Non-Stocked Items
If you sell and need to deliver items that are non-stock, you want to include them in the aggregator SKU so you can charge for their delivery. Often when you add these items, the Item ID changes (to reflect the non-stocked status). When that occurs, the aggregator SKU keeps track of these renamed item types to preserve the Aggregator linkage for the renumbered/renamed item.
Items You Cannot Add to Aggregator Types
The aggregator type may not be appropriate for all items in your inventory. You cannot add the following items to an aggregator type:
-
Labor, Freight, Deposit, Gift Cards, Rewards Coupons, Repeat Rewards Types, Stored Value Cards, Comments, Credit SKUs, and ACE Types
-
Tally types excluded:
Fixed Tally Item (Parent SKUs)
Pull to Length Tally Items (Parent SKUs)
Adding Inventory to the Aggregator Type
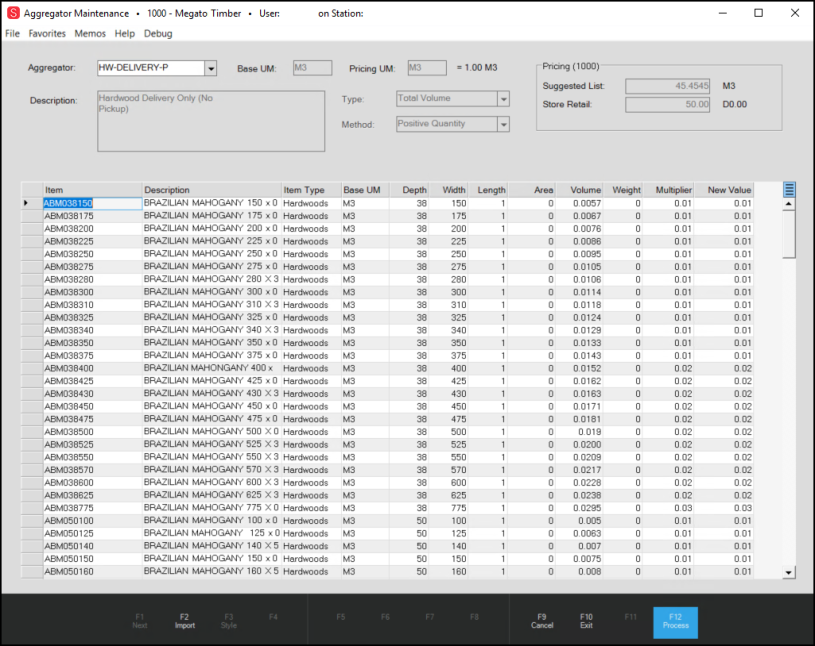
Now that you have created the aggregator items, it’s time to populate these records with inventory and generate the aggregator multipliers.
To add inventory to the aggregator item:
1. From the Main Menu, choose Inventory > Utilities > Aggregator Maintenance. The Aggregator Maintenance form displays.
2. In the Aggregator list, choose the aggregator type you want to add items to and press Enter. The Aggregator Maintenance fields update with the information added earlier.
![]()
Aggregator Maintenance Form with Aggregator Type Loaded
You can add items manually, but it probably more efficient to use the import feature.
3. Choose Import (F2) and from the local menu, choose Inventory to display the Inventory Copy box. Choose the criteria for importing the items that match the selected aggregator type.
Note: You can also import from a document by selecting the Import Wizard option, see Using the Template Feature to Add Inventory to the Aggregator Type.
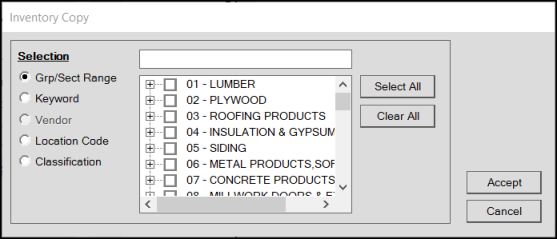
Inventory Copy Box
4. Consider the Inventory Item Type measurement value (piece, weight, area, etc.) and select the check box beside the inventory that applies to that type in the list.
5. Choose Accept to import the items you selected. The data grid fills up with the inventory items you imported. When you import more than 1000 items, a confirmation message displays. Choose Yes to continue.
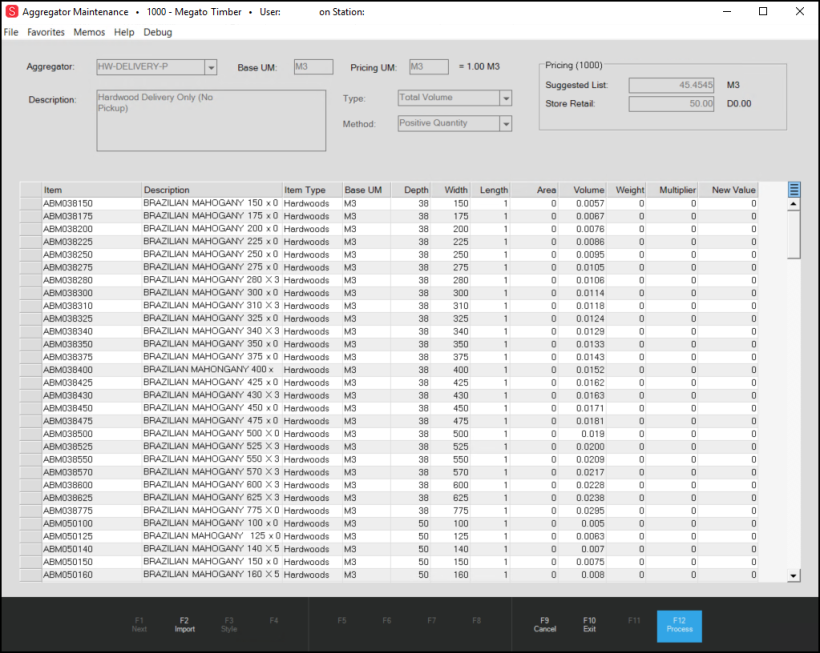
Aggregator Maintenance Form with Entries
A message may display after the import is complete to display the number of items (usually duplicates) that were ignored and not imported, if any. Choose OK to clear this message.
After the import is complete, you cannot change the Item identifier in the first column of the data grid. You can delete an item and re-enter it if you need to. The application does not import any disabled items from inventory, nor does it allow you to enter them. If you decide to disable an item, you should delete it from the Aggregator first, to avoid errors.
6. Review the items in the data grid and add or remove items that do not fit the Aggregator SKU criteria:
-
To organize the list, right-click the row header and click Sort to sort by that type. It might be useful to sort by Base UM so you can ensure these item entries match the default for the aggregator item.
-
Delete any items that you want to measure a different way by highlighting the record and pressing the Delete key on your computer.
-
Repeat steps 4 and 5 (or use the Import Wizard) to add any new items that belong in the list.
-
Press <Ctrl Insert> to add a blank line to the data grid and enter an item manually.
After you have finalized the list of items you want to associate with this aggregator type, you are ready to calculate the Multipliers.
Aggregator Maintenance > Menu Marker Options
7. When you are sure you have the list you want, you are ready to calculate the multipliers.
In the upper right corner of the data grid, choose the Menu Marker to display three options:
-
Calculate for Zero Values
Select this option to calculate the Multiplier for all items that have a zero value in the New Value field. The application takes into account the Aggregator Type (length, area, volume, weight, quantity) when making this calculation. -
Clear All Values (Zero)
Select this option when you need to reset the Multiplier for all items in the list to zero. -
Reset to Saved Values
Select this option to reset the New Value entry to the value in the Multiplier column.
8. Select the Calculate for Zero Values option to generate the New Value for each item in the data grid. The application calculates the New Value based on the following:
-
If the Type = Total Quantity, the New Value = 1.
-
If the Type = Total Length (Lineal), the New Value = item’s length.
-
If the Type = Total Area, the New Value = item’s length x width.
-
If the Type = Total Volume, the New Value = item’s length x width x depth.
-
If the Type = Total Weight, the New Value = item’s weight.
-
Note: The application multiplies the Weight values times the BASE quantity.
IMPORTANT: For the application to perform a calculation, all required values must be in Item Maintenance. An error message displays to explain the values needed for the calculation.
9. Review the New Value entries and replace any value if you decide you do not want to use a calculated value for an item. The value in the New Value field determines the Multiplier the application uses at Point of Sale. New Value entries cannot be 0.
10. After you have updated any remaining New Value fields with non-0 entries, choose Process (F12). The application updates the Multiplier column with your new values and closes the Aggregator Maintenance list.

Aggregator Maintenance Form with Updated Multipliers
If you attempt to save the aggregator SKU when the New Value column is 0 or a negative number, an error message displays and an icon displays next to the items that need to be corrected.
Aggregator Maintenance Form with Errors Highlighted
11. Update any entries with errors in the data grid and choose Process (F12) again to create the aggregator SKU.
12. Repeat steps 2 – 11 for each aggregator SKU you need to create to quantify delivery charges in Point of Sale.
The application does not lock down the units of measure, because you know your stock better than we do and you know what unit of measures work for your inventory. Please be aware that the units of measure on the aggregator SKU won't matter to the calculated quantity. At Point of Sale, the quantity you enter in the data grid affects the total that is calculated for the linked items. You can base the pricing using some different measurement if you prefer, for example, SF (square feet) but price is per MSF (thousand square feet) which may not work for you.
Using the Template Feature to Add Inventory to the Aggregator Type
You can also use the template function to import items into the Aggregator Maintenance Utility using the Import Wizard. The two pieces of information required for this import are the Item ID and the Multiplier value, but if you have data for the other fields in the Aggregator Maintenance form, you can import them as well. If you want to leave the Multiplier value blank, that is OK, you can update it when you return to the Aggregator Maintenance form.
To import a list of items into the Aggregator Maintenance form from a document or Windows file:
1. From the Main Menu, choose Inventory > Utilities > Aggregator Maintenance. The Aggregator Maintenance form displays.
2. In the Aggregator list, choose the aggregator type you want to add inventory to and press Enter. The Aggregator Maintenance fields update with the information added earlier.
3. Choose Import (F2) and from the local menu, select the Wizard option to display the Import Wizard box.
4. Choose the type of file you are importing, either by selecting a linked document or navigating to a Windows file on your computer. After you choose the document or the file, preview information displays.
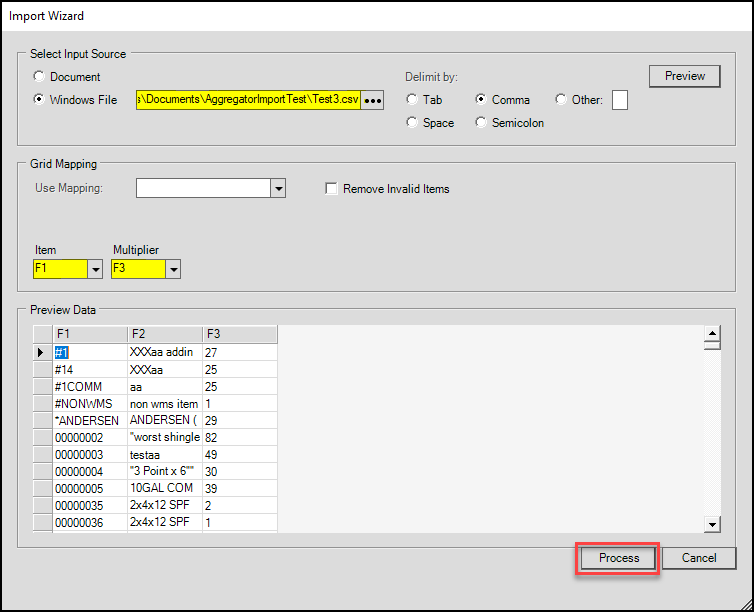
Import Wizard Box
5. If you have specific mapping associated with this document/file select the mapping from the Use Mapping list. If you do enter a mapping type, select the Remove Invalid Items check box. This step is not required.
6. In the Item list, choose the field that contains the Item ID value.
7. In the Multiplier list, choose the field that contains the Multiplier value, if any.
If you have not created the multiplier before, you can leave this field blank. When you import Item IDs without a Multiplier, the application adds a 0 in this field.
8. When you have completed these entries and selections, choose Process (F12).
If you import more than 1000 items, a pop up message displays asking you to confirm the import. Choose Yes to continue.
A new pop up message displays to report how many items have been ignored, if there were invalid or duplicate entries in the data grid. Choose OK to continue.
For each item you added, the application adds a new entry to the Aggregator Maintenance data grid. If you added a multiplier, it displays in the Multiplier field.
9. From here, continue the aggregator SKU creation process at step 6 of Adding Inventory to the Aggregator Type.
Note: If you add an item that is already associated with another Aggregator (but is not an Aggregator-type item itself), the application adds the new association based on the same settings as the template SKU. When you process the change, and the application creates the new aggregator links and a warning displays:
-
Template SKU has aggregator association. Please review.
If you cancel the new SKU entry, the application removes or rolls back new association. If you do not cancel the SKU entry, the application adds the aggregator SKU to all items associated with the template.