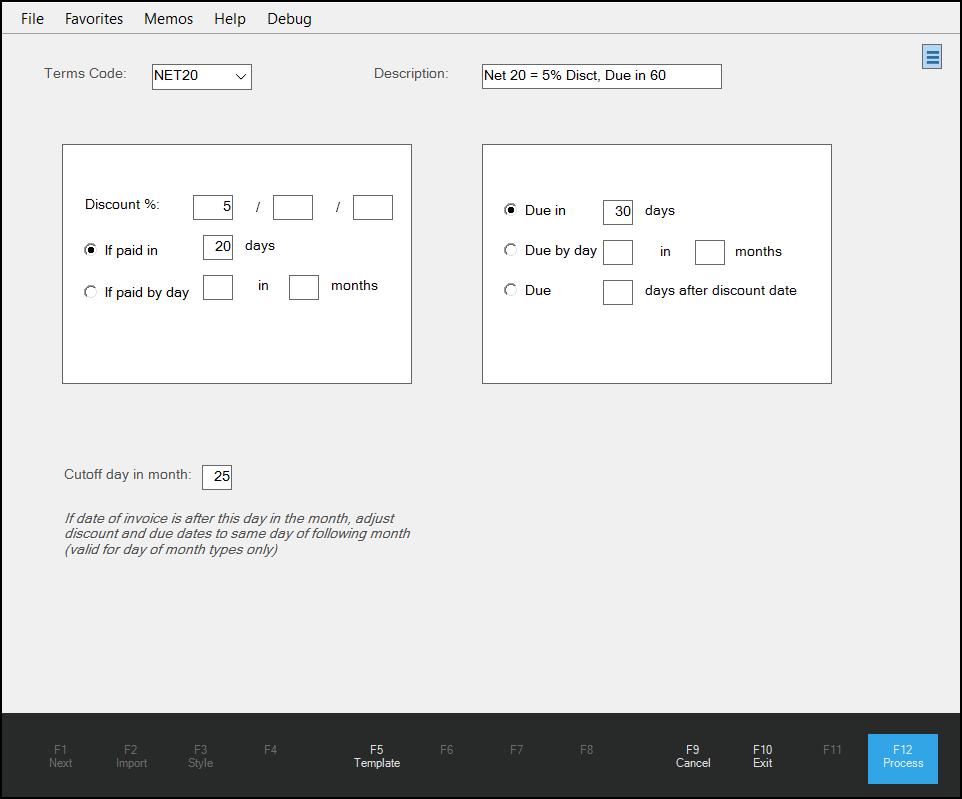
Terms Codes
You can use Terms Codes to calculate discount rates and payment due dates for
A Terms Code allows you to set the discount rate for an amount if it is paid either in a certain number of days or by a specific date in the month and set the due date for that amount by the number of days after the billing date, by a certain day in the month or by a certain number of days after the discount date expires. The discount amount is not necessarily required, if you are using this code to track payment schedules.
Adding a New Terms Code
You can add and edit terms codes from the Terms Code Maintenance form. There are two panels on the database form for setting the parameters.
-
The panel on the left specifies the discount percentage if paid in a particular number of days or if paid by a particular day in the month. Discounts are not required.
-
The panel on the right uses the transaction due date to determine when the terms code applies.
These panels work together to ensure the term code is applied on the time line you set.
Note: If you are applying a discount percentage to the term code, it will be useful to review the Understanding_the_Discount_Percentage_Fields_and_Calculations section before you get started.
To add a new terms code:
1. From the Main Menu, choose Payables, Receivables, or Purchasing > Database > Terms Codes. The Terms Code Maintenance form displays.
![]()
2. In the Terms Code list, enter a new code you will use to keep track of the term code settings you enter here. Then press Tab. You can enter an alpha-numeric code up to six-characters long.
3. In the Description field, enter a description that defines this term code in the application.
4. In the Discount % fields enter the discount percentages you want to apply to the amount you are discounting.
The first field represents the first discount percentage amount and is required if you are applying a discount to the specified amount.
Note: If you are not setting a discount percentage for the terms code, you can skip to step 6.
5. Next, choose the time limits of the discount based on one of these criteria. Choose:
-
If paid in if you want the application to apply the discount percentage(s) to the amount based on the number of days after the billing date. Then enter the number of days after the billing date you want the discount percentage to be limited by in the days field.
-
If paid by day if you want the application to apply the discount percentage(s) to the amount based on a particular day of the month. Then enter the day of the month you want to apply the payment (in the day field) and the number of months in the months field.
Note: To learn more about these settings, see Understanding_Discount_Date_Calculations.
6. To specify when this amount is due, (whether a discount is part of the calculation or not), choose from these options in the right panel: Choose:
-
Due in to specify the number of days that the amount is due from the billing date. Enter the number of days in the days field.
-
Due by day / in to specify the day of the month that the amount is due. Enter the day and the number of months after in the day and months fields.
-
Due to specify the number of days (in the field) the amount is due after the discount date has passed. This is for discount terms codes only.
7. Consider whether the Cutoff day in month field entry is applicable to your Term Code. If so, enter the Cutoff day in the field provided.
If you selected an If paid by day or Due by day setting, this entry gives you a way to reset the Paid/Due date of the Term Code based on your business's statement date. This only applies to Paid and Due calculations that include month settings.
Note: If the billing date is after the date in this field, the application adjusts the discount paid and due dates to the same day of the following month.
8. When you have completed these settings, choose Process (F12) to save the Terms Code to the database.
Understanding the Discount Percentage Fields and Calculations
You can add up to three levels of discount percentages in Terms Codes. The left-most Discount % field is the primary level and is taken first. The additional two percentage fields calculate the discount based on the remaining amount (after the previous discount(s) is/are applied).
For example, if you set three discounts of 2%, 1%, and 2%, on a $1,000 invoice, the application would calculate the discount this way:
2 % of $1000.00 = $20.000
1 % of $ 980.00 = $ 9.800
2 % of $ 970.20 = $19.404
========
Total Discount = $49.204
Net Discount % = 4.92% (49.204/1000)
It's important to understand that the application does not apply split-level discounts by adding them together. If you want a discount that applies to the whole amount, enter the total percentage in the first Discount % field instead.
Understanding Discount Date Calculations
The application calculates the discount dates based on the invoice's "billed date". The application can calculate the terms code discount date in one of two ways:
-
number of days from the billed date of the invoice or
-
the day of the month
When you enter a number of days, that number will be added to the billed date of the invoice to determine the discount date.
For example, if the If Paid in # Days is set to 10 and the invoice's billed date is 9/18/2026, the discount date will be set to 9/28/2026.
When you enter a day of the month instead, the discount date will be that day of the month you specify (in one month, two months, and so on, for example). If the If Paid by Date is 10 and in # Months is 2 and the invoice's billed date is 9/18/2026, the discount date will be 11/10/2026 (the 10th of the 2nd month). A zero in either of the month fields means the current month (same month as the invoice).
If you are applying a Terms Code to a Receivable, ("POS Invoice Terms"), the "Discount" date is also considered the "Due" date. Invoices are considered eligible for finance charges as soon as they pass their "Discount" date. Finance charges are assessed on the entire unpaid balance and are not prorated by the number of days past due.
Setting the Due Date Options
There are three options for setting Term Code's due dates. The first two match the date options discussed in the discounts section, which give you a way to specify either a specific number of days from the invoice's billed date or a specific day and month that the invoice will be due based on the billed date (the 30th day of the following month, for example). If you are applying this due date to a discount, there is a third choice that allows you to choose the due date as a set number of days after the discount date ends. So if your discount date is the 8th and the # of days after discount date is set to 20, the due date calculated will be the 28th.
Due date calculation only applies to terms used with
Deleting a Terms Code
Although deleting a terms code is possible, you should do this very rarely. You need to ensure that the terms code you are deleting is not currently in use. Since this code may already be part of transactions you have processed in the past, deleting this code may affect your understanding of how the payment was calculated or what discounts were applied. We recommend that you create a new Terms Code instead and use that to go forward. If not sure, we suggest that you don't delete a terms code that might be in use.
To delete a terms code, from the Terms Code list, choose the code you want to delete. Then, click the Menu Marker  icon and choose Delete Terms Code option. A confirmation prompt displays. Choose Yes to delete the selected Terms Code or No to leave it in place. There is no undo option; you must re-add a deleted Terms Code manually if it is removed unintentionally.