Process Document > Delivery Tab
The Delivery tab in the Process form gives you a way to work with your customer to schedule the delivery of the items in the transaction. You can use this tab to schedule the delivery date, time, and even choose to pay for the transaction on delivery.
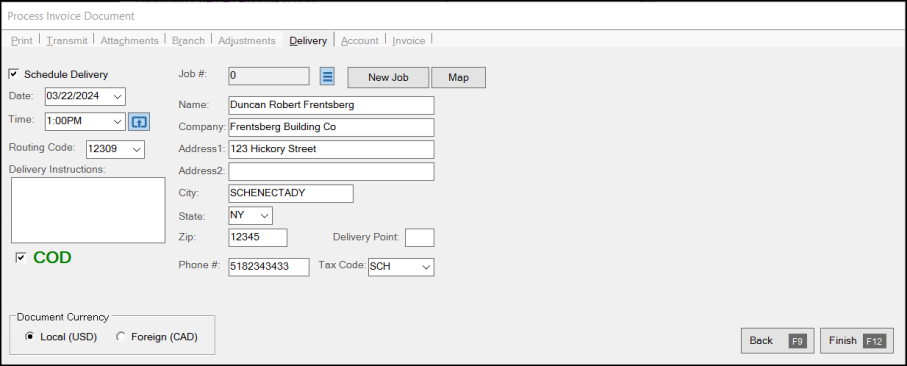
Sale Entry > Process Invoice Document > Delivery Tab
The appearance and function of the Delivery tab can vary based on the transaction type and depend upon the delivery feature being enabled in the parameters. This is listing of transactions that provide a Delivery (or pickup) tab:
| Transaction Type | Is Delivery Available? | Delivery Scheduling |
|---|---|---|
|
Sales |
Yes |
Allowed |
|
Orders |
Yes |
Allowed |
|
Quotes |
No |
N/A |
|
Open Tickets (Advice Notes) |
Yes |
Allowed |
|
Direct Ship |
Yes |
N/A (Allows a Delivery Date Only) |
|
Installed Sales |
No |
N/A (Linked Orders /Tickets may specify Delivery) |
|
Charge Returns |
Yes (named "Pickup") |
Allowed |
Fields and Settings in the Delivery Tab
In the Delivery tab, many of the fields are prefilled by the transaction record based on the customer's account settings. This includes the Job #, the Name and address/contact fields, and the tax code associated with the transaction. You can modify these fields if the customer wants to delivery the items to a different address. You can even change the tax code if making this kind of change alters the tax code that should be used. There are more details about these fields and their use in the Delivery Options and Features section below.
Schedule Delivery
Select this check box to begin the delivery scheduling process. When you select this check box the Date, Time, and Routing Code lists enable.
Date
Select the date the customer wants the delivery to occur.
Time
Select the delivery time from the schedule of existing delivery times available.
Note: If the materials being delivered require a specific truck type, click the Settings ![]() icon beside the Time list to display the Delivery Type list.
icon beside the Time list to display the Delivery Type list.
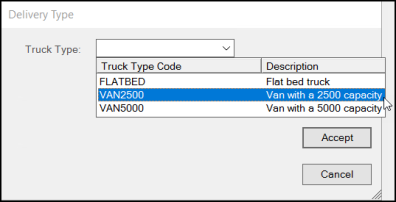
Choose the type of truck required from the list and choose Accept to save the selection.
Routing Code
From this list, choose the route that services this delivery address.
Delivery Instructions
Use this field to enter any instructions required for the driver or dispatcher that affect the delivery.
COD
Select this check box to specify that the payment is expected upon the delivery of the transaction items. This check box is specific to the Sale Entry process form. Select this option before you specify the payment type in the Invoice tab or delete the default payment type in the Invoice tab before you select this check box. When you select this check box, the application selects the Schedule Delivery check box automatically. You can also use the Payments transaction to enter a COD payment after you receive it (post delivery). For more information on COD transactions, ![]() click here.
click here.
Job # Menu Marker 
The Job # field indicates the job associated with the transaction. When an account has more than the required "master" job zero (0), you may need to select the job associated with the transaction in this tab. The selected (current) job number is listed above the address information (on the right-side of the Delivery tab). Typically, the delivery address defaults to the account's address, but if you need the items to be delivered to the job-specific address, choose the Job # Menu Marker to display the Reset to Job Address option. When you select this option, the application updates the address fields to reflect the address associated with the Job number. You may have to have specific user permissions to make this change.
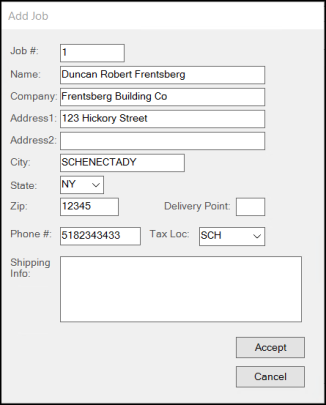
New Job Button
If the materials the account ordered are for a new job, choose this button to display the Add Job Box. The entries in this box default to the account address and the Job # increments to the next available job ID for this account. Type over these entries to enter the new name, company, and address information in the fields provided. Enter any relevant Shipping information in the Shipping Info field. When you have completed your entries and selections, choose Accept. To revert to the previous job entry, choose Cancel.
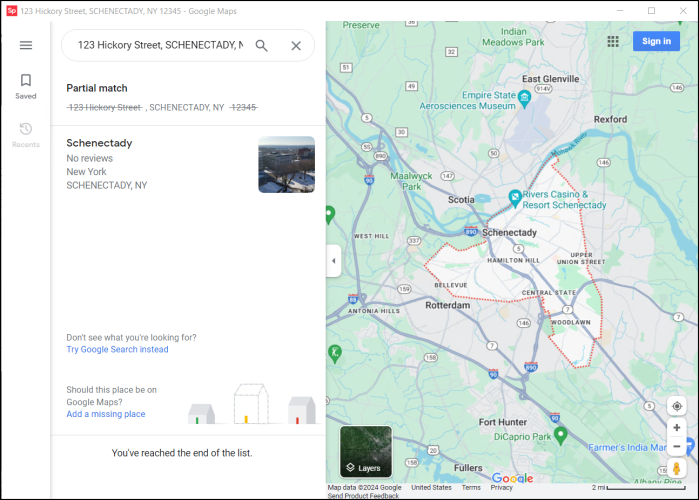
Map Button
Choose this button to see a map that includes the delivery location, if valid. If the address provided is not found, the address appears crossed out.
Delivery Options By Transaction Type
Depending upon the transaction type (Sales, Orders, etc.), the way you specify delivery can vary.
For the Sale Entry transaction, the Delivery tab provides a way to schedule a delivery (as described in the previous section). The COD payment option is not provided elsewhere.
For the Order Entry transaction, there are three Delivery tab options: Customer Pickup, To be Delivered, and Schedule Delivery.

Order Entry > Process Order Document > Delivery Tab
Customer Pickup
This is the default selection for orders and means that no delivery is indicated for the customer's order. The expectation is that the customer will pick up their order from your location in this case.
To be Delivered
Select the To be Delivered option if the order will be delivered in the future, but isn't ready to be scheduled yet. Choosing this option can automatically set a default delivery date in certain cases.
Schedule Delivery
Select this option to schedule a delivery of the ordered items for the customer's indicated job or other specified shipping address. If your company isn't using either the Spruce Delivery feature or the DQ Technologies delivery feature, the application saves the date and other delivery information with the order and prints it on documents. If you are using the Spruce Delivery feature, the order will automatically be added to the Delivery queue table as a "scheduled" delivery. You may have the option, depending upon how your company uses the feature, to reserve a specific type of delivery vehicle and time of day for the delivery as well. See the Delivery Options and Features section below for additional information.
Delivery Options and Features
In Spruce, there are three delivery feature options:
1. DQ Technologies Delivery
2. Spruce Delivery-Dispatch
3. No Delivery
ECI Support personnel must enable both (either) the Delivery-Dispatch module or DQ Technologies Delivery features before you can use them.
-
DQ Technologies is a third-party delivery management software solutions provider and is neither owned nor operated by ECI. You need to purchase DQ Technologies software separately and this integration is billed separately as an add-on to the software.
-
The Delivery-Dispatch feature is free, but is only enabled upon request and requires additional setup by your company before you can use it.
-
When you do not enable either of these features, you still have delivery options for your transactions. You can still indicate delivery on a transaction that would normally support delivery; however, there isn't any additional software management or processing involved. The application still prints and retains the delivery information with Point of Sale documents, even when no delivery feature is enabled.
The controls available for Delivery change depending upon whether you choose Spruce Delivery-Dispatch, or DQ Technologies Order Tracking, or you have no delivery features enabled at all.

|

|

|
| No Delivery Enabled Options in Delivery Tab |
Delivery-Dispatch Options in Delivery Tab | DQ Technologies Options in Delivery Tab |
|---|
Date
The date control is provided regardless of any selected delivery feature (including None). The date does not default to any date value, so the user must select a date if delivery is indicated. For more information about date selection, click here.
|

Time
The time control only displays when at least one delivery feature is enabled (either

As mentioned, the delivery time values when using Spruce Delivery are defined by your company using the Time Intervals Maintenance form available from the Delivery area's Database menu. They might be actual times of day or more general values such as AM/PM, for example.
When Spruce Delivery is enabled, an additional Settings![]() icon displays next to the Time list, so you can select a truck and reserve it for the time period selected. Trucks (Lorrys) are defined in the Trucks Maintenance form available from the Delivery area's Database menu. The number of reserve slots per truck type and time period can be set in the Slot Reserves Maintenance form available from the Delivery area's Database menu.
icon displays next to the Time list, so you can select a truck and reserve it for the time period selected. Trucks (Lorrys) are defined in the Trucks Maintenance form available from the Delivery area's Database menu. The number of reserve slots per truck type and time period can be set in the Slot Reserves Maintenance form available from the Delivery area's Database menu.
Click the Settings![]() icon to open the Delivery Type form. Use this form to reserve a delivery slot on a specific truck on a specific date. Choosing a truck type that has reserve slots defined will provide the "reserve on" control for selecting the reservation date; otherwise, if no reserve slots are associated with the truck, the control is not shown.
icon to open the Delivery Type form. Use this form to reserve a delivery slot on a specific truck on a specific date. Choosing a truck type that has reserve slots defined will provide the "reserve on" control for selecting the reservation date; otherwise, if no reserve slots are associated with the truck, the control is not shown.

If all the available slots for the selected truck (lorry), time interval, and date have been reserved, users will no longer be able to reserve additional slots and will have to choose a different truck (lorry) and/or date. The calendar indicated unavailable dates in gray text and will not allow selection if this is the case.
Routing Code
The routing code control is provided regardless of any delivery feature. Routing codes are defined from the Route Codes Maintenance form located on the Database menu found in the Delivery area. Routing codes are typically provided as a way to indicate a general delivery area defined by your company. Routing Code is not provided in transactions where delivery processing by your company is not applicable such as Direct Ship transactions.
Delivery Instructions
This text area provides a place to optionally enter additional information about the delivery. If any text is entered, it will be saved with the transaction (document) and printed in the area immediately below the "ship to" address box on certain document styles. Delivery instructions can be saved with a job (adding delivery instructions at time of processing does not save those instructions for the job, however). If a job has default "shipping info," the those instructions will automatically be populated in the Delivery Instructions text-area on the Process (F12) form. Instructions from the job can be modified by the Point of Sale user prior to processing.
Once a transaction designated for the Delivery is processed, the transaction is added to the delivery queue (table).
Job
All jobs are numbered and when an account has more than the required "master" job zero (0), job selection is often required. The selected (current) job number is listed above the address information (found right-hand side of the Delivery tab). A menu marker icon ![]() , next to the job number, provides a context menu offering a "Reset to Job Address" option. This can be used to undo any changes made to the delivery address (below) reverting the address back to the job's default address. This may be necessary when changing jobs after the Process (F12) form has been displayed.
, next to the job number, provides a context menu offering a "Reset to Job Address" option. This can be used to undo any changes made to the delivery address (below) reverting the address back to the job's default address. This may be necessary when changing jobs after the Process (F12) form has been displayed.
New jobs can be added to any non-system account using the ![]() Add Job button.
Add Job button.

When using a "system" account, such as CASH, new cash-only accounts can be added via the ![]() Add Account button.
Add Account button.

")

Map
You can use the Map button on the Delivery tab of some process forms to check the validity of a delivery address using your web browser. The current delivery address values are used to create a query request string and open your default browser. Internet access is required. Your company's network and firewall settings may block access to certain web sites and services. The application does not provide Mapping services, so we cannot guarantee availability, accuracy, suitability for use, or any other aspect of mapping services provided by other parties.
Typically, when a map query is successful, the web service shows the location with additional details regarding the address. If the web service cannot locate the address specifically, typically it provides a map centered on the nearest known location (which might be a street, town, city, etc.). You can choose whether the address is valid. Some job sites, particularly new housing, may not yet exist on public map services.
Address Fields
The format of the Address fields is determined by your application parameters and your system's region and language settings. The Address fields are different if you are located in the United States, Canada, Australia, or the United Kingdom. The application uses the same address control in a wide range of transactions and forms; however, each area may use the address differently. Branches, accounts, contacts, jobs, and vendors all have associated address data.
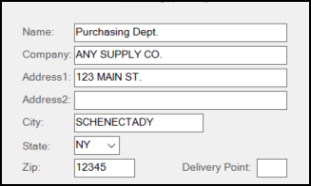
Name
This is the name of the person associated with the address and is typically the first (top) line when an address is printed or displayed. This part of the address can be up to 50-characters long.
In some cases, the Name field performs additional functions that might not be obvious. For example, when you are adding a new account, the Name becomes the default for the Sort Name field and the name of the primary contact for the account. You can modify this entry in a context form so it is different from the default address "Name;" however, any changes you make to the Name field entry or to the name associated with contact zero, automatically update to keep both fields the same.
Company
This is the company name associated with the address (if any). If supplied, the company prints/displays below the Name entry and above the Address 1 and 2 lines. This part of the address can be up to 30-characters long.
|
Note: If the Company and Name entries for an address match exactly, the text value is only printed once on documents to avoid unnecessary repetition. |
Address Line 1 and Address Line 2
These are the local/street address lines for business. Both are optional. Usually, when the application displays the address or prints it on a document, these address lines only show when they are filled from the account or branch settings. This is done to avoid unnecessary blank spacing between address lines. These lines can be up to 30-characters long.
City
This field is reserved for the "city" (city, town, village, etc.) part of the address and can be up to 30-characters long.
State or Province (Code)
This field length varies based on your regional setting in Parameters (United States, UK, Australia, or Canada). When shown, it is a postal abbreviation used for the state, province, or territory where the address is located. Depending upon your settings, entering a zip/postal code (in the Zip or Postal Code field) can result in this field automatically updating to match the database settings. Listings of state and province codes also include territories. This part of the address can be up to two- or three-characters long. In some cases, the printed address will only show the state/province if the City field is also complete.
Upon request, Support can enable a parameter to include country codes in addition to the state / province codes.
States, provinces, and country codes are grouped together. If your company is located in Canada, this list field displays the province codes first, followed by state codes, and then country codes (if enabled). In the United States, this list displays the state codes first, followed by Canadian provinces, and then country codes (if enabled). If your company is located in the United Kingdom (UK), this field does not display, nor is it typically printed. There is no "UK" parameter setting. If you are located in the United Kingdom, the software uses the region and language settings of your computer as well as the database region (in certain cases).
Zip / Postal Code (or Postcode)
In certain cases, changes you make to a postal (Zip) code can trigger other changes, such as setting the sales tax location. This part of the address can be up to 10-characters long. In the United States, the zip code is numeric and is listed to the right of the city and state code. The Postal Code in Canada is alphanumeric and also displays to the right of the province code. In the United Kingdom, the postcode is printed as a separate line (the last or bottom line of the address). In Australia, the postcode is four-digits long and displays to the right, after the name of the city/suburb/town, and the state or territory code.
Delivery Point
The United States Postal Service (USPS) assigns delivery points in addition to the zip + 4 codes to differentiate delivery points at the same address (as when there are four offices in the same building or multiple apartments in the same house, for example). Delivery points are not typically printed (except for Canadian regions in certain cases) but are included when POSTNET barcoded mailing labels are printed. Usually, this is a single digit added to the end of the ZIP code, ZIP+4 code, or a combination of both codes when printing a barcode. Typically, the application adds a check digit after the delivery point (if included). This part of the address can be up to four-characters long.
For Canadian users, the Delivery Point field has an alternate use (see below):
 Delivery Point Settings for Canada
If your company is located in Canada (and assigned to the Canada regional parameter), you can use the Delivery Point field to add a country notation to document addresses. If the Delivery Point entry is US, USA, or CAN, the application prints these codes as part of the address on documents.
|
Delivery and Zip/Postal Code Changes When Delivery is enabled, address changes to the postal/zip code field can affect the tax location for the transaction. This will only occur if a Delivery option is enabled and the zip/postal code has also been mapped in the Zip Code (aka. Postal Code) maintenance form to a specific tax location. The zip/postal code's mapped sales tax location will be used except in cases where the tax location is "always" exempt or the customer/transaction has a tax ID associated with it. Postal/Zip codes can also be mapped to specific branch locations (when applicable). In this case, the "inventory provided by" and "sale credited to" branches on the Branch (Alt-R) tab would be set to match the branch mapping in the Postal Code (aka. Zip Code) maintenance area (if done). Mapping zip/postal codes to branches and tax locations is entirely optional. For more information about tax handling at Point of Sale, click here. |
Phone
The phone number is the phone number for the selected job. If the job has no phone number, the phone number is not set. The phone number can be manually entered by the user processing the transaction.
Sales Tax
The tax location shown is the tax location that will be used for calculating tax for the transaction. In some cases, the tax location can be automatically set by certain actions within the Process form of the transaction. For example, changing delivery designation or zip code can automatically adjust the tax location. Typically, the current job's tax location is used in cases of delivery since that is where the goods are exchanged. There are tax code settings that can override this function. The actual sales tax calculated for the transaction can also be affected if a tax exempt ID is specified for the customer, job, or transaction as well as by any non-taxable or always taxable items that may be included. Some tax locations calculate the tax amount based on the cost of materials rather than the customer's price.