Open Tickets - Advice Notes (UK)
Open Tickets and Advice Notes (UK) give your inventory team a way to collect ordered materials for staging ahead of a customer's pick up or for a scheduled delivery.
Open Tickets - Advice Notes are transactions that immediately affect on-hand quantities while at the same time allow adjustments before final processing as a sale (invoicing). This transaction is ideal for use either as a yard ticket or for deliveries. Open tickets can be used for cash-only customers as well as charge. Invoicing is different for cash-only tickets, however. (See Invoicing Cash Only Tickets)
Here's an example: a customer speaks with a salesperson and orders a list of goods that they will pick up. The salesperson creates a "ticket" for the items. When the delivery vehicle arrives, the yard staff make substitutions or changes as necessary to the "ticket" to match the materials that were actually loaded. The ticket can be invoiced at that time or later on.
Invoicing can be done individually or all at the same time (by using the Point of Sale > Utilities > Invoice Tickets utility).
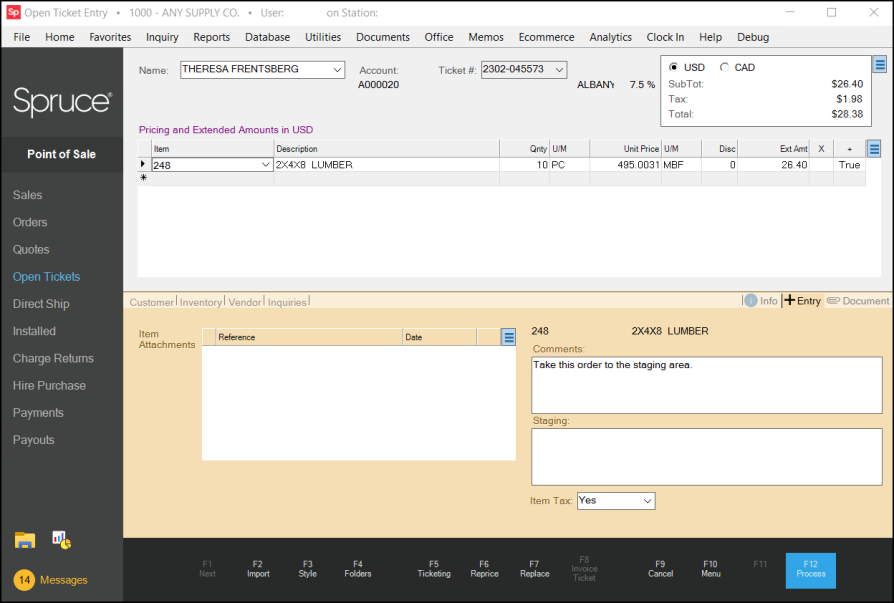
As is true with sales or order activities, this transaction begins with account (and sometimes job) selection. Next, a ticket number is generated or entered that is used for identifying the ticket in the future. If the sales person added a note to the transaction, the word True displays in the + column at the end of the row. You can see the notes associated with this item entry by selecting Folders (F4) and selecting the Entry tab.
For information regarding folders in the Point of Sale areas, click here.
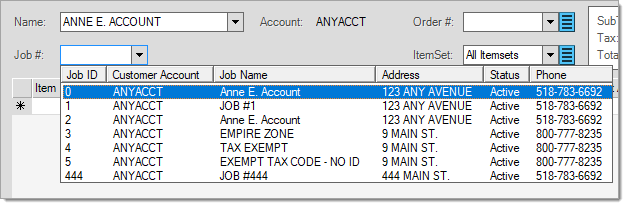
Selecting an Account
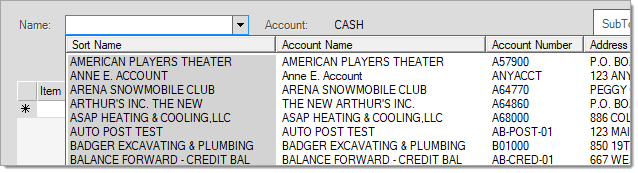
In the Point of Sale Name list, you can either enter the Sort Name (from the Account Maintenance form) or the account ID. Most Point of Sale transactions involve selecting an account and sometimes job (when applicable) first. For Sales, you can scan or enter the items into the data grid first, but for other transaction types (Orders, Quotes, Tickets, etc.), you choose an initial account first. If you know the customer participating in the transaction, there is usually no need to choose an alternate menu, just type either the sort name or the account number/ID.
When a customer has their own charge account, we recommend that you enter their name in the Name list. You can change it to a different account, if needed, before processing.
There are some additional search options you can use, based on other information you know at the time of your search. You can review these options here
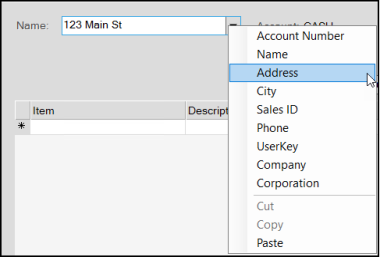
Other Account Search OptionsTo see additional search options, enter the text you know (address, phone number, etc.) in the Name field and right-click the down arrow beside the field to see additional search options.
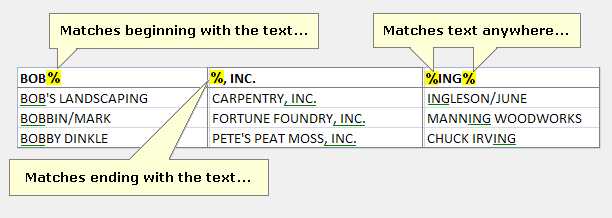
If you do not enter any text or you enter text that matches more than one account, the application sorts the list by the field (Address, City, etc.) you selected. You can click the column headings to sort the list in a different order. In some cases, only those account's with a value for the selected field(s) will be included. If the Enhanced Look Up option is not enabled, you can also use a "wildcard" (using a % character/symbol) to represent unknown characters to perform a search. A wildcard can represent any character or set of characters before and/or after the text you enter to find records that may match (see the examples below).
You can use wildcards to look for account matches using the alternate menu selections as well. Searching for an Account Using the Customer's Rewards or Loyalty CardIf your company participates with the Do it Best® Loyalty Rewards program, Best Rewards™, or other loyalty rewards programs, you can scan the customer's rewards card ID or enter the customer's card ID in the Name list and choose the UserKey option to perform the search. We should point out that as long as a Loyalty ID is assigned to the customer correctly and the customer's account is used for the transaction, there is no need to scan their card to associate a transaction with the program. All sales transactions will be associated with their rewards ID automatically regardless of whether or not a card was scanned or loyalty ID was used for selection. For ACE Rewards™, choose <CTRL-R> to scan or enter the customer's rewards ID unless it has been associated with the customer's account. In the latter case, the customer's rewards ID is automatically associated and displayed in a Point of Sale, Sales transaction. Other transactions (Orders, Quotes, *The customer's rewards ID must be associated with their account in a specific way. Please see the Database > Account documentation for further details. |
When the Enhanced Look Up feature is enabled, you have more selection options, but the account's Sort Name field entry is still the primary match field. The application only shows you account number matches if no sort name matches are found. If matches for both the sort name and account number exist, only the entries with the name display.
Using the Enhanced Account Look Up Feature to Find an Account
When enabled, the Enhanced Look Up feature searches using the account number, sort name, address (line 1), and company name automatically. For each row, the cell matching the look up text contains a gray background color. Even when more than one column for the same row (account) has a match, the application only highlights the column with the first look up match. Typically, the more text you enter, the shorter and more useful the list of matching results will be. With enhanced look up, there is a maximum number of matches (up to 70). There is no <<More>> option, which means that if more than 70 matches exist, you may have to either enter additional text to narrow the search or enter new search information instead.
Note: You cannot use the % character as a wild card when using the Enhanced Look Up feature.

The Enhanced Look Up feature can be enabled by Support upon request. The team sets up parameters and uses a Support Utility to populate tables with the data you have already entered into the application. If you decide you do not want to use this feature after it is enabled, Support needs to reset these tables and the application returns tothe original methods for search. You can request to re-enable this feature in the future if you choose. Key look up data is removed when account or items are modified if you disable the enhanced look-up feature.
After you select an account from the list, the account type displays beside the list. There are three types of accounts:
-
A Cash account is a customer-specific account that does not allow receivables charges.
-
A Charge account is also a customer-specific account that allow receivables charges to accumulate.
-
A System account is a general-use account that is not customer-specific. A System account does not have a credit limit or allow charges.
All companies must have a system account named CASH. Except in the case of Tickets* (Advice Notes) and Charge Returns, the default account, "CASH," is the default when no specific account is indicated.To select the System account, press TAB . In addition, this type of account requires the entry of a delivery name when used with non-sale type transactions (orders, quotes, etc.). more...
Understanding System Accounts vs. Cash AccountsSystem accounts are used for cash and carry transactions, where the customer doesn't have their own account. Your company can create more than one System account; however, most companies only have one. By contrast, Cash accounts require additional information, such as the customer's name (or other information), for certain payment types and in cases of delivery. When you begin a transaction using a system account, you can create a new "cash-only" account directly using the Delivery tab on the Process form (when applicable). Cash-only and System accounts are not the same. |
Selecting a Job
Accounts may be linked to one or more jobs; every account has at least one job, known as the master job (0). You can add additional jobs to any account to track account activity separately from the account. You are only prompted to select a job if the account has multiple jobs (more than the required job "zero"); otherwise, all activity is assumed to be for the master job. In Point of Sale, disabled and closed jobs are not included in selection list. You may be able to add new jobs during the transaction processing (on the Delivery tab of the Process (F12) form).*
*Your security settings may prevent you from adding jobs during processing.
Note: In other Point of Sale areas (such as Order or Sale Entry) you can also add a job in the Delivery tab. This option is not available in Tickets/Advice Notes.
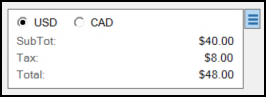
Reviewing the Ticket Totals
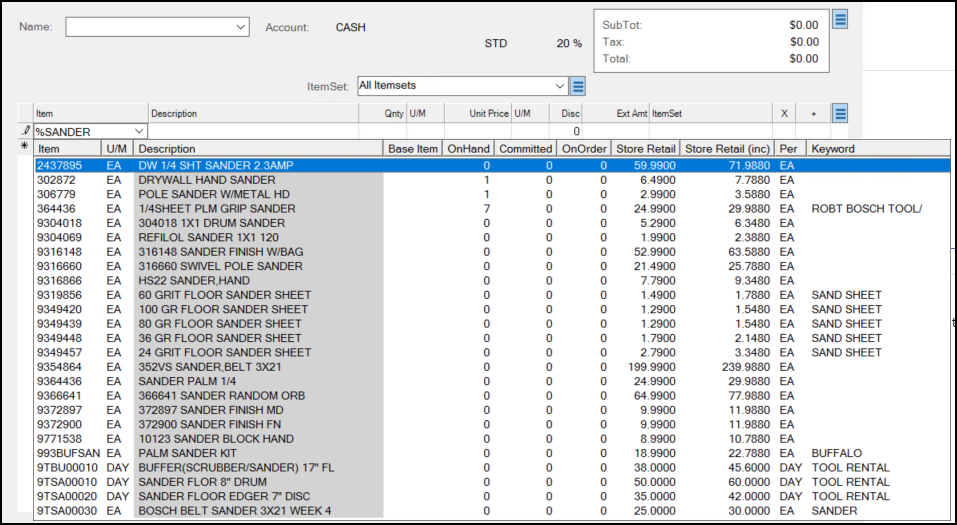
To the right of the Name list, is a Totals panel, which shows the ticket's current subtotal, sales tax, and total. When you make pricing or quantity changes to the items in the data grid, these values update.
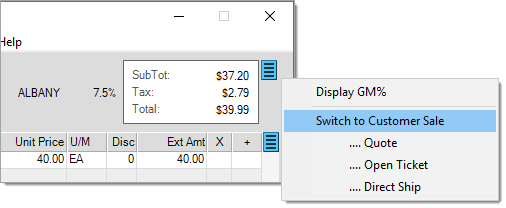
If you have specific user permissions, you can use the Menu Marker  to the right of the box to switch to a different transaction type (Sale, Order, or Quote) or display the current GM% (gross margin percentage) for the entire transaction. This is described in detail below.
|
If you are in Canada, you can double-click the tax amount entry in the Totals box to display the split provincial (PST) and GST taxes as dollar amounts. For Canadian provinces with both PST and GST taxes, both locations (and rates) display to the left of the Totals panel. HST (Harmonized Sales Tax) locations (used for the Maritime provinces) combine the GST and any local amounts together into one tax rate, so no split is provided in those cases. 
Tax Details (Canada) |
Changing the Transaction Type
You can convert a transaction from one type to another and retain much of the information from the original. When you switch to a new transaction type, the items (and item comments), pricing, account-job selections, PO#, and delivery information move to the new transaction. The application does not maintain other information unless it is permanently associated with the account or job. This includes a number of fields located on the Process form such as Print and Transmit options, Adjustments, and any manually entered information (such as a tax exempt ID or purchase agent).
Note: Making a transaction type change requires specific user permissions that may not be available to all sales personnel. Check your security settings if these menu options are blocked from your view.
To "switch" the current transaction to a new transaction type, click the Menu Marker to the right of the Totals box to display the context menu and select the new transaction type from the list.
Restrictions and Special Cases that can Prevent this Switch
There are a few restrictions that can prevent you from changing transactions. You cannot change a transaction that includes a rental item. If you enable and apply promotion pricing, to a transaction, the promotion pricing is removed when you make the switch and when you invoice an order or quote, these converted promotions are disabled).
Ticket Number
Like Quotes and Orders, Tickets are assigned an ID number. The same format is used for Tickets as with other types of documents. Just as with any document type, open tickets can be assigned to one of three numeric ranges. You cannot choose a Ticket number manually, unlike orders and a few other document types.
Contracts for Installed Sales
If the selected account (and job) has an installed sale contract associated with it, a Contract list appears on the form. If you are not creating a ticket that is to be associated with a contract, you can skip this field. Otherwise, choose the Installed Sale contract from the Contract list. Only the orders associated with the selected contract will be available for Ticketing (F5).

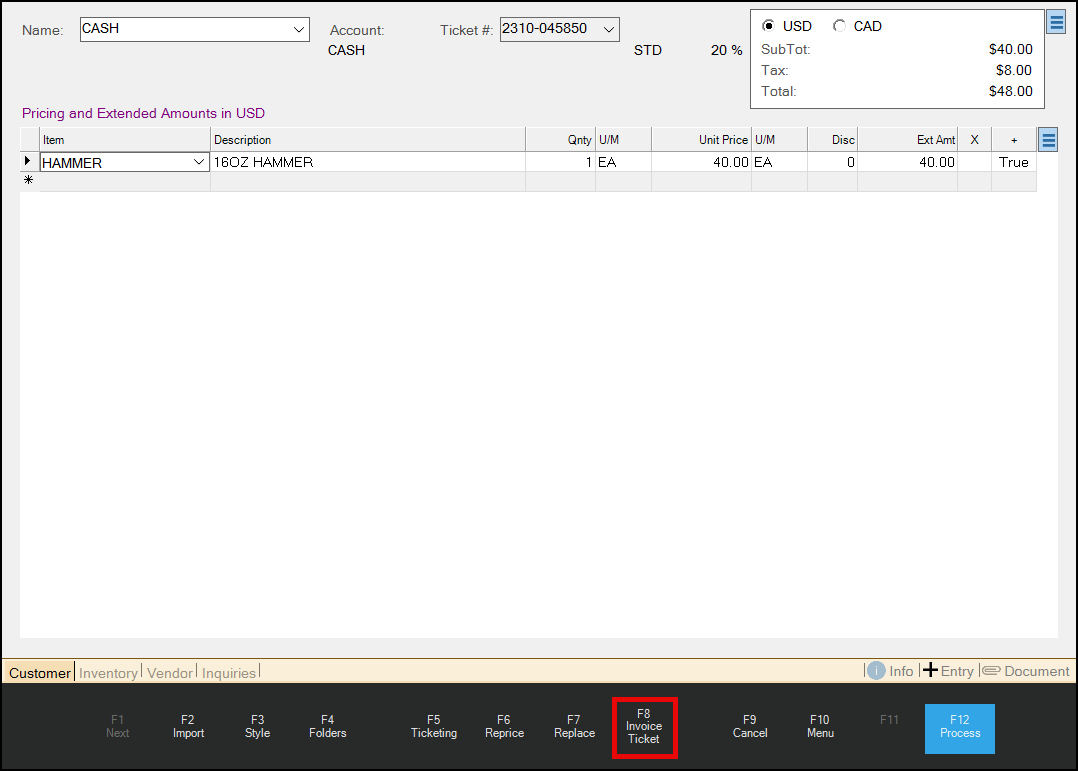
Invoicing Cash Only Tickets
You can invoice cash only tickets from the Open Ticket Entry form using a process that is a bit different than for charge customers.
To invoice a cash-only account's ticket, you must reselect the ticket and choose the Invoice Ticket (F8) function. This will convert the transaction to a sale and add the items in the Open Ticket data grid to the Sale Entry form.
When you process the Sale transaction, the ticket will be converted into an invoice; otherwise, the ticket remains open for further updates. The "Invoice Ticket" function is only provided on modification of an existing ticket, not on initial entry. To invoice on initial entry, use the "switch to" feature to change the transaction to a "sale."
Grid & Item Entry
As with other Point of Sale forms the data grid is used for item entry. You can add items manually or by scanning them any time after you have completed the account/job selection and you have added the ticket number.
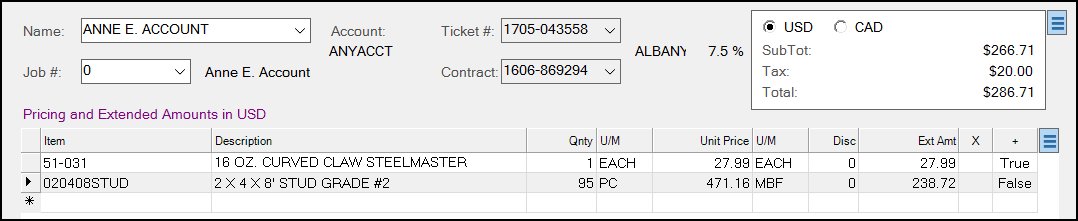
Primary entry fields include all columns except Description, Extended Amount, and additional information.
![]() For more information about item entry and selection, click here.
For more information about item entry and selection, click here.

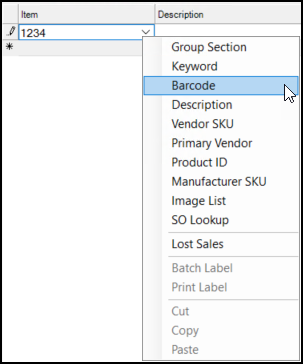

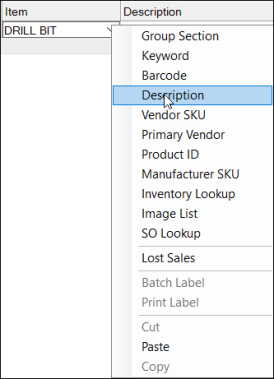
Selecting Items using Group Section


 . If you select some but not all sections within the same group, the group's check box background is changed to gray
  . Use the Select All button to select all groups and sections. Use the Clear All button to clear all check boxes. Choose Accept to build a selection list based upon the groups and/or sections you have chosen (checked). Or, click Cancel to close the window and
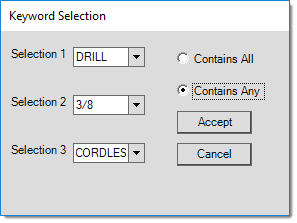
 Selecting Items using a Keyword
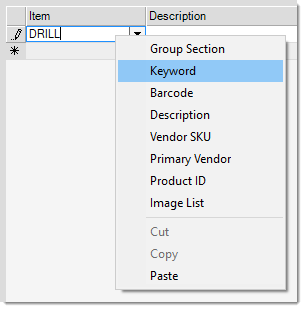
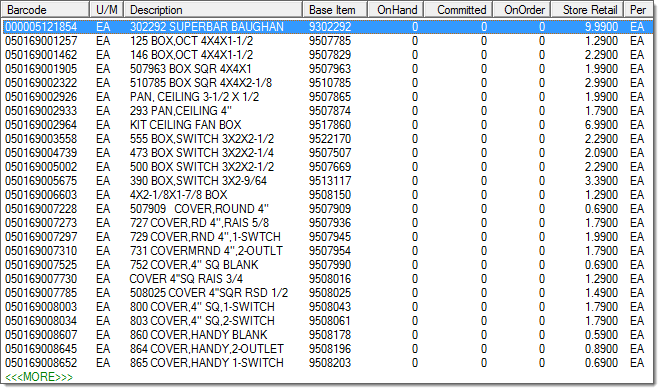
Selecting Items using a Barcode
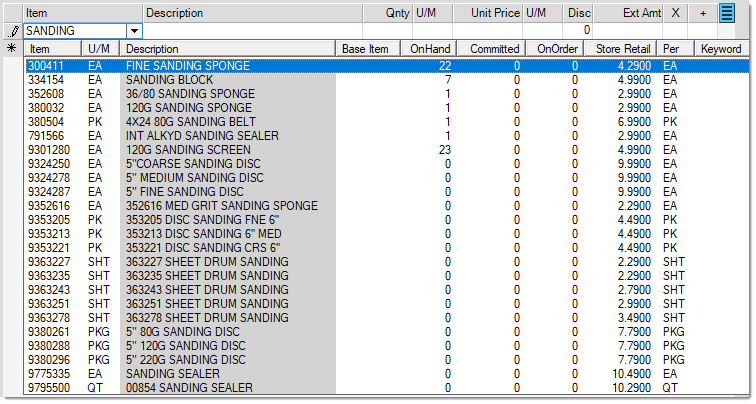
Selecting the Item using the Description
Selecting Items using a Vendor SKU
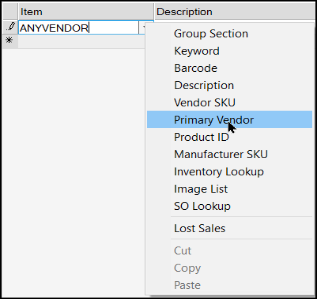
Selecting Items using the Primary Vendor
Selecting the Item using the Product ID

Selecting the Item using the Manufacturer SKU

Selecting the Item using Inventory Look up
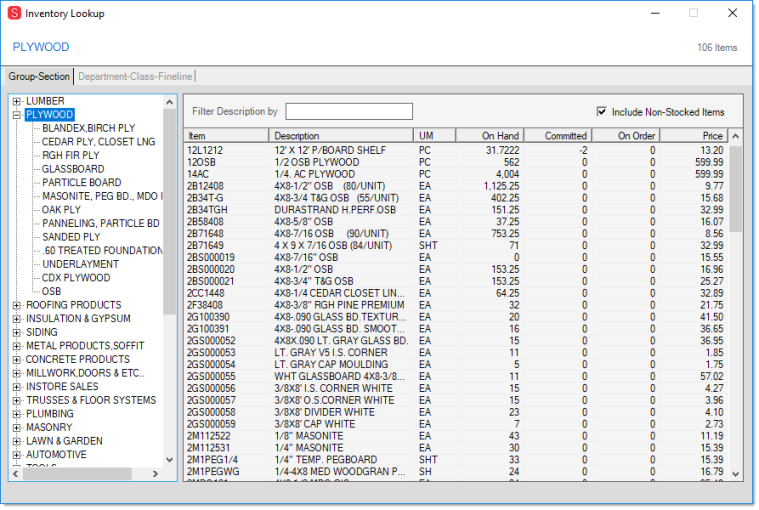
Inventory Lookup : Group-Section
Inventory Lookup : Department - Class - Fineline
Selecting Items using the Image List Selection

Selecting Items using SO Lookup
Selecting Items using Lost Sales
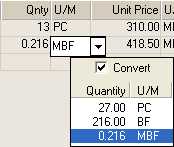
Unit of Measure Changes
Quantities and pricing reflect the unit of measure displayed. Changing the unit of measure (U/M) to a measure with some other value (other than 1:1) can optionally modify the related quantity or price. If the "convert" box is checked ![]() , the existing quantity or price will be converted to a value equal to the current value (displayed in the drop down). The "convert" option will not change existing extended amounts. If the "convert" option is not checked, the existing quantity or price will not change, and will be used to re-calculate extended amounts.
, the existing quantity or price will be converted to a value equal to the current value (displayed in the drop down). The "convert" option will not change existing extended amounts. If the "convert" option is not checked, the existing quantity or price will not change, and will be used to re-calculate extended amounts.
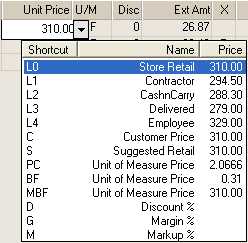
Pricing Changes
There are a number of ways to affect pricing. Users can modify the price by typing another in, select a reprice option (F6), type a discount, or select an alternate price from the input drop-down. Typed keyboard shortcuts are also available. For example, type L2 in the unit price field to use the level 2 price, or D20 to do a 20% discount.
Discounts
The "Disc" column is used for line item discounts. These discounts will only affect pricing on "discountable" items. Use the Inventory and Codes tabs in the folders (F4) to view the current item's discount status. Pricing for "net" items will not change when a discount is entered; however, reprice functions (F6) don't consider an items discount status.
Exception Codes or "X" Column
The "X" or exception column displays pricing exceptions when encountered. There are six exception codes used: L, M, N, P, X, and Z. A maximum of two codes may be displayed for any item. When more than two exceptions occur, the letter "X" appears in the Exceptions column. Please see the following table for an explanation of these codes:
|
Code |
Description |
|---|---|
|
L |
Line Discount Users may be allowed to discount specific items by typing a discount percentage in the discount column of the data grid. When this has been done, the discount percentage is shown and the exception code "L" is set. Net items also use the discount column and will display an "N" in place of any discount (net items don't allow line discounts). |
|
M |
Margin Out of Limits
Every item may optionally be assigned an expected % (margin) and minimum % (margin). These are located on the Branch (Alt-B) and Pricing (Alt-P) tabs in the Item Maintenance (database) form. When an item's margin falls below the minimum %, it is flagged as a "Margin Out of Limits." |
|
N |
Negative Margin
An item has a negative margin when its cost is higher than its selling price. This can happen for a number of reasons. One example is if the item's price is lowered too much by a discount or repriced too low. Receiving errors can cause an item's cost to be inflated. |
|
P |
Price Change This exception is set as a result of the sales clerk's (user's) actions. If a price is either modified manually or by using one of the Reprice (F6) functions, this flag will be set. This allows company or store management to review manual pricing changes. |
|
X |
More than Two (2) Exceptions Encountered.
The column has room to display up to two (2) exception codes. In cases where three (3) or more codes apply, an "X" is displayed. To find the exact exceptions, either run the Exceptions report or view the document and choose Format and File Copy from the alternate menu. |
|
Z |
Zero Cost
Certain items can have a zero cost for legitimate reasons in some cases (this is common with non-stocked items and some special use items); however, most other items should be associated with a cost. Comment type items would not normally have a cost, so they are excluded from exception flagging. |
Exceptions are reported in the grid immediately, so Point of Sale users should be trained to notice exceptions and to notify the appropriate party or make changes in the transaction to prevent the exception (if unexpected). In addition, company or store management should make a practice of reviewing exceptions to catch issues with pricing and costs on inventory. The Exceptions Report can be useful for reviewing transactions for possible issues that need to be addressed.