Manufacturing Schedule
The schedule area can assist with managing various manufacturing processes. This is done by assigning one or more work orders to a "schedule" document. Each schedule document is assigned to a specific user; however, we don't restrict more than one schedule from being assigned to the same user. The default view of the "schedule" form is split into two vertical panels. The left-hand panel, labeled "Clipboard," is used for viewing and selecting pending work orders. The right-hand panel is used for creating a "schedule" and assigning one or more work orders to that schedule. A "summary" view (F6) is also available that provides information about manufacturing (work orders) that have already been assigned to scheduled processes.

Schedule (Manufacturing)
What is the "Queue?"
In order for work orders to be available for scheduling, they must reside in the manufacturing queue. Once your company installs release 10.0.0 or later, the queue will automatically be populated when new work orders are processed (saved). Existing work orders can be added to the queue by modifying and re-saving them (by using the Process (F12) function found in the Work Order transaction). Work orders are removed from the queue once they are completed.
Manufacturing Status
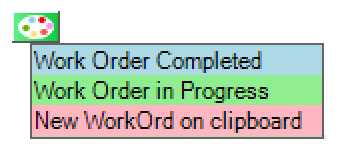
There are three(3) statuses which are assigned to work orders listed in the clipboard, schedule(s), and summary form. When a work order meets the conditions of any of the three statuses, the background color of the work order (row) will be used to indicate the status (see the color key below).
Statuses are determined automatically based on the status of the work order.
Work Order in Progress
Work orders with stages defined are considered "in progress" once at least one stage has been started but the entire work order has not yet been completed.
Work Order Completed
The "work order" completed shows when a user has marked the work order as "complete" which finalizes the manufacturing process (removes use items, etc.).
New Work Order on Clipboard
The remaining status is "new work order on clipboard" (pink). This is used to indicate when a new work order has automatically been added to the clipboard (this only happens if the timer (clock) is enabled).
Overview of Scheduling
To schedule manufacturing processes, the person (user) managing the scheduling would typically pick a date or dates in the "clipboard" area (on the left) and then click the "view" button in order to list the queued work order documents for the date(s). An additional filter is provided for "proc" (process) that allows the clipboard to be limited to just those work orders assigned to a specific manufacturing process. Process assignment is optional.
Starting and Ending Date
The dates specified determine which queued work orders will be included in the clipboard when the View button is selected. If no date selections are made, all open (not completed) work orders will be included. Date selection uses each work order's completion date.
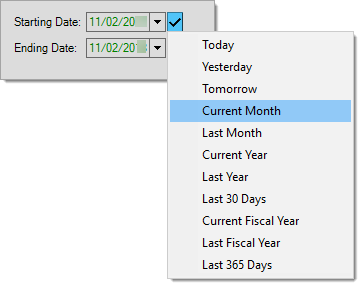
Some fields contain preset dates, particularly when the circumstances require a date range. When saving and scheduling reports, preset dates are the only date selections that automatically update when you save a report or process a scheduled report (manual date selections only run for the original date selected). The Check Mark icon ![]() indicates that preset values are available. Click the icon to review a menu of preset date selection options.
indicates that preset values are available. Click the icon to review a menu of preset date selection options.
After you make a date selection, the date fields become read-only (disabled) and you cannot change them manually. The application displays the dates in green.

Preset values are based on the current date by default or use the current date to determine the "current" period (such as the current month or year). Fiscal year values may consider the current date as well but also use parameters for your financial (fiscal) year to determine the starting and ending months.
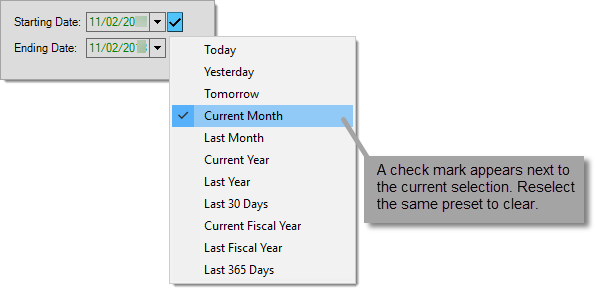
To clear a preset, reselect the same preset from the context menu. The date values may remain but the application will allow you to modify them after you clear the preset dates.
Process (Proc)
This drop down can be used to filter selected work orders based on their assigned "process." Work orders do not have to be assigned a process. The selection list of processes includes all defined manufacturing processes (if any). Manufacturing processes can be defined from the Manufacturing Process maintenance form available from the Database menu in this area (Manufacturing) and also from the Inventory area.
View {button}
This button populates the clipboard's data grid with queued work orders that meet the date and process criteria specified (if any).

Viewing Queued Work Orders
The data grid, once populated, lists the work order's document ID, completion date (Date), and Process code (if any). Users can double-click on any document ID in the grid to view the document.
Creating a Schedule
The next step in scheduling is creating a schedule (document) and assigning one or more work orders to that schedule. Before adding a schedule document, make sure that the date displayed in the schedule panel (on the right) is correct. This should be the date that work orders are being scheduled for. The default is the current date. Users can choose a different date using the drop down calendar control or the previous next buttons (displayed next to the "today" button).
A new schedule (document) is created by choosing the "Add Sched" button found in the upper right-hand corner of the form.

Adding a Schedule
The new empty schedule is immediately assigned a document identifier and the next sequential schedule ID (for the day).
Schedule ID
Each day's schedules are automatically assigned a sequential integer value starting with one (1). The schedule ID can be manually set if desired.
User
A user can be associated with the schedule either now or after assigning work orders. The listing of users includes "other" type users. There is currently no special user type for manufacturing.
After a schedule document has been reserved, work orders can be assigned to the schedule. Work orders are associated with the schedule by using a "drag & drop" method.
Drag & Drop
To "drag & drop," highlight one or more rows in the clipboard then click and hold down your mouse's select button. To select rows in a sequence, click the starting row in the range, hold down the SHIFT key, and then click on the ending row in the range (then release the SHIFT key). To select random rows, hold down the CTRL key while selecting (clicking) on each row you want to select.

Select: Work Orders from the Clipboard
Move the cursor with the mouse to be over the schedule's work order panel (the area with a lighter background color). A "pages" icon is displayed showing the number of work order documents you have selected.
Do not release the mouse button until your cursor is over the load you want to add the work orders to.

Drag: Move Selected Work Orders to a Schedule
After releasing the mouse, the selected work order document(s) will now be listed in the schedule's work orders panel and will no longer appear in the queue.

Drop: Work Orders Associated with a Schedule.
The above procedure can be repeated as necessary with the same or additional loads. Schedules are saved immediately and whenever changes are made, so there is no need to use a Process (F12) function.
Removing or Moving Work Orders from a Schedule
Work Orders can be removed from a schedule using the same "drag & drop" method. In this case, select the work order(s) from the schedule and drag them back to the clipboard or to another load. Work orders can also be re-arranged within the load.
Removing a Schedule
If you create a schedule that you don't need, you can delete the schedule by choosing "Delete Mnfr" from the alternate menu (while hovering over the schedule control). This is only available when no work orders are assigned to the schedule document.

Delete a Schedule
Folders (F4)
Folders in the Manufacturing area's Schedule form are populated once a schedule document is selected. It's possible to toggle which folder is currently displayed by holding down the SHIFT key and pressing either Page Up (Left) or Page Down (Right).
Work Orders
The Work Orders tab lists the work order documents assigned to the current schedule. The data grid contains the document ID, process name (if any), work order's reference, and the (anticipated) completion date. Your row (document) selection in this grid determines which work order "details" are shown on the Detail tab. You can double click on the document ID (#) to open any document listed in the Viewer.

Folders (F4): Work Orders
Details
This tab displays the item(s) associated with the work order (row) selected on the Work Orders tab. The "details" data grid displays the item number(s), item description, detail quantity, quantity unit-of-measure, and stage (optional).

Folders (F4): Details
Summary (F6)
This function provides an alternate form where scheduled manufacturing processes are listed along with the details of the selected schedule. This form consists of two (2) data grid areas. The upper (top) grid displays the schedules for the date range and process (if any) specified. The lower (bottom) grid displays details regarding the schedule selected in the upper (top) data grid.
 Function")
Summary (F6)
Starting and Ending Date
The dates specified determine which queued work orders will be included in the clipboard when the View button is selected. If no date selections are made, all open (not completed) work orders will be included. Date selection uses each work order's completion date.
Some fields contain preset dates, particularly when the circumstances require a date range. When saving and scheduling reports, preset dates are the only date selections that automatically update when you save a report or process a scheduled report (manual date selections only run for the original date selected). The Check Mark icon ![]() indicates that preset values are available. Click the icon to review a menu of preset date selection options.
indicates that preset values are available. Click the icon to review a menu of preset date selection options.
After you make a date selection, the date fields become read-only (disabled) and you cannot change them manually. The application displays the dates in green.
Preset values are based on the current date by default or use the current date to determine the "current" period (such as the current month or year). Fiscal year values may consider the current date as well but also use parameters for your financial (fiscal) year to determine the starting and ending months.
To clear a preset, reselect the same preset from the context menu. The date values may remain but the application will allow you to modify them after you clear the preset dates.
Process (Proc)
This drop down can be used to filter selected work orders based on their assigned "process." Work orders do not have to be assigned a process. The selection list of processes includes all defined manufacturing processes (if any). Manufacturing processes can be defined from the Manufacturing Process maintenance form available from the Database menu in this area (Manufacturing) and also from the Inventory area.
Include Completed
This check box indicates whether the listing of schedules should include schedule documents where all work orders have been completed. If checked, completed schedules will be listed; otherwise, they won't be included.
View {button}
This button populates the clipboard's data grid with queued work orders that meet the date and process criteria specified (if any).
Defaults
The date and process selections found under the "Defaults" heading are used when inserting (adding) a new schedule and/or work order.
Inserting a New Schedule
From the Summary (F6) form, a new schedule can be added by choosing "Insert" from the alternate menu (usually a right-click) on the upper (top) data grid. New schedules can only be added for the current or a future date. The "defaults" settings determine the default date for new schedules. The data grid will only show the newly added row (schedule) if the starting and ending date range includes the default date and the default date is set to either the current or a future date. Once done, a new row is added to the grid.
")
Summary (F6): Insert a New Schedule
Three column cells of the inserted row are editable: Schedule ID, Date, and User. The "# Docs" (number of documents), start, and end columns are read-only and are automatically populated once work orders are associated with the new schedule.
: Editing a New Schedule")
Summary (F6): Editing a New Schedule
Adding Work Orders to a Schedule while in Summary (F6) Mode
While a new, or existing schedule, is selected in the upper (top) data grid, the lower "details" grid can be used to associated work orders with a schedule.
: Adding Work Orders")
Summary (F6): Adding Work Orders
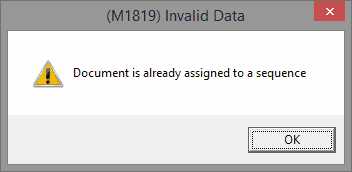
The easiest way to associate work orders this is to scan the barcode from the documents you are scheduling. In this case, the work order will automatically be associated with the selected schedule (in the upper, or top, data grid). If the work order is completed or already associated with another schedule, you won't be allowed to add the work order and a warning message will be displayed.
As an alternative to scanning, you can choose "Insert" from the lower (bottom) grid area's alternate menu (usually a right-click) and then choose a work order document from the "drop down" selection control in the grid's "Document" column.
Refresh (F7) Function
The Refresh (F7) function is a toggle that either enables or disables the "auto-refresh" feature. The Refresh (F7) function is only enabled once at least one work order has been added to the clipboard after choosing the "view" button.
Auto-refresh checks the database for changes to schedules and/or new additions to the queue (this is done based on the selected date range and process). If any changes are found, the application re-populates the grid to reflect those changes. This occurs on a regular basis (once per minute). Because the automated refresh feature cannot be refreshing while a user is updating rows in either grid, it's not enabled (on) by default.
Enabling the auto-refresh feature puts the Summary into an "inquiry-only" mode where both grids are disabled (changes aren't allowed). While the refresh is on, both grids' appear with a gray background color (except that any color coding of rows due to status is retained).
When the automated refresh is enabled (on), the refresh clock icon does not display red lines. This indicates that the auto-refresh is currently enabled.

Refresh Off
vs.

Refresh On
If the feature is disabled (off), the clock icon displays a line through the clock. Some actions can temporarily pause the auto-refresh feature.
Print (F8) Function
The Print (F8) function allows the scheduler to print or transmit schedule documents. There are 3 primary choices for printing: clipboard, selected, and all. The "clipboard" radio button prints a copy of every schedule document currently listed in the Clipboard's data grid (left-hand side) or the Summary (F6) function's schedule (upper) data grid. The clipboard contains deliveries that have not been assigned to schedules. "Selected" prints documents for the selected schedule only. Based upon the check boxes you've selected (schedule or documents), this may include just the schedule document, all of the schedule's work order documents, or both the schedule and schedule's work order documents. "All" prints the selected (checked) documents for every schedule listed (in either the Clipboard or Summary view).
")
Print (F8)
Any work orders printed using this dialog (from Scheduling) will not include costs or totals when printed. We are making an assumption that since the scheduling feature is being used that manufacturing involves multiple users and at least some may not have permission to view costs or margins.