Load Schedule > Summary
The Summary is an alternate format that can show more information on the form, but doesn't offer all the features of the clipboard area. We anticipate that users will likely use the Clipboard for setting up their loads and the summary for review and smaller changes. Some major differences between the summary and clipboard are that there is no drag & drop function, there isn't a clipboard showing queued items, and the auto-refresh timer is not used. If you choose to use this Summary screen for associating deliveries with loads, the easiest way to do so is to add deliveries by scanning the bar-coded delivery documents (just select a load row and scan).
To view or change existing deliveries, use the filters or click the "view" button. If you don't specify dates or a truck filter, all delivery loads for the current date will be shown (the current date will be selected as a default). This makes seeing the day's deliveries a one click procedure.
Just as with the "clipboard" form, the Summary uses a color key to indicate the status of deliveries and loads.
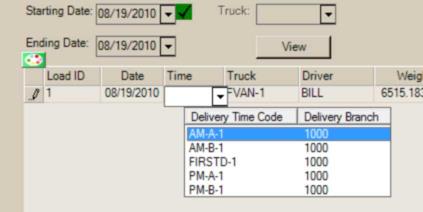
Certain changes may be made within the upper grid regarding a delivery load (manifest). These changes update immediately. The first 5 columns allow updates: load ID, date, time, truck, and driver. The remaining columns are read-only and don't allow direct modification (they are updated automatically by changes in status, stops, documents, etc.). If a truck has a default driver assigned, that driver will automatically be selected when that truck is specified (the driver may be changed after this, however).
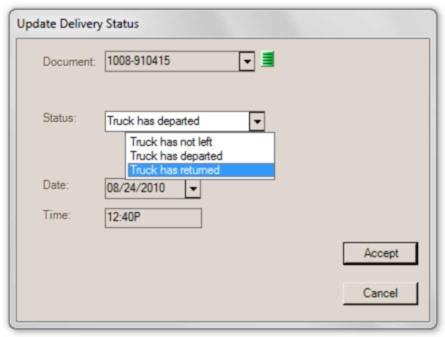
Status (F5) Function
This function allows you to change the delivery status of either a load (manifest) or specific delivery (order, ticket, etc.). The document defaults to the selected load's manifest document. Please see the topic Delivery Status Updates for further information.
Refresh (F7) Function
The Refresh (F7) function is a toggle that either enables or disables the auto-refresh feature in the load (upper) grid. Auto-refresh checks the database for changes to deliveries (for the selected range and filters), and if any changes are found, the application re-populates the grid to reflect those changes. This occurs on a regular basis (once per minute). Because the automated refresh feature cannot be refreshing while a user is updating rows in either grid, it's not enabled (on) by default.
Enabling the auto-refresh feature puts the Summary into an "inquiry-only" mode where both grids are disabled (changes aren't allowed). While the refresh is on, both grids' appear with a gray background color (Note: color coding of rows is retained when applicable).
When the automated refresh is enabled (on), the refresh clock icon does not display red lines. This indicates that the auto-refresh is currently enabled.

Refresh Off
vs.

Refresh On
If the feature is disabled (off), the clock icon displays a line through the clock. Some actions can temporarily pause the auto-refresh feature.
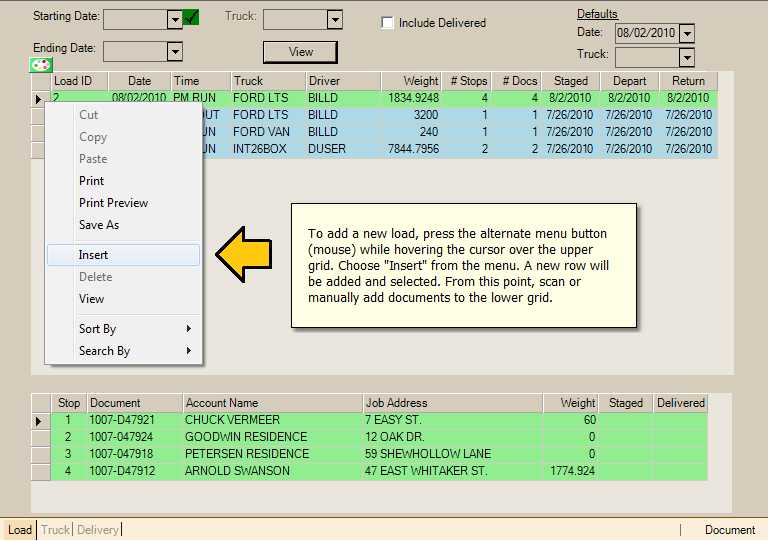
Adding a new Load
New loads are added by choosing Insert from the alternate menu available on the upper grid. The "insert" option creates a new row in the grid where the user can specify the following load information: date, time, truck, and driver. New loads will default to the current date unless another date is specified. The Defaults panel, located in the upper right-hand area of the form, can be used to change the date default and set a default truck for new loads.
Associating Deliveries with a Load
Deliveries (stops) are assigned using the lower grid. These may be associated with a load using the Insert menu choice (as explained above for adding new loads); however, the easiest way to associate deliveries with a load is with a bar code scanner and the delivery documents. To do this, you need to have the load's row selected (indicated by an arrow icon) in the upper grid then scan each document you want to add to the load. It's also fine to use the Clipboard form for assigning the deliveries to a load instead.
Merging Separate Delivery Documents into ONE Stop
If you have more than one delivery document that's being delivered to the same location, you can assign them both to the same stop in the lower grid. To do this, you must first associate both delivery documents with the load which automatically assigns them a stop number. For those documents being delivered together, simply modify the stop number to match the other document(s) for that delivery location.