Load Schedule > Clipboard
The clipboard format in Load Schedule (Delivery) provides a number of features designed for any delivery operation. You will notice two panels on the left and right. On the left, the Delivery Queue panel provides a listing of any new or previously unassigned deliveries. This information is refreshed automatically on a regular basis (there is a timer setting, the default being every 1 minute). The intention is that a dispatcher would leave the Clipboard screen active on a client (PC) through the day. When new deliveries have been added for the selected date, they will appear on the screen as soon as the refresh timer processes.
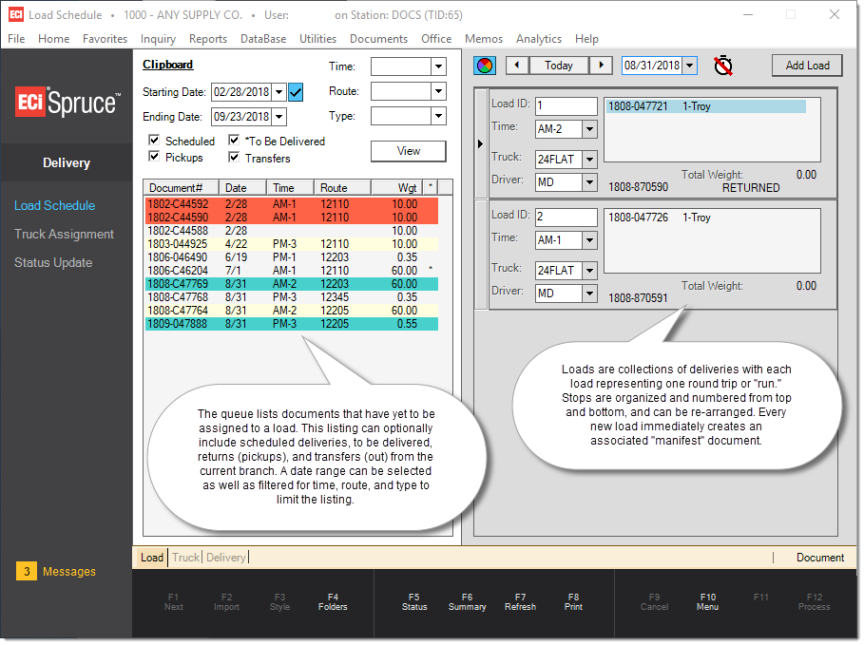
Checking for Deliveries (Queue)
Before the Delivery Queue panel (on the left) displays any documents, the dispatch user must minimally click the View button. This will populate the queue table with ALL deliveries that have been assigned to the "scheduled" status (selected by default). If you use the "to be delivered" status, these can be optionally included as well by selecting the check box and pressing "view" again.
|
|
A status of "scheduled" or "to be delivered" can be assigned in Point of Sale (using the radio buttons on the delivery tab). In the delivery queue, these can be filtered based upon your selections. The "scheduled" (selected by default) might be used with deliveries that have been reserved for specific dates. "To Be Delivered" might be used for deliveries that did not specifically reserve a delivery time (an asterisk * is used to indicate these items in the clipboard). The "to be delivered" status is not selected by default. The dates, time, route, and type filters are optional. These filters can be used to limit the delivery queue to a specific delivery date (or date range), time period, route, or truck type. For a smaller operation, these filters may not be needed. In high volume cases, this can help group deliveries by route, time, etc. Filters don't apply to transfers. Click the View button to populate the delivery queue after modifying any filters. Items in the queue that appear highlighted using orange are Deliveries that have been reserved at Point of Sale for a particular delivery time slot. Those that have not been highlighted were processed as a delivery without any time slot reservation. Transfers are highlighted in magenta background and pick-up (return) deliveries with a purple background. An automatic timer will refresh the queue every minute. When this occurs, any newly added items are highlighted in pink. |
 Color Key Legend
Color coding is also applied when the status of a load or document is updated. Click on the "pallet" icon to view the color key:
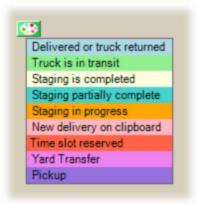
Delivered or Truck Returned (Blue)
This status would be used to indicate a completed delivery or pick-up.
Truck is in Transit (Green)
This status might be used to indicate that the delivery vehicle is in the process of delivering either the specific document or the load that the document is assigned to.
Staging is Complete (Antique White)
Staging either refers to the process of gathering delivery materials in a location prior to loading a vehicle for delivery or it can be used to indicate the actual loading of the vehicle. This status might be used to indicate when either has been completed.
Staging Partially Complete (Teal)
The SpruceWMS (Warehouse Management System) app uses this status to indicate when all warehouse items have been staged, but non-warehouse items exist that have not been staged. This status can be used for other purposes if you aren't using SpruceWMS as needed.
Staging in Progress (Orange)
This status might be used to indicate that staging has begun but not been completed for a particular load or delivery.
New Delivery on Clipboard (Pink)
When the timer is being used, this would be used to indicate any new deliveries which have been added to the queue.
Time Slot Reserved (Red)
This status is used to distinguish between delivery documents that have a reserved delivery time slot (interval) from those that don't. Typically, a company would treat a reserved time interval (slot) as an indication of the customer's availability or preference on a time to receive a delivery. These deliveries would usually be assigned to loads matching the reserved time interval (slot) prior to deliveries where no specific time was indicated.
Yard Transfer (Magenta)
This color is used to distinguish between delivery documents that are the result of a transfer between locations vs. those for customers.
Pickup (Purple)
This status is intended to refer to a "credit" or "return" delivery. In this case, a delivery vehicle is being used to pick-up materials from another location that are being returned and/or credited to the customer. This might be linked with a credit sale or credit customer order document, for example.
Creating a Load (Manifest)
Each delivery run is considered a "load." A load is comprised of one or more delivery stops. Most of the time, each stop represents an individual order, ticket, or invoice (there is a way to assign more than one delivery document to the same stop). For each load, a document named a "manifest" is created. This document lists the stops (deliveries) assigned to a load.

To create a load, click the "Add Load" button. A new "empty" load is added to the Load Panel on the right-hand side of the Clipboard form.
Note: At this time, an empty manifest document has been generated and the load has been saved. Even if you don't add any deliveries to the load at this point, both the load and manifest document will remain indefinitely unless they are manually deleted. There is no Process (F12) function in the Load Schedule area, processing is entirely automatic and immediate.
![]()
A load (manifest) would typically be assigned to a time, truck, and driver as well. The time (slot) and truck selections are defined from the Database menu and are branch specific. The "driver" drop down lists users who are assigned to the driver user type and who have an default branch matching the current branch.
Next, select one or more loads from the clipboard (left-hand panel) and drag them over the load. To "drag & drop," highlight one or more rows in the clipboard then click and hold down your mouse's select button. Move the cursor with the mouse to be over the Load's delivery panel (gray). Do not release the mouse button until your cursor is over the load you want to add the deliveries to.

After releasing the mouse, the delivery document(s) will be listed in the load's delivery panel.
If needed, you can then use drag & drop on individual deliveries to sort deliveries by stop (see below).
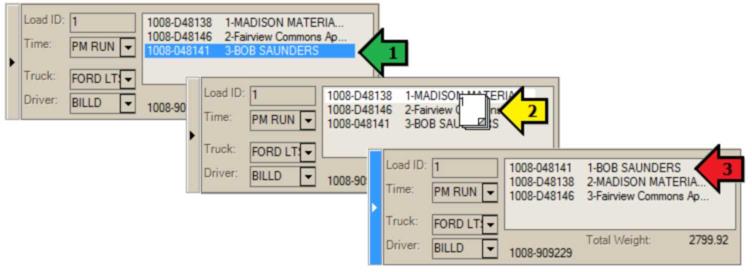
Stop Assignment
Stop numbers are assigned in sequential order from top to bottom (1, 2, 3, etc.). The numbers appear prior to the delivery name of the document. The top item in the delivery panel will be the first (1st) stop and the bottom item will be the last stop (depending upon the type of delivery vehicle, the last stop may be the first delivery loaded). More information regarding each delivery stop is available in the Folders on the Load tab.
|
Spruce Tip: Row Selection in a Grid |
|---|
|
Many forms in the software utilize a "data grid" control. This control lists data (usually items) in rows and columns. Another example of a grid control that you might be familiar with is a spreadsheet table as is found in Microsoft® Excel® software and other programs. In grids where selection is allowed, there are some "tricks" to selecting rows that aren't necessarily obvious (these work in other programs too, not just the application).
Once multiple rows have been selected, you can use copy, cut, and paste functions and/or drag and drop (where supported).
Selecting Rows in Sequence
When you want to select a series of rows that are grouped together, you can do the following:
•Click on either the top or bottom row in the series you want to select. •Press and hold the SHIFT key on your keyboard. •If you clicked on the top row, click the bottom row in the series; otherwise, click the top row. •All of the rows between the two rows you clicked on should now be selected.* •Release the SHIFT key.**
**Clicking on (selecting) a row after releasing the SHIFT key will deselect the range.
Alternate Method: In some grids, you can just select the first row, hold the "select" mouse button down, and drag the mouse up (or down) to select multiple rows. This doesn't work in all grid controls, however.
Selecting Rows NOT in a Sequence
When you want to select multiple rows that are not grouped together, you can do the following:
•Click on any row in group that you want to select. •Press and hold the CTRL key on your keyboard. •Click on EACH row you want to select (hold the CTRL key until all the rows you want have been selected). •All of the rows you clicked on should now be selected.* •Release the CTRL key.**
**Clicking on (selecting) a row after releasing the CTRL key will deselect the range.
|
Weight
The "weight" column in the Delivery Queue (left-hand panel) lists the total weight of the items for the particular transaction. The calculated weight only includes items that have been assigned weight factors.
If used, weight factors can be any measure of weight your company prefers; however, once a weight measurement is selected (such as kilogram, ton {or tonne}, or pound, for example), it should be used consistently with ALL products. As items are added to a transaction, weight load factors are applied to the extended quantities to produce a total weight for the transaction.
The application compares the total weight of the delivery documents to the weight allowance for the particular truck/lorry (if specified). If a particular load exceeds the weight allocated to the vehicle, the weight is displayed in red. Weight for return (pick-up) deliveries is not considered when calculating the total truck weight.
Folders (F4)
The Folders (F4) function either expands or minimizes the Delivery folders. Information in the folders changes based upon your current selection. The "Document" tab is used for designating attachments and/or notes for the Load (Manifest) that is currently selected (in the repeater on the right). Attachments (including Notes) are immediately saved for the selected Manifest (aka. Load). In some cases, folder data may not apply and will not be populated. Please see the Folders documentation for Delivery for further information.
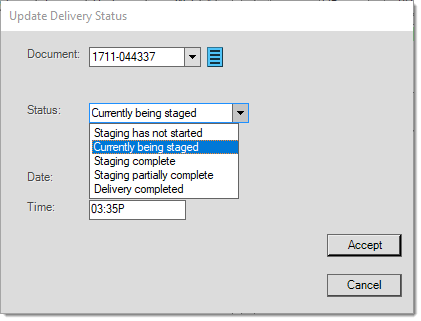
Status (F5) Function
This function allows you to change the delivery status of either a load (manifest) or specific delivery (order, ticket, etc.). The document defaults to the selected load's manifest document. Please see the topic Delivery Status Updates for further information.
Refresh (F7) Function
The Refresh (F7) function is a toggle that either enables or disables the auto-refresh feature. Auto-refresh checks the database for changes to deliveries (for the selected range and filters), and if any changes are found, the application updates both the delivery queue and load table with those changes. This occurs on a regular basis (once per minute). Because the automated refresh feature should not interfere with a user who is updating loads, it's not enabled (on) by default.
When the automated refresh is enabled (on), the refresh clock icon does not display red lines. This indicates that the auto-refresh is currently enabled.

Refresh Off
vs.

Refresh On
If the feature is disabled (off), the clock icon displays a line through the clock. Some actions can temporarily pause the auto-refresh feature.
Print (F8) Function
The Print (F8) function allows the dispatcher to print or transmit delivery documents. There are three (3) primary choices for printing: clipboard, selected, and all. The "clipboard" radio button prints a copy of every delivery document currently listed in the Clipboard's delivery queue panel (left-hand side). The clipboard contains deliveries that have not been assigned to loads. "Selected" prints documents for the selected load only. Based upon the check boxes you've selected, this may include just the manifest, all of the load's delivery documents, or both the manifest and delivery documents. "All" prints the selected documents for every load listed in the Clipboard form.
")
Load Schedule, Print (F8)
Formats allow you to select the style of the documents printed when the "Documents" check box is selected; otherwise, the lower panel including these options is disabled. Format selections override the style associations for the selected printer. Choose "None" to keep the printer's defaults.
The "include item pricing" and "include notes" options work the same as they do as if the documents were printed from a Point of Sale transaction. Some styles, by nature, don't include pricing or notes. These options only affect documents that normally print pricing and/or notes.
Deleting or Modifying Existing Loads
A load can only be deleted if it contains no deliveries. Only delivery loads that have not yet been updated as having "left" for delivery can be modified.