Document Selection
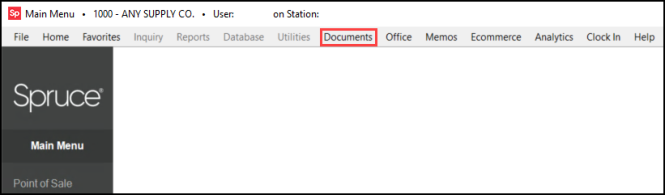
All menus and transactions provide access to documents (as user security permits access to the documents menu) using the Documents option on the tool bar (displayed horizontally near the top of the form). As an alternative, many documents can be directly selected and viewed by double-clicking on the document identifier in grids, folders, and other areas where supported.
Individual documents can be scanned, typed, or selected in the document drop down. All documents include a barcode1 (doesn't include reports) and barcode labels can be printed and attached to outside documents that should be associating with an existing application document. If the document # is known, enter either the entire document number (including the year-month) or just the sequence number in the Document # field. If just the sequence portion is entered and matches are found, those matches will be listed in the drop down. If the first document listed is the one you want to view, press enter or select the desired document using your mouse.

Once a document is selected, or a valid full document ID was entered, that document is added to the document grid area and immediately opened in the document viewer. Partial entry matches are only supported when using just the alpha prefix character (if used).
1Document barcodes use the "39 Extended" format.
Document ID Formatting
Documents are assigned an identifier consisting of two (2) parts separated by a dash (-). The first section is 4 digits and represents the year and month that the document was processed (a prefix of 1607 would mean that the document was created in July 2016, for example).
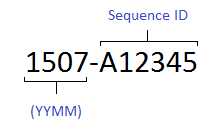
The following six (6) characters are usually numbers that are sequentially assigned; however, some types of documents do allow alpha characters. Numeric ranges can be specified to specific document types. Prefix characters may also be assigned to branch locations for use with customer orders, purchase orders, and work orders (manufacturing). When selecting a document, it is only necessary to enter the last 6-characters; however, entering the full ID avoids an additional step.
Recent Documents
If the document number isn't known, but was processed recently, the drop down selection lists the most recent documents first. The drop down selection includes all documents regardless of type and is not affected by any selection, search, or branch options that have been or will be selected.
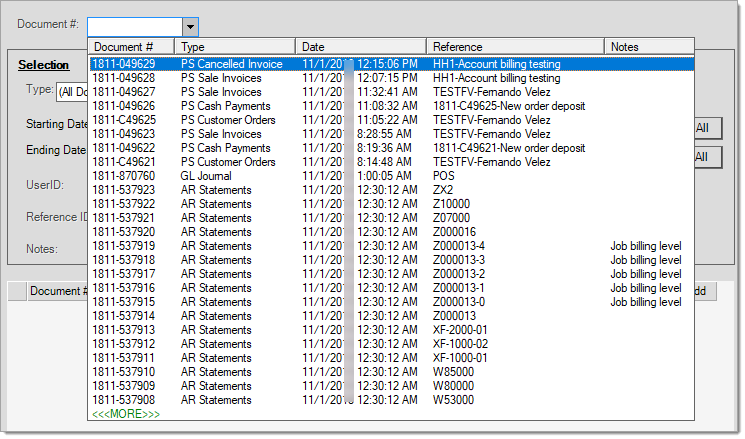
Users access may be limited by security settings to only allow viewing of certain types of documents. If you don't have access to a particular type, the document will be hidden when attempting to view the document (after selection).
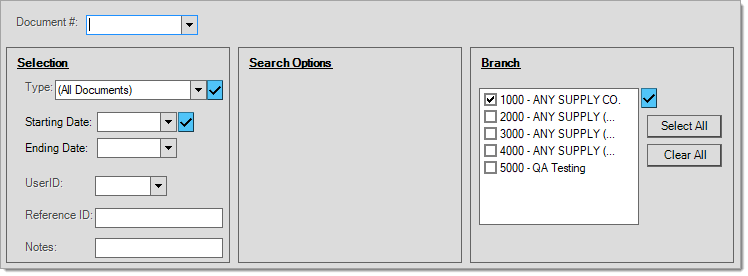
Selection
When the document ID isn't known and the transaction wasn't recently processed, it's easier to use Selection, Search Options, and Branch filters to find a document. Selection and Branch choices remain the same regardless of the type of document. Search Options are shown after choosing a document type, and the options change based upon the document type selected. Search options are explained in more detail along with the documentation for each document type.
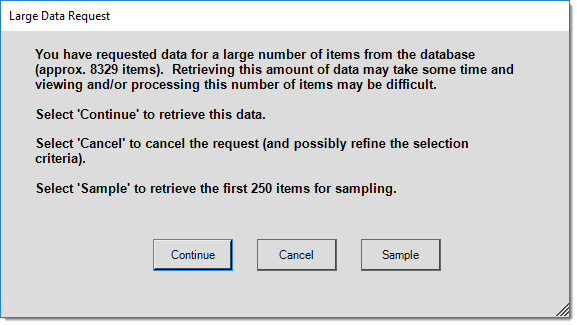
Selection, Search, and Branch options can be used alone or in combination. It's strongly suggested that at least some of these options be used to reduce the amount of data returned. Be aware that the more open the selection criteria, the larger the number of matching documents will be and the longer the process time for generating the list will take. If building a selection list of documents in the grid takes too long, try narrowing the search and selection criteria to decrease process time. In some cases, a warning is provided if the amount of data being selected is excessive.
Basic Document Selection Step-by-Step
As a specific example, let's say you wanted to view invoices for today:
•From the Selection panel, choose "PS Invoices" from the Type drop down.
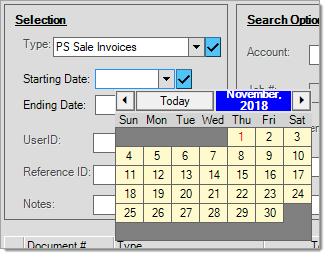
•Click on the down arrow button next to the "Starting Date" field and click the Today button on the calendar.
•Select the Process (F12) function using your mouse or keyboard.
At this point, one of two things will happen:
1.If there are no invoice documents for the current date, a message box will appear notifying you that no documents matching the criteria were found.
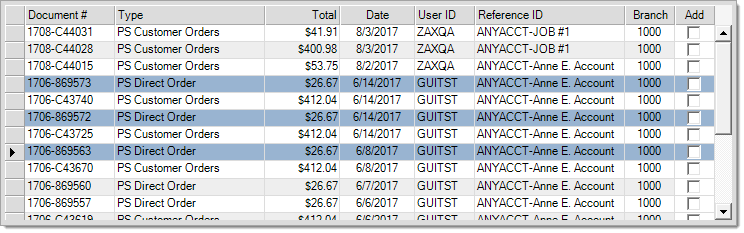
2.If invoice documents do exist for the current date, those documents will be listed in the grid area based upon when the document was created (in descending order... most recent (top) to least recent (bottom).*
*All documents have a hidden "internal" numeric ID that is sequentially assigned. This is used for sorting documents when they are initially added to the grid. Users can change how the grid is sorted after selection.
Individual documents may be opened in the Document Viewer by double clicking on the ![]() button to the left of the desired document (row). These buttons
button to the left of the desired document (row). These buttons ![]() are also used when selecting multiple documents in combination with the View (F7) function. We discuss grid selection more a bit later in this topic.
are also used when selecting multiple documents in combination with the View (F7) function. We discuss grid selection more a bit later in this topic.
Search Archives
In our examples, you may notice the "Search Archives" check box in the upper right-hand corner of the Documents form. This check box may or may not appear when you view your Documents form in the application. It refers to document archival which is an optional database maintenance function used for removing old data from the current "live" database and moving it to a separate "archive" database. If used, this helps keep the "live" database to a manageable size and may improve performance. The check box is only visible for those companies who have requested an archive database.

Once archived, documents are still available for viewing but don't necessarily appear in many other areas of the software, such as inquiries and reports. Archival removes the data used to create the documents (invoice data, etc.), not the document records themselves. Users can specify the time periods for archiving various documents. Documents are only archived after all the documents they maintain links with are also eligible for archiving.
A fee applies to the setup of document archival and archival is only done upon request. This option is mostly of benefit to larger companies or companies who have used Spruce for a long period of time and accumulated large amounts of data. It is likely that most small companies will never need this option. For more information, please see the Archive Documents topic.
Document Type
Depending upon your version and selected features, there are between 21 and 35 different types of documents used by the application. Most documents are linked with specific transactions
Each document type is prefixed with the initials of the application area that document relates to:
|
PS |
Point of Sale |
|
PO |
Purchasing |
|
IN |
Inventory |
|
AR |
Receivables |
|
AP |
Payables |
|
GL |
General Ledger |
|
DD |
Delivery-Dispatch |
For a complete listing, click here.
Styles and Default Style Viewing
Many documents offer a selection of styles. Styles change the document's appearance and/or content. For example, a "file" copy style typically includes cost and profit information that would not be included on a "customer" copy style. When viewing a document, you can change the style using the alternate menu; however, it's also possible to select a default style in the Documents form after Type selection. To view the list of styles, click the ![]() context menu next to the Type drop down.
context menu next to the Type drop down.
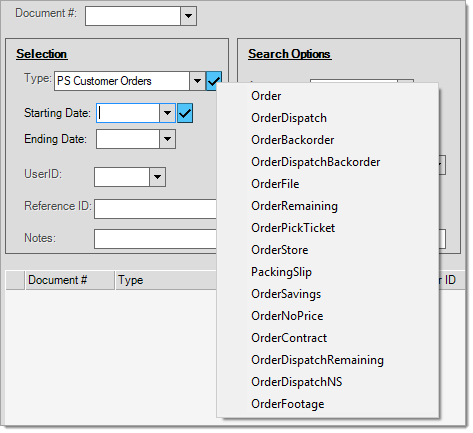
Once a type is chosen and a default style selected, all documents selected from the grid for viewing will open using that style. The default style selection will remain in effect until a different type is selected, the user chooses Cancel (F9), or the Documents form is closed.
Date selection is optional; however, it's strongly encouraged in order to place a reasonable limit on the quantity of document data returned. There are 3 different ways to specify a date or date range for document selection: manual entry, calendar control, and date range presets.
When entering dates manually, the default format is MM/DD/YYYY for the United States. Several other formats are acceptable for entry; however, all are converted to the default format when pressing TAB or ENTER. For example, the following entry sequences would all be acceptable for the date October 15, 2016:
10152016
10.15.2016
10-15-2016
10/15/2016
For customers in the United Kingdom (UK) and Canada, the date format is DD/MM/YYYY. Similar rules apply to date entry, so the following sequences would be accepted for the date 15 October 2016:
15102016
15.11.2016
15-10-2016
15/10/2016
The regional and language settings of your PC and server determine the default date format and some terminology/spelling differences in the application. Manual entry of an invalid date immediately clears the date field for re-entry. When changing an existing date selection, it's sometimes best to clear the entire date before typing (unless you are just changing a portion of the date such as the month, day, or year only).
Using the Calendar Control
To select a date using the calendar control, click the down arrow button located next to the starting or ending date fields. The Today button selects the current date (the current date is displayed in red if the current month is selected on the calendar). Use the arrow buttons to change months either backward (past) or forward (future).
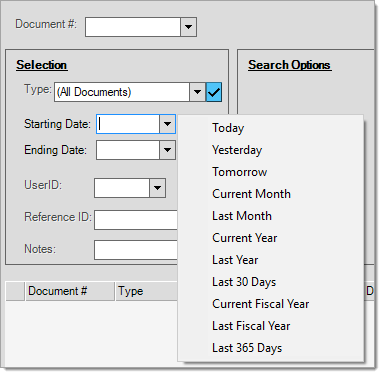
Preset Date Selections
The context marker ![]() next to the Starting Date field may be used to quickly select a date range from a listing of preset options:
next to the Starting Date field may be used to quickly select a date range from a listing of preset options:
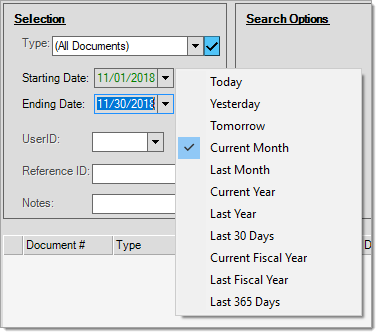
Once a date preset is used, the date fields become "read-only" and the dates will be displayed in green text. Read-only dates may not be modified manually or by using the calendar control. A check mark appears next to the current selection if you view the date presets again.
To clear the preset dates and allow manual changes, just reselect the same preset using the context menu ![]() . You can also select a different preset if you prefer.
. You can also select a different preset if you prefer.
Another optional criteria for selection is the User ID associated with the document. It's important to note that some types of transactions may have more than one user who is considered to be associated with the "transaction." For example, there might be a cashier user, account or job user, and an order user linked with a particular sale. Some transactions have both an entry user and last modified by user.
The User ID used for document selection is always the user associated with the document, not any or all of the users that may be linked with a particular transaction. The document user is the person who was signed into the application at the station where and when the document was initially created. Some documents, such as AR Statements and GL Journals, are created by external processing, so there is no "user" in these cases. For these types of documents, the user will be listed as "SPRUCE."
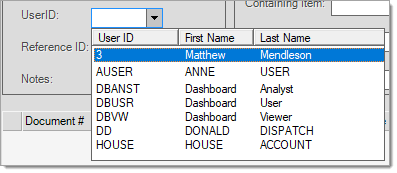
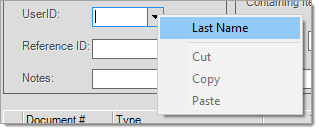
Your company determines the format for user IDs (names, codes, numbers, etc.). If you don't know a person's user ID and don't see it in the listing, you can type in the last name of the user and choose "Last Name" from the alternate menu to produce a listing of any matches.
When a user is specified, only those documents linked with that user will be included in grid during processing (F12).
Documents are assigned a reference ID when they are created. The format of this reference varies based upon the type of document but can also be different depending upon the source of the document. One example is deposits. For instance, it is possible to add a deposit to a customer order directly in the Orders transaction or later on from Payments. In both cases, a PS Payments document is created, but the reference ID is slightly different depending upon where the document originated. Reference IDs may contain a simple description, but sometimes include additional information such as an account number, document ID, or name.
Some types of documents, such as Payments and Payouts (Point of Sale), are used for a variety of purposes. In these cases, the document reference is useful for selecting specific types of transactions only. For helpful tips on searching for specific types of documents, please see the Search Options (Documents) listing in this Help file's index.
The reference ID field performs an exactmatch on whatever text is specified; however, it may also be used along with the wild card character (%). The percentage symbol can be used to indicate what part of the reference ID the text is to be compared to in order to determine a "match."
Using Wildcards in Searches
We use the percent symbol (%) as a wildcard character for search and selection purposes. When you are looking for some information and you know it starts with or ends with certain letters or numbers, you can use the wildcard (%) to stand for the part after or before the information you already know. Most of the time, searches are limited to a particular field in the data. For example, the text being searched might be the reference ID of a document, document notes, customer name, or perhaps a delivery address.
Here are a few examples:
•Entering %JOHN% would produce a list of matches where the word "John" is located anywhere in the search text.
•Entering %JOHN produces a list of any matches with the word "John" as the last word in the search text.
•Entering JOHN% produces a list of any matches with the workt "John" as the first word in the search text.
•Entering %JO%HN% produces a list of any matches with both the letters "JO" and also "HN" anywhere in the search text (although "JO" must appear before "HN" in this case).
Wildcard text searches are not case sensitive, so JOHN is the same as john or jOhN or John, etc.
Notes
This refers to document notes only and will not search other types of notations such as delivery notes, for example. For many documents, notes may be added prior to processing. Notes are added from the Document folder tab available with most transactions. The Notes field searches for an exact match on the text entered unless the wild card character (%) is used. See the reference ID field (above) for more information on using wild card characters.
Search Options
Search options change based upon the type of document and some documents do not offer any search options. With most Point of Sale (PS) type documents, users are offered options that apply to those types of documents such as account, job, item, and amount. On purchasing documents, you'd typically be offered a "vendor" option instead, for example. Search options are explained in more detail along with the documentation for each document type.

Search Options: PS Customer Orders
Only one selection may be used at a time from the drop down; however, all other options for searching documents may be used either individually or in combination.
"Amount" fields allow users to designate a specific dollar amount, but also allows conditions such as an amount greater (>) or less (<) than the amount, amounts greater than or equal to (either >= or => may be used), amounts less than or equal to (either <= or =<), or a range (separate the lower and upper amounts using a dash "-" symbol).
Amount searches do not include all amounts found on the document. The figure used varies by document but is typically a number that appears in the summary information rather than the details (subtotal or total might be used, but not a specific item's price or extended amount, in other words).
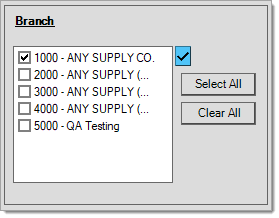
Branch
The branch panel is only used as a filter when populating the grid with documents and doesn't prohibit or limit individual selection. The "document" drop down provides access to documents for all branch locations. The current branch is the default selection when the form is opened. In this particular case, the branch control does not by itself restrict access to any documents. Users are only allowed to select branches to which they are assigned; however, clearing all branches ignores any branch selection when retrieving documents. This can be used when the branch is either not known or the user doesn't have access to select the branch. Users do not have to have permission to access a particular branch in order to select or view a document from that location; however, the ability to display (view) a document can be limited (read further for more information about this).
The branch control really doesn't provide any security limitations to branch documents; however, access to branch documents can be restricted using the "Restrict Branch Access" option available from the Document Access security settings (access via the User Maintenance form). Unless this restriction is in place, users can view any document regardless of their branch assignment. This feature does not prevent a document from appearing in selection lists or the grid; however, it does prevent the user from viewing the document once selected.
Print, Save, Transmit, and View Multiple Documents
There may be cases where users need or want to print, save (as a file), view, or Email/Fax more than one document at the same time. This isn't that difficult to do; however, it's not completely obvious at first glance. First, you must populate the grid with any of the documents you want to view, save, transmit, or print. As long as the documents have something in common (such as a date, type, account, item, etc.), this can usually be done using the selection options.
For example, if you wanted to view or print selected invoices for a customer from a particular time period, choose the document type PS Invoices, enter a date range (or select from the preset date choices), and enter the account # (or other search criteria) then use the Process (F12) function to populate the grid with documents (see the example below).
Use the Print (F8) function to print the selected document or documents. To view the document(s), choose View (F7) instead. If viewing more than a single document, either use the Links option to select the document to view or use the "PrevDoc" and "NextDoc" buttons on the Viewer form. The last document listed in the grid will be the one displayed in the viewer by default.
To Email or Fax the selected document(s), use the options on the Transmit (ALT-T) tab. Each document will be transmitted as a separate Email or Fax, not combined together as a single transmission or attachment. If you have selected more than a single document, you'll notice that the form displays "(To Main Contact)" next to the check boxes to either fax or Email. This means that each document will be transmitted to the main contact associated with the document (may be a customer or vendor). If neither a customer or vendor contact applies, the document will not be transmitted unless you specify a recipient. If you want all of the selected documents to be sent to the same recipient, check the "Override Main Contact" check box and specify the Email or Fax information for the desired recipient. Individual emails or faxes will still be transmitted for each document in either case.
If you choose to override the main contact, type in a subject and note. These are onlyauto-filled when the main contact option is being used.
 Transmit Options")
Document Print (F8) Transmit Options
To attach more than one document to the same Email, use the instructions below save the documents first as PDF files and then attach them to an Email independently from the software.
Saving Documents as PDF Files
You can use the Print (F8) function from the Documents form to save multiple document selections as individual PDF files. It's important to point out that this procedure does not combine multiple files together as a single PDF (Portable Document File).*
*Note: It is possible to combine multiple documents together into a single PDF; however, doing so requires the use of 3rd party software (there are a number of both free and paid versions available on-line). Use discretion when selecting a product, free software may install unwanted add-on's or change your Internet settings; typically, paid versions usually don't. For assistance, follow your selected product's instructions. Most are used similar to a printer, so rather than choose "Output to File," you would select the PDF "printer" installed by the 3rd party software and follow your product's instructions.
To begin, select one or more documents from the grid that you want to create PDF files for. You can select sequential ranges of documents by holding the SHIFT key down and clicking a starting and ending point -- or -- hold down your keyboard's CTRL key to click on random documents and select them. See the "Selecting Documents in the Grid" section below if you need some visual examples.
Next, select the Print (F8) function using your mouse or keyboard. The "Document Print" form will open. Clear the check box next to "Print Document" (unless you also want to print the documents). Check the box next to "Output to File" and specify a directory in the "Save in" area using the "..." button to browse to a directory ("My Documents" or "Desktop," for example). don't specify a "File Name."
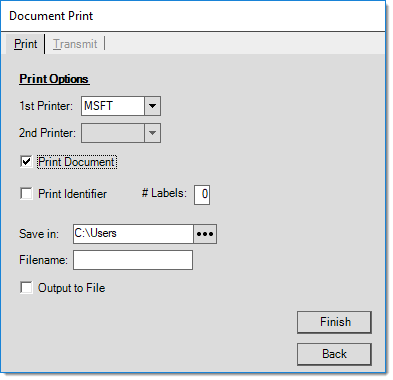
Choose "Finish" and the selected documents will be saved as PDF files in the location you selected. The file names will be automatically set to match the application document ID ("1603-123456.PDF," for example). Once saved, you can attach the PDF documents as to one or more Email messages, etc.
Selecting Documents in the Grid
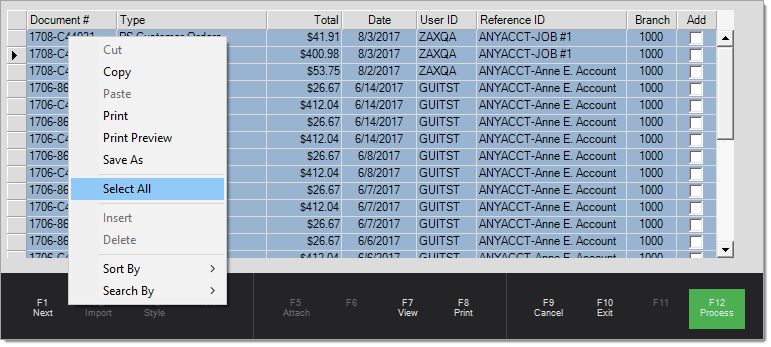
Once documents have populated the grid, there are several selection options. To select all the documents in the grid, click once anywhere inside the grid area. Next, click your mouse's alternate menu button (usually the button on the right) and choose SelectAll. There's also a keyboard shortcut for selecting all (Ctrl-A). To use the keyboard option, press and hold the Control key (Ctrl) and press the A key and then release both. Selected rows are indicated by a blue background.
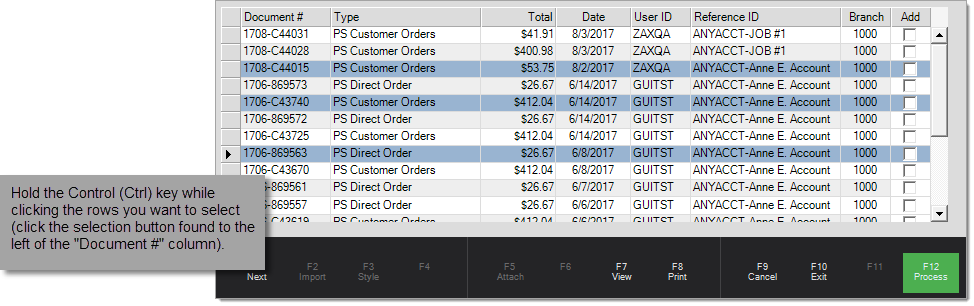
Users can also individually select documents (rows) in random areas of the grid. The easiest way to do this is to hold the Control (Ctrl) key down while clicking on the selection column next to the each document you want selected (see below). For this to work, it's important that you click in the selection column (found to the left of the "Document #" column), not elsewhere in the grid. The button selects the entire row (see the example below).
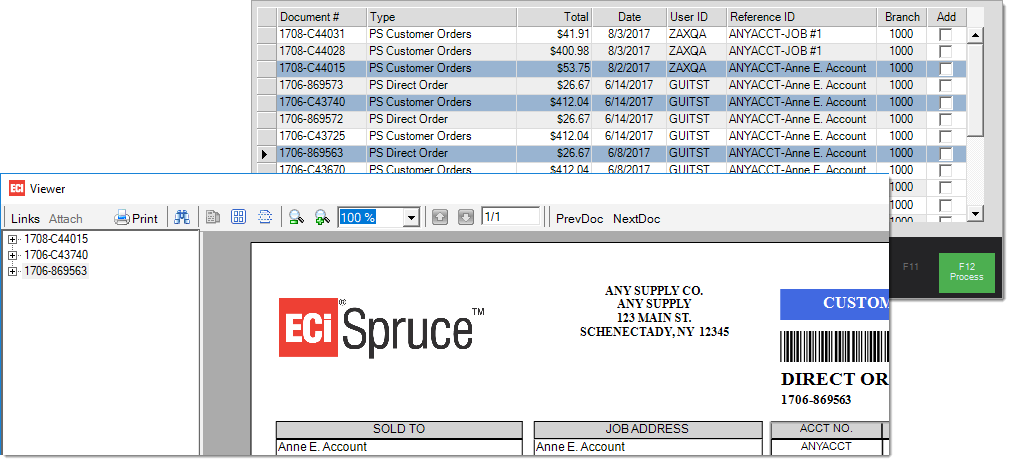
Once some documents have been selected, use either the View (F7) or Print (F8) functions. When viewing, it's necessary to click on the Links button in the Viewer window to see all the documents. Use the PrevDoc and NextDoc options to move back and forth between documents.
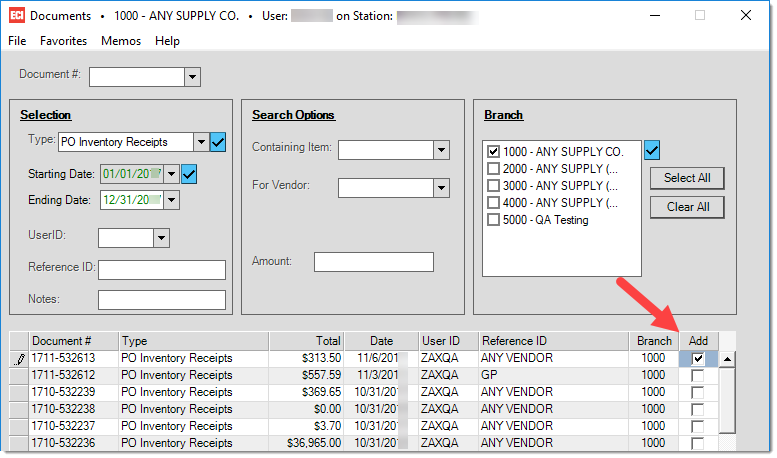
What is the "Add" column?
The add column is currently only used with PO Inventory Receipt type documents. If checked, an extra or "additional" page is added to the document that includes more information about the receipt (such as the on-hand before and after, the new Average cost for each item received, and other information for each item received). To view the additional page on Receipt documents, check the box before opening the viewer.