Release Details for Version 21
This section contains the detailed content for the version 21.0 release.
Key Updates:
Quick Tender Feature Improves Point of Sale Transactions
New: Cayan M400 Devices Available for Point of Sale Processing
Cayan: Changes to Manual Entry Options for Genius 2.0 Devices
Adding Delivery/Cartage Fees to Point of Sale Transactions
Using the Aggregator to Quantify Inventory
Application Resize Focuses on POS and Utility Forms
New Protections for General Ledger Chart of Accounts
GL Inventory Reconciliation Report: A Snapshot of Inventory Valuation
Account Payment Convenience Fees Made Easy
Creating Job-Level Price Groups to Manage Competitive Bids
Added Job Name to Posting Payments Form
Timber/Lumber Unit/Pack Inventory Type Added
Receipts Focus on Vendor Rather than Date
Exporting Reports to XLSX Excel Format
Payment Integration using Clover Devices (UK)
Applying VAT/GST Discounts in Payables
Including/Excluding Taxes on Items for GST Tax Regions (AU)
Support for Zero-Decimal Currencies Complete
Landscape Format Update for Tax Document Styles (VAT/GST)
Updated Setting for Customer Tax ID Labels in Point of Sale Documents
New: Cayan Genius 2.0 Alert Report
UPDATED: Using Windows Scaling to Manage Text Size in your Application
Point of Sale Updates
Quick Tender Feature Improves Point of Sale Transactions
We have updated the Point of Sale Process Documents to make completing transactions faster. When you process the transaction, we have added function (FX) key options that populate the amount field with the balance amount. We use a Sale process in this example, but the Quick Tender buttons work the same way in Orders and Direct Shipments, and the F9 Back and F12 Finish buttons display this way in the other Point of Sale document boxes.
Select F10 Reset whenever you need to change direction after selecting a function key button.
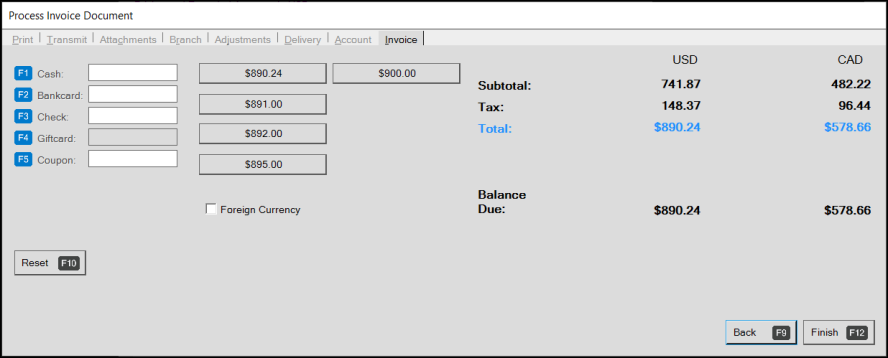
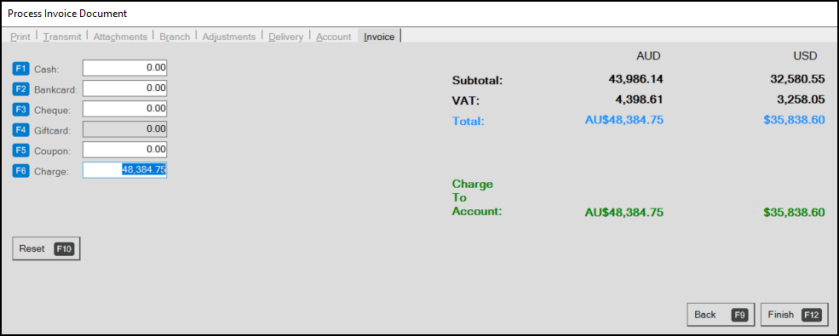
Process Invoice Document with Quick Tender Options Displaying
You do not have to use the function keys to complete a transaction. You can still type the balance in the amount fields directly.
For example, to pay the entire balance in cash, select F1 Cash. The Cash field updates.
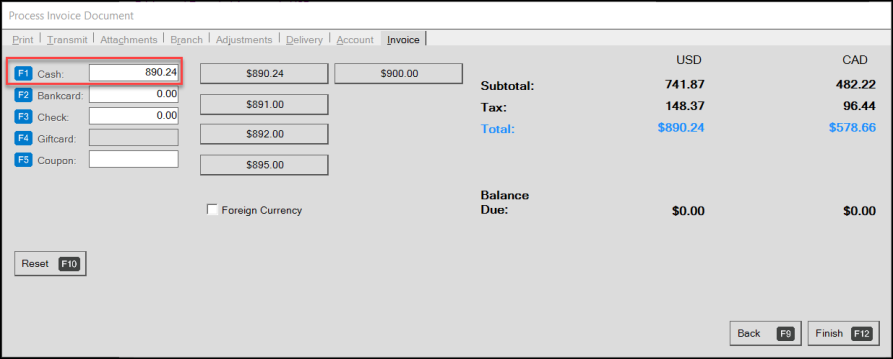
Process Invoice Document with Cash Entry Displaying
You can still use the Cash buttons if you prefer.
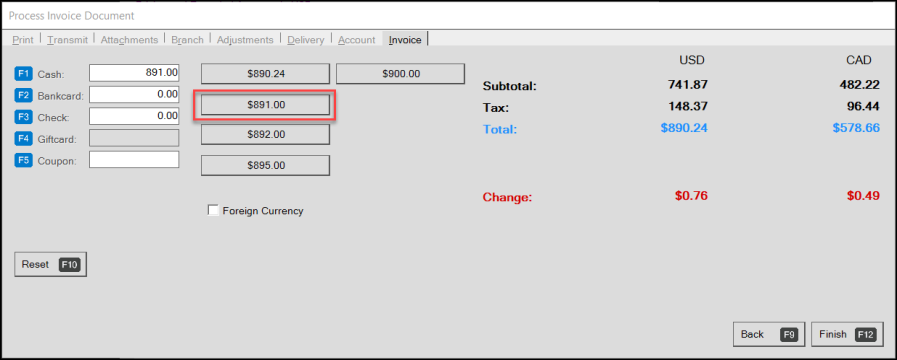
Process Invoice Document with Cash Buttons Highlighted
If the customer changes their mind and wants to pay by bankcard instead, select F10 Reset and then select F2 Bankcard. The Bankcard field updates with the total amount, as do the transaction fields.
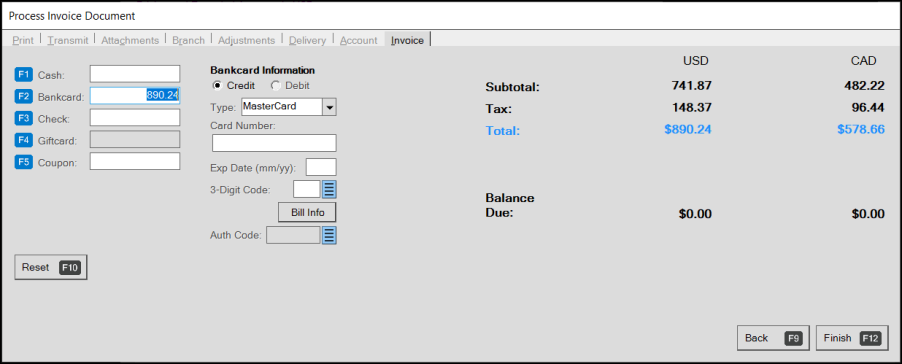
Process Invoice Document with Bankcard Field Populated
Note: If the customer has a Blue Tarp account, you can still use the F6 Blue Tarp function key to update the transaction settings.
When the customer chooses to pay by check, select F3 Check to update the Check field with the balance.
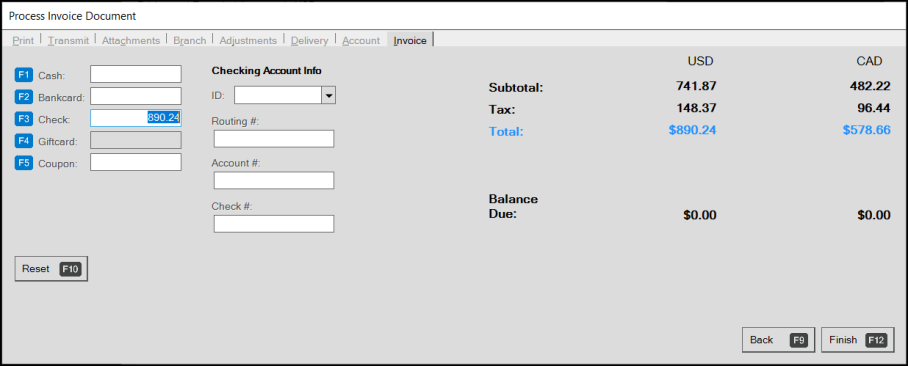
Process Invoice Document with Check Field Populated
If the Customer remembers they have a gift card or coupon, select F10 Reset and select F4 Giftcard or F5 Coupon as appropriate.
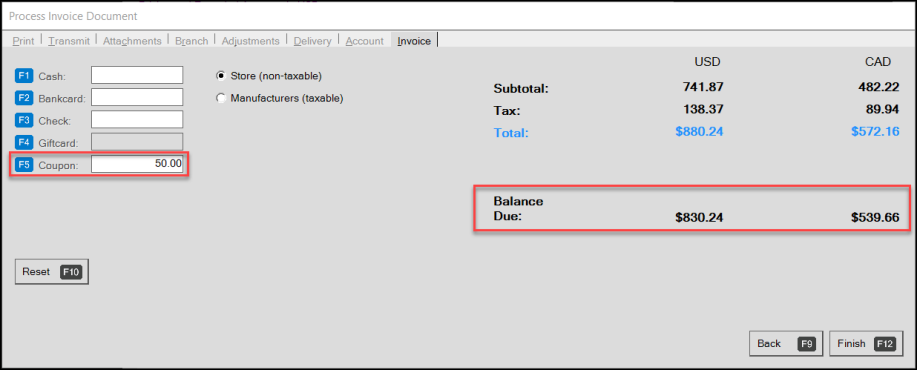
Process Invoice Document with Coupon Field Populated
The application places the cursor in the field you selected. Enter the coupon/gift card value and select Enter. The application updates the transaction information to reduce the balance amount.
Note: If local taxes apply to the coupon or gift card, the application updates the tax amount, so the appropriate tax amount contributes to the balance due.
If the customer prefers to pay with multiple tenders, type the amount of the first tender in the appropriate amount field. The application updates the balance amount. Then, select the appropriate function key to update the other tender field with the remaining balance.
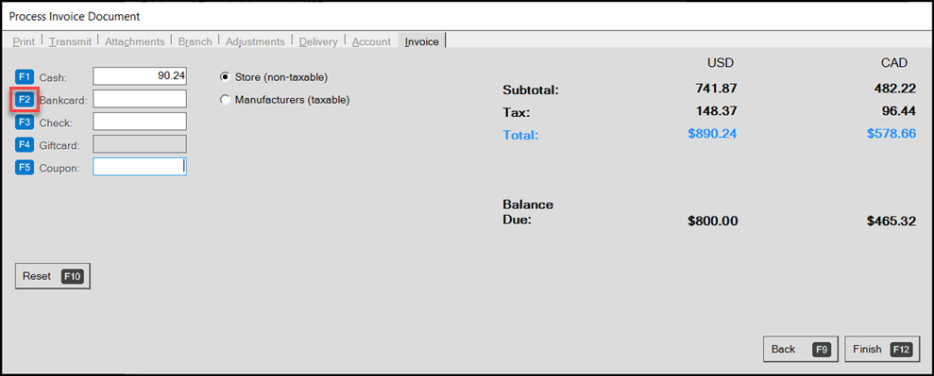
Process Invoice Document with Multiple Tenders In Progress
If the customer prefers to pay in a foreign currency, when you enter the document, select the Foreign Currency check box and use the same rules to process the transaction as you normally would. Cash rounding and the other regional settings still apply to these transactions.
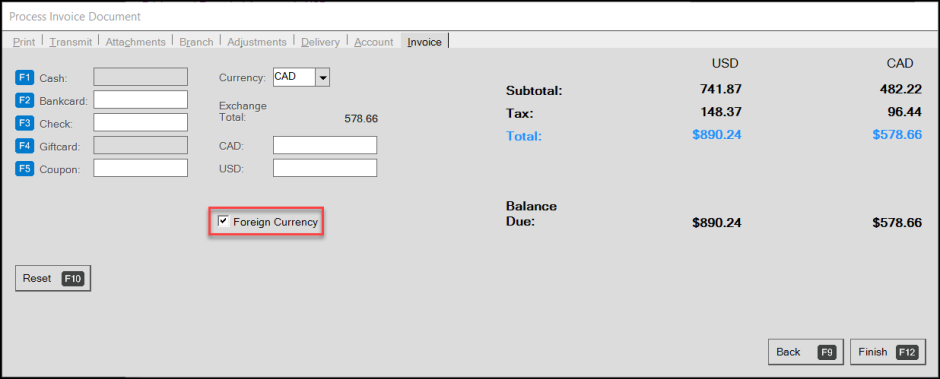
Process Invoice Document with Foreign Currency Check Box Highlighted
To return to the transaction form, select F9 Back. Select F12 Finish to process the payment.
New: Cayan M400 Devices Available for Point of Sale Processing
B-103796 – You can process your transactions through the application using the new Cayan M400 devices. You can run these devices via ethernet, Bluetooth, or Wi-Fi and USB host and client connections are available. It has more memory than the MX915 and has the same payment acceptance capabilities. It has a faster processor and enhanced security. These devices will be available through ECI very soon.To set up the M400 device, you need admin rights.
Note: We are in the process of upgrading existing Cayan Point of Sale devices to support the Genius 2.0 standard. If you use these devices, you should have received a FAQ document earlier this year that explained this process. After you upgrade to the 21 release, you are eligible for this upgrade. To learn more about this program, email your questions to GeniusUpgradeRequest@ecisolutions.com.
To set up a station with an M400 device:
1. From the Main Menu, choose Maintenance > Database > Devices to display the Device Maintenance form.
2. From the Device Name list, select the station you are setting up.
3. Choose the Signature Pad check box and from the Type List, choose Cayan.
The Cayan Device Settings box displays.
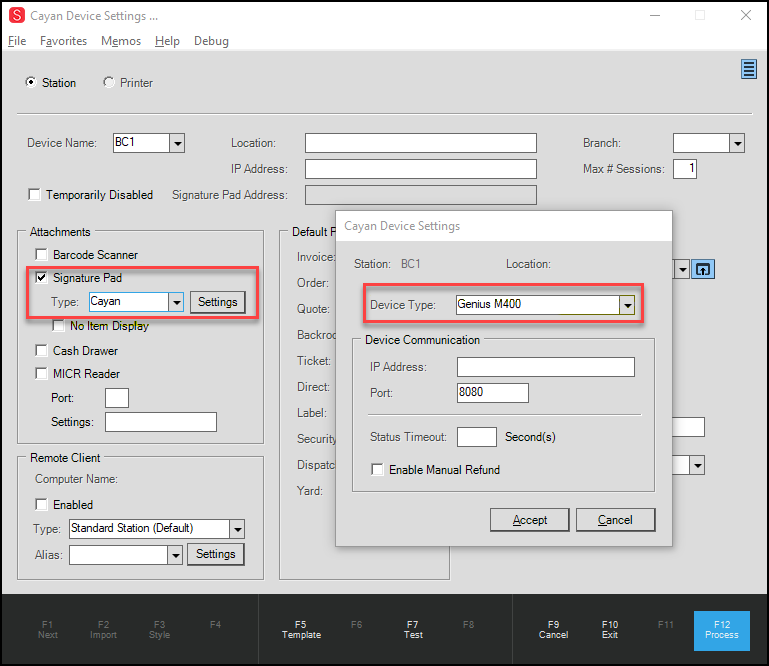
Cayan Device Settings Box with Genius M400 Device Type Entered
4. From the Device Type list, select Genius M400.
5. In the Device Communication box, enter the station's IP Address and Port information.
6. In the Status Timeout field, enter the status time out for this device.
The application sets a 60 second time out if none is selected.
7. Select the Enable Manual Refund check box if it applies. (Not Required)
8. When you have completed your entries, click Accept.
9. Choose Process (F12) to save your station changes.
Cayan: Changes to Manual Entry Options for Genius 2.0 Devices
B-104186 – When processing card options on a Cayan Genius 2.0 device, you need to be able to distinguish among debit, credit, and gift cards for Point of Sale transactions. To allow your customer to enter the card information manually, we have added the following process. The cashier must have sufficient permissions to complete manual card processes and be connected to a Genius 2.0 device. This process is slightly different from the one for Genius 1.0, so we show the differences for clarity.
To pay by credit card using the manual entry process:
1. Complete the Point of Sale entry process as you normally would and choose Process (F12) to process the payment. The Process Invoice Document form displays.
2. Choose Bankcard (F2) to add the total to the Bankcard field and display the Card Type options.
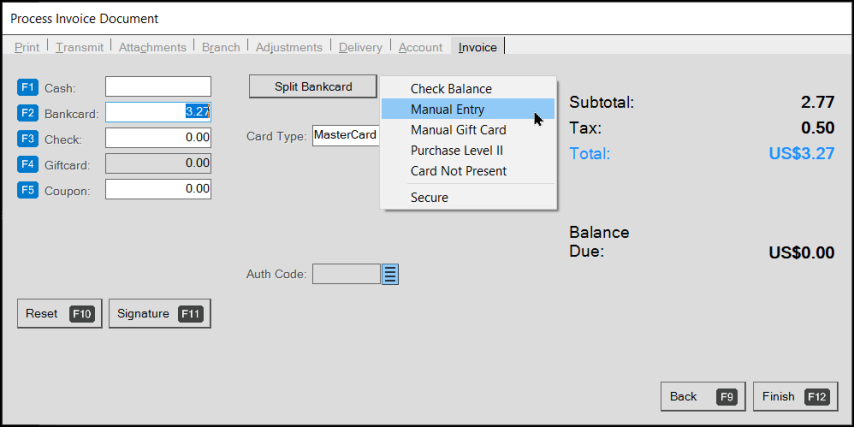
Process Invoice Document with Context Menu Option Manual Entry Selected
3. Beside the Split Bankcard button, choose the Menu Marker  and select Manual Entry from the list.
4. Choose Finish (F12). The Genius 2.0 device displays the total with a Pay Now option.

Genius 2.0 Device with Pay Now Button Displaying
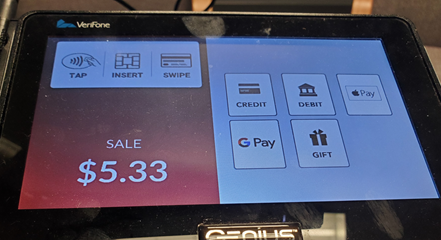
Genius 1.0 Device with Payment Amount Version
The Genius 1.0 device would have displayed the total with all payment options.
5. For Genius 2.0 devices, ask the customer to tap the Pay Now option.
The Genius 2.0 device then prompts the customer to enter their card number, their expiration date, their CVV code, and their postal code. When they have completed these entries, the Cayan device validates the entries and completes the transaction.
To allow the customer to pay for the transaction using a manual entry gift card:
1. Complete the Point of Sale entry process as you normally would and choose Process (F12) to process the payment. The Process Document form displays.
2. Choose Bankcard (F2) to add the total to the Bankcard field and display the Card Type options.
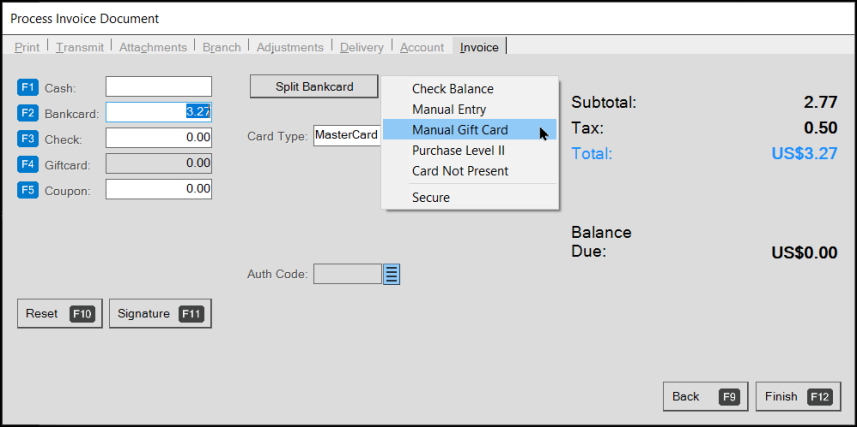
Process Invoice Document with Context Menu Option Manual Gift Card Selected
3. Beside the Split Bankcard button, choose the Menu Marker and select Manual Gift Card from the list.
4. Choose Finish (F12).
The Genius 2.0 device displays the total with a Pay with a gift card option.
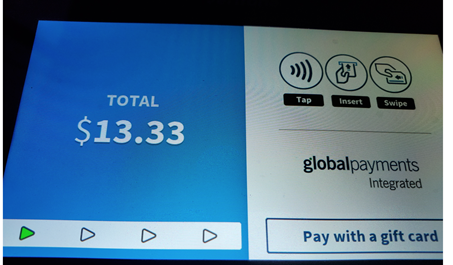
Genius 2.0 Device with Gift Card Prompt Displaying
Genius 1.0 Device with Gift Card Version
The Genius 1.0 device would have displayed the total with all payment options, including the Gift Card option.
5. Prompt the customer to tap the Pay with Gift Card option.
The Genius 2.0 device then prompts the customer to enter their gift card number in the field provided.
When they complete this entry, the device validates the gift card entry and processes the transaction.
Adding Delivery/Cartage Fees to Point of Sale Transactions
B-98793 – We developed the Aggregator process to help you group-like-materials to calculate delivery costs, to quantifying assembly work, to calculate total coverage for paint/wallpaper/driveway sealer, and any other process where grouping materials is useful.
In this release, we focused of using the Aggregator process to calculate delivery charges for your inventory items at Point of Sale according to the items your customer has purchased. The Aggregator calculates an item’s multiplier based on some physical aspect of the item (such as number, weight, length, area, volume).In a transaction, the application links these multipliers to an aggregator SKU, which adds delivery (and potentially other) charges based on the measurement values of the sold product (s). You can use your current delivery charge calculation method to define these costs.
For example, to calculate the delivery charges for an order that has:
-
Lumber/Timber, you could use a lumber/timber aggregator based on the number of board feet/meters, number of pieces, weight, etc.
-
Sheet Goods, you could use a sheet goods aggregator based on square feet/meters,
-
Sand/gravel, you could use a volume-based aggregator based on weight or cubic feet/meters
Each of these aggregators would appear separately in the data grid and show your customers the cost of transporting each type of item. You can use the Aggregator delivery calculation feature in Sales, Orders, Quotes, Direct Shipments, Open Tickets, and Charge Returns. You cannot use aggregator SKUs in Manufacturing Work Orders, Purchasing, or Inventory Transfers at this time.
You can also use Aggregators for non-delivery processes. We focus this section on calculating delivery costs.
IMPORTANT: You are responsible for defining the relationship between the linked items and the aggregator SKU because you know your inventory best. You can use your current method to charge for delivery of materials. The delivery charges for the inventory items you link to the aggregator SKU will be a sum based on multipliers assigned to those items. The application calculates the total based on the quantity and units of measure at the Point of Sale. To set up your inventory items in the Aggregator, see Setting up the Aggregator to Quantify Inventory. The setup must be complete before you can create the aggregator SKUs.
Understanding the Aggregator Type and Method
Aggregator SKUs use a Type to quantify the delivery size and a Method to specify how to handle the charges for the load back and forth. There can be several similar Aggregator SKUs that represent the same items but for different delivery conditions.
Aggregator SKUs allow your business to group items you need to deliver/pick up by Type based on their physical characteristics using:
-
Total Quantity for any items whose delivery charges would be determined as a piece/box/each.
-
Total Lineal (Length) for any items whose delivery charges would be determined by their length.
-
Total Area for any items whose delivery charges would be determined by their area.
-
Total Volume for any items whose delivery charges would be determined by their volume.
-
Total Weight for any items whose delivery charges would be determined by their weight.
Aggregator SKUs use the Method to specify whether/how to account for the delivery/pickup of the transported items by:
-
Positive Quantity > Use this method when you are delivering items only or you do not intend to charge for pick up (negative quantities).
-
Negative Quantity > Use this method when you are picking up items only or you do not intend to charge for delivery (positive quantities).
-
Absolute Quantity > Use this method when you are charging for item delivery and pick up.
-
Net Quantity > Use this method when you are charging for item delivery and crediting the account for pick ups.
Your inventory is assigned to aggregator SKUs so their quantities are included in the deliver charge calculation. So, after you add the items to the data grid, and add the aggregator SKU(s) for those items, the application can calculate a default delivery charge. You can adjust this amount in the Point of Sale when necessary.
Important Aggregator Notes
-
The application applies all multipliers to the BASE measure quantity of the items in inventory, which may not match the measure listed for the quantity in the transaction.
-
Even though aggregator records are stored in the Inventory area, the application handles them like adjustment codes, so they don’t appear on inventory reports.
-
You cannot use Aggregator assignments for e-Commerce sales at this time.
-
After you create an aggregator SKU and use it in Point of Sale, you cannot delete it or merge it.
The supported use for this feature is for calculating cartage fees and other charges associated with delivery and shipping. You may use this feature for other purposes in the future, but we cannot anticipate every need in this regard.
WARNING: In addition to the Inventory and Point of Sale setup, you need to define detailed general ledger mapping for the inventory to record aggregator SKU use financially. The application does not perform this work automatically.
Using the Aggregator SKU to Calculate Delivery (Cartage) Charges
B-98801, B-98802, B-98803, B-98804, B-98805, B-98808, B-98809 – After you add the customer’s items to the data grid, you can add the corresponding aggregator SKUs. Your customer can see the charges by item type, and the Point of Sale documents also display the delivery/cartage charge information. You can apply aggregator SKUs to sales, orders, quotes, direct shipments, open tickets, and charge return transactions.
You cannot enter the same aggregator SKU to the data grid more than once in a single transaction. If you enter items into the data grid for delivery without adding their defined aggregator SKU(s), a message displays pointing out which items are missing their SKUs.
To add Aggregator charges to a transaction:
1. From the Main Menu, go to Point of Sale, choose the transaction type, and add the customer’s items to the Point of Sale data grid as you usually would.
2. To choose the appropriate aggregator SKU(s), consider the aggregator SKU(s) make sense:
-
What materials determine the aggregator SKU(s) I need?
For example, for SKUs based on the type of material (Hardwood, Lumber, Sheet Materials, etc.), look for those types of SKUs.
-
What type of delivery charges determine the aggregator SKU(s) I need?
For example, is this a delivery only, a pickup only, are we charging for delivery and pickup, or are we charging for delivery and crediting for pickup?
3. In the data grid, enter the appropriate aggregator SKU(s) based on your assessment. The Qnty column updates to show the aggregator total based on the item quantities associated with that SKU. You can update this quantity manually if you need to.
Note: If you manually change the aggregator SKU quantity and then later update the item quantity values in the data grid, the application recalculates the aggregator SKU value and replaces your manual entry. For this reason, it is best to add the aggregator SKUs at the end of the data grid list.
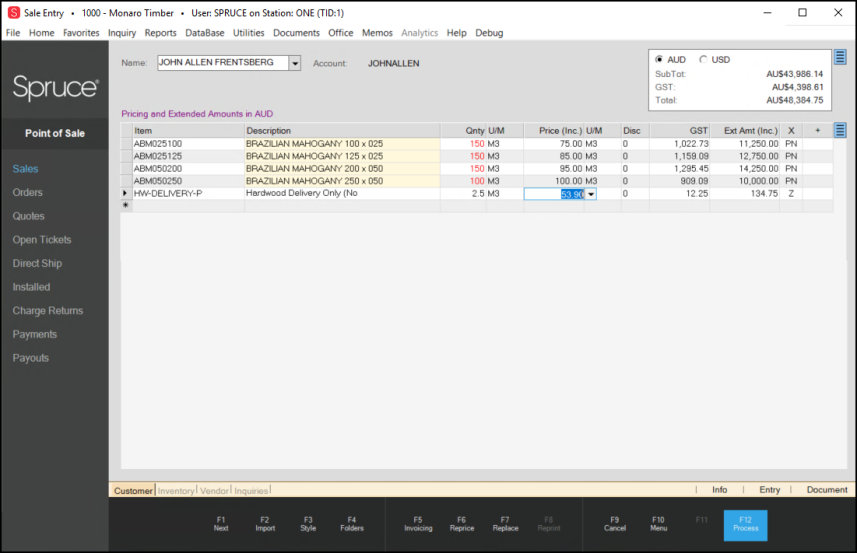
Sale Entry Form with Aggregator SKU Entered
When you make changes to the items in the data grid, such as adding new items, changing the quantities of existing items, or removing items from the data grid, the application updates the aggregator SKU(s) to reflect any changes that affect the multiplier value.
Note: Repricing items in the data grid does not affect the pricing in the aggregator SKU. Only changing the item quantities or adding new items change the aggregator SKU values.
4. In the Price field for each aggregator SKU, review the default price. Continue based on what you decide:
-
If you want to keep this price, for example, to a round number, continue to the next step.
-
If you want to change this price, enter the unit price you want to apply to the aggregator SKU and press Enter.
The Extended Amount field updates with the Aggregator charge.
Note: You can change this value to arrive at the amount you want display.
5. When you import a quote or an order into the data grid, the application preserves the original quantities and amounts from the Point of Sale record.
If you reprice the SKU entries in the data grid (that is, you change the SKU price from the amount listed in the order or quote) or change the quantities of the items in the data grid, the application will prompt you to choose whether to update the aggregator SKU.
-
If you choose Yes, the application updates the aggregator SKU with any new values that apply.
-
If you choose No, the application leaves the imported quantities and items as they are.
6. When you are happy with the Delivery (Cartage) amount, select Process (F12) to process the transaction. If the aggregator SKU(s) are not at the bottom of the list, the application moves them there.
The application evaluates the items in the data grid to determine whether there are duplicate items, duplicate aggregator SKUs, or to check if there are deliverable items not listed in the aggregator SKUs. When the application finds any of these conditions, a task list displays, listing each issue based upon the severity. The application shows an icon in the data grid beside the items you need to correct / remove.
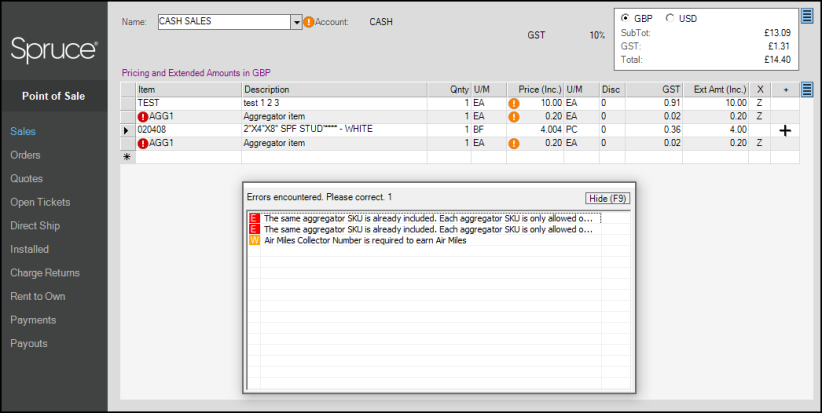
Sale Entry Form with Aggregator Error and Warning Messages
Note: Sometimes, you cannot tell that items in material lists (BOM) are part of an aggregator calculation. The Aggregator still considers them part of the delivery and includes these items in its calculation, even if, due to Bill of Materials setup, the items do not display individually in the data grid.
7. After you correct any errors and the transaction can proceed, select Process (F12) to display the Process Invoice Document form, which displays the transaction total, including tax.
8. When applicable, complete the Delivery tab tasks and select Finish (F12) to process.
9. Check the printed document or go to Documents and look up the transaction to view the itemized delivery information.
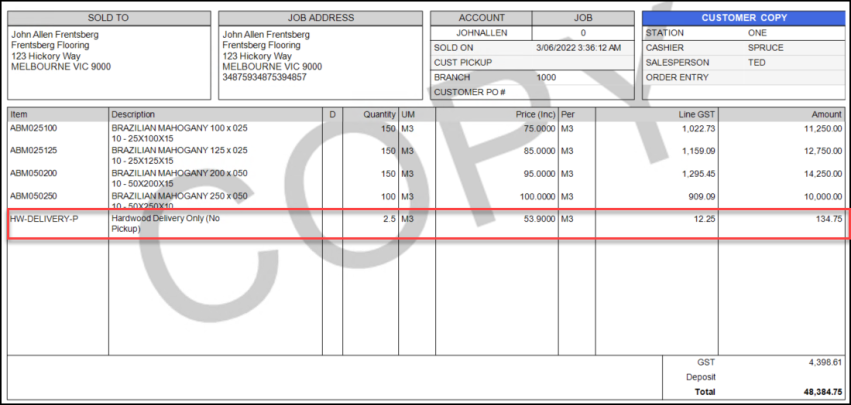
Invoice with Delivery Charge Highlighted
Application Resize Focuses on POS and Utility Forms
B-95903, B-95904, B-95906, B-96899, B-96902, B-96904, B-96912, B-96915, B-96917, B-96918, B-96919, B-96921, B-96925, B-97867, B-97868, B-97869, B-97870, B-97878, B-97880, B-97881, B-101235 – In this release, we have completed work on the forms in Point of Sale, the Delivery Utilities, the Accounts Payable Utilities, the General Ledger Utilities, the Miscellaneous Activities, and the Accounts Receivable Utilities. We have updated the amount fields in the folders in Point of Sale, Inventory, Accounts Receivable, Purchasing, Delivery, Accounts Payable, and General Ledger. This meant expanding many of the fields that display cost and other financial amounts to provide enough space for local currency values and labels. In most cases, we expanded the amount fields to 24 characters. In AP Billing, we also expanded amount fields in the Recurring Billing Maintenance form to ensure successful GL accounting management.
General Ledger Updates
New Protections for General Ledger Chart of Accounts
B-56535, B-100644 – When you are looking at the Chart of Accounts, you want to make sure that someone is not deleting an account, even if the account only has a beginning balance. We have added new protection for General Ledger accounts that prevents the deletion of any account that contains a beginning balance.
The criteria for this protection include the following General Ledger account types:
-
All accounts included in the System Journal Mapping
-
All accounts included in the System Journal Mapping
-
All accounts in the Detail Mapping
-
All accounts in the Branch Detail Mapping
-
Any account that has a BEA year
-
Any account that has any journal entries, regardless of posting status that are linked to journals
When you attempt to delete an account that matches these criteria, the application displays an error message:
-
Account may not be deleted - Detail mapping contains account
We have also added additional task list validation for Manual Journals to warn users when they are adding journal entries to "protected" accounts. The application expects these accounts to match other detailed data maintained by your ECI application. Making changes to these account balances outside of normal application activity can cause discrepancies between the recorded activity and the expected ledger balances. These types of problems can be difficult to track down later.
In General Ledger, when you make journal entry changes to any of the following accounts and select Process, a task list displays to allow you to assess whether to make those changes:
-
Payables: A/P Accrual Account (Billing), Accounts Payable (Billing), and Accounts Payable (Disbursement)
-
Receivables: Credit Adjustments, Debit Adjustment, Payments Applied (Posting), Adjustments Applied (Posting), Memos Applied (Posting), Charges Paid (Posting), Finance Charges Paid (Posting), and AR/Finance Charges
-
Inventory: Inventory Adjustment, Inventory (Transfer Out), Inventory (Transfer In), Inventory – Sales (Cost Corrections), Inventory – Returns (Cost Corrections), Finished Goods (Manufacturing), and Raw Materials (Manufacturing)
-
Point of Sale: A/R Charges (Sales), Inventory (Sales), A/R Credit Memos (Returns), Inventory (Returns), A/R Credit Payments (Misc. Payments), Charge (Misc. Payments), Charge-Deposit Refund (Payouts), and A/R Charges (Direct Sales)
-
Receiving: Received Inventory (Purchases) and A/P Accrual Account (Purchases)
Note: The entries in (parentheses) are the category settings for these journal entries.
Please note that the application also restricts branch accounts that match the account in the mapping.
The application will check for system and detailed mapping when you process manual journals. The application will display a message when any restricted accounts are included in the ledger entries.
For existing customers, the application displays the validation messages as warnings.
For new customers, the application displays the messages as errors based on the recommendations of the ECI Implementation and Training team. If you see a "restricted" message during Manual Journal processing, regardless of the severity, you should carefully consider whether it is appropriate to continue. In most cases, you can use software operations that affect these accounts independently.
GL Inventory Reconciliation Report: A Snapshot of Inventory Valuation
B-100645 – Many customers have asked us to give them a way to see their inventory on hand reconciled with the stock’s GL value. We have created the General Ledger Inventory Reconciliation report to accomplish this request. This report shows the inventory activity for a date range that highlights potential discrepancies between the ledger asset value of the inventory and the real value of the inventory on hand. While using an average cost valuation does not provide an exact match between the ledger amount and inventory in stock, the differences between the two valuations should be small and remain relatively consistent over time.
In general, this report is broken down into three sections (as you choose):
-
The first section contains a comparison of the perpetual inventory value compared to the GL inventory value as of the close of business on the last day of the report (as selected).
-
The second section lists the transactions for the report period where there is a difference between the stock value and the GL inventory account balance change.
-
The third section contains a listing of any specific alerts the application has found based on the challenges associated with the inventory reconciliation itself. This section can provide coaching to your business about the specific reconciliation issues in their inventory calculation and reconciliation process
Note: It may be useful to produce this report outside of normal business operation times, as generating it will use many resources.
Creating the GL Inventory Reconciliation Report
To run the General Ledger Inventory Reconciliation report:
1. From the Main Menu, go to General Ledger > Reports > GL Inventory Reconciliation to display the General Ledger Inventory Reconciliation Report form.
![]()
General Ledger Inventory Reconciliation Report (Empty)
2. As with all reports, we give you a variety of criteria to use to generate the report.
The Selection Options list allows you to begin by selecting the report’s overarching criteria:
-
Select the Date Range button and enter the beginning and ending dates of the report in the fields provided. The date or date range is required.
-
Select the Document Type button to select the type of GL-based records to use for evaluating the inventory stock. Options include existing reports available in the application: PS Sale Invoices, PS Charge Returns, IN Receipt Cost Corrections, IN Inventory Adjustments, IN Item Cost Corrections, IN Physical Counts, Yard Transfers In, Yard Transfers Out, and PO Inventory Receipts.
Choose Select All to include each of these report sources, or select the check box beside each source you want to include. The application does not select any options by default. -
Select the Inventory button to display the inventory options and choose Select Inventory to display the Inventory Selection list. Options include: All Inventory Items, particular inventory groups and sections, a particular vendor or group of vendors, inventory at a particular location, inventory classification (by Product ID, Range, Department, Class, and /or Subclass), or even a particular item.
3. In the Filter On section, you can choose None (for no filter) or you can filter on Discrepancies.
If you choose Discrepancies, you can specify a discrepancy threshold amount. The report would then highlight discrepancies above that threshold.
Note: In the Discrepancies Threshold field, the application defaults to the local currency set for the region.
4. In the Sort By section, you can sort in ascending or descending order by Branch, Transaction Type, Date/Time, Discrepancy Amount, or Group Section.
5. In the Totals section, you can organize the results of the report using Sub Totals, Grand Total, or None, and you can choose Print Totals Only to display the totals in the print version of the report alone.
6. In the Branch section, choose the branches you want to include in the report by selecting the check box beside each branch you want to include.
7. In the Print Options section, you can choose to print or save the report locally, based on your preferences. You can save the report in various formats as a document or a spreadsheet. These settings are no different from any other report.
8. In the upper right hand corner, there is an Include Sections list. These are the sections of the GL Inventory Reconciliation report, which you can include (by checking the option check box) or exclude (by leaving the check box unchecked).
-
Check the Ending Date Summary check box to summarize the value of the inventory stock based on the weighted average cost as of the last date of the report.
-
Check the Reconciliation check box to document the date/time/user ID, type description, and GL debits and credits showing the stock value changes in the discrepancy cost and correction notes.
-
Check the Setup Alerts check box to notify you of anything the application thinks you left out of the report that may be useful before you execute the report.
9. When you have completed your selections, you have several options:
-
Select Save (F6) to save the report. When you choose Save, the Save Report Settings box displays.
Enter the Report name, a description, and indicate whether the report is Public or Private. Then, select Accept. -
Select Preview (F8) to display the results of the report visually, but not print or save yet.
-
Select Process (F12) to display and process (print or save) the report locally.
The option to schedule the report also displays and that is covered in the next section.
Note: As with any report of this size and scope, this will take some time to generate.
Scheduling the GL Inventory Reconciliation Report
B-100646 – After you have crafted this report the way you want it, you can schedule it so that it runs at a specific time each day, week, month, or yearly. You can schedule it to run off hours, so it does not interfere with other application or business processes.
To schedule the GL Inventory Reconciliation Report:
1. Before you get started, you need to know the Schedule Report Directory path, which authorized users can find in Maintenance > Database > Parameters on the Setup > System tab. Copy and paste the path listed in the Scheduled Report Directory field somewhere nearby, because you will need it later.
2. Follow the instructions in Creating the GL Inventory Reconciliation Report to create the report parameters you want. In the Print Options section, choose the Output to File check box and choose a file location, a report name, and format type for the new report in the fields provided.
3. Select the Save (F6) option in step 9.
4. Select Cancel (F9). The application resets the page.
5. Choose Select (F5). The Select Report Settings box displays.
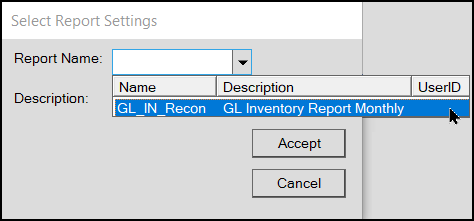
GL Inventory Reconciliation Report > Select Report Settings
6. From the Report Name list, choose the name of the report you want to run and select Accept.
The application updates the report fields with the choices you saved in the report.
7. Select Schedule (F7) to display the Schedule this Task list.
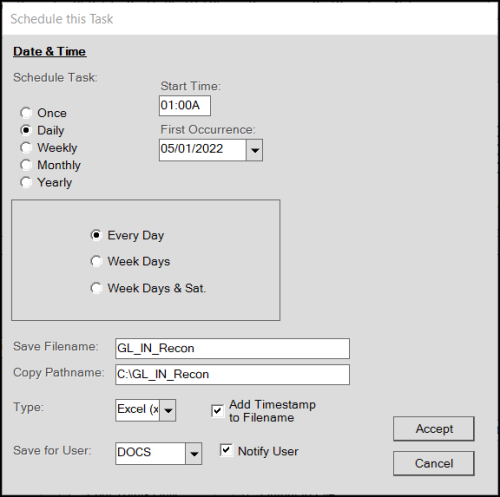
General Ledger Inventory Reconciliation Report > Schedule this Task Box
8. Consider when you want to run this report, how frequently, the time of day, and the file-specific settings in this box:
-
Schedule Task: Choose one of the following: Once, Daily, Weekly, Monthly, or Yearly.
-
Start Time: Enter the hour you want the report to run. Note: Typically, you may want to schedule this report when the location is closed, so it doesn’t interrupt other normal business operations.
-
First Occurrence: Choose the date of the first report from this list. The entries in the box are specific to the Daily, Weekly, Monthly, Yearly selection you made above.
-
Select Year/Month/Weeks/Days details: Use these fields and buttons to specify the recurring details for running the report. When you select Monthly, make sure you specify all of the months you want the report to run.
-
Save Filename: Choose the filename for the report.
-
Copy Pathname: Enter/paste the path to the Scheduled Report Directory folder, which you found in step 1.
-
Type: Select the report type (PDF, Excel, etc.) and check the Add Timestamp to Filename box to put the date and time stamp on the file after it has been generated. This will help you keep track of the reports by date in the same folder.
-
Save for User: To restrict access to this report, choose the user ID of the person for whom the application is generating the report. Select the Notify User check box to send an email message to this user after the report is complete. The application uses the email address stored in the user’s User ID Maintenance form.
9. When you have completed these entries and selections, select Accept to save them.
After you schedule this report, you can view it in the Task Scheduler.
Go to Maintenance > Task Scheduler and look up the day the report is scheduled.
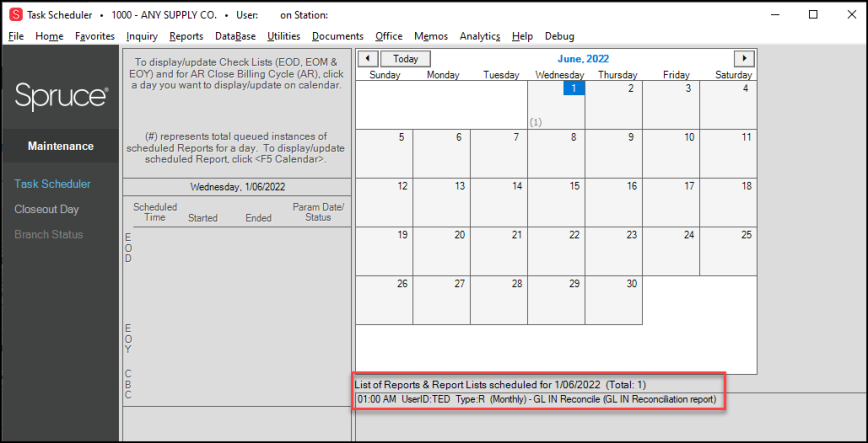
Task Scheduler with GL Inventory Reconciliation Report Scheduled
See Also: General Ledger Inventory Reconciliation Report
Price Management Updates
Account Payment Convenience Fees Made Easy
B-94094, B-94295, B-94335, B-99541, B-99542, B-100106 – When you need to process a credit card payment for a Receivables account, that costs you money. Adding a convenience fee allows your customer to pay their account their way and helps you maintain your profit margin. After the Convenience Fee setup and mapping are complete, the application will apply Convenience Fees automatically to any account that pays all or part of their balance using a credit card. Before you implement a Convenience Fee policy, we recommend that you add a note to your customer statements alerting them of this new policy and when you will be implementing it.
Disclaimer: When you apply Convenience Fees to account payments paid by credit or debit card, there may be legal, tax liability, and/or contractual restrictions that may apply in your area. Further, adding this charge may affect the terms of your card merchant or other contractual agreements. Your company is responsible for researching these legal regulations, liabilities, and restrictions to determine whether you can comply with them when applying the convenience fees in this application. ECI and the software applications we provide are not responsible for making these determinations on your behalf, nor do we claim this feature is suitable for your company. You are not required to use the Convenience Fee feature; only you can determine whether a convenience fee is appropriate for your business. Before enabling this feature, we recommend you work with your local legal and financial counselors to ensure you can apply Convenience Fees where you are.
A Note about Tax Liability: The Convenience Fee feature has no automatic consumer tax impact and does not include a tax component. Specifically, existing tax reports and transaction details at the time of sale do not include convenience fees because they are applied to payments afterward. If convenience fees are considered taxable in your area (when charged at the time of payment (VAT/GST, etc.), you need to report and pay these taxes manually. Convenience fees are recorded as income (based on your GL mapping in the application) and impact your company’s financial reporting. We also recommend you track any convenience fee taxes using the appropriate GL accounts.
You can also completely prevent bank card payments for Receivables accounts by updating the severity on a task list to an error. This prevents credit card payments during the processing step in the Point of Sale > Payments transaction. Managers or employees with administrative rights can override this setting, if needed.
Convenience Fee Setup
There are two steps required to set up and implement the Convenience Fee feature:
-
Setting the Convenience Fee Parameters
Allows you to set the default convenience fee percentage by branch for each credit card your business accepts.
-
Mapping the Convenience Fees to the Appropriate Journal Account
Allows you to specify which journal account to apply the Convenience Fees to. Once this mapping is established, the application will manage this for you.
Setting the Convenience Fee Parameters
B-94295, B-99535 – To set the Convenience Fee parameters, you must have administrative rights to the application. When you set these parameters, we recommend setting them for each branch that uses the feature. You can set separate rates for various credit cards, based on their charges, if you wish, or you can set one percentage for all cards. You can include or exclude debit cards from this fee.
To set the Convenience Fee parameter:
1. From the Main Menu, go to Maintenance > Database > Parameters to display the Parameter Settings form.
2. Select the Receivables tab to display the Card Convenience Fee options.
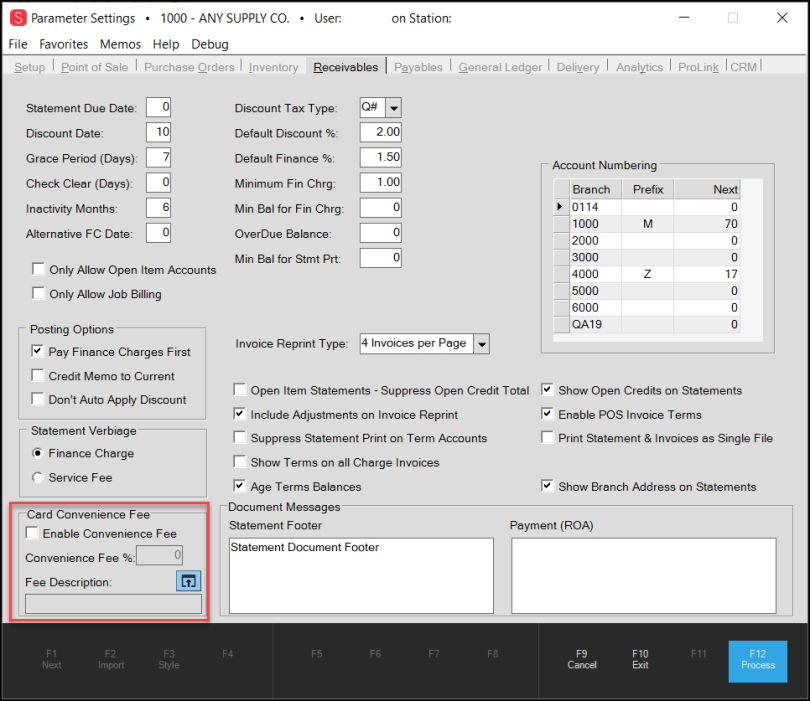
Parameter Settings > Receivables > Card Convenience Fees Options
3. In the Card Convenience Fee box, select the Enable Convenience Fee check box.
4. Select the Fee Description Settings ![]() icon to display the Convenience Fee Setup box.
icon to display the Convenience Fee Setup box.
If you choose to set different rates for different cards, the Card Type list displays the list of cards from the Parameters > Setup > Software tab. Only cards in that list are configurable in this feature.
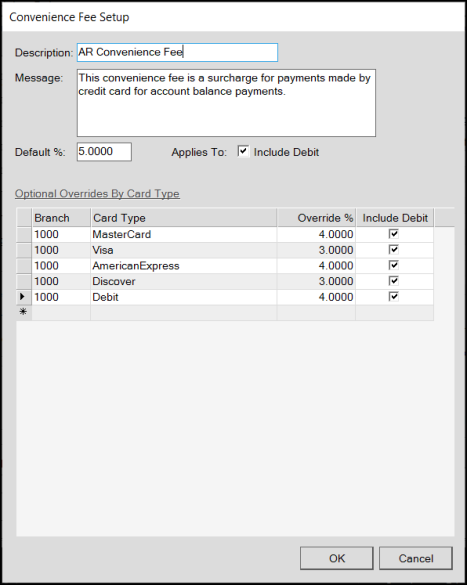
Convenience Fee Setup
In the data grid, you cannot enter duplicate records for the same branch.
5. Complete the settings in this box for each card you accept at each Branch.
-
Description
Enter a description for the Convenience Fee. This is the text that displays beside the convenience fee transaction amount in the customer’s invoice document. (Required). -
Message
Enter the message you want to display on the customer’s invoice explaining the convenience fee when the customer pays their balance by credit card. This message only displays when the application applies a Convenience Fee to an account payment. -
Default Percent
Enter the default percentage for any card you accept that you do not explicitly list in this box. This percentage is the default for all cards and branches.
This entry must be a positive number, and it cannot exceed 99.9999%. The application applies the default convenience fee percentage to any debit cards you do not list specifically in the data grid. -
Include Debit
Select this check box if you intend to include convenience fees for debit card payments by default for all card types. -
Data Grid Entries
For each branch, enter records for any credit card type that requires a different convenience fee percentage from the setting in the Default Percent field. The application applies the percentage you set in this list whenever an account payment uses this card type. You can sort this list by selecting the Branch heading.
Note: If you leave out any branch/card combinations, the application displays a warning message to allow you to verify you want to apply the default settings to these cards -
Debit check box
Select the Debit check box if the Include Debit check box is not selected and you want to apply the same convenience fee percentage entered for a particular card type to the associated debit card account payments.
You can include or exclude Debit cards by default (check box at the top) or include debit cards by card type if you prefer by selecting the appropriate check box(es).
Note: When you add a new branch location, you need to add any necessary Convenience Fee settings if you want to add specific fees to apply for that branch in this table. This is not completed automatically. If you do not add new entries, the application applies the default percent to transactions that incur convenience fees.
6. When you have completed these entries, select OK to save them. The application updates the parameter settings based on your entries.
![]()
Card Convenience Fee Entries Complete
7. Choose Process (F12) to save these settings. An error message displays, reminding you to set the mapping for this fee in the Journal Account.
Note: When you create this fee, you need to complete the journal mapping so the company can track this asset appropriately.
8. Complete the steps in Mapping the Convenience Fees to the Appropriate Journal Account and then return to these instructions.
9. Choose Process (F12) again to clear the error message and complete the setup process.
Mapping the Convenience Fees to the Appropriate Journal Account
After you set the Convenience Fee parameters, it is important to map these payments to an appropriate journal account. A default script adds a new AR Convenience Fee entry in the System Journal Setup form, but you need to add the appropriate journal account to track these incoming funds.
To map the convenience fees to a journal account:
1. From the Main Menu, go to General Ledger > Database > System Journals to display the System Journal Setup form.
2. In the Journal Type list, choose Point of Sale.
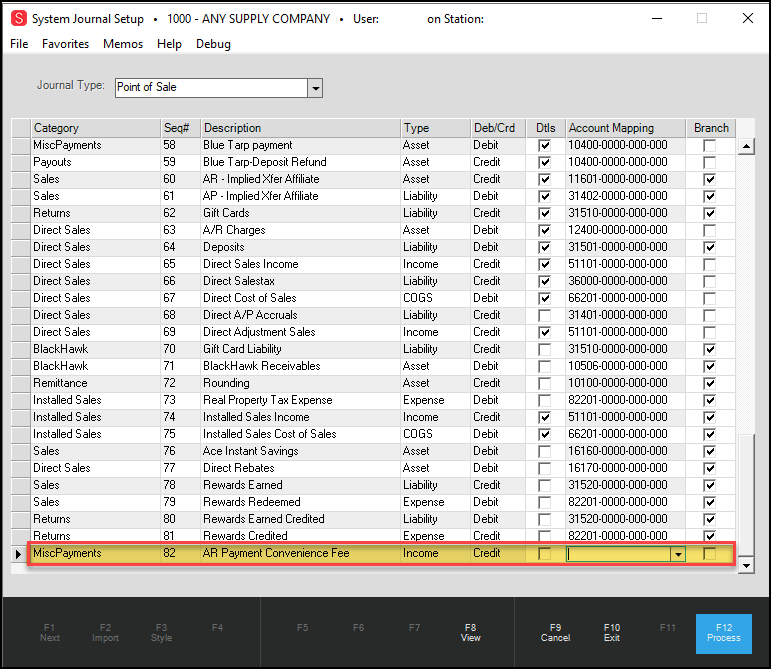
System Journal Setup with MiscPayments Entry for Convenience Fee Payments
3. Scroll down to find the AR convenience fee entry you created in the Description field in Step 5 of the Setting the Convenience Fee Parameters.
4. From the Account Mapping list, choose the appropriate business's account to track this payment amount and select the Branch check box. Checking the Branch box ensures that the application records these payments by branch.
5. When you have completed your mapping settings, select Process (F12) to save the change.
6. Return to the Parameter Settings > Receivables tab and select Process (F12) to update the journal mapping.
Applying a Convenience Fee to an Account Payment
B-94099, B-94295, B-100101, B-100102 - In the Point of Sale > Receive on Account task, when you select the bankcard option (and the Convenience Fee settings are in place), the application applies the convenience fees by default. You can override Convenience Fees at Point of Sale if you need to, with the proper permissions. In regions with currency rounding rules, these rules also apply to Convenience Fees.
Note: If the customer’s bankcard cannot authorize the entire payment amount, they cannot use the card for the payment. When the payment fails, the following message displays to explain the issue:
-
Partial payment not available when convenience fees are active; card transaction voided.
To see the Convenience Fee to be applied at Receive on Account:
1. From the Main Menu, choose Point of Sale > Payments > Receive on Account to display the Accept Payment form.
2. From the Account Name field, select the account you want to process the payment for.
3. In the Amount to Apply field, enter the amount the customer is paying.
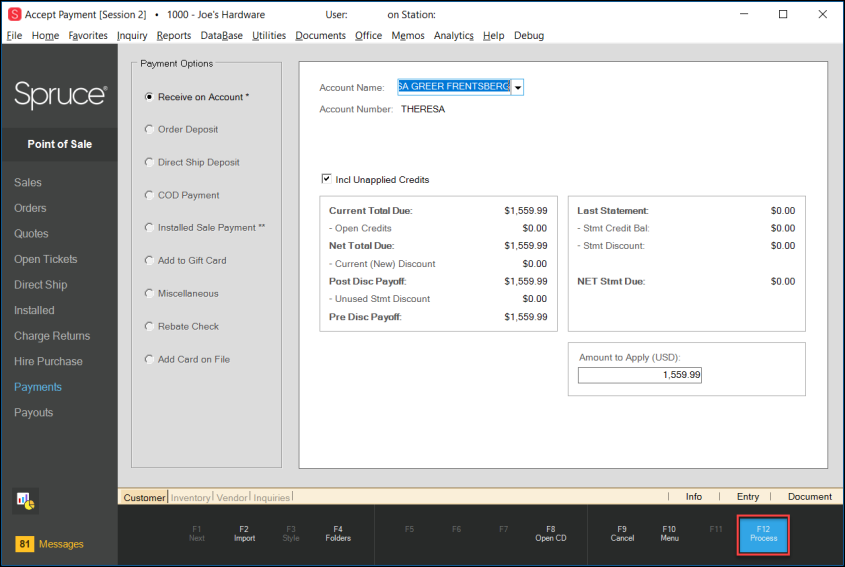
Accept Payment Form with Receive On Account Amount Applied
4. Select Process (F12) to display the Process Payment Document.
5. Select BankCard (F2) to display the debit and credit card options for the account.
Note: The application does not select a default credit card when Convenience Fees apply. Since the fee rate may vary and depend upon the card you choose, the application cannot apply the convenience fee until you complete the credit card entries.
6. Select the Credit or Debit button and choose the credit card type.
Note: The percentage set for the Mastercard credit card in this case is 4%.
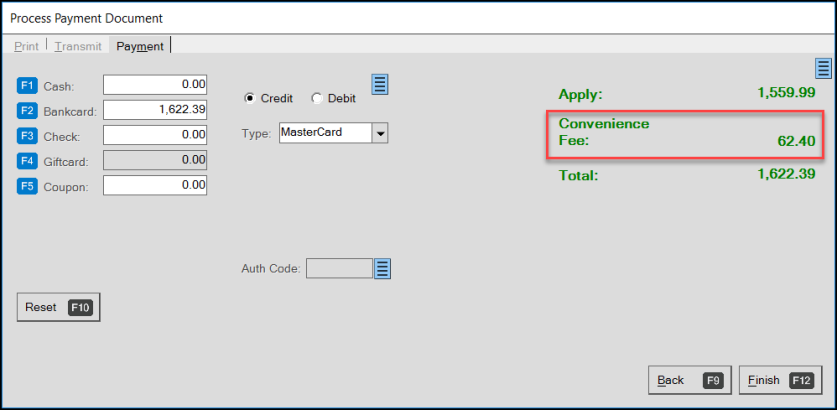
Process Payment Document for Receive on Account Payment with Credit Card
Note: If the customer wants to make a partial payment using another tender type (such as cash, coupon, gift card, etc.) and it affects the bankcard balance, the application adjusts the convenience fee using the new Bankcard amount.
7. If you change the credit card type, and the percentage setting is different, the Convenience Fee updates.
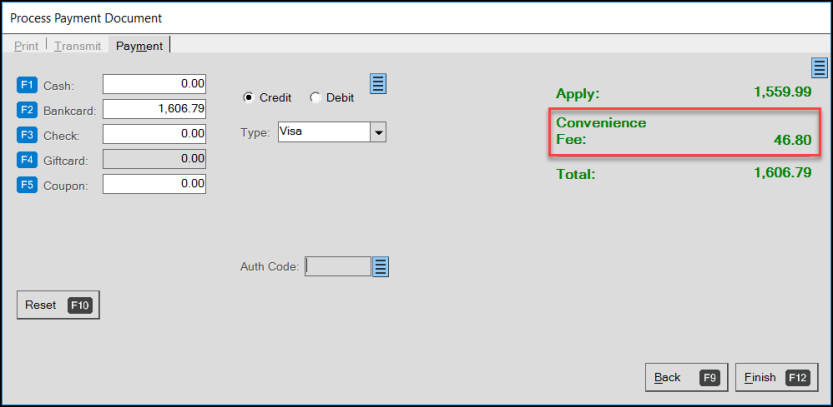
Process Payment Document for Receive on Account Payment with Different Card Percentage
To override the convenience fee in the Process Payment Document box, select the blue Menu Marker to display the override option.
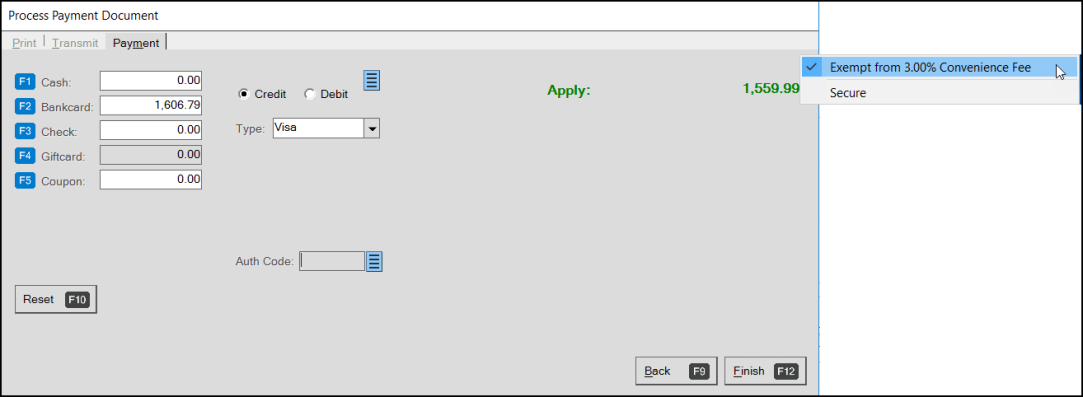
Process Payment Document with Override Message
Select the Exempt from X.XX% Convenience Fee option. The application removes the convenience fee from the transaction. Uncheck the option to redisplay the Convenience Fee.
Note: If you override the convenience fee, re-enter the original amount in the Bankcard field to reflect the total without the convenience fee.
8. Complete the credit card entries and select Finish (F12).
When you pay with a credit card or override the payment with a credit card, a warning message displays:
-
Bankcard payment type specified for Received on Account
9. Select the Accept Warnings option to continue.
10. To review the Payment document, go to Documents > PS Sales Invoices (Account Name).
The customer copy of the invoice displays. The message at the top is the message entered in the parameter settings. The AR Convenience Fee (Percentage) reflects the Convenience Fee percentage charged.
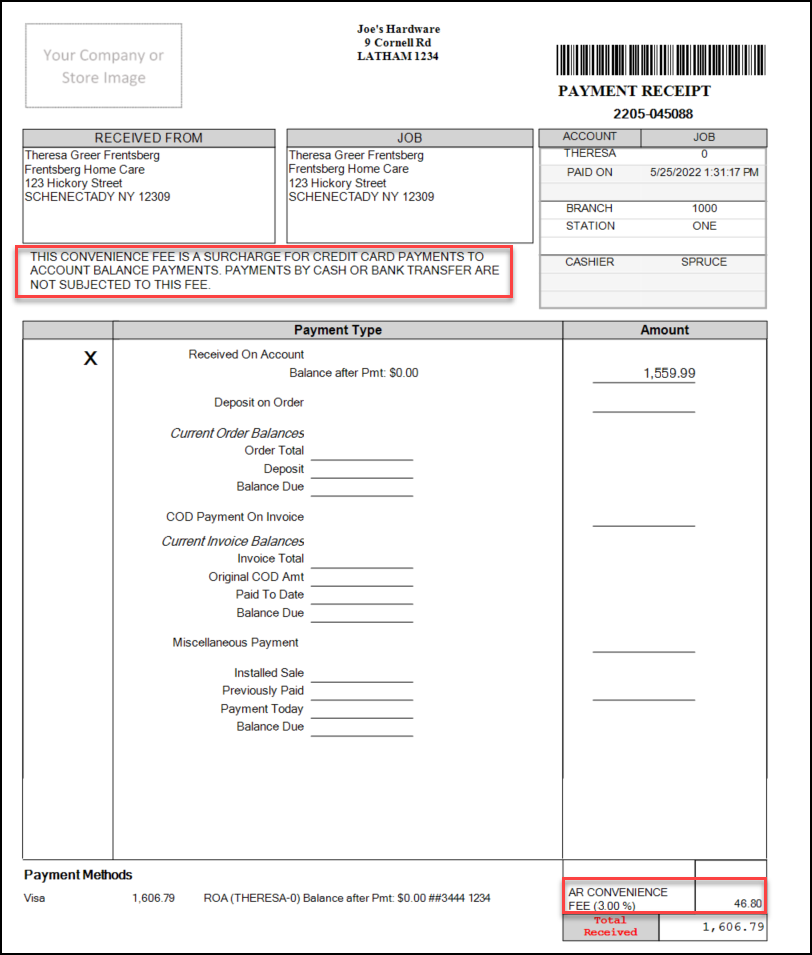
Invoice Document with Convenience Fee Message and Entry Highlighted
B-94102 – When you complete a transaction with a convenience fee, the application updates the appropriate general ledger account for the End of Day report and the EOD Cashier’s Report. Convenience fees display as separate line items.
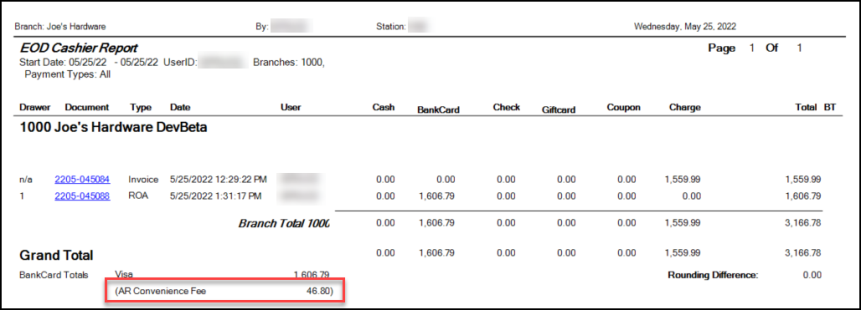
Convenience Fee on EOD Cashier Report
Using Moneris Devices to Process Payments with Convenience Fees
For businesses that use Moneris devices for bankcard processing, the Process Payment Document form does not display a list of card options by default, except when cards are not integrated. Since selecting the debit and credit options and choosing the card type are required for the Convenience Fee feature, we have made some changes to how bankcard processing works for Moneris-paired devices in the application.
For Moneris devices with integrated cards, we have added the Card Type list and the Credit and Debit buttons to the Process Payment Document form; these features now display by default. The Card Type list also displays non-integrated cards, but the Moneris system will not process these payments automatically. You still need to process those payments manually outside of the application.
We have renamed the Type field, Trans Type, which displays the Credit/Debit option when you choose Bankcard payment options.
When you process the account payment using the Receive on Account feature, you enter the customer’s requested payment in the Amount to Apply field and choose Process (F12) to display the Process Payment Document. When the customer asks to pay using credit or debit options, follow the process below.
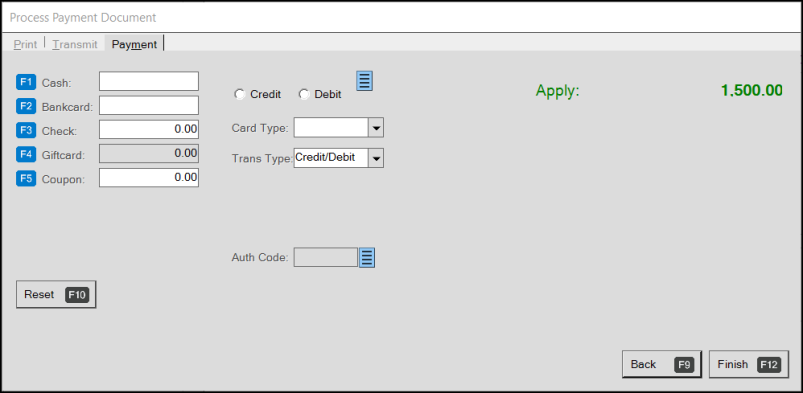
Process Payment Document (Initial)
To process a convenience fee with a payment using Moneris devices:
1. In the Process Payment Document form, in the Bankcard field, enter the amount the customer wants to apply to their account balance.
2. Choose the Credit or Debit button depending upon the customers requested transaction type.
3. From the Card Type list choose the bankcard the customer wants to apply the payment to. The appropriate Convenience Fee amount displays and updates the Bankcard field amount.
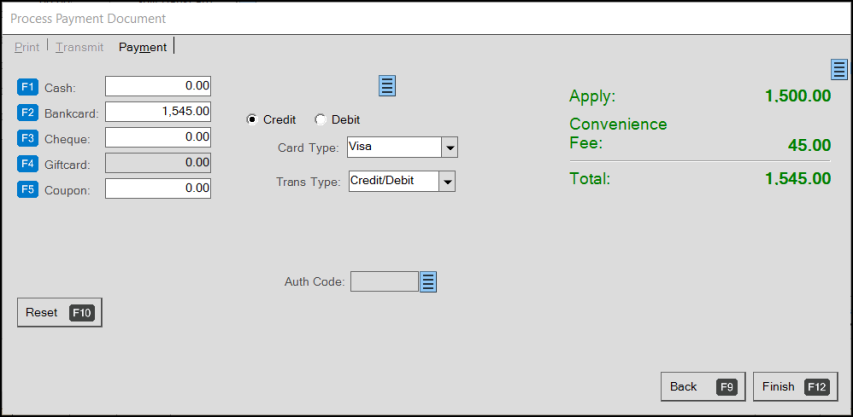
Process Payment Document with Convenience Fee Options Displaying
Note: The application still uses the entry in the Trans Type list to signal the type of payment you are processing to the Moneris device. If you select a non-integrated card type from the Card Type list, the application expects you to process that payment using a different device or method. If you select an integrated card from the Card Type list, the Moneris device processes the payment as it normally would. If you leave the Card Type list entry blank, the device assumes you are paying using the Mastercard bankcard type.
4. To process the payment, choose Finish (F12). One of these things occur:
-
If you chose an integrated bankcard or debit card, the Moneris device processes the payment with the Convenience Fee.
-
If you chose a non-integrated bankcard or debit card, the transaction completes with the convenience fee, but the application assumes you are using another payment validation method.
Integrated or non-integrated Moneris card settings are defined in the Parameter Settings > Setup > Software subtab. You must have administrative rights to set or modify these entries.
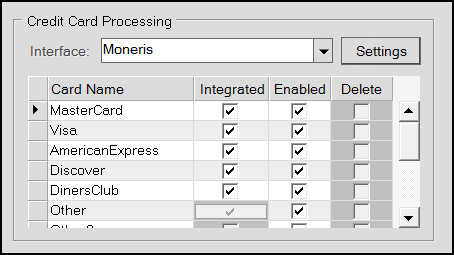
Parameter Settings Form > Setup > Software Subtab > Credit Card Processing Settings Sample
Processing a Convenience Fee using ProLink
B-100108 – You can also use ProLink to apply convenience fees to accounts with balance forward settings, when you have completed the Convenience Fee setup. No additional configuration is required for this to work on ProLink.
To process a payment with a convenience fee for a customer in ProLink:
1. Log into ProLink and access an account with a balance forward amount.

ProLink with Account Activity to be Paid
2. Select Make a Payment. The Make a Payment page displays.
3. Enter a credit card payment amount (such as 45) and the Convenience Fee amount displays (updating the total).
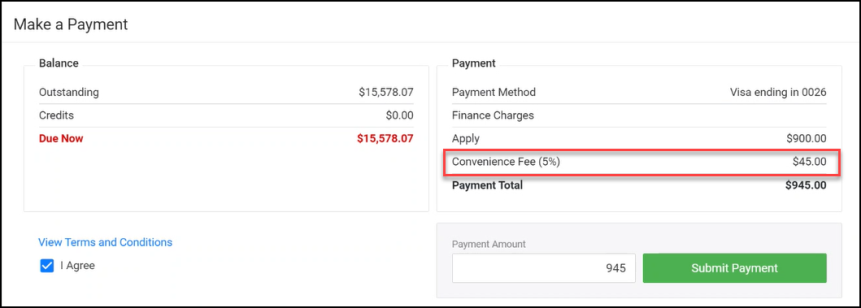
ProLink – Make a Payment with Convenience Fee Highlighted
4. Select Submit Payment. The confirmation message displays confirming the Payment total amount.
5. Do one of the following:
-
Click OK to accept the payment change.
-
Click Cancel to return to the Make a Payment options and change the payment method.
Applying a Convenience Fee to a Specific Invoice
You can also see the Convenience Fee applied to a specific invoice if the customer wants to pay that way.
To see the convenience fee applied to a specific invoice in ProLink:
1. Login to ProLink with the same account as above.
2. Select the Select Invoices button to display the list of open invoices.
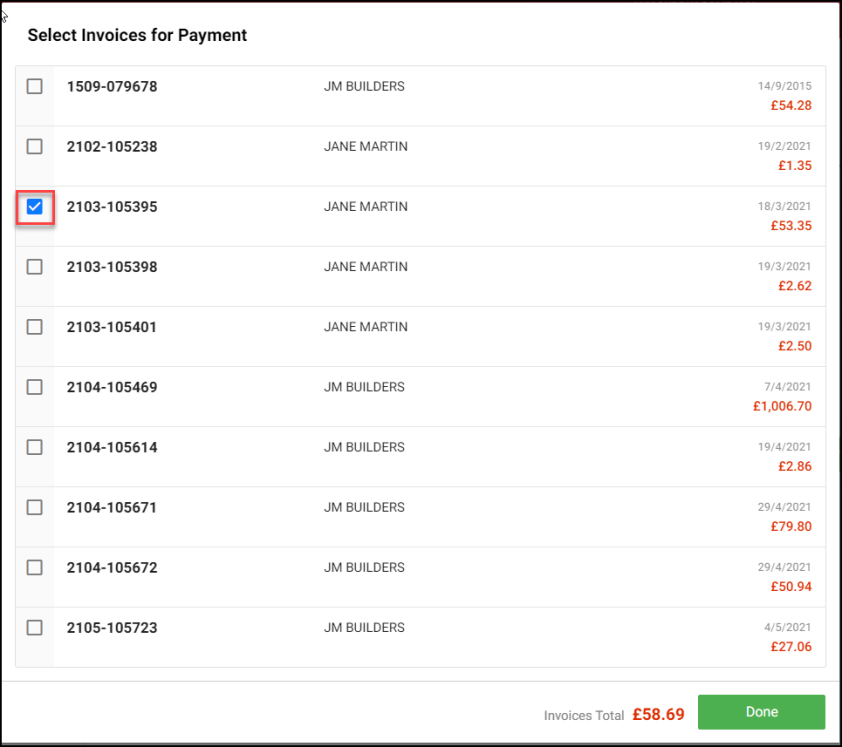
ProLink – List of Open Invoices
3. Select the check box beside the invoice you want to pay and choose Done. The Make a Payment page displays.
4. Enter a credit card payment amount for the full amount and the convenience fee field updates.
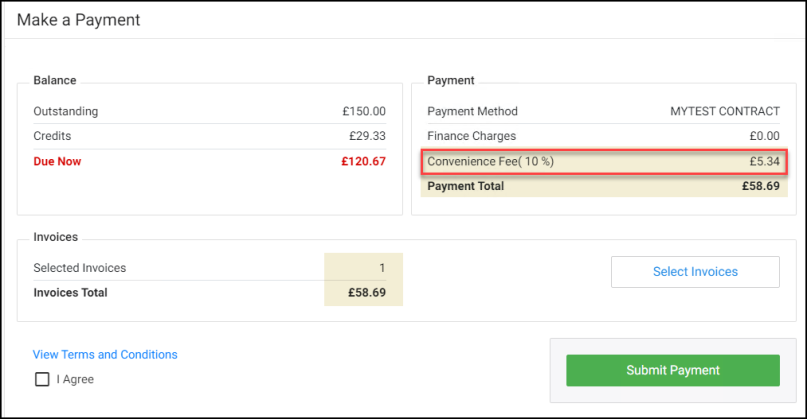
ProLink – Make a Payment with Convenience Fee Amount Highlighted
5. Select Submit Payment. The confirmation message displays confirming the Payment total amount.
6. Do one of the following:
-
Click OK to accept the payment change.
-
Click Cancel to return to the Make a Payment options and change the payment method.
Importing E-Commerce Payments and Applying Convenience Fee
B-94100, B-94101 – When you import a customer’s on-line purchase, you can apply a convenience fee for using a credit card. You can select the account in ProLink to make the payment request as well.
To import an e-commerce payment:
1. From the Main Menu, go to Point of Sale > Payments > Receive on Account to display the Accept Payment form.
2. In the Account Name field, choose the account you want to process the payment for.
3. Select Import (F2) and choose the E-Commerce option.
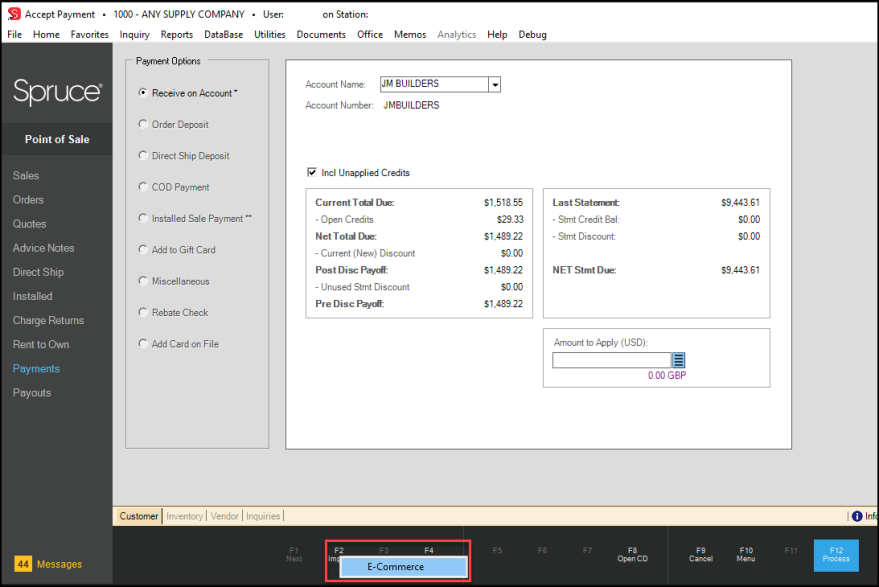
Accept Payment Form with Import E-Commerce Option Highlighted
The Import E-Commerce Payment box displays.
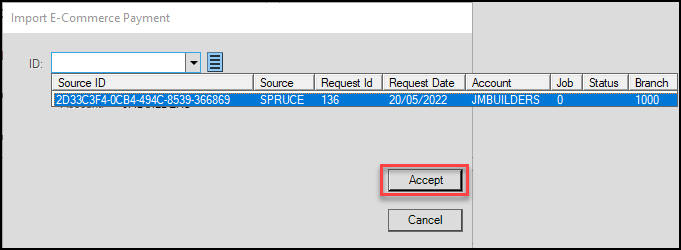
Import E-Commerce Payment Box
4. Select the payment ID from the list and select Accept.
The application adds the payment amount in the Amount to Apply field. The entered amount is read-only.
5. Select Process (F12) to process the payment. The Process Payment Document box displays.
The application applies the convenience fee automatically based on the e-commerce record.
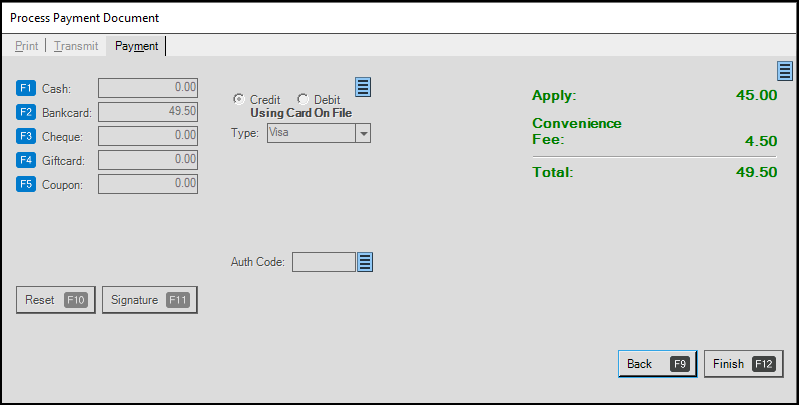
Process Payment Document with Convenience Fee Applied Automatically
6. Select Finish (F12) to complete the transaction.
When you review the convenience fees in your general ledger accounts, you notice that they display like this:
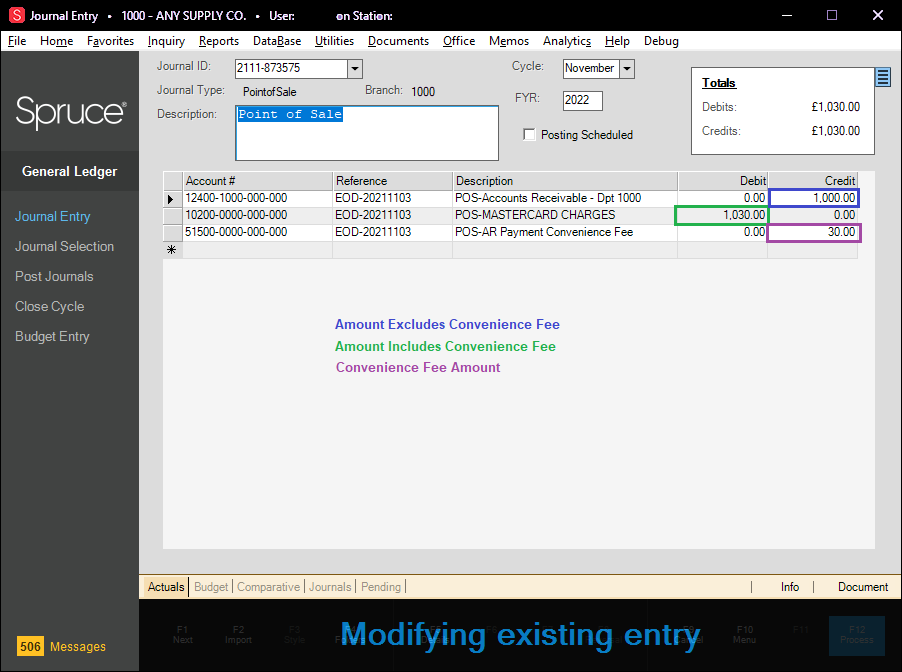
Journal Entry Form with Convenience Fee Mapping Shown
Creating Job-Level Price Groups to Manage Competitive Bids
Job-level price groups allow you to define a pricing strategy for a specific job and maintain that strategy as the job is executed. It is a lot easier to keep track of the profitability of a job when you can manage the costs in one place over time. Using job-level pricing, you can change the price strategy for a category that may have taken many hours before but can now be implemented in a few minutes, with few mistakes, and for only one job.
Job-level pricing takes precedence over account-level pricing, sale pricing, volume discounts, POS quantity U/M, U/M price, or price levels for the account. Job-level price groups are valid for Sales, Orders, Quotes, Open Tickets, Direct Shipment, Installed, and Charge Return transactions. Job-level pricing is applied to contract pricing, if an account contract exists.
Note: When you choose the Ignore Price Groups option for a particular item, the application ignores job-level pricing too.
To create a job-level price group for an account with an existing account-level price group:
1. Begin by creating a price group that contains the job-level pricing you want to apply to the job. Instructions for creating a price group are here. The instructions for creating a job-level price group are no different from creating an account-based price group.
2. From the Main Menu, go to Point of Sale > Database > Job to display the Job Maintenance form.
3. In the Account field, choose the account associated with the job you want to apply the job-level price group to.
4. In the Job ID field, select New. The account record displays with the existing account details.
5. In the Overrides tab, scroll down to the Price Group entry.
6. Uncheck the Use Master Setting check box to display a new list box.
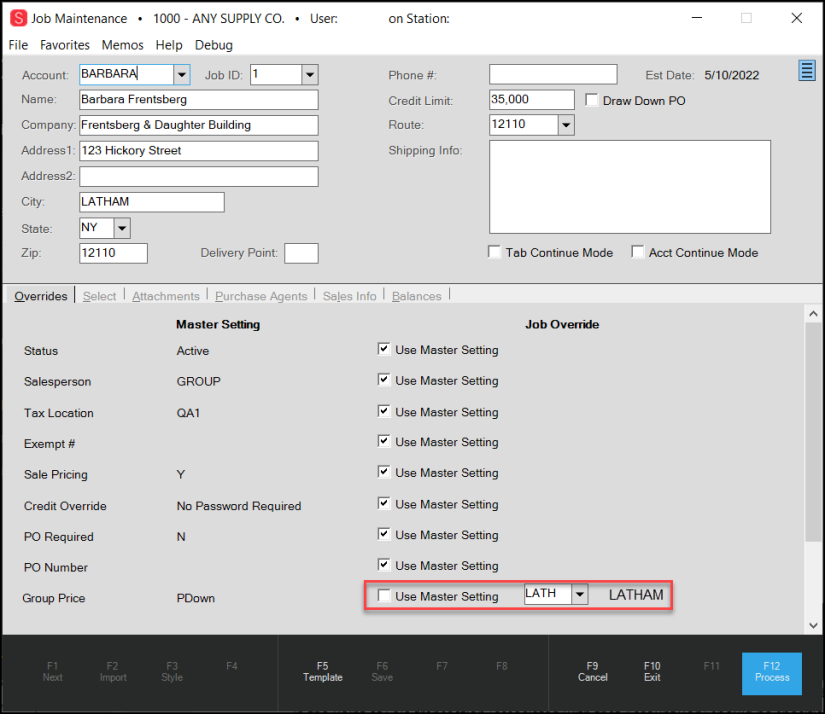
Job Maintenance Form with Price Group Entry Highlighted
7. From the Price Group list box, choose the job-level price group you created in step 1.
Note: If you do not select an entry from the list, an error displays.
8. Choose Process (F12) to save this change.
After you create the job-level price group and associate it with the account-based job, the default pricing in the Point of Sale transaction (associated with that Account/Job) should be specific to the job price group. When you add an item you specified in the inventory list in the data grid, the default price is the one specified by the job-level pricing. This amount is the Customer Price in the UM drop down list.
-
If you change the job after you enter the items in the data grid, the application prompts you to reprice the entries in the grid so you don’t apply the job-level price to another job.
-
If you change the account after entering the items in the data grid, the application also prompts you to reprice the entries in the data grid.
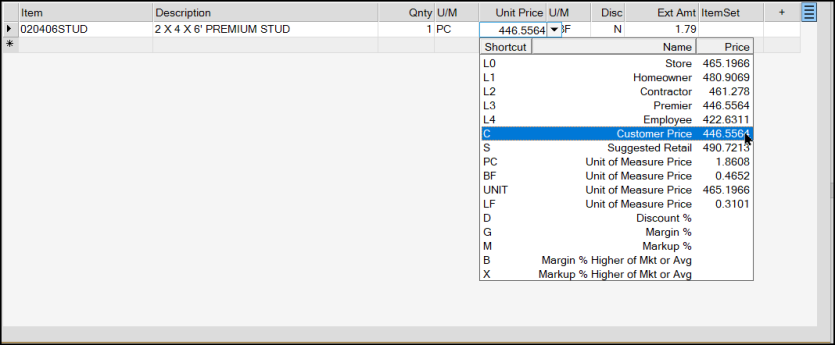
Order Entry Form with Customer Price Highlighted (Job-Level Pricing)
Added Job Name to Posting Payments Form
B-103546 – When you are posting a payment to an account record that has multiple jobs, it can be confusing to differentiate the jobs so you can apply the payment to the right one. We have added the name of the person associated with the job to the Posting Payments form to help you post incoming payments correctly. You can set the name of the person responsible for the job in the Job Maintenance window in the Name field. To see this change, the account has to have the following settings:
-
Posting Type: Open Item
-
Billing Level: Account
To see this change:
1. From the Main Menu, go to Receivables > Posting to display the Posting Payments form.
2. Choose an account that has multiple jobs associated with it and different names associated with the job. The account details display in the data grid:
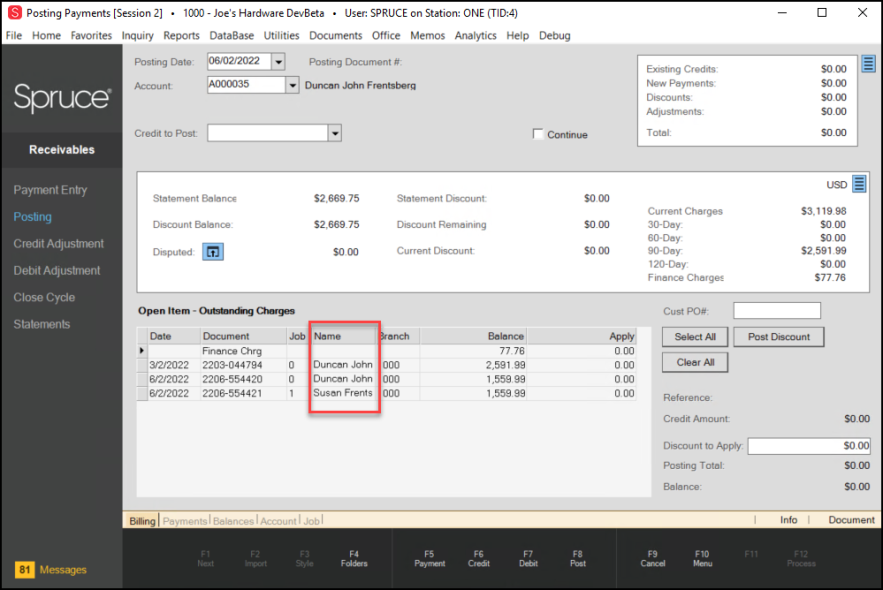
Posting Payments Form with Job Name Field Highlighted
Inventory Updates
Using the Aggregator to Quantify Inventory (Spruce Only)
You can use the Aggregator feature to quantify your inventory for many different purposes. In this section, we cover how to use it to set up delivery charges only.
To use the Aggregator to calculate delivery charges, you create Aggregator Types that combine the way inventory is quantified with the method your business uses to charge for delivery and pickup. By adding your inventory to these aggregator types, you create Aggregator SKUs that define the multipliers the application will use in Point of Sale transactions to calculate the delivery charges for the materials your customers are purchasing. This section describes how to use the Aggregator to create those Types and SKUs.
The Aggregator setup requires additional security. To specify the user(s) who will create and support this feature, follow the instructions in Granting User Permission for Creating Aggregator Records. Then, these are the Aggregator tasks:
-
Create the aggregator types for each branch that combine the type and method settings, the item measures, and the delivery prices for the materials you need to transport. See Creating the Aggregator Type.
-
To keep track of the inventory and delivery accounting, create a new Group/Section type and add the appropriate GL mapping for the delivery/cartage amounts and asset values. See Setting the GL Mapping for the Delivery Group/Section.
-
Use the Aggregator Maintenance Utility to tie the aggregator types to specific inventory items. See Adding Inventory to the Aggregator Type.
-
Educate the Point of Sale team on the use and rules associated with delivery charges (cartage) and show them how to add the appropriate aggregator SKUs to the data grid. See Using the Aggregator SKU to Calculate Delivery (Cartage) Charges for these instructions.
Warning: In the Point of Sale data grid, if you set the Aggregator's quantity to LF (linear feet), but the multipliers on the products associated with the Aggregator are based on MLF (thousand linear feet), the application does not correct for that. The application will calculate the quantity based on MLF, not LF, and the wrong unit of measure will display. There is no fixed or direct relationship between the Aggregator's units of measure and the linked items; it's just a multiplier associated with the base unit of measure on the linked items only.
To learn more about how the application uses the Aggregator in Point of Sale, see Adding Delivery/Cartage Fees to Point of Sale Transactions.
Granting User Permission for Creating Aggregator Records
Users must have specific permissions for creating and modifying Aggregator records. You must complete the steps below to see the Aggregator Maintenance option in the Inventory > Utilities list.
To update a user’s permission to create and manage Aggregator records:
1. From the Main Menu, choose Maintenance > Database > User IDs. The User ID Maintenance form displays.
2. In the User ID list, choose the User ID of the person or group you want to grant the Aggregator creation/management rights to.
3. In the Security Options tab, choose the Settings ![]() icon next to the Permissions List option. The Permissions List Code Maintenance pop up box displays.
icon next to the Permissions List option. The Permissions List Code Maintenance pop up box displays.
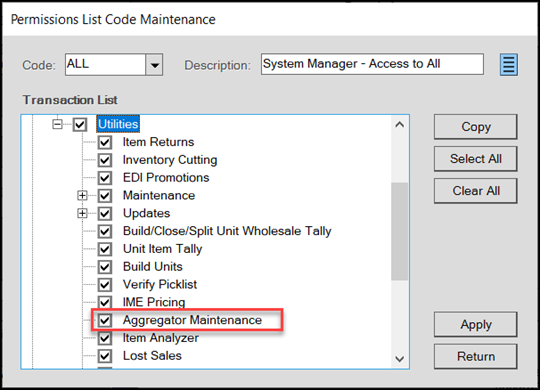
Permissions List Code Maintenance (Aggregator Maintenance Checked)
4. Navigate to Inventory > Utilities > and choose the Aggregator Maintenance check box and choose Apply. The database updates.
5. Choose Return to return to the User ID Maintenance form.
6. Choose Process (F12) to save this change.
Understanding Aggregator Types
B-98723, B-98724, B-98772, B-98773, B-98774, B-98775 - You create Aggregator Types in the Item Maintenance form to quantify the inventory you need to deliver and establish pricing for these deliveries and pickups. Aggregator types are a combination of aggregator item types, which define the how the items are measured (by length, area, volume, weight, or by piece) and aggregator methods, which define how your business charges for the transportation of those items. You create as many aggregator types as you need to cover the inventory you need to deliver.
Aggregator item types, such as Lumber, Sheet Goods, and Hardwoods, for example, have different units of measure, which you quantify by length, area, volume, weight, or by piece in inventory. Consider how you quantify delivery charges for these materials and choose one of these aggregator item Types. If you charge for delivery based on the items’:
-
Number, choose Total Quantity. The Aggregator will use the number of items purchased as the multiplier.
-
Length, choose Total Lineal. The Aggregator will use the items’ length as the multiplier.
-
Area, choose Total Area. The Aggregator will use the items’ length x width calculation as the multiplier.
-
Volume, choose Total Volume. The Aggregator will use the items’ length x width x depth calculation as the multiplier.
-
Weight, choose Total Weight. The Aggregator will use the items’ weight as the multiplier.
The multiplier times the number of each item the customer purchases, gives you a way to quantify the amount of material you are transporting. Each aggregator type should be associated with a base unit of measure so the quantity calculation is consistent.
After you choose how to quantify your items, you pair this with the Method of delivery so, at Point of Sale, you can choose the delivery calculation method that is appropriate for the circumstances. If you:
-
Charge for items’ delivery only, choose Positive Quantity
-
Charge for items’ pick up only, choose Negative Quantity
-
Charge for items’ delivery and for pick up, choose Absolute Quantity
-
Charge for items’ delivery and credit for items’ pick up, choose Net Quantity
Keep track of these two pieces of information, as you will need them in step 7 in the instructions below. You only need to create aggregator types for your chosen delivery methods and materials.
Creating Aggregator Types
B-98713, B-98714 – When you create an aggregator type, it remains in inventory for any transaction you need to process. Though aggregator types are saved globally, these types are specific to a branch based on the branch’s tax settings. They form the basis for the Aggregator SKU, which pairs the type with the actual inventory covered by the SKU.
If you are using this feature for delivery, and you have a charges group already, we recommend that you create a new section for Delivery Charges (Cartage) to track the income/payments associated with this service. A new section can help you manage and track this income and inventory assets (sold and returned) separately.
Note: There are many different ways you can use Aggregators. Depending on how you use this Aggregator, you will want to map this appropriately to your general ledger accounts.
To create an aggregator type:
1. From the Main Menu, choose Inventory > Database > Item to display the Item Maintenance form.
2. In the Item field, type the name of the Aggregator item and press Enter.
This will be used at Point of Sale to identify the items and type of delivery that is occurring, so consider that when you choose a name.
3. In the Description field, enter a description for this aggregator type:
-
You may want to enter the type of material used for this type
-
You might want to include the Type and Method values
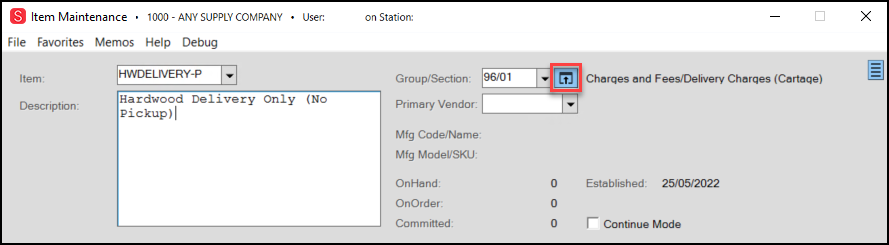
Item Maintenance Form with Aggregator Item Name, Description, and Group/Section
4. Beside the Group/Section field, choose the Settings ![]() icon to display the Group/Section Maintenance box.
icon to display the Group/Section Maintenance box.
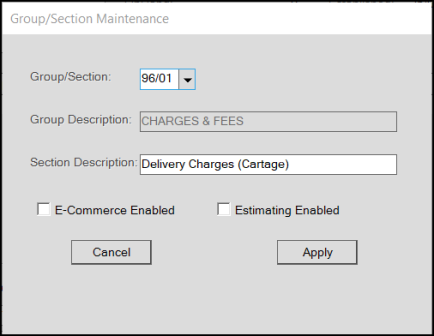
Group/Section Maintenance with Entries
You only need to create this Group/Section entry the first time you use these instructions. Next time, you can just select the defined delivery charges entry.
5. In the Group/Section Maintenance box, add a new entry for Delivery Charges (Cartage) and leave the E-Commerce Enabled and Estimating Enabled check boxes unselected. Then, choose Apply. The Item Maintenance form redisplays.
6. In the Common > Measures tab, select Aggregator from the Item Type list. A new Aggregator section displays.
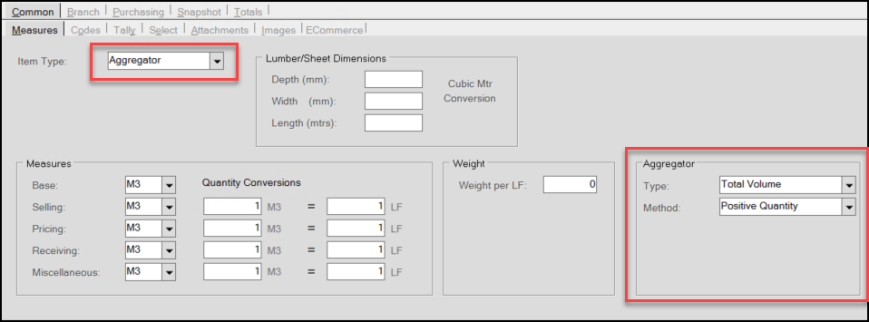
Item Maintenance with Aggregator Type and Method Displaying
7. In the Aggregator box, select the appropriate Type and Method for this aggregator type.
Type options. To measure the delivery of these items by:
-
Number of Items, choose Total Quantity.
-
Length, choose Total Lineal.
-
Area, choose Total Area.
-
Volume, choose Total Volume.
-
Weight, choose Total Weight.
Method options. If you want to:
-
Charge for delivery of these items only, choose Positive Quantity
-
Charge for pickup of these items only, choose Negative Quantity
-
Charge for delivery and for pickup of these items, choose Absolute Quantity
-
Charge for delivery of these items and credit for pickup of these items, choose Net Quantity
8. In the Measures section, enter the measurements you want to associate with this aggregator type. This measurement should be the type associated with the type of items you want to deliver.
9. When you have completed these entries, choose the Codes tab.
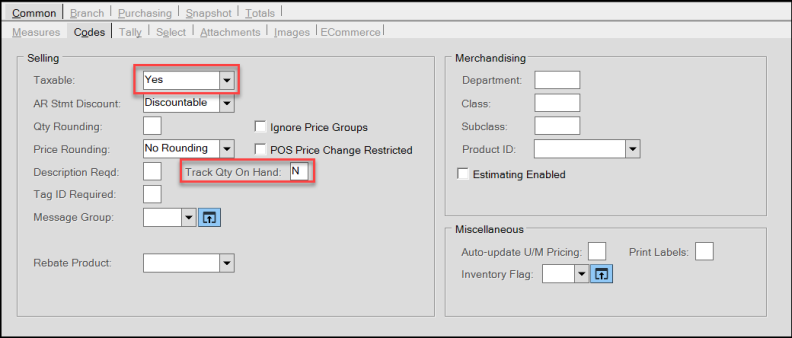
Item Maintenance > Common > Codes Tab with Settings
The settings in this tab may be different, depending upon your region.
10. Select the appropriate tax options for this aggregator type and enter N in the Track Qty On Hand field. Sometimes, the taxable setting is branch-specific.
11. Next, choose the Branch tab and a new Branch Codes tab displays.
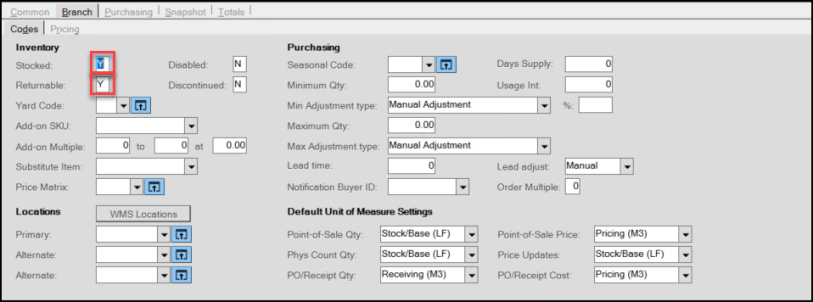
Item Maintenance > Branch > Codes Tab with Settings
12. Make sure that the Stocked and Returnable fields contain a Y. You can leave the quantity amounts untouched.
13. Choose the Branch > Pricing tab.
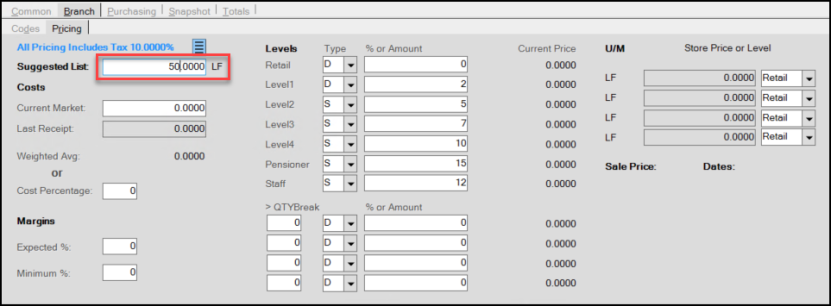
Item Maintenance Form with Branch > Pricing Tab
14. In the Suggested List field, consider what you normally charge for delivering these items and enter that amount in this field. You may want to consider labor costs for this type of delivery.
15. When these entries and selections are complete, choose Process (F12). The Warnings Popup displays.
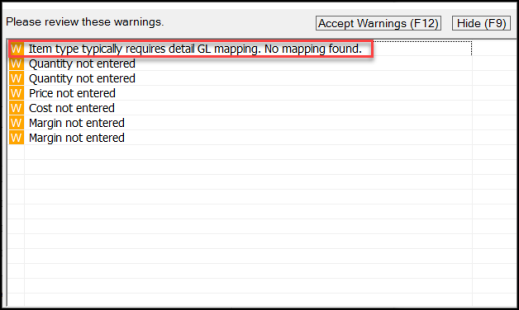
Item Maintenance > Warning Messages
Most of the warning in this list are not needed for the Aggregator, but take note of the first entry:
-
Item type typically requires detail GL mapping. No mapping found.
This entry reminds you to set up the GL mapping for the new Group/Section entry. See Setting the GL Mapping for the Aggregator Group/Section for these instructions.
16. Select Accept Warnings. The Branch List displays.
17. Choose the branch(es) for this aggregator type and select Accept.
18. Repeat this process to create any additional aggregator items for different delivery methods and for any additional branches that have deliveries.
You won’t have to create the Group/Section entry again, you just need to select it from the list.
Setting the GL Mapping for the Delivery Group/Section
It makes sense to create detailed GL maps for the new group/section record for each type of Inventory Mapping type that applies to these delivery and asset transactions.
Note: Typically, users map non-inventory items to non-inventory accounts such as income or expense accounts (or both) and sometimes liabilities (gift cards, deposits), etc. If you don’t set the appropriate GL mapping, the aggregator type might appear as inventory in the general ledger but not show up on inventory subledger reports. This could cause discrepancies when assessing sales and performing inventory GL reconciliations.
To assign the GL mappings for the new Aggregator Group/Section:
1. From the Main Menu, choose General Ledger > Database > Detail Mapping to display the Detail Mapping Setup form.
2. In the Mapping Type list, choose the first mapping type you want to add.
3. In the Mapping ID list, choose the Group/Section entry combination you added in the first Aggregator Item Maintenance form.
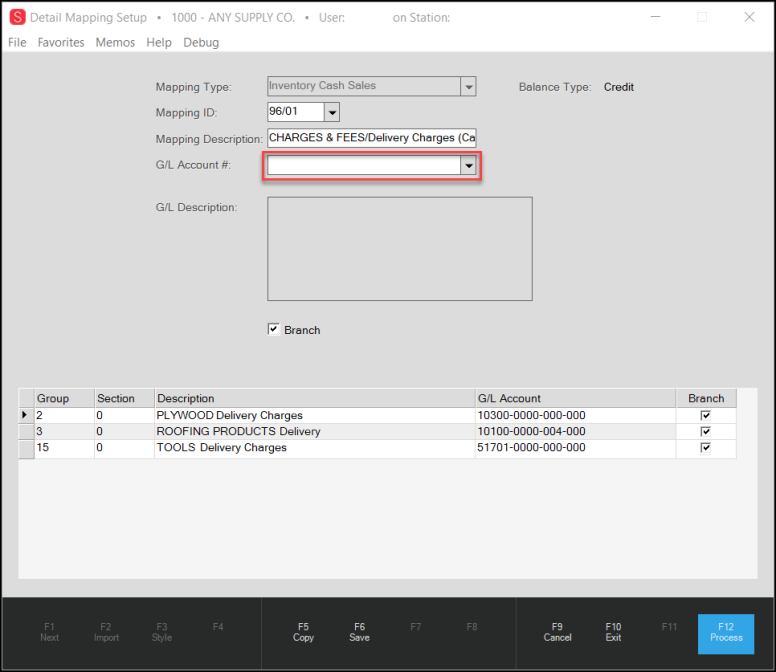
Detailed Mapping Setup Form with Entries
4. In the GL Account # field, select the appropriate GL account number for this aggregator item.
5. Check the Branch check box if the mapping of this entry is department (branch)-specific for your business.
6. Choose Save (F6) to save the Group/Section record to the data grid.
7. Choose Process (F12) to process the GL mapping type for the Group/Section.
8. Repeat steps 2 – 7 to add other Group/Section GL mapping types that apply to the aggregator SKUs for your business:
-
Inventory Cash Returns
-
Inventory Charge Sales
-
Inventory Charge Returns
-
Inventory Exempt Cash Sales
-
Inventory Exempt Cash Returns
-
Inventory Exempt Charge Sales
-
Inventory Exempt Charge Returns
-
Inventory Issues
-
Inventory Cost
Assigning Inventory to Create Aggregator SKUs
By associating your inventory with one or more aggregator types, the application can use the item’s default unit of measure to calculate the delivery cost (or other Aggregator uses). The Aggregator Maintenance Utility helps you create this link between the aggregator types and your inventory. When you add inventory to the aggregator item, the application uses the default unit of measure you choose to create a multiplier for each item. In the Point of Sale data grid, these multipliers, times the quantity of units to be delivered, determine the delivery price.
Aggregator Maintenance Form with Entries
Keep in mind that you set the default units of measure for lumber/timber (volume), sheet goods (area), and lineal (length-based) goods in the Code Definitions table (Inventory > Database > Code Definitions); these entries vary based on whether you use a metric or imperial system of measurement.
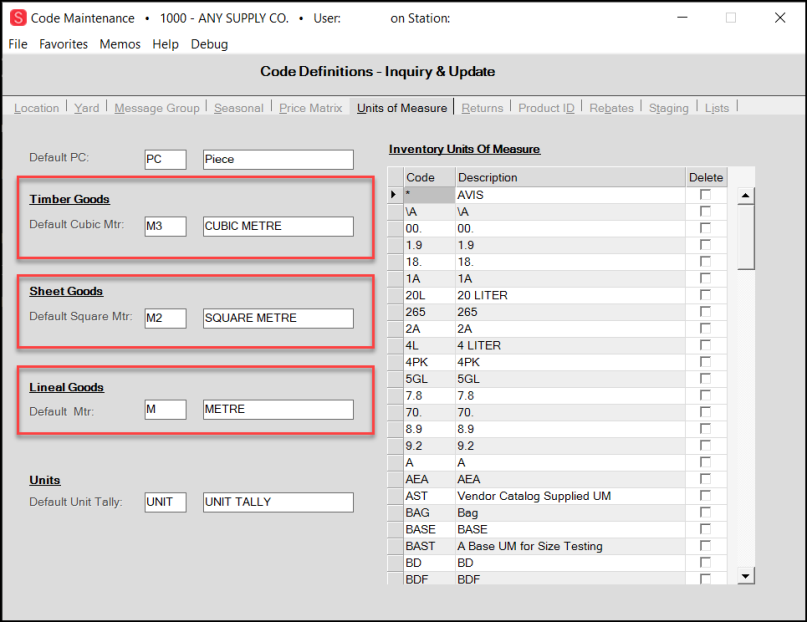
Code Maintenance Form with Lineal, Sheet Goods, and Timber/Lumber Goods Default Settings
So how are the item’s multipliers determined?
In general, the multiplier is determined by the base unit(s) of measure of the item, as follows:
-
Number of Items: For items that are sold by the piece, each, or box, the multiplier is always 1.
-
Lineal/Length: Typically, Lumber, Timber, or Hardwood Items
For lineal (length)-based aggregator types, the length value defined in the Item Maintenance form determines the multiplier. In the next figure, the length is 8, which would be the default multiplier for this item.
Note: If you add this item to the data grid, but the unit of measure is thousand board feet/meter instead, the application uses the quantity conversion listed (5.333) x the default length (8) and the multiplier would be 42.664.
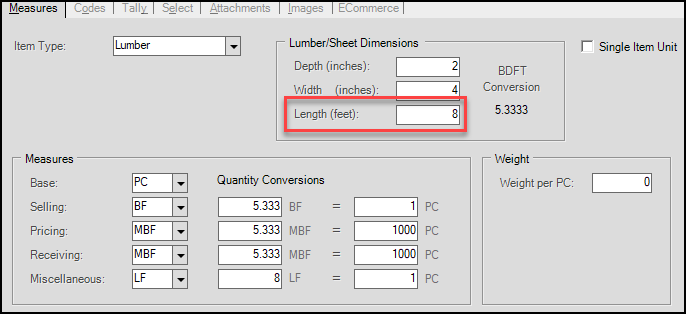
Lineal/Length Measures in Item Maintenance Form
-
Area: Typically Sheet Goods
For area-based aggregator types, the items’ length x the width values in the Item Maintenance form determine the multiplier. In the next figure, the length is 8 x the width, 4, so the default multiplier for this item would be 32.
Note: If this item is added to the data grid with a square foot or thousand square foot measurement, the calculation becomes length x width (32) times the multiplier, which in this case is also 32 to equal a multiplier of 1024.
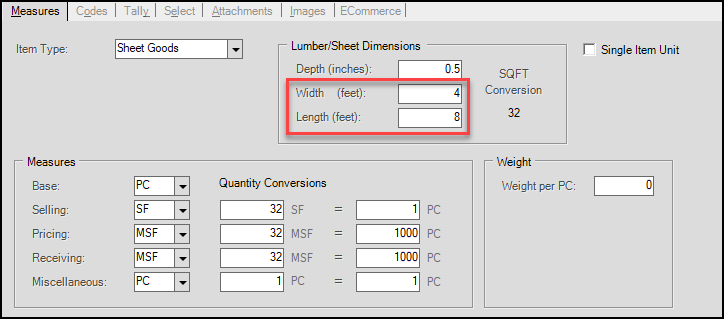
Area Measures in Item Maintenance Form
-
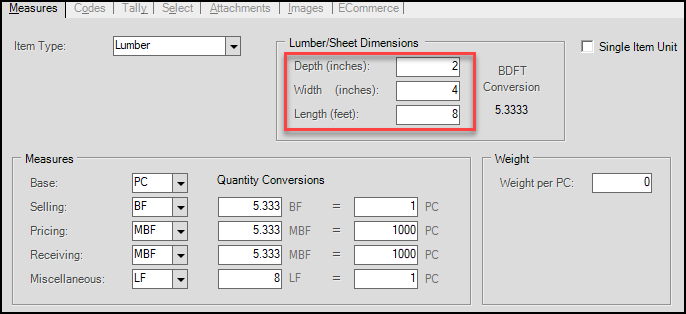
Volume: Typically, Lumber, Timber, Hardwood, Liquids
For volume-based aggregator types, the length x the width x depth values in the Item Maintenance form determine the multiplier. In the next figure, the length is 8 x the width, 4 x the depth, which is 2, so the default multiplier for this item would be 128.
Note: If this item is added to the data grid with a unit of measure other than the base unit of measure, the calculation becomes length x width x height (128) times the quantity conversion, which is 5.333 to equal a multiplier of 682.624.
-
Weight:
For weight-based aggregator types, the weight value is the multiplier. In the next figure, the weight is 11.5 per gallon, so the default multiplier for this item would be 11.5.
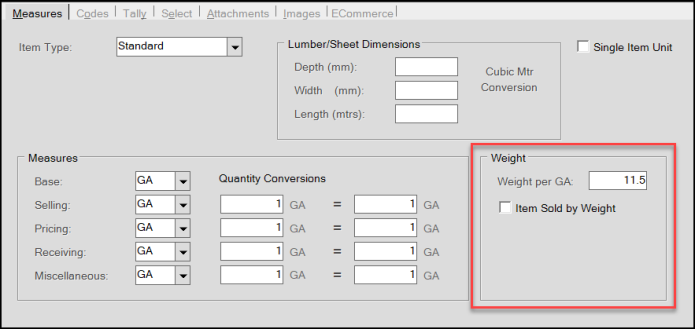
Weight Measurement in Item Maintenance Form
IMPORTANT: For any item where the default unit of measure cannot be reconciled with the aggregator type’s unit of measure, the multiplier is 0. You either have to assign these multipliers manually, or remove them from the aggregator type list.
Items to Add to Aggregator Types
The aggregator types are designed for these types of items:
-
Standard Items, Lumber/Timber, Sheet Goods, Clothing, Rental Charges, Hardwoods, Food, Resale Items, Renumbered Items, Manufactured Items, and Variable Weight Items
-
Tally types included:
Lineal Tally Items
Lot-Location Tally Items
Sheet Metal Tally Items
Random Length Tally Items
Unit of Measure Tally Items
Unit Tally Items (Single Item Units only)
A Note About Non-Stocked Items
B-98810 – If you sell and need to deliver items that are non-stock, you want to include them in the aggregator SKU so you can charge for their delivery. Often when you add these items, the Item ID changes (to reflect the non-stocked status). When that occurs, the aggregator SKU keeps track of these renamed item types to preserve the Aggregator linkage for the renumbered/renamed item.
Items You Cannot Add to Aggregator Types
The aggregator type may not be appropriate for all items in your inventory. You cannot add the following items to an aggregator type:
-
Labor, Freight, Deposit, Gift Cards, Rewards Coupons, Repeat Rewards Types, Stored Value Cards, Comments, Credit SKUs, and ACE Types
-
Tally types excluded:
Fixed Tally Item (Parent SKUs)
Pull to Length Tally Items (Parent SKUs)
Adding Inventory to the Aggregator Type
B-98723, B-98724, B-98773, B-98774, B-98775 – Now that you have created the aggregator items, it’s time to populate these records with inventory and generate the aggregator multipliers.
To add inventory to the aggregator item:
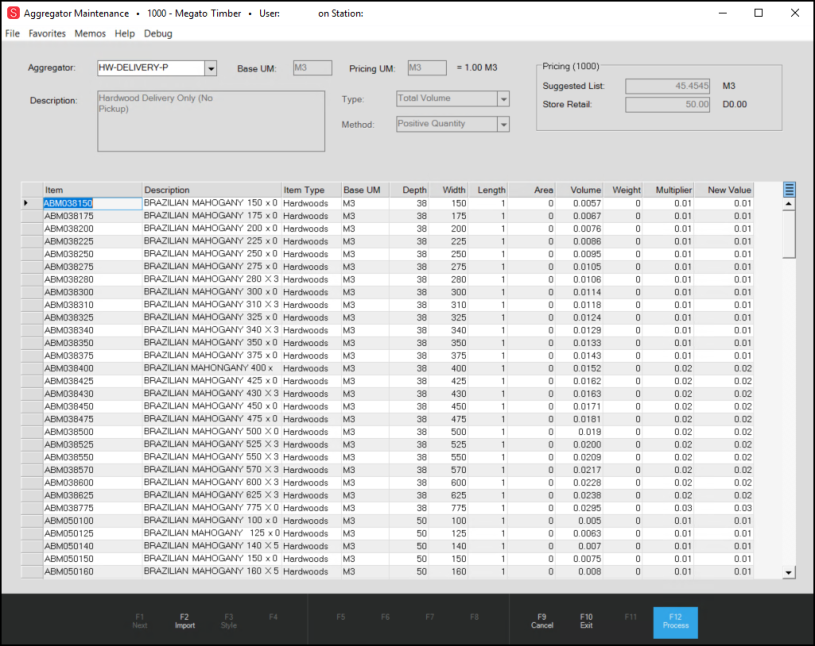
1. From the Main Menu, choose Inventory > Utilities > Aggregator Maintenance. The Aggregator Maintenance form displays.
2. In the Aggregator list, choose the aggregator type you want to add items to and press Enter. The Aggregator Maintenance fields update with the information added earlier.
![]()
Aggregator Maintenance Form with Aggregator Type Loaded
You can add items manually, but it probably more efficient to use the import feature.
3. Choose Import (F2) and from the local menu, choose Inventory to display the Inventory Copy box. Choose the criteria for importing the items that match the selected aggregator type.
Note: You can also import from a document by selecting the Import Wizard option, see Using the Template Feature to Add Inventory to the Aggregator Type.
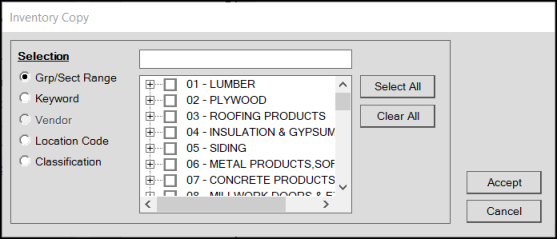
Inventory Copy Box
4. Consider the Inventory Item Type measurement value (piece, weight, area, etc.) and select the check box beside the inventory that applies to that type in the list.
5. Choose Accept to import the items you selected. The data grid fills up with the inventory items you imported. When you import more than 1000 items, a confirmation message displays. Choose Yes to continue.
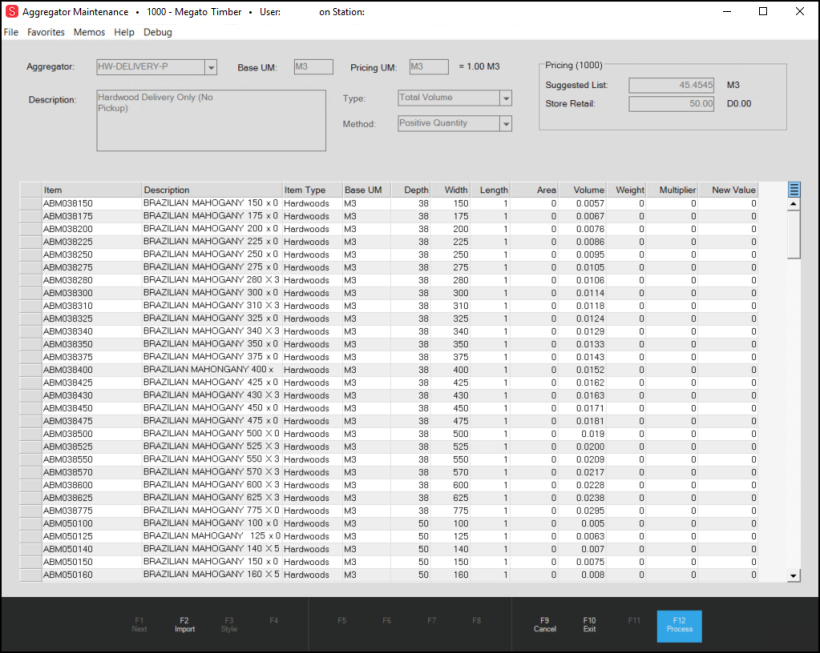
Aggregator Maintenance Form with Entries
A message may display after the import is complete to display the number of items (usually duplicates) that were ignored and not imported, if any. Choose OK to clear this message.
After the import is complete, you cannot change the Item identifier in the first column of the data grid. You can delete an item and re-enter it if you need to. The application does not import any disabled items from inventory, nor does it allow you to enter them. If you decide to disable an item, you should delete it from the Aggregator first, to avoid errors.
6. Review the items in the data grid and add or remove items that do not fit the Aggregator SKU criteria:
-
To organize the list, right-click the row header and click Sort to sort by that type. It might be useful to sort by Base UM so you can ensure these item entries match the default for the aggregator item.
-
Delete any items that you want to measure a different way by highlighting the record and pressing the Delete key on your computer.
-
Repeat steps 4 and 5 (or use the Import Wizard) to add any new items that belong in the list.
-
Press <Ctrl Insert> to add a blank line to the data grid and enter an item manually.
After you have finalized the list of items you want to associate with this aggregator type, you are ready to calculate the Multipliers.
Aggregator Maintenance > Menu Marker Options
7. When you are sure you have the list you want, you are ready to calculate the multipliers.
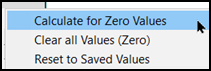
In the upper right corner of the data grid, choose the Menu Marker to display three options:
-
Calculate for Zero Values
Select this option to calculate the Multiplier for all items that have a zero value in the New Value field. The application takes into account the Aggregator Type (length, area, volume, weight, quantity) when making this calculation. -
Clear All Values (Zero)
Select this option when you need to reset the Multiplier for all items in the list to zero. -
Reset to Saved Values
Select this option to reset the New Value entry to the value in the Multiplier column.
8. Select the Calculate for Zero Values option to generate the New Value for each item in the data grid. The application calculates the New Value based on the following:
-
If the Type = Total Quantity, the New Value = 1.
-
If the Type = Total Length (Lineal), the New Value = item’s length.
-
If the Type = Total Area, the New Value = item’s length x width.
-
If the Type = Total Volume, the New Value = item’s length x width x depth.
-
If the Type = Total Weight, the New Value = item’s weight.
-
Note: The application multiplies the Weight values times the BASE quantity.
IMPORTANT: For the application to perform a calculation, all required values must be in Item Maintenance. An error message displays to explain the values needed for the calculation.
9. Review the New Value entries and replace any value if you decide you do not want to use a calculated value for an item. The value in the New Value field determines the Multiplier the application uses at Point of Sale. New Value entries cannot be 0.
10. After you have updated any remaining New Value fields with non-0 entries, choose Process (F12). The application updates the Multiplier column with your new values and closes the Aggregator Maintenance list.

Aggregator Maintenance Form with Updated Multipliers
If you attempt to save the aggregator SKU when the New Value column is 0 or a negative number, an error message displays and an icon displays next to the items that need to be corrected.
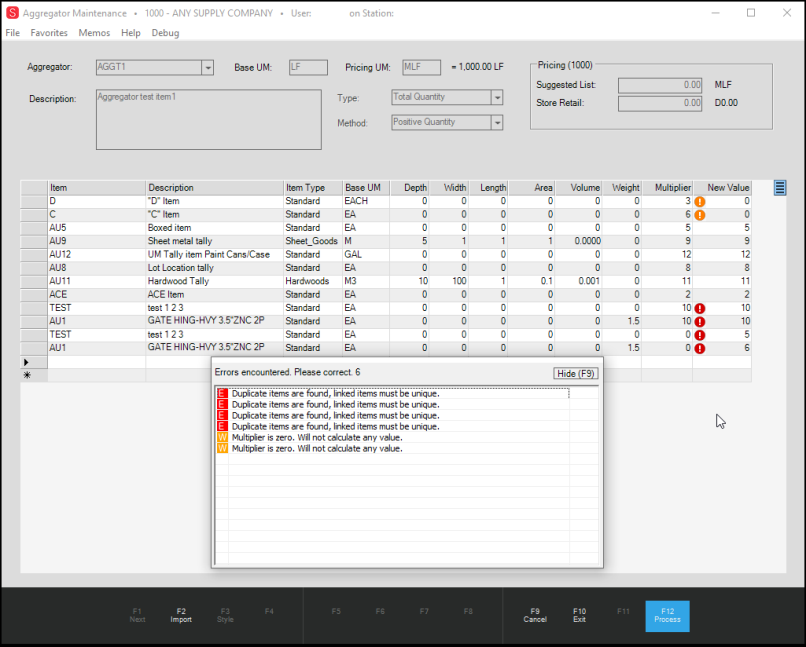
Aggregator Maintenance Form with Errors Highlighted
11. Update any entries with errors in the data grid and choose Process (F12) again to create the aggregator SKU.
12. Repeat steps 2 – 11 for each aggregator SKU you need to create to quantify delivery charges in Point of Sale.
The application does not lock down the units of measure, because you know your stock better than we do and you know what unit of measures work for your inventory. Please be aware that the units of measure on the aggregator SKU won't matter to the calculated quantity. At Point of Sale, the quantity you enter in the data grid affects the total that is calculated for the linked items. You can base the pricing using some different measurement if you prefer, for example, SF (square feet) but price is per MSF (thousand square feet) which may not work for you.
Using the Template Feature to Add Inventory to the Aggregator Type
B-98720, B-98772 –You can also use the template function to import items into the Aggregator Maintenance Utility using the Import Wizard. The two pieces of information required for this import are the Item ID and the Multiplier value, but if you have data for the other fields in the Aggregator Maintenance form, you can import them as well. If you want to leave the Multiplier value blank, that is OK, you can update it when you return to the Aggregator Maintenance form.
To import a list of items into the Aggregator Maintenance form from a document or Windows file:
1. From the Main Menu, choose Inventory > Utilities > Aggregator Maintenance. The Aggregator Maintenance form displays.
2. In the Aggregator list, choose the aggregator type you want to add inventory to and press Enter. The Aggregator Maintenance fields update with the information added earlier.
3. Choose Import (F2) and from the local menu, select the Wizard option to display the Import Wizard box.
4. Choose the type of file you are importing, either by selecting a linked document or navigating to a Windows file on your computer. After you choose the document or the file, preview information displays.
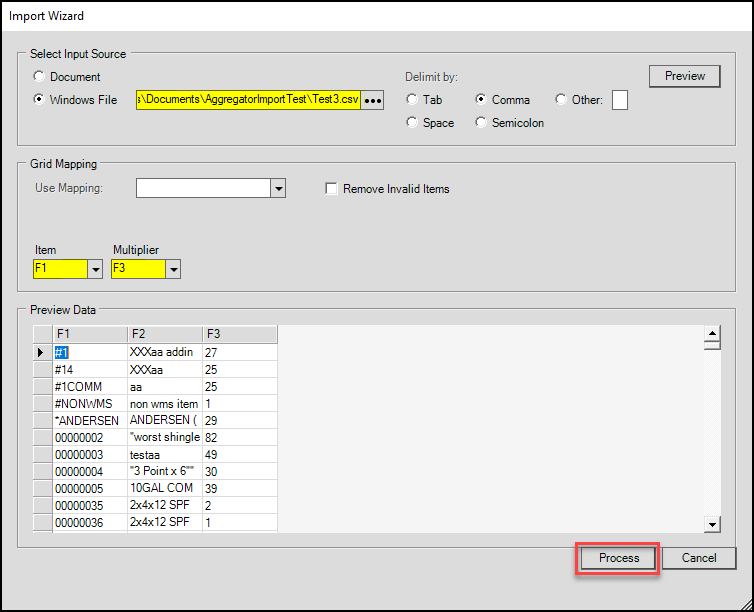
Import Wizard Box
5. If you have specific mapping associated with this document/file select the mapping from the Use Mapping list. If you do enter a mapping type, select the Remove Invalid Items check box. This step is not required.
6. In the Item list, choose the field that contains the Item ID value.
7. In the Multiplier list, choose the field that contains the Multiplier value, if any.
If you have not created the multiplier before, you can leave this field blank. When you import Item IDs without a Multiplier, the application adds a 0 in this field.
8. When you have completed these entries and selections, choose Process (F12).
If you import more than 1000 items, a pop up message displays asking you to confirm the import. Choose Yes to continue.
A new pop up message displays to report how many items have been ignored, if there were invalid or duplicate entries in the data grid. Choose OK to continue.
For each item you added, the application adds a new entry to the Aggregator Maintenance data grid. If you added a multiplier, it displays in the Multiplier field.
9. From here, continue the aggregator SKU creation process at step 6 of Adding Inventory to the Aggregator Type.
Note: If you add an item that is already associated with another Aggregator (but is not an Aggregator-type item itself), the application adds the new association based on the same settings as the template SKU. When you process the change, and the application creates the new aggregator links and a warning displays:
-
Template SKU has aggregator association. Please review.
If you cancel the new SKU entry, the application removes or rolls back new association. If you do not cancel the SKU entry, the application adds the aggregator SKU to all items associated with the template.
Notes about Aggregator SKUs
B-98793, B-98798 – Here are some rules about using aggregator SKUs that may not be obvious:
-
After you create an aggregator SKU and use it in a transaction, you cannot delete it or merge it.
After you use an aggregator SKU in a transaction, deleting or merging this SKU would make it difficult to track the pricing in the future. We recommend that you create new SKUs and use those instead if you decide to change the nature of a SKU. -
When you rename an item, the application updates that item name in the aggregator SKU. When you review deliveries that have the old item name/ID, the application displays the new name/ID instead.
-
When you rename an aggregator SKU, the application maintains the list of items associated with that SKU and updates the SKU in the records of previous transactions.
-
You cannot use aggregator SKUs in Manufacturing and Purchasing at this time.
Timber/Lumber Unit/Pack Inventory Type Added
We have added a new item type, Timber/Lumber, that allows you to sell products of various lengths but fixed depth and width measurements, most-commonly used with flooring. This inventory type can be used in metric and Imperial system regions to manage inventory measured by quantity and length. These items can be split and broken down as your customers need into unit/packs. In regions that use metric dimensions, we refer to these units as Timber. In regions that use imperial, we use Lumber.
Creating the Code Definition for a Unit/Pack Inventory Type
Unit/packs can be Metric or Imperial. We use the example of metric here, but the same type of units can be used for Imperial measurements.
To create the code definition for a unit/pack type:
1. From the Main Menu, go to Inventory > Database > Code Definitions to display the Code Maintenance form.
2. In the Units of Measure tab, add a new type with these measurements:
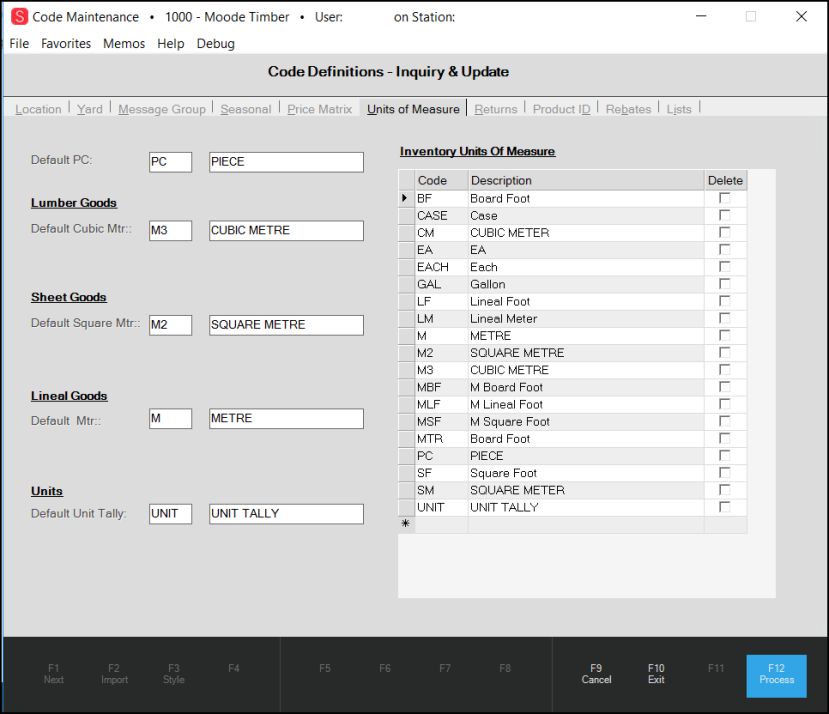
Code Maintenance Form – Unit/Pack Type Entries
3. Complete any undefined fields as follows:
-
In the Default PC fields, enter PC and PIECE.
Usually, these would be the same in regions using Imperial measurements. -
In the Lumber Goods, Default Cubic Mtr fields, enter M3 and CUBIC METRE.
Typically, these entries would be BF/Board Foot and MBF/Thousand Board Foot in regions using Imperial measurements. -
In the Sheet Goods, Default Square Mtr fields, enter M2 and SQUARE METRE.
Typically, these entries would be SF/Square Foot and MSF/Thousand Square Feet i in regions using Imperial measurements. -
In the Lineal Goods, Default Mtr fields, enter M and METRE.
Typically, these entries would be LF/Lineal Foot and MLF/Thousand Lineal Feet in regions using Imperial measurements. -
In the Units, Default Unity Tally fields, enter UNIT and UNIT TALLY.
Typically, these entries would be UNIT and UNIT in regions using Imperial measurements.
4. When you have completed your entries, choose Process (F12).
Adding Pack/Unit Items to Inventory
At first, we recommend that you create a template unit item, so other similar items can inherit its properties. Then add new items based on that template.
To add a single-item unit/pack template item to inventory:
1. From the Main Menu, go to Inventory > Database > Item to display the Item Maintenance form.
2. Enter the item name, Description, Group/Section, and initial Vendor information as appropriate.
3. In the Common > Measures tab, choose the Single Item Unit check box.
4. From the Item Type list, choose Timber (for metric-based systems) or Lumber (Imperial-based systems).
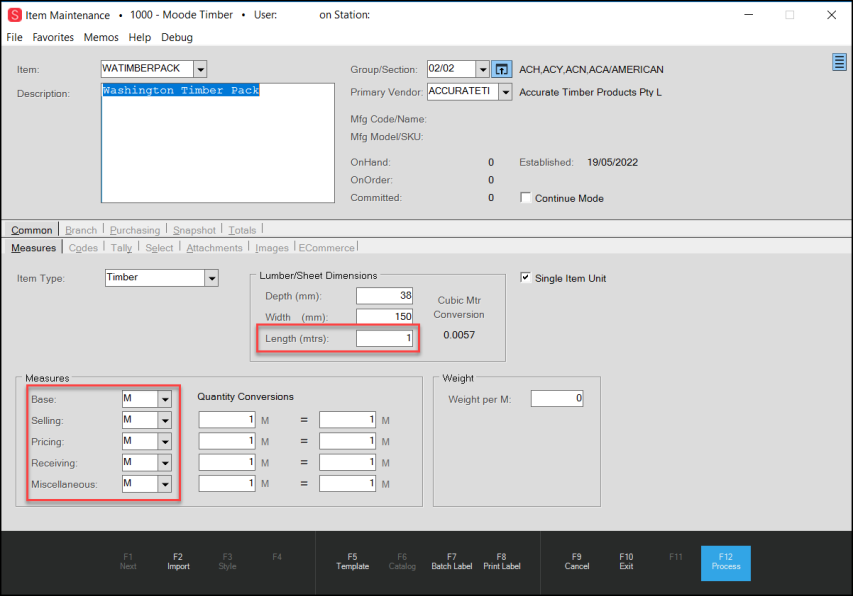
Item Maintenance Form with Single Item Unit/Pack Item Details
Single Item Units are characterized by the same unit of measure in the Measures list, without regard to the length. In the Length field, if you enter a length other than one (1) for this type, a warning displays to remind you to set the value to 1 to request lengths during the tally input.
5. In the Lumber/Sheet Dimensions fields, enter some standard Depth and Width dimensions as are appropriate to the item and enter 1 in the Length field.
Note: The Length field must be set to 1 or an error occurs.
6. In the Measures fields, enter M (Metres (for metric systems), or LF (Lineal Feet for Imperial systems) and 1 in the quantity Conversions column.
7. In the Branch > Codes field, complete some standard pricing information appropriate to the unit/pack types you are adding.
8. When you have completed your entries, choose Process (F12). A Branch selection box displays.
9. Choose the branch(es) the template is associated with and select Accept.
After you complete this template item, you can create new unit/pack items based on this template.
Adding a Unit/Pack Item from a Template
To create a unit/pack item from the template:
1. From the Main Menu, go to Inventory > Database > Item to display the Item Maintenance form.
2. In the Item field, type the ID for the unit/pack item and choose Template (F5) to import the original template.
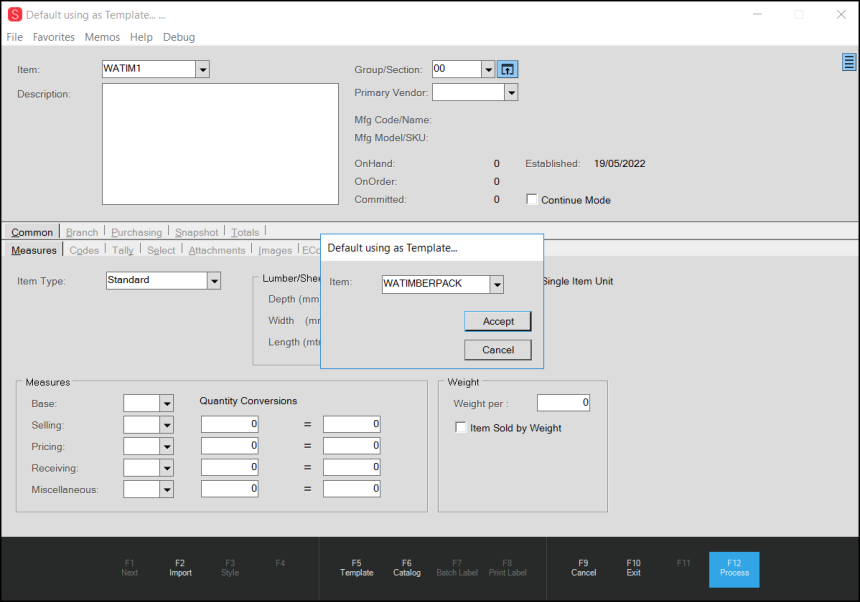
Item Maintenance Form with Default using as Template Option Box Displaying
3. From the Item list, choose the template you just created and select Accept.
The Item Maintenance form updates with the details from the template.
4. Update the Measures fields using the measurement units you want to specify when you sell the item.
Note: There must be at least one lineal measurement item in each Measures list for an item. It does not have to be the Base UM. In the case of metric, the entry would be Metres and for businesses that use Imperial measurement, one entry must be Lineal Foot. An error results if you do not add at least one lineal measurement to the Measures list.
5. In the Branch > Codes tab, complete the entries defining the appropriate quantities for inventory and define the default unit of measure settings as needed.
6. In the Branch > Pricing tab, enter the list, market, margin, and other required pricing information.
7. When you have completed your entries, choose Process (F12).
A Branch selection box displays.
8. Choose the branch(es) the item is associated with and select Accept.
Purchasing and Receiving Unit/Pack Items
After you create the item(s) in inventory, you can purchase them and receive them from the vendor.
To purchase a unit/pack item type:
1. From the Main Menu, go to Purchasing > Order Entry to display the Purchase Order Entry form.
2. In the PO # field, choose New.
3. Choose the vendor that has the unit/pack item that you added.
4. Enter the unit/pack item in the Item field and press Enter.
5. Consider how you would like to order your unit/pack items:
-
You can order a generic quantity and define the units being received when processing the receipt, (these instructions are available in the Help System) or
-
You can define the makeup of the units you want in the PO, later updating quantities based on what is being received. If you wish to define units on the PO, beside the data grid, choose the blue Menu Marker
to display the context menu.
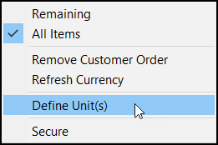
Context Menu with Define Units Highlighted
6. Select the Define Units option to display the Receive Unit options.
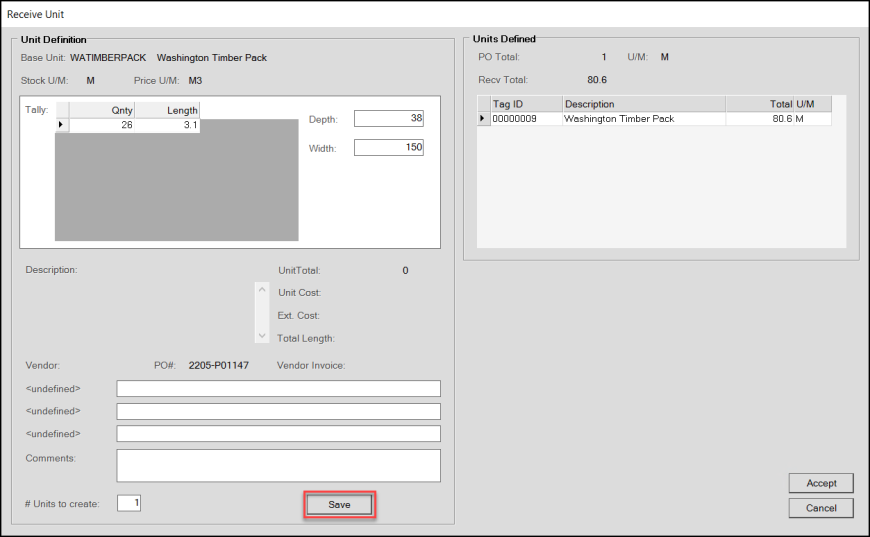
Receive Unit Box with First Unit Tally Item Added
7. Enter the Quantity and Length of the unit/pack items you are ordering in the fields provided and choose Save.
8. Add each quantity and length of this unit item you need and select Accept to save them to the data grid. The data grid updates to show the entries.
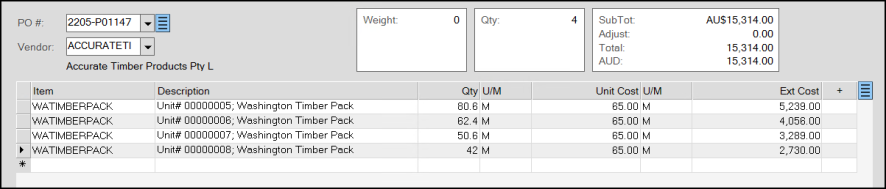
Purchase Order Entry Form with Unit Items in Data Grid
9. When you have added all of the items you want to purchase, choose Process (F12). The Process Order Document displays.
10. Choose Mark as ordered and select Finish (F12).
11. To review the purchase order, go to Documents and look up the purchase document you created for this order.

Documents > Purchase Order for Unit/Pack Order
12. To receive the new inventory, from the Purchasing menu, choose Receipts.
The Inventory Receiving form displays.
13. Choose Receiving (F5) and select Purchase Order from the context menu. The PO Purchase Orders box displays.
14. Choose the purchase order you created from the list and select Accept. The Inventory Receiving form updates with the items from the purchase order.
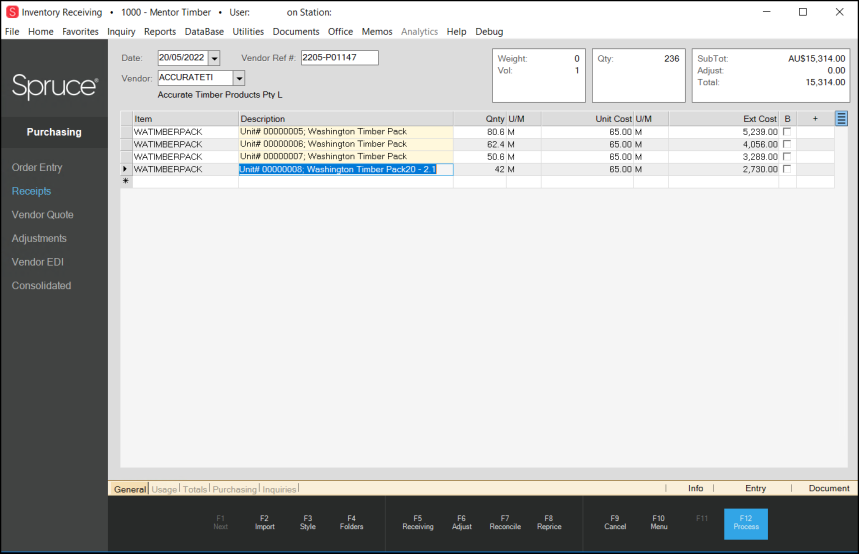
Inventory Receiving Form with Unit/Pack Materials Received
15. To change the makeup of the PO-defined units, or to define the units being received if the order didn’t have defined units, choose the blue Menu Marker beside the data grid to display the context menu and choose Define Packs or Define Units. Otherwise, this step is not necessary.
16. Choose Process (F12) to receive the items into inventory. The Process Session Document displays.
17. Choose Finish (F12) to print the receipt document and save the changes.
18. To look up the receipt document, go to Documents and look up the receipt document.
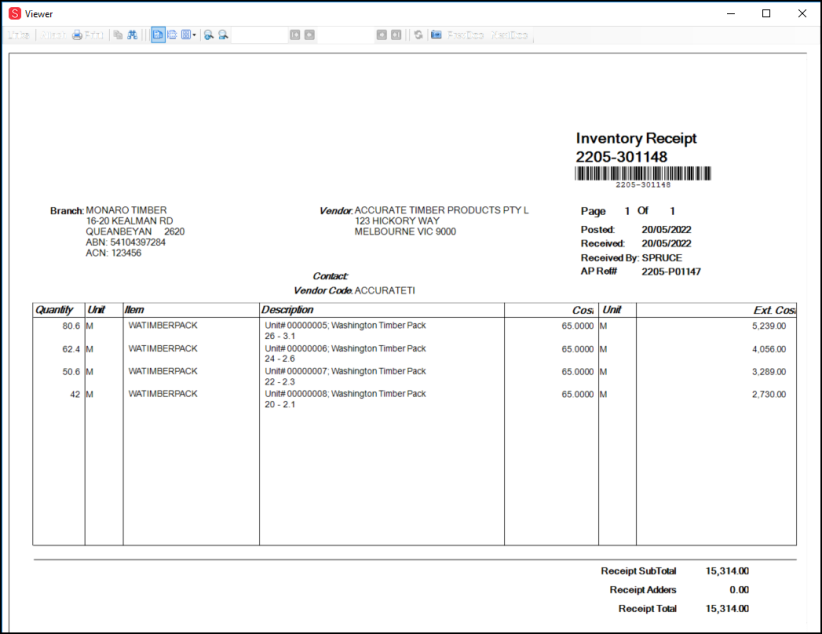
Documents > Inventory Receipt for Unit/Pack Purchase
Adding Detail to Unit/Pack Records
The benefit of the unit/pack item type is that you can break up these inventory items and build them into the units you need to sell them to your customers. Build units allow you to allocate existing inventory to a new unit. Building a unit does not change the on-hand quantity for the unit or the member items, it just affects whether the on-hand inventory is allocated.
To build a unit from the unit/pack items you received:
1. From the Main Menu, choose Inventory > Utilities > Build Units. The Build Units form displays.
2. From the Base Item list, choose a unit/pack item you have received and select Build. The Unit Definition box displays.
3. In the table, enter the quantities and lengths for the new unit you want to create in the fields provided.
4. When you have completed your entries, select Accept.
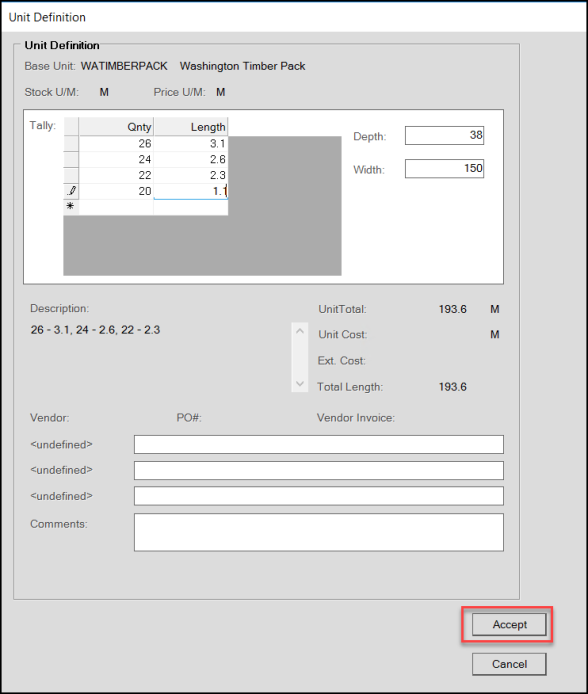
Build Units Form with Unit Definition Box Completed
The application saves the changes, creates a new Unit Number, and displays the new unit in the data grid.
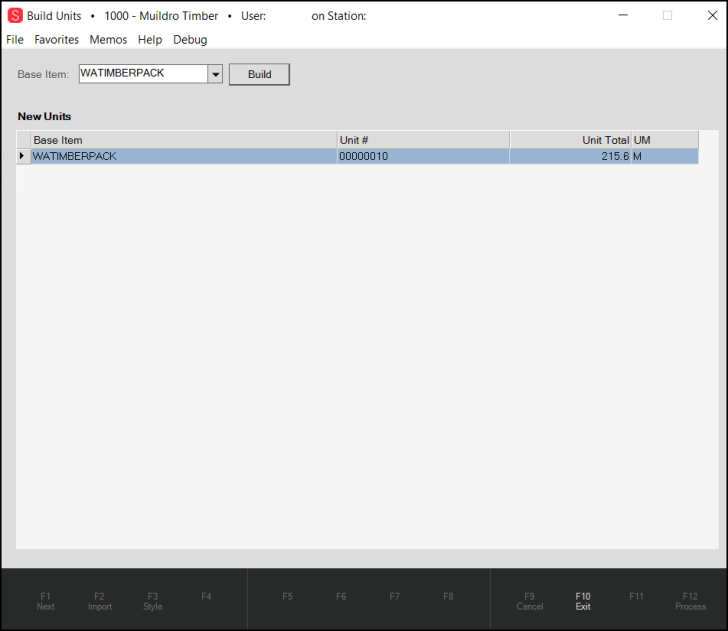
Build Units Form with new Build Unit Displaying
After you build your new unit/pack items, you can add more information about the newly built item to the inventory record. Typically, businesses add details such as supplier, mill, and location information to these records. Use the Inventory Unit Item Maintenance form to change unit quantities, split units into new unit tally items, or break a unit and place the items in stock. You can also use the Unit Item Maintenance form to add more detail to the new tally item.
5. From the Main Menu, go to Inventory > Utilities > Unit Item Tally. The Inventory Unit Item Maintenance form displays. The Update Unit Info button is selected by default.

Inventory Unit Item Maintenance Form with Unit List Displaying
6. From the Unit list, choose the first unit item you want to add detail information to.
7. In the fields provided (such as Supplier, Mill, Location), enter the details needed for this unit tally item. If you need to update this information later, you can use the Update Unit Info option again.
8. Choose Process (F12) to update this unit information with the changes you made.
When you retrieve this unit tally item later to change the unit quantities, the details you added display:
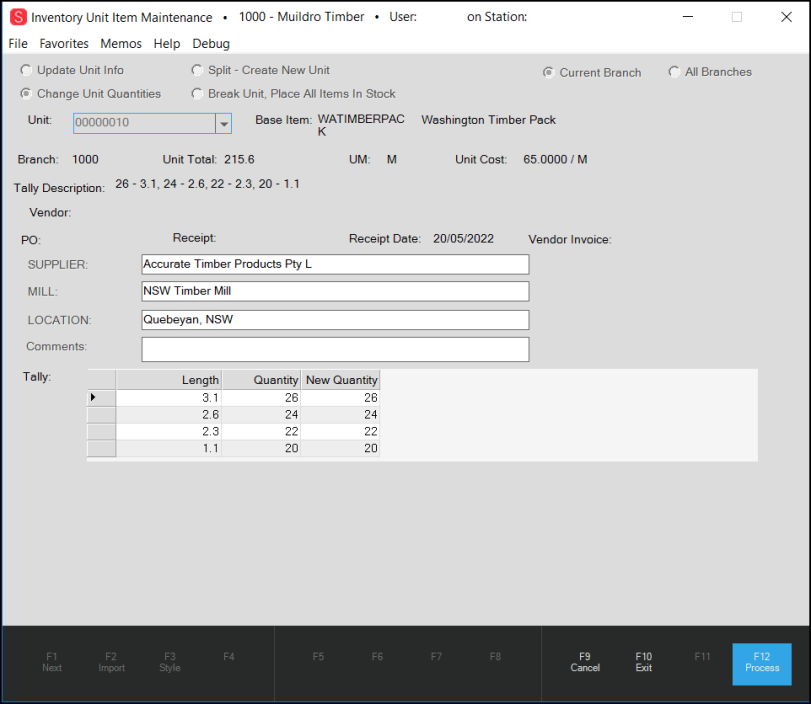
Inventory Unit Item Maintenance Form with Updated Entries
This is also the form you use to split or break the unit/pack tally item into the items as needed by your customers.
Splitting Unit/Pack Items to Create New Units
You can split an existing unit/pack item and create a new one using the Split utility.
To split a unit/pack item:
1. From the Main Menu, go to Inventory > Utilities > Unit Item Tally to display the Inventory Unit Item Maintenance form.
2. Select the Split – Create New Unit option. New fields display.
3. In the Unit list, choose the unit/pack item you want to split. The new fields update.
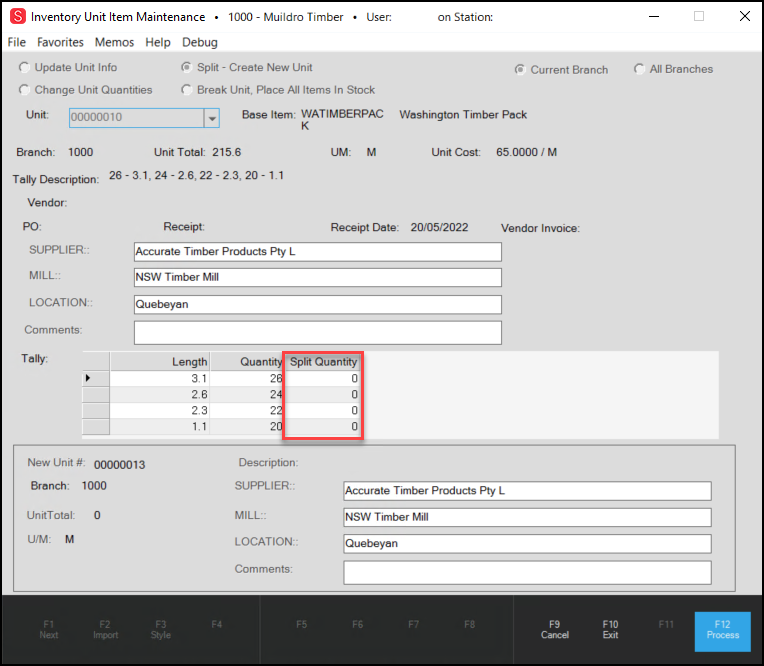
Inventory Unit Item Maintenance Form with Split Option Displaying
4. In the Split Quantity field, enter the new split quantities for each length.
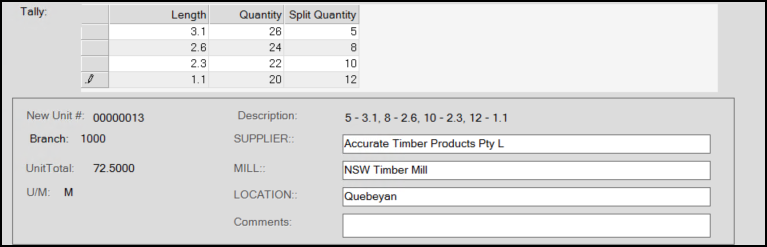
5. When the split items display the way you want, choose Process (F12).
6. To break and unallocated the items in a unit, in the Inventory Unit Item Maintenance form, choose the Break Unit, All Items in Stock button.
7. From the Unit list, choose the new unit you just created. The fields update with the values you entered.
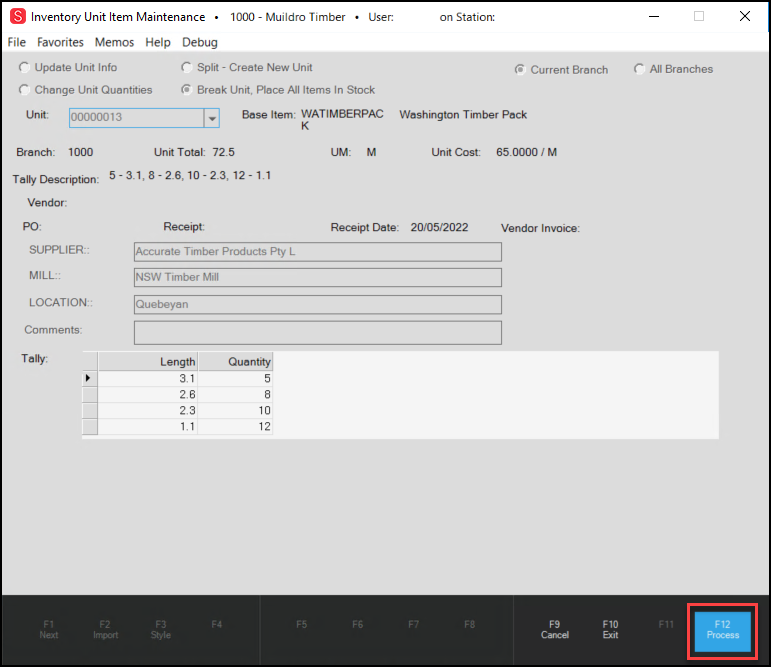
Inventory Unit Item Maintenance Form with Brake Unit Entries
8. When you are satisfied that this is the unit you are breaking / returning to stock, choose Process (F12) to save the new items to inventory. A confirmation message displays.
9. Select Yes to save the changes.
Selling Unit/Packs in Point of Sale
B-93769, B-94177 – After the unit/packs are in inventory, you are ready to sell them. Like any other product, you can create Sales, Orders, Quotes, Tickets, Direct Shipments, and Charge Return transaction types with unit/packs.
To sell the unit/packs in Point of Sale:
1. From the Main Menu, go to Point of Sale > Sales to display the Sale Entry form.
2. From the Name field, select a customer.
3. In the data grid, enter the item ID for the unit/pack item you want to sell.
4. Choose the data grid Menu Marker and choose Select Units. The Select Units box displays.
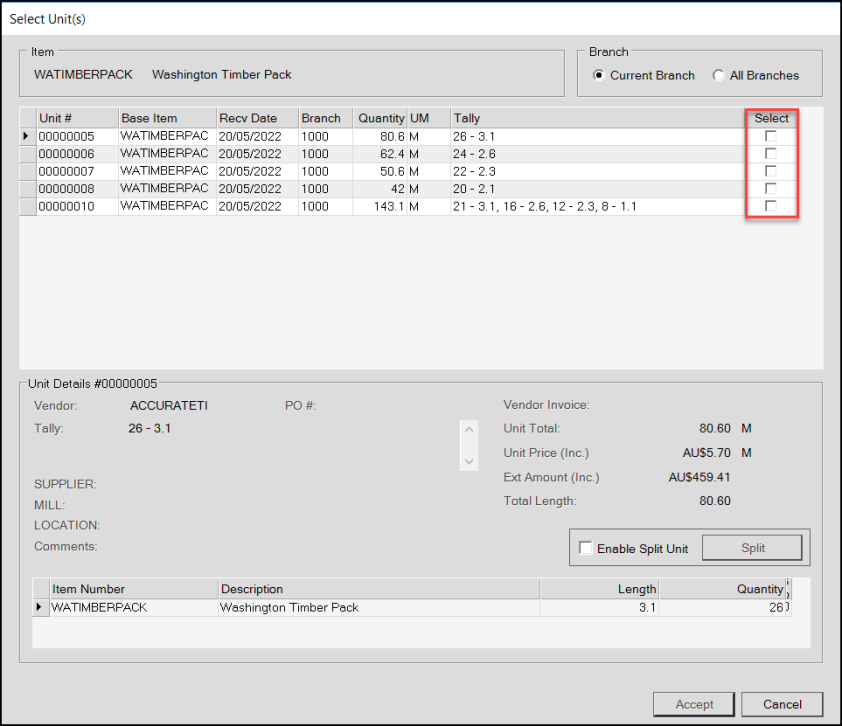
Sale Entry Form with Select Units Box Displaying Unit/Pack Details
5. In this box, do one of the following:
-
Choose the Select check box beside the unit/packs the user wants and the Unit details of the selected item display.
or -
Choose the Enable Split Unit check box and select Split to split the unit into the part the customer wants. See Splitting Unit/Pack Items to Create New Units for these instructions.
6. When you have completed your selections, select Accept. The application updates the data grid with the unit/pack entries you selected.
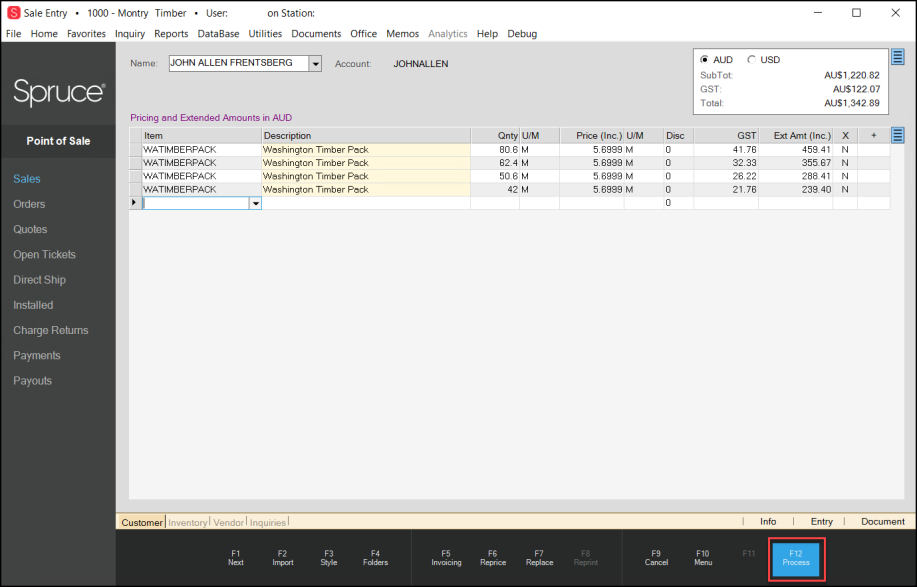
Sale Entry Form with Unit/Pack Items Displaying
7. Choose the Process (F12) option to process the sale. The sale processes normally.
8. When you go to Documents > PS Sales Invoices for the transaction, the invoice shows the unit/pack details and the appropriate tax amounts.
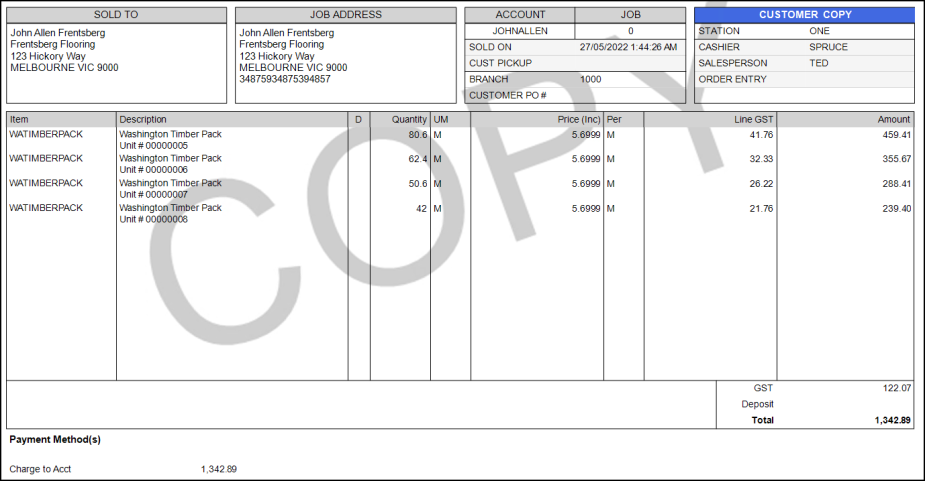
Unit/Pack Invoice with Details
Receipts Focus on Vendor Rather than Date
B-100643 – Receiving Inventory Gets Easier
In the past, when you received inventory, the application would land on the Date field first rather than the Vendor field, causing issues when processing receipts from the previous day. We have updated this workflow to place the cursor in the Vendor field first. You can still edit the date if you need to, but it is not the first field you land on.
Reports Update
New: Exporting Reports to XLSX Excel Format
B-102005 – One of the issues that has plagued report users is the inability to export report data generated in Spruce to the current Excel (.xlsx) file formats. Exporting reports to Excel makes application data available for all sorts of analysis that can be useful.
To publish a report to the xlsx format:
1. From the Main Menu, select the subsystem for the report you want to run (Point of Sale, Purchasing, Inventory, etc.). We chose Point of Sale for illustration.
2. Select Reports > any report in the list. The report form you selected displays.
3. Select the report parameters you need to produce the report.
4. Optional: In the Print Options section, uncheck the Print Report button.
Note: You can leave this option selected if you also want to print the report.
5. To export the report to an XLSX file format:
-
In the Print Options section, check the Output to File check box.
-
In the Save In field, choose the Ellipsis
 button and choose the path you want to save the Excel file to.
 -
In the Filename field, enter the filename for the Excel file (and include the .xlsx extension).
-
From the Type list, choose the Excel (xlsx) entry.
6. Choose Process (F12) to generate the report and produce the Excel file in the folder you specified.
Regional Updates
Payment Integration using Clover Devices (UK)
In this release, United Kingdom customers can process payments using the Clover Flex and Mini devices, which we have integrated using the Clover API in the application. Using these Clover devices, you can process sales, void sales, make payment refunds, and make manual refunds with the support of the application. Clover Mini devices support chip-based cards and magnetic stripe cards. Clover Flex device’s support chip-based cards, magnetic stripe cards, contactless cards, and NFC-enabled phones. After you have signed up with ECI for the Clover integration, you have set up your Clover Merchant Account, and received your Clover devices, you are ready to start. The application supports both Clover devices, both for on-premises and in hosted environments, with Wi-Fi or ethernet connections.
Overview of the Clover Setup Process
Some of the Clover setup you need to complete on your own, such as the setup of your Clover Merchant Account and powering up your Clover devices. This section will walk you through:
-
Connecting the Clover Device to the Network.
Provides instructions for connecting the Clover device(s) to your location’s wired or Wi-Fi network. -
Setting up the Payment app.
Provides instructions that connect your system to the Clover payment application through which you manage your payments. -
Installing Clover Device Certificates.
Provides instructions for setting up your Clover Device Certificates on the computer that is attached to your Clover devices. -
Working with ECI to Pair Each Clover Device to the Application.
After you have completed the Clover device setup, you are ready to work with the ECI team to pair the device(s) to the application. -
Setting up the Cash Back Feature.
If your company allows customers using Debit cards to get cash back, there are some additional steps to complete that setup. This is not required.
When you have completed these steps, the ECI Implementation or Support team can work with you to complete the configuration and device pairing process. After these steps are complete, your team can complete transactions using Clover devices.
Connecting the Clover Device to the Network
There are two options for connecting the customer’s Clover device to the network:
-
Attach an ethernet cable to the Clover device and connect it to the LAN manually. There is no further setup needed in this case.
-
Connect the Clover device to the wireless network (Wi-Fi), using instructions below.
Note: We do not recommend this if your Wi-Fi infrastructure is unreliable or weak. We strongly recommend a strong password to enhance security.
To connect the Clover device to the wireless network:
1. On your application computer, choose to the Windows Start ![]() icon, select the Settings
icon, select the Settings ![]() icon and select the Network & internet settings option.
icon and select the Network & internet settings option.
2. Ensure this computer is connected to the same Wi-Fi network as the Clover device and the network connection is enabled.
3. Turn on the Clover device and enter the login code.
4. On the Clover screen select the Settings option.
An error message may display explaining that you need to connect to your Clover merchant account. Follow the prompts to do so.
Note: If this is a first-time connection, the application may also need to install an update before you go further. When these updates are complete, move on to the next step.
5. From the Settings list, tap Network and Internet. The Network and Internet options display. The Wi-Fi is set to Off.
6. On the right, drag the Wi-Fi button to the right to the On position.
The Wi-Fi entry updates to not connected.
7. Tap the Wi-Fi label to display the list of available network connections nearby.
8. Select the same Wi-Fi network discussed in step 2 from the list to connect to it.
The password box displays.
9. Enter the Wi-Fi password and tap Connect.
The Clover device connects and indicates that it is connected.
The Clover is configured to use DHCP rather than a static IP address, however, you will need the device’s assigned IP address later anyway.
Finding the Clover Device's IP Address
To find the Clover device’s IP address and/or the MAC address:
1. On your Clover Mini/Flex, open the Settings app.
2. Scroll down and tap About device.
3. Scroll down and review the IP address and MAC address.
Make a note of this information because you will need it later.
Setting up the Payment app
The application will use Clover to make payments by communicating with the Secure Network Pay App through the device. After the Clover is setup and default apps have updated, install the Secure Network Pay App as follows:
1. On the Clover device, scroll right and tap the Settings app.
2. Tap the Apps & notifications option.
3. In the middle of the screen, tap the SEE ALL XX APPS link.
The exact number of apps displayed in this link may vary.
4. Tap the App Market app.
5. Tap the Open icon to start the app market. Application icons display.
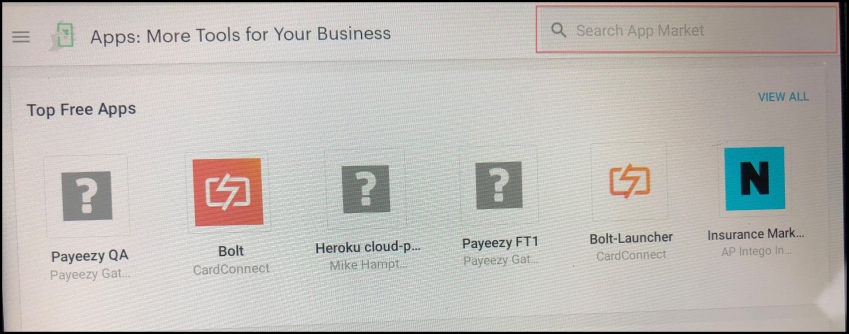
Clover: Search App Market for Secure Network Pay Display
6. In the search box, enter Secure Network Pay Display. When the Secure Network Pay Display option displays in the list, tap it.
7. Tap Install and allow the app to download and install.
8. When the installation is complete, tap Open. The Network Pay Display Start page displays.
9. In the upper left corner, tap the Menu and tap Settings.
10. Select the Server Is Secured check box.
11. Tap Configure and Restart Server.
12. Then tap Back to return to the main Network Pay Display app screen.
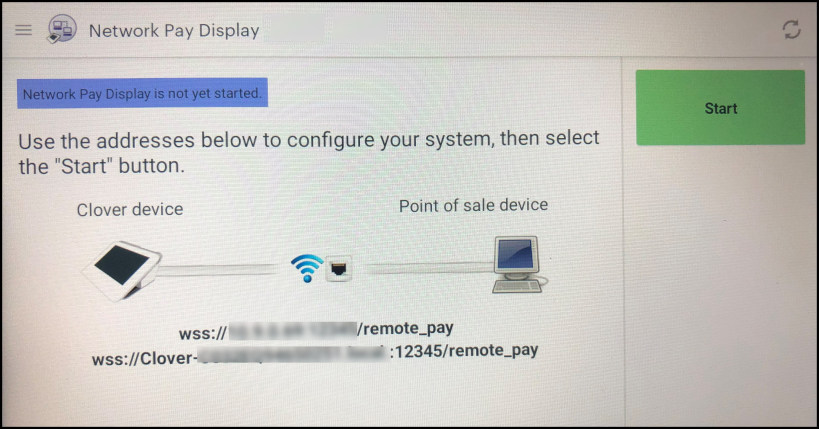
Clover: Network Pay Display
13. Tap Start. The app displays a message telling you to exit the app, you have to touch all four corners of the screen at once.
14. Tap Got it. The payment app re-starts and the Welcome page displays on the Clover device.
From now on when you boot the Clover device, the Payment app should start automatically.
Installing Clover Device Certificates on the Pairing Computer
Any Windows computer that will connect to a Clover device needs to have the Clover SSL certificates installed into its trusted root store.
To install the Clover device certificates:
1. On the application computer, go to this site to download the appropriate certificate.
Be sure to get the certificate that specifies the currency type you will work in (GBP, EURO, etc.) Choose the certificate that has the .crt file extension.
2. After downloading the certificate, double-click it to open it in Windows.
This opens the certificate install wizard.
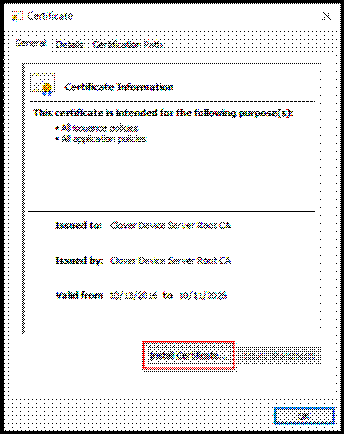
Windows: Certificate Information – General Tab
3. Choose the Install Certificate button. The Welcome to the Certificate Import Wizard page displays.
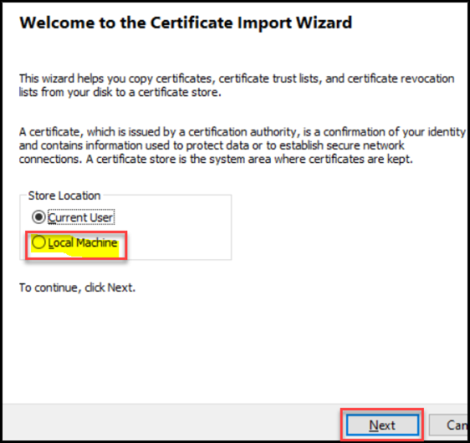
Windows – Welcome to the Certificate Import Wizard
4. Select the Local Machine store location option and choose the Next button.
The Certificate Store dialog box displays.
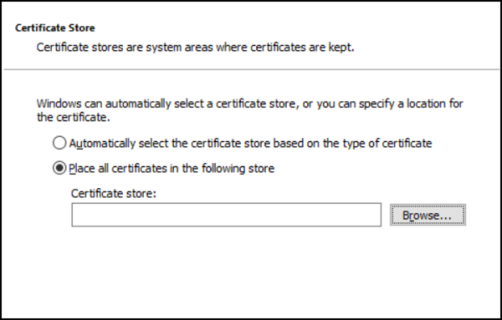
Windows – Certificate Store
5. Select the Place all certificates in the following store button and choose Browse. The Select Certificate Store box displays.
Windows - Select Certificate Store
6. Select Trusted Root Certification Authorities and choose OK. The Certificate Store box redisplays.
7. Choose Next.
8. Choose Finish.
Pairing Each Clover Device to the Application
You can pair your Clover devices yourself if you have administrative (MAN) permissions to the software. If you do not, pairing the Clover device with the application is a job for the ECI Implementation and Support teams, but they need your help. They need to know:
-
Credit cards you take
-
The threshold amount that you require for credit card signatures
-
Station IDs to be paired with each Clover device
-
The time out time you prefer (how long do you want the application to wait to decide to end the transaction)
-
The IP Address for each Clover device to be paired
-
Whether you permit customers to get cash back
During the pairing process, someone with access to the devices to be paired needs to be in contact with your ECI team because the pairing requires action on the device at the same time as the setup of the application.
Setting up the Cash Back Feature
If your business allows customers to receive cash back for debit cards, there is some additional setup required to complete this feature.
Note: Make sure your ECI Implementation or Support team knows that you are offering this service, so they can set that feature up properly in the application.
To set up the Cash Back feature in Clover and the application:
1. Log into the Clover device as the administrator.
2. Tap the Setup icon. The setup options display.
3. Tap the Payments option.
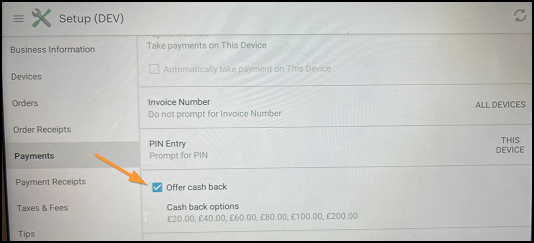
Clover: Setup > Payments > Offer cash back option
4. Tap the Offer cash back check box. The Cash Back Options list displays.
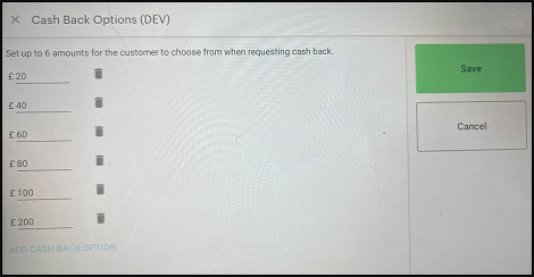
5. Here you indicate which cashback amounts you allow.
-
Leave amounts you want to offer in place.
-
Tap the Dust Bin icon to remove the amounts you do not want to offer.
-
Tap the Add Cash Back Option at the bottom to enter additional valid amounts.
6. When the list contains the cash back options you agree to, tap Save.
7. Go to Network Pay Display and tap Start.
8. Make sure that the settings Server is Secured and Enable Ping are selected.
Tell your ECI Implementation or Support team that you want to offer Cash Back services. They have a setting in the application that is required for this feature to work.
Processing Transactions using Clover Devices
B-94688, B-94701, B-94703, B-94704, B-94706, B-94707, B-94712 – After you complete the setup, Point of Sale transactions should execute normally.
To process a normal sale (paid by credit card):
1. From the Main Menu, choose Point of Sale > Sale to display the Sale Entry form.
2. In the Name field, enter the account information and press Enter.
3. Scan or enter an item into the data grid. The Clover device updates showing the item you added to the data grid.
As you add new data grid entries the Clover device updates with the new items and calculates the VAT amount.
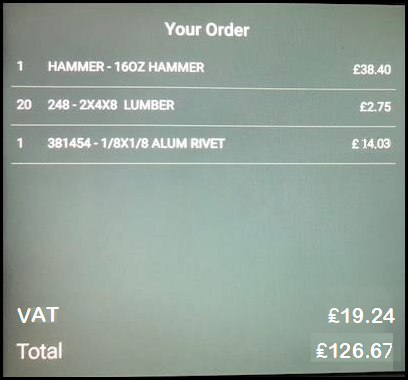
Clover Device Display
UPDATE: Since we have gone to Production, we have updated the Clover device display to include the transaction's pre-tax sub-total and the VAT label now reflects the Name on Invoice setting from the VAT Maintenance form.
As you change the quantity or add new items to the data grid, this screen updates with the changes you make and updates the totals. When you remove items from the data grid, the Clover screen updates to show the items have been removed.
4. To complete the transaction, choose Process (F12) to display the Process Invoice Document.
5. Choose Bankcard (F2) to update the application window.
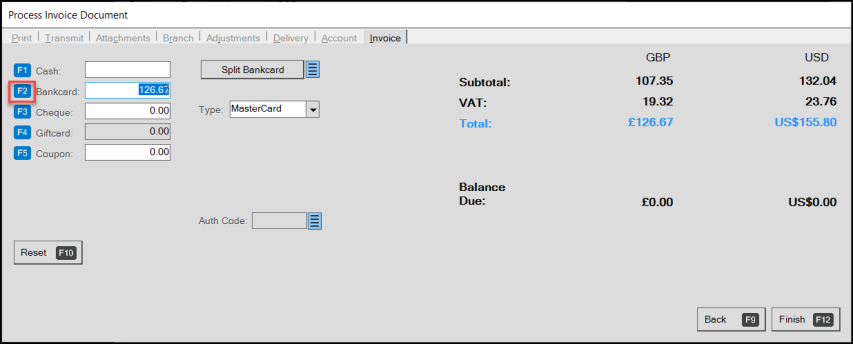
Process Invoice Document – Before Bankcard Selection
Note: Two columns may display in the Process Document in environments where the Multi-Currency parameter is turned on.
6. The Clover Device displays the swipe prompt.
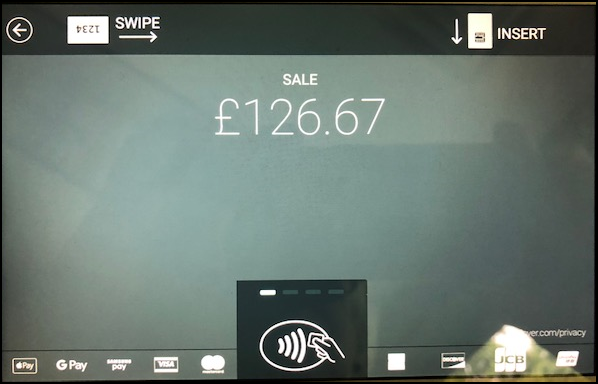
Clover: Swipe Prompt
7. On the Clover device, the customer swipes the card.
The device may prompt them to select an account: Credit or Debit.
This prompt does not display for chip cards.
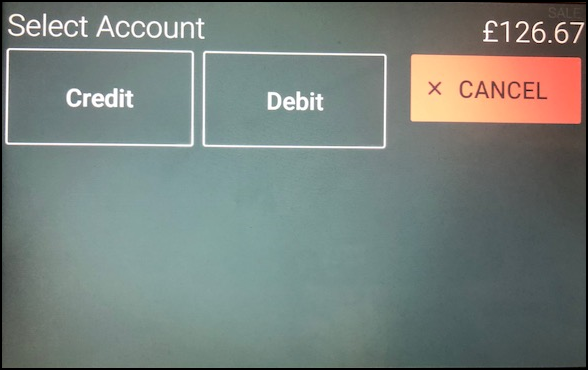
Clover: Select Account Credit or Debit
8. On the Clover device, the customer chooses Credit or Debit.
The application updates the Bankcard Information in the appropriate fields.
The transaction works using either the Credit or Debit option, it just collects different information from the user.
9. Choose Finish (F12). The application displays the Authorizing BankCard Amount prompt.
Note: If any information (card number, expiration date, etc.) does not process, an error results and the transaction fails.
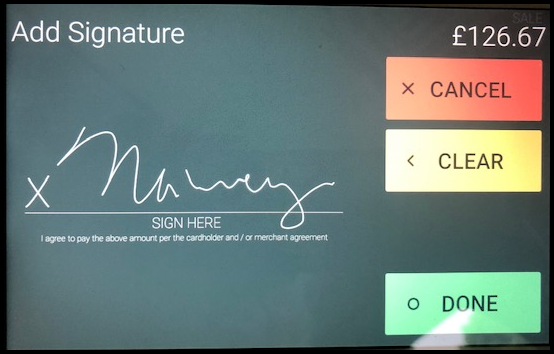
10. When the authorization is successful, depending on the transaction amount and the system signature threshold, the Clover device may display the Add Signature prompt.
The customer signs their name and taps Done.
The application saves the customer’s signature, processes the sale, sends the receipt (if applicable), and redisplays the Sale Entry form.
11. If the customer is getting cash back, the Payment window on the device displays the amount. The application prompts the cashier to press the Spacebar to continue.
To view the application invoice, from the Tool Bar, select Documents. From the Document # list, choose the transaction you just completed.
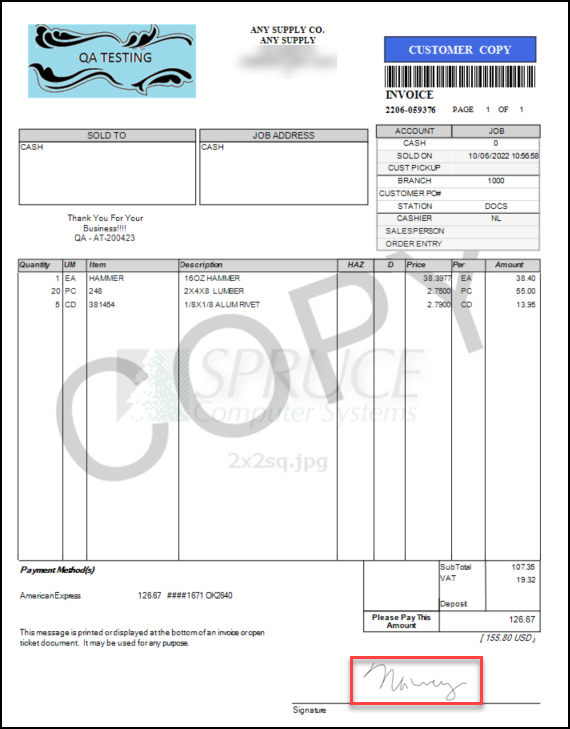
Clover Transaction Customer Invoice
Note: If the customer is getting cash back, that information displays at the bottom of the invoice:

Clover Transaction Customer Invoice with Cash Back Listed
After you complete the transaction, you can look it up on the Clover Portal. Log into the Clover Portal using your businesses login and password and go to the Dashboard:
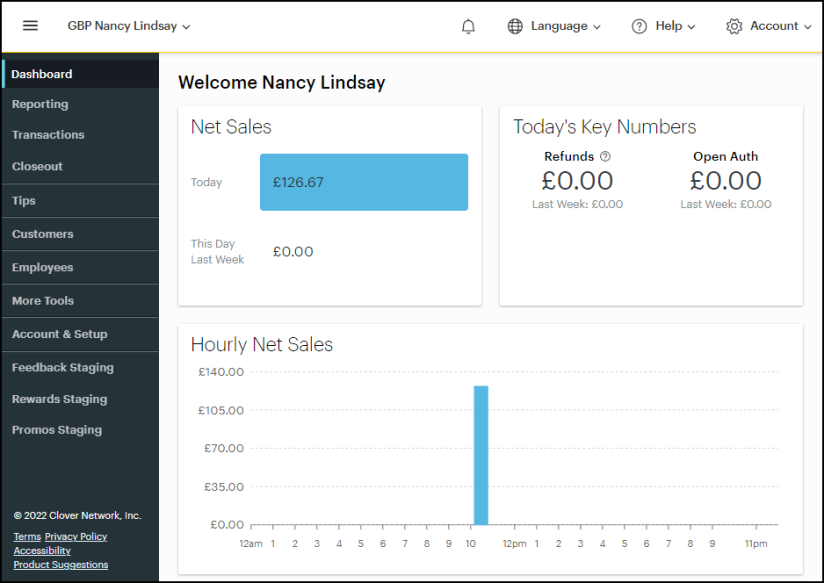
Clover Portal Dashboard – Showing Transaction
To see the transaction detail, from the Main Menu, go to the Transactions > Payments and the transaction is listed:
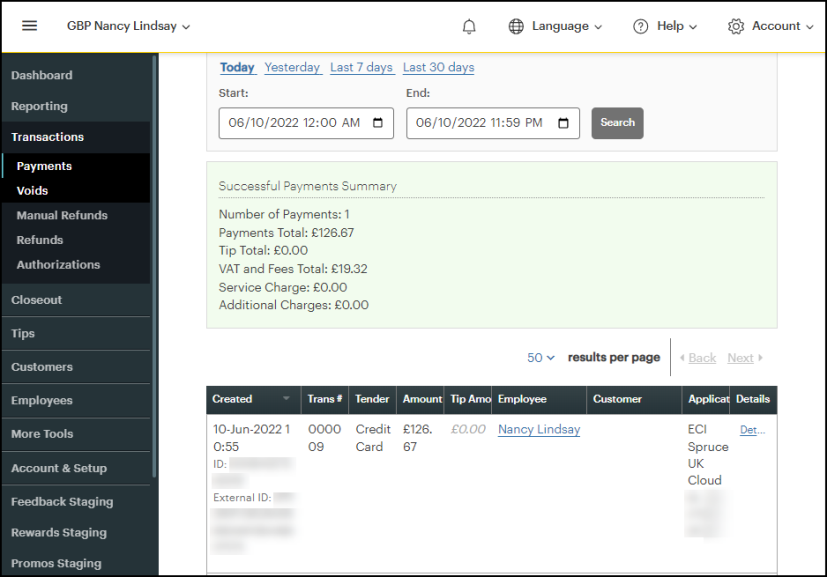
Clover Portal – Transaction Detail
What if a transaction/device goes wrong?
B-94715, B-100975 – We have all had the experience of completing a transaction and having the device or internet connection fail or time out. When this occurs, we have put into place some fail-safes to prevent the transaction from completing in one place (as on the customer’s card) and failing in the application. Clover devices are set to time out if the transaction takes more than 60 seconds to verify. These fail-safes have been established for Sales, Orders, Direct Shipment, Payment, and Payout transactions. Consider these failure types and learn how the application responds:
-
If there is an incomplete transaction both in the application and on the Clover device:
The application reboots and you can begin the transaction again. -
If there is an incomplete transaction in the application, but it completed on the Clover device:
The application reboots, prompts you to cancel the invoice, and voids the transaction. -
If the device displays a message explaining that it is reversing the transaction:
The application verifies that the transaction is reversed, and you can start again. -
If the Clover device times out or the application times out:
Typically, the device is set to time out a short time before the application does.
When the application times out, the application displays a message explaining that the time out has occurred and offers the Retry and Cancel options on the Clover device. -
If the application times out but the Clover device processes the payment:
In this case, the application reverses the payment and the Cancel button displays on the Clover device. Retry the transaction again.
Working with the Clover Portal Dashboard
As part of your Merchant Account, you have access to the Clover Dashboard, which contains the list of each transaction that your Clover devices have processed. You can use this portal to search for payments and transactions, initiate voids, send a receipt manually, process manual refunds, and review transaction histories. When you initiate voids or process manual refunds, the portal sends your application a prompt to complete these transactions. If you have questions about the portal, we recommend you reach out to Clover Customer Service.

Clover Dashboard Sample
Refunding a Payment to the Original Card
B-94691 – To refund a payment to the customer’s original card when they return an item, you need to find the original invoice in the system. The customer needs to provide some information about the sale, such as the date. The process is the same for debit cards, but keep in mind that on the Clover Portal, debit card refunds are considered “Manual Refunds” and credit card refunds are considered “Refunds”.
To refund a payment completed with a Clover device:
1. From the Main Menu, go to Point of Sale > Sales to display the Sale Entry form.
2. If a specific account is associated with the sale, choose that record from the Name field. If not, use the cash account.
3. In the data grid, enter the items the customer is returning with a negative number in the Quantity column and press Enter.
On the Clover device, the item to be returned displays with the pricing from the data grid.
On the application, the Item Return box displays.
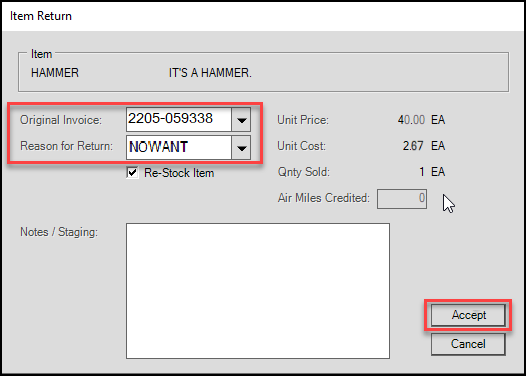
Item Return Box with Original Invoice Highlighted
4. Choose the original invoice and the reason for the return and select Accept.
Note: If you enter more than one item, the Item Return box displays for each item and the item information displays on the Clover device.
5. When all of the items to be returned are in the data grid, choose Process (F12).
The Process Invoice Document box displays.
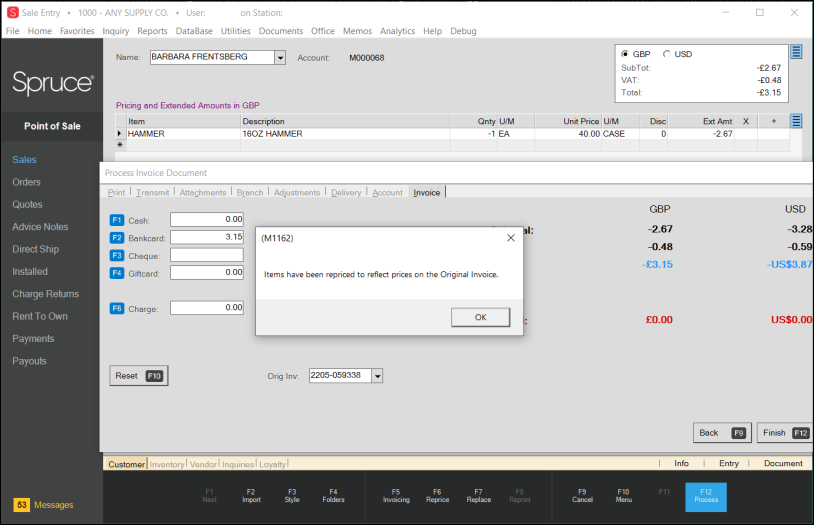
Sale Entry Form with Invoice Tab Showing Return (Original Invoice Selected)
This message displays:
-
Items have been repriced to reflect prices on the Original Invoice.
The application updates the prices on the Clover device, if needed.
6. Choose OK to dismiss the message. A new message displays:
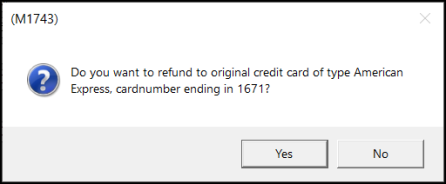
Refund Original Card Message
7. Select Yes.
8. Choose Finish (F12).
Typically, the Store Manager Override message displays. If so, enter the Store Manager’s override password and select OK. If not, continue to the next step.
9. Follow the prompts on the Clover device to add the credit to the original card.
It makes sense to verify that the credit was issued in the application and by checking the Clover Portal for the return record. Check the Payments > Returns list for credit card returns and the Payments > Manual Returns list for debit card returns.
Voiding a Clover Payment
To void a payment in the application through the Clover device, use the Invoice Reversal Utility. Typically, voids occur very shortly after the purchase, as opposed to a return, where there is more of a lag time associated with the transaction.
To void a Clover payment:
1. From the Main Menu, go to Point of Sale > Utilities > Invoice Reversal. The Invoice Reversal form displays.
2. From the Invoice # field, choose the Clover invoice that you want to reverse. The form updates with the details of the transaction.
3. Choose Process (F12) to reverse the payment. A pop up message displays.
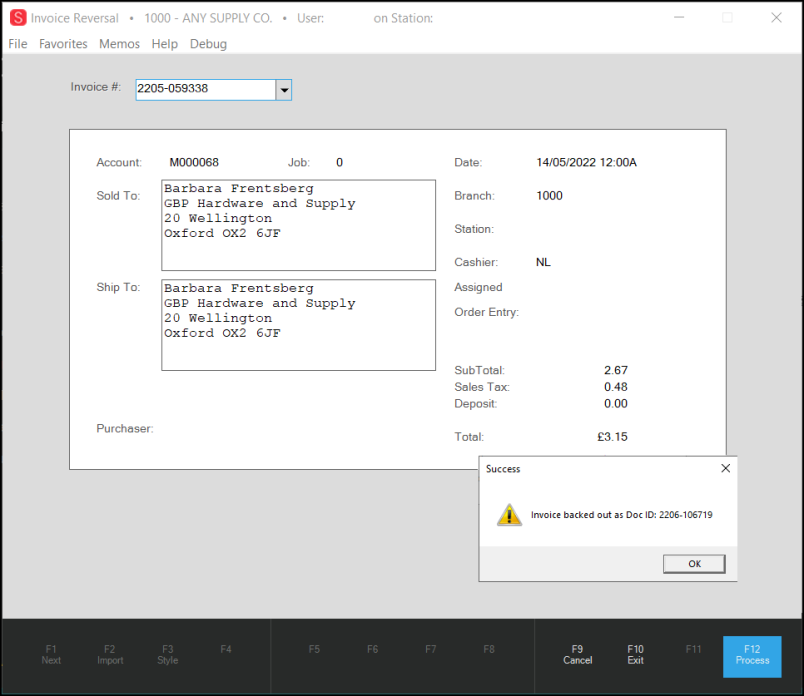
Invoice Reversal Form Displaying Clover Transaction and Reversal Doc ID
4. Choose OK. A confirmation prompt displays on the Clover device. The customer taps to confirm.
5. Go to your Clover Dashboard and choose Transactions > Voids to ensure that the transaction was voided on their end.
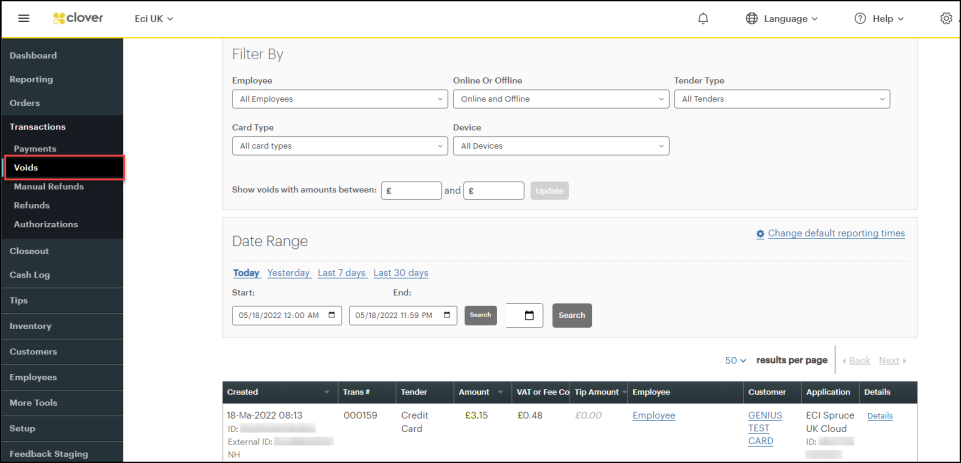
Clover Dashboard with Void Record
Applying VAT/GST Discounts in Payables
If your region has a value-added tax system (VAT or GST, not including Canada), and your vendors offer a discount for timely payment, you may also be getting a discount on the tax amount. A new feature allows you to account for the tax adjustment when a tax discount applies. This project ensures that you are paying the proper tax amount and that you report the appropriate amount to the tax authorities. For partial payments, you can choose to pro-rate the tax amount or apply the full discount to the final payment. The application also reflects the discounted tax amount in the GL account that tracks tax payments so that it does not mess up your End of Day report.
Note: This feature will not work for UK businesses until the HMRC is updated to handle this functionality.
IMPORTANT: Only you can assess whether you can reduce your VAT payment on purchases when your payment involves discount percentage. This feature is not required in all VAT/GST regions, so you need to determine whether it applies to your business or even if it may apply to some locations and not others. If you prefer, you can deduct your expected VAT discount manually or issue a vendor credit to reduce payments for these discounts. If you decide to handle the VAT discount manually, the application cannot track that for you.
ALSO IMPORTANT: After you enable this option, you cannot disable it, particularly after payments have been made using this discount. There may be a way to handle this data issue subsequently, by having a conversation with the ECI Support and Data teams. ECI will charge a fee for this service.
Setting the Adjust Tax on Discount Payables Parameter
B-98862 – If you decide you want to adjust your VAT/GST tax on an account when there is a discount for on-time payments, begin by setting the Adjust Tax on Discounts option in the Payables tab in the Parameter Settings.
To set the Adjust Tax on Discounts parameter:
1. From the Main Menu, go to Point of Sale > Database > VAT or GST to display the VAT/GST Maintenance form and make sure you have set up the GL mapping for your Payables transactions.
This includes creating a mapping for the new tax discount adjustment.
2. From the Main Menu, go to Maintenance > Database > Parameters to display the Parameter Settings form.
3. Select the Payables tab to display the Payables parameter options:

Parameters > Payables > Adjust Tax on Discounts
Note: The Adjust Tax on Discounts field does not display for non-VAT/GST tax regions. This field will not display for UK applications until the HMRC is updated to handle this feature.
4. Select the Adjust Tax on Discounts check box.
5. Choose Process (F12) to save the change.
Reviewing the Vendor Discount Information
To make this work, it makes sense to keep track of the vendor discount information in the Vendor Maintenance form. This discount rules and how the discount is applied is determined by these settings.
To review the vendor’s discount setting:
1. From the Main Menu, go to Purchasing >Database > Vendor to display the Vendor Maintenance form.
2. In the Code field, look up the vendor you want to review the discount for.
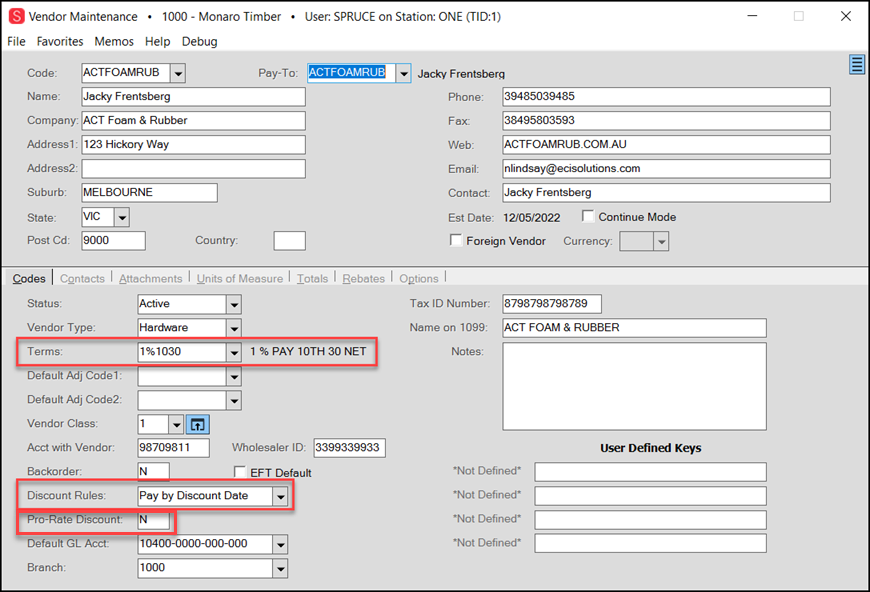
Vendor Maintenance Form with Discount Fields Highlighted
3. Review the settings in the following fields:
-
In the Terms field, you specify the discount rate.
-
In the Discount Rules field, you indicate that the discount applies.
-
In the Pro-Rate Discount field, you indicate whether the discount is prorated.
- When you enter N in this field, the application applies the discount only on the last payment when you make partial payments.
- When you enter Y in this field, the application applies the discount on a pro-rated basis based when you make a partial payment.
Seeing the VAT/GST Tax Discount in a Payables Invoice
B-98865, B-98872, B-98873, B-98875, B-98914 - After you set the Adjust Tax on Discounts parameter, and verify that the Vendor provides a discount, the application can calculate the VAT/GST discount in the Billing Invoice Entry form. This works the same way whether you process the payable before you receive the materials or after you receive them. It works whether you choose to pay the entire amount or submit partial payments.
In this case, the company has purchased $1890.00 of materials, with a GST Tax of $189.00 for a total of AU $2079.00. Let’s see how that displays in the Billing Entry form. The vendor’s discount is 1% on net 30 terms.
To review the VAT/GST Discount on a Payable Invoice:
1. From the Main Menu, choose Payables > Billing Entry to display the Billing Entry form.
2. In the Vendor Invoice list, choose the invoice with the discount to pay.
3. In the Vendor list, choose the vendor. The application fills in the appropriate fields.
4. Depending upon when you are processing this billing, do one of the following:
-
If you are paying the bill ahead of receiving the inventory, in the Bill Amount field, enter the total amount (in this case, 2079.00) and in the VAT field, enter the tax amount ($189.00) and press Enter. The application calculates the item discount and the VAT discount based on the entry in the Terms field using the information you entered.
-
If you are importing the information from receipts, choose Receipts (F5) and select the receipt you are paying for. The application updates the Bill Amount, the VAT Amount, and the discount amount fields based on the discount quantity in the Terms field.
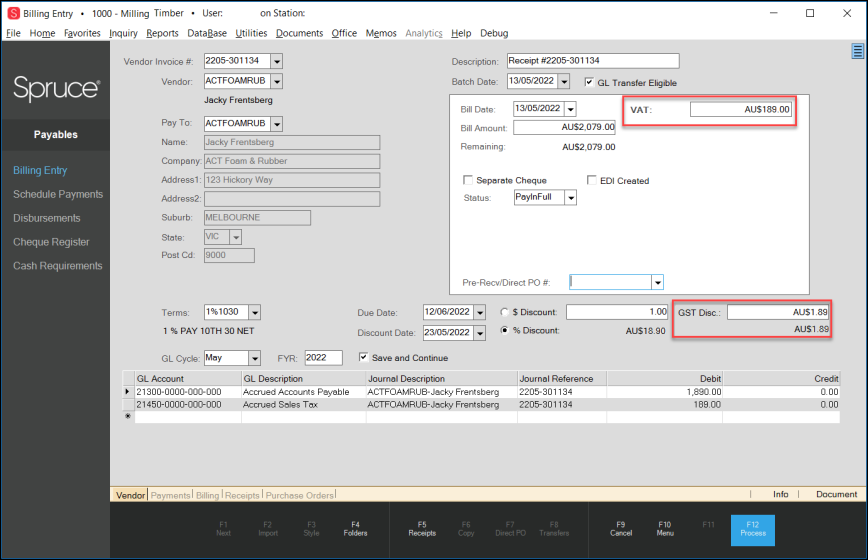
Billing Entry Form with GST Payable Discounts Applied
This section of the form displays the discount information. The VAT/GST Disc field contains the application’s calculation of the tax discount. The total discount for the transaction would be (18.90 (for materials) +1.89 (for the tax) = $20.79 discount for the transaction. The application calculates the discount, in part based on the status (Open, PayinFull, Paid, etc.)
5. To ensure that the amounts that display in the transaction are transferred to the appropriate GL account, select the GL Transfer Eligible check box.
6. If you decide to make a partial payment, the application manages the discount based on your pro-rate entry in the Vendor Maintenance record:
-
If you selected N in the Pro-Rate Discount field, the application applies the entire discount in the last payment;
-
If you selected Y in the Pro-Rate Discount field, the application applies a pro-rated discount amount for each payment.
7. To change the GST Discount, you can type over the amount in the GST Discount field. If you modify the VAT/GST entry manually, the application displays a warning message:
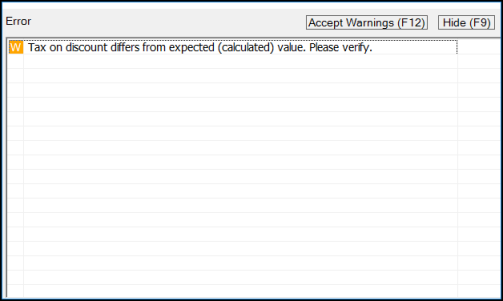
Billing Entry Form Warning Message
8. Select Accept Warning if you are confident that your change is appropriate.
9. When you process the payment, the application keeps track of the discount information you applied.
After the check run, the application applies the calculated discount to the transaction, so the payment amount displays correctly on the check.
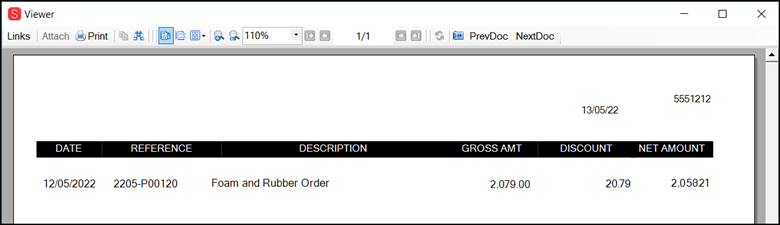
Check Run Results
When you look at the AP Billing Invoice, it reflects the discounts for the item and for the taxes:
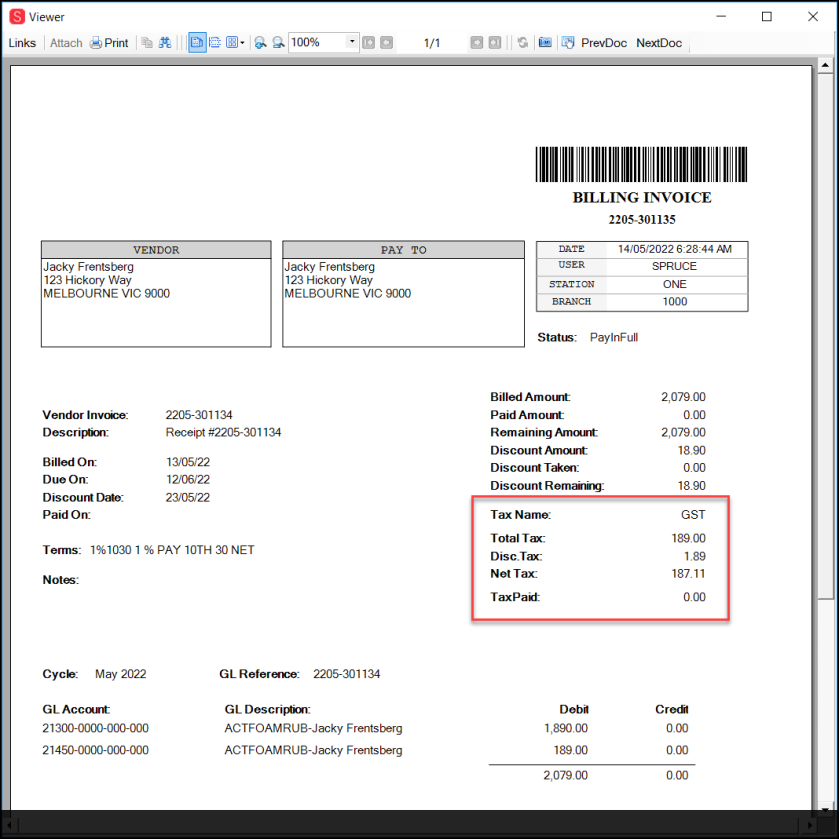
Billing Invoice with Item and Tax Discounts Highlighted
When you are paying a foreign vendor with a VAT/GST discount, the discount is calculated in the local currency and then applied to the foreign account.
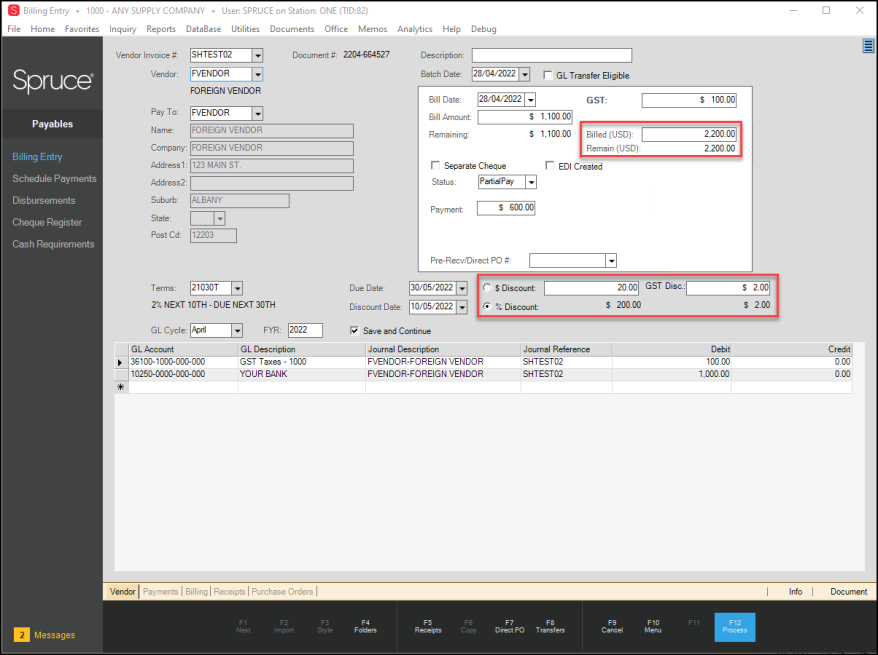
Billing Entry Form with Foreign Vendor GST Discount Highlighted
The Billing Tax Invoice reflects the amounts in both local values and foreign amounts:
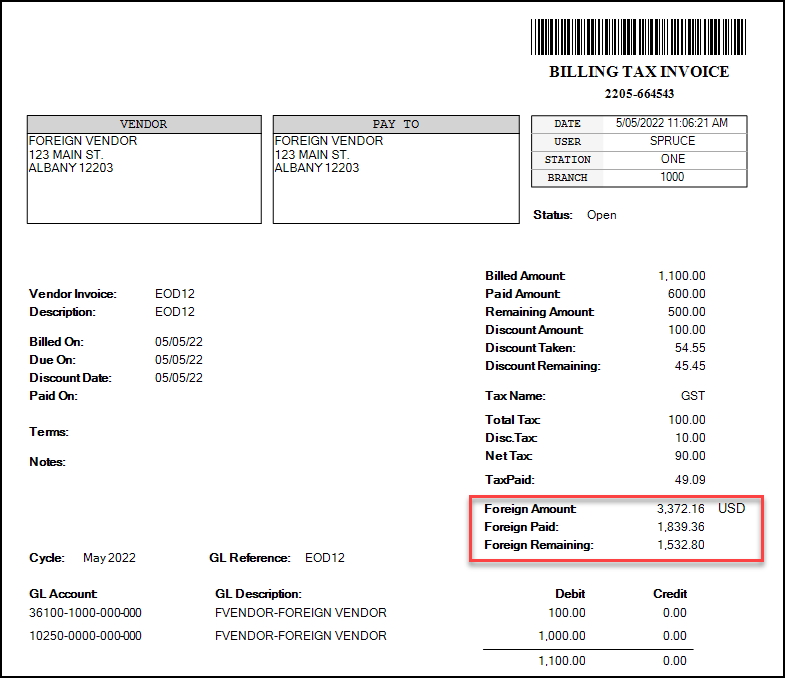
Billing Tax Invoice with Foreign Values Highlighted
Reviewing VAT/GST Tax Discount Applied to Partial Payments
In partial payments, you need to check the Pro-Rate Discount field to determine when the discount is applied. To review: In the Pro-Rate Discount field, you indicate whether the discount is prorated.
-
When you enter N in this field, the application applies the discount only on the last payment when you make partial payments. In our example, this is the option we show.
-
When you enter Y in this field, the application applies the discount on a pro-rated basis based on the amount of the partial payment.
This affects when the discount appears in the Billing Entry form and in the subsequent GL entries.
In this example, we have purchased inventory, received it, and will work with the received records.
To see the partial payments effect on the payable billing (Pro-Rate Discount = N):
1. From the Main Menu, go to Payables > Billing Entry to display the Billing Entry form.
2. Choose Receipts (F5) and pull in the receipt you want to partially pay. The form updates with your changes.
3. In the Status field, choose PartialPay and in the Payment field, enter the amount of the partial payment. Press Enter. The Recalculate prompt displays.
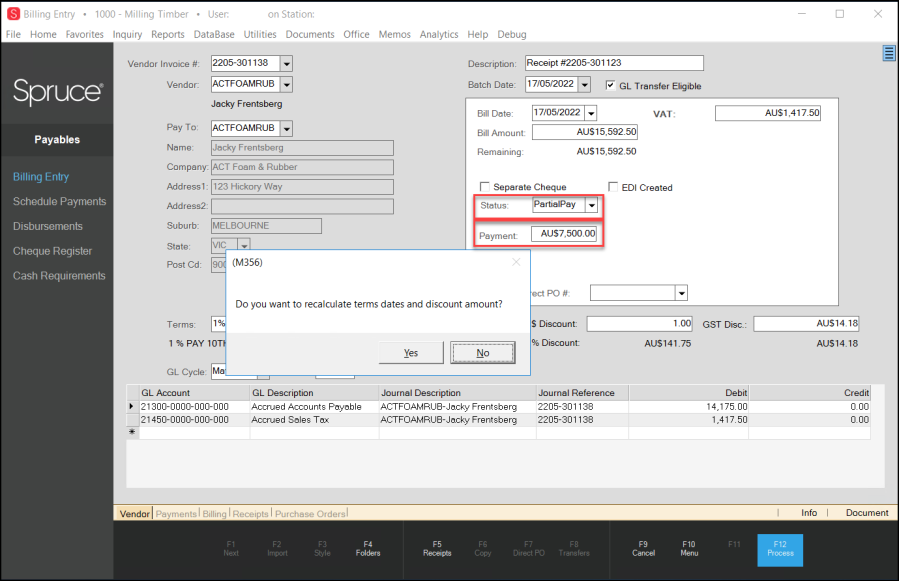
Billing Entry Form with Partial Payment Entered and Recalculate Prompt Showing
Note: If you change the terms entry, a pop-up message displays asking you if you want to re-calculate the term dates and the discount. Select Yes to recalculate the term dates and discount amount. In this case, nothing updates because the discount will be applied when you make the final payment.
4. Choose Process (F12) to process the payment.
5. Run the disbursement process and create the first check. When you look at the first check, there is no discount amount reflected:
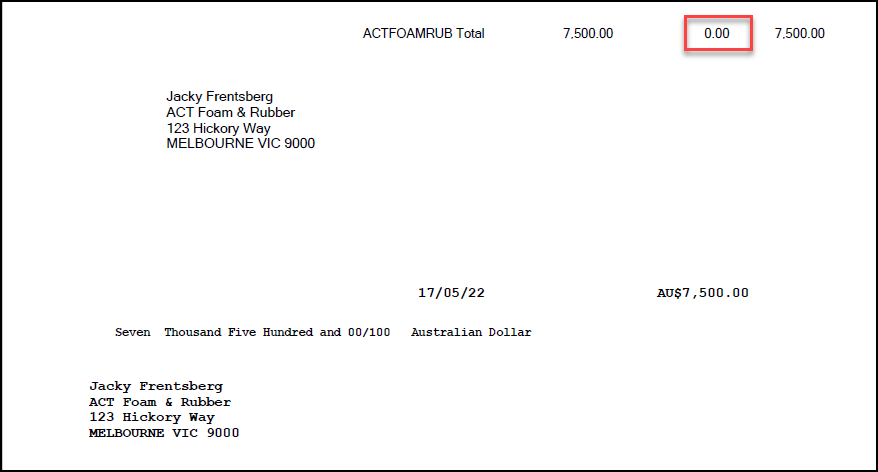
Check 1 with No Discount Recorded
6. When we return to the payable, you can see that the first payment amount has been deducted from the total and the Discount fields are disabled.
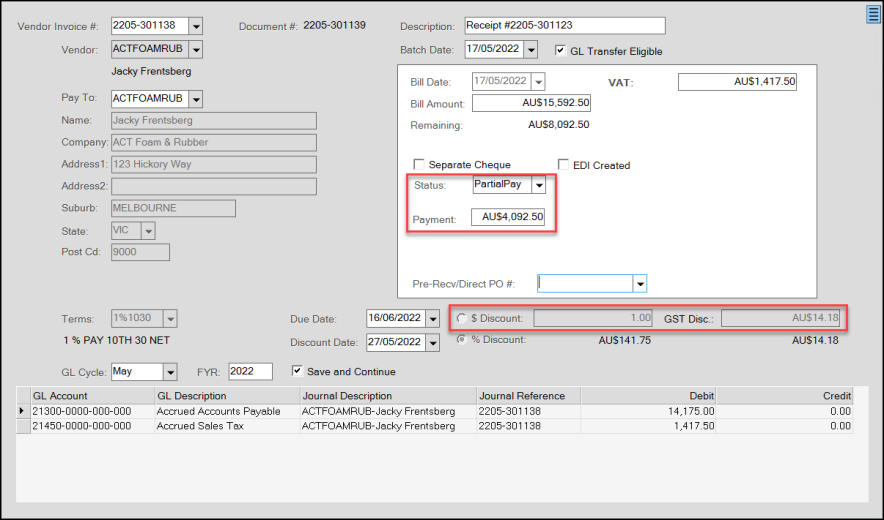
Billing Entry Form with Second Partial Pay Amount Entered and Discount Fields Disabled
7. Choose Process (F12) to process the payment.
8. Run the disbursement process and create the second check.
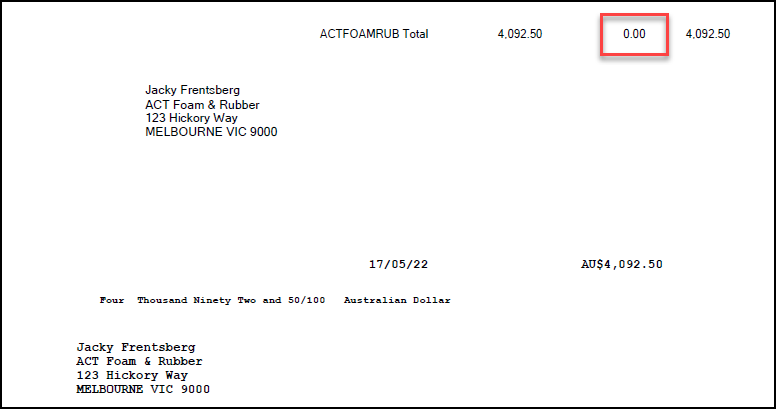
Check 2 with No Discount Recorded
9. When we return to the payable, you can see that the second payment amount has been deducted from the total.
10. Choose PayInFull from the Status list. The application moves the cursor to the Pre-Recv/Direct PO# field, so you can select the PO from the list.
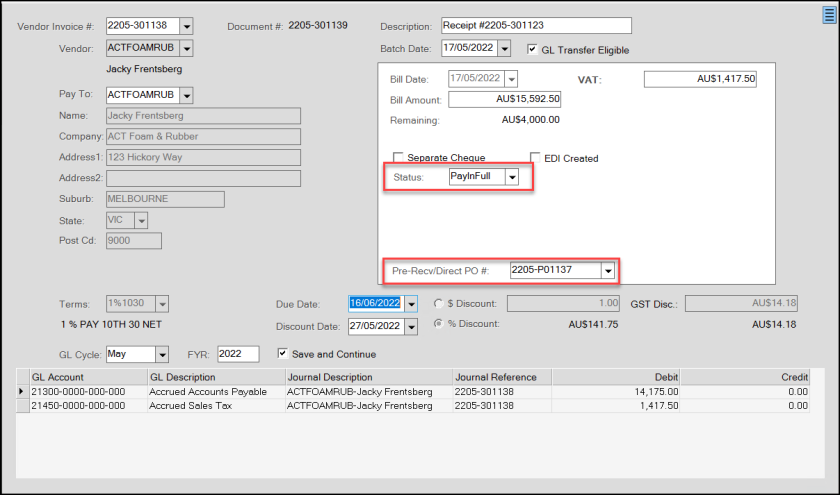
Billing Entry Form with PayInFull Selected
11. Choose Process (F12) to process the payment.
12. Run the disbursement process and create the last check.
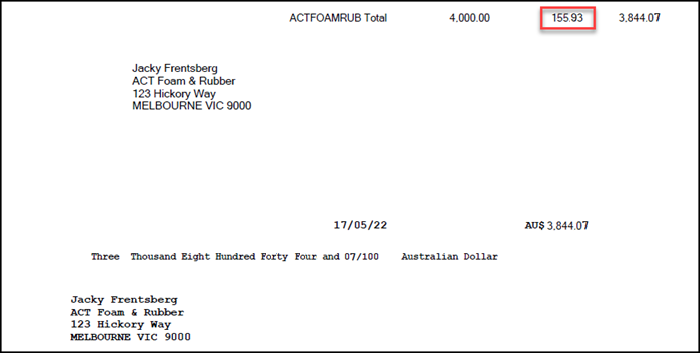
Check 3 with Discount Recorded
Seeing the VAT/GST Tax Discount Applied to the General Ledger Account
B-98915 – It is also important to see that the VAT/GST discount is applied to the appropriate AP Tax Discount GL account, so you are reporting the appropriate amount of tax to the tax authorities. Setting this up properly ensures that the discount is also recorded in the End of Day (EOD) report so the books balance.
When you process a payment that has a VAT/GST tax discount associated with it, the tax discount amount displays in the VAT/GST Disc field of the Billing Entry form. It is important that you select the GL Transfer Eligible check box to ensure that the application transfers the correct tax amount minus the discount. This is why it is important that you map the tax discount to a GL account before you set the parameter. If you do not add this mapping, the application will separate the tax amount into a separate account, but it will not display the Discounted tax amount on the GL account.
![]()
Billing Entry Form with GL Transfer Eligible Field Highlighted
If you choose to transfer the payment amount to the General Ledger account manually:
1. In the Main Menu, go to Payables > Utilities > Transfer A/P to display the Transfer Accounts Payable form.
2. Choose View (F8) to display the eligible transactions.
3. Choose the Select check box at the end of the row of the transaction you want to process.
4. Select the Transfer Now check box.
![]()
Transfer Accounts Payable with Transaction Highlighted
5. Choose Process (F12) to complete the transaction.
6. Then go to General Ledger > Inquiry > Journal to display the Journal Inquiry form.
7. In the Journal ID, choose the journal you just completed the transfer for.
8. Then, choose the Accrued Sales Tax entry to see the detail.
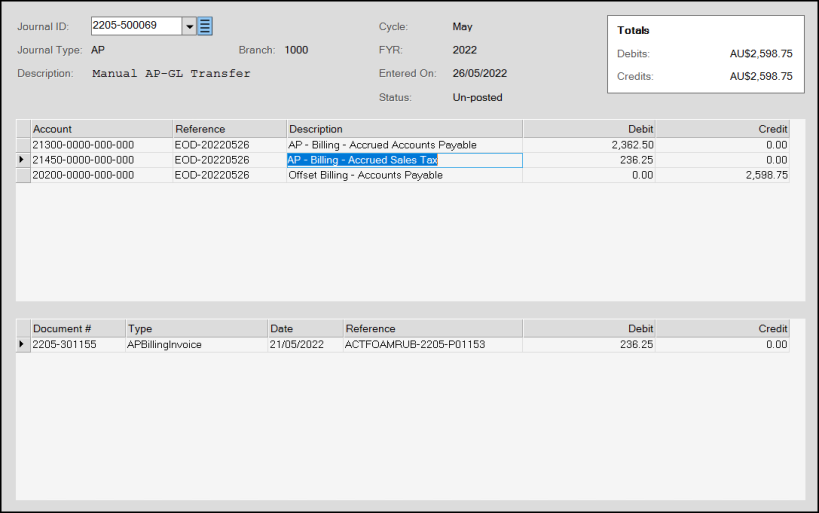
Journal Inquiry Form with Sales Tax Detail
9. Run the Disbursement to pay the bill:
-
Choose Payables > Disbursements to display the Disbursements form.
-
Select the appropriate checking account.
-
Choose Process (F12).
10. Run the End of Day GL Report.
11. From the Main Menu, go to General Ledger > Inquiry > Journal to display the new Journal Inquiry form.
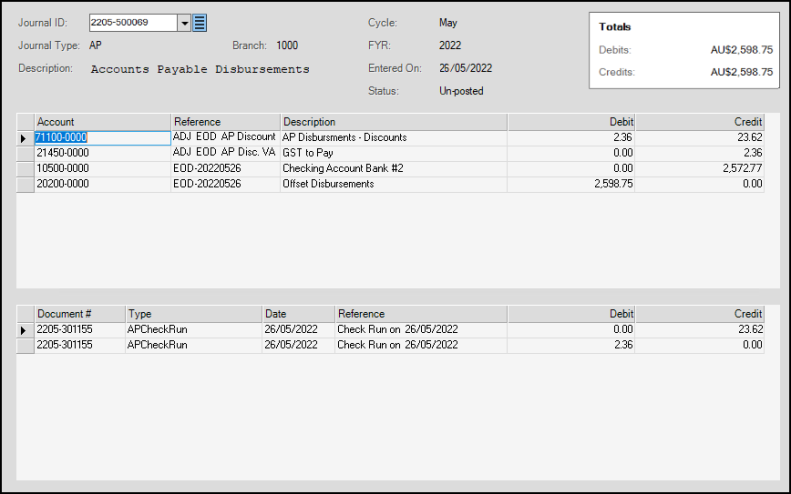
Journal Inquiry Form after EOD Report Run
Looking up the Tax Discount in Billing Inquiry
B-98877 – After the disbursement run, you can also review the tax discount on a payable in the Billing Inquiry system.
To review the tax discount in the Billing Inquiry system:
1. From the Main Menu, go to Payables > Inquiry > Billing to display the Billing Inquiry form.
2. From the Vendor Invoice list, choose the invoice we have been working with to display the tax discount information.
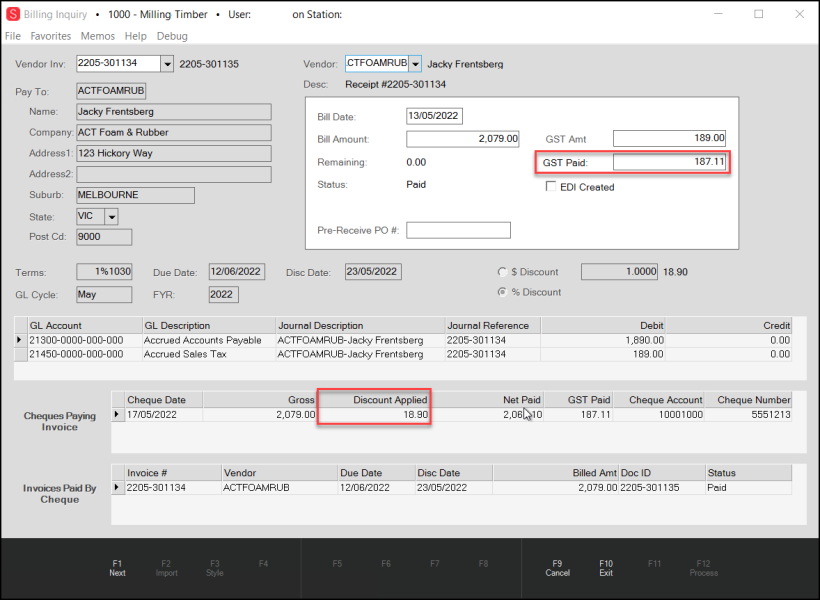
Billing Inquiry Form with Discount Fields Highlighted
Including/Excluding Taxes on Items for GST Tax Regions
B-98633, B-98635 – In general, when you are calculating taxes in Point of Sale in a VAT or GST region, the application calculates the taxes based on the item’s assigned tax location, and if no tax is assigned to the item, the application uses the default tax setting for the branch (if it is a Tax Included branch). If the user overrides the tax assigned to the product or the branch, the application uses the override tax instead. When the tax code selection changes, the application recalculates the totals to include or exclude any needed tax amounts based on these settings.
Note: Users who have specific User ID permissions (Allow change of item tax status) can change the tax status of an item in Point of Sale. The instructions for setting this permission are in Setting the Adjust Tax on Discount Payables Parameter.
Sometimes, when a parent tally item is made up of child items (particularly for lineal tally, lot tally, and fixed-length tally items) that have their own tax settings, this calculation method gets more complicated. Typically, in this case, we update the child items to use the tax settings of the parent when the user changes the tax location that applies to the transaction. This way, when the application calculates the taxes, the transaction’s total tax should match the sum of the detail item taxes.
When you add an override item VAT/GST location for the entire transaction (in the Process form), the application uses the transaction tax override value for all items, except when there are items with a lower tax rate (or exempt tax rate) in the data grid. Tax overrides should only reduce the taxes on items, not increase taxes on items that normally would have little or no tax rate. This is true, even if you have Overrides Item VAT selected in the VAT or GST Maintenance form.
When you override an item’s VAT/GST tax location but later change it back to a non-override item VAT location, the application recalculates the taxes and the tax values return to their initial values based on the tax codes and rates assigned. Each time a user changes the taxes of items in the data grid, the application updates the tax included values to reflect the change in the item's tax amount as requested. When the transaction is finalized, the application saves the last tax code location settings with the transaction record. Any returned items use the final tax amount saved with the transaction, even if the return is in a different tax location.
Note: The application uses the taxable amount of the transaction in both cases, so the total sales, etc. is the transaction amount. The tax would reflect the transaction amounts for the related items.
When you import a transaction (such as an Order into Sales), the the application maintains the tax setting from the original transaction. If someone with admin permissions changes the tax calculation, an entry displays in the task list to verify that this change was made appropriately.
When EOD report generates the ledger entries based on the Point of Sale activity, the ledger uses each transaction’s tax code to determine the appropriate G/L account. Item taxes aren't split into different tax codes for financial reporting even if the mapping differs. The application only considers the transaction account.
A Note about Tax Exempt Customers/Transactions
When the customer associated with a transaction has an exempt tax ID assigned or an exempt ID is assigned manually from the Process form on a transaction, the application sets the tax for the transaction to zero, overriding any other considerations. If the tax exempt ID is removed or the customer is modified to a customer with no assigned tax ID, the application recalculates the taxes to the default values based on the item's normal tax assignment (either based on the item’s tax or the default branch tax settings).
Setting a User’s Tax Override Permissions
Tax override permissions are set in the user’s User ID Maintenance form.
To set a user’s tax override permissions:
1. From the Main Menu, go to Maintenance > Database > User IDs to display the User ID Maintenance form.
2. In the User ID field, choose the user ID you want to change permissions for. The form displays the user’s current permissions.
3. Beside the Application Security list field choose the Settings ![]() icon to display the list of security permissions.
icon to display the list of security permissions.
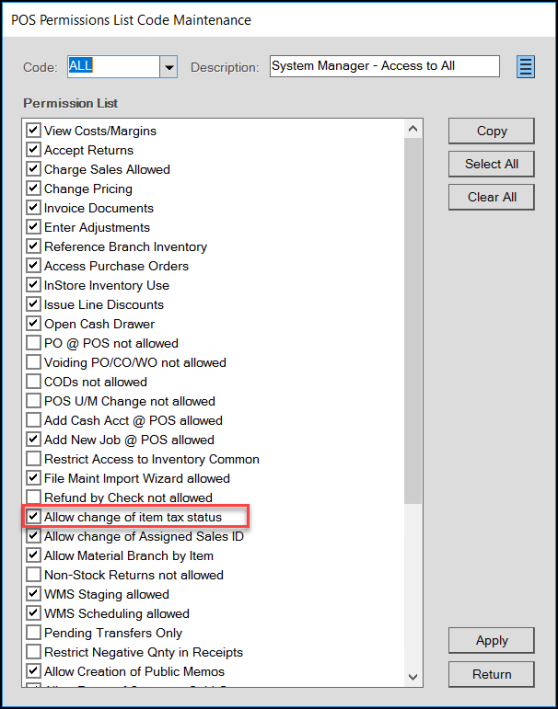
User ID Maintenance Form with Application Security List – Allow change of item tax status Highlighted
4. Select the Allow change of item tax status check box and choose Apply.
5. Select Return.
6. Choose Process (F12) to save this change.
Understanding the Override Item VAT Setting
In the Sales Tax Maintenance form for VAT/GST regions, there is an Overrides Item VAT entry, which determines whether the VAT/GST code of the Item or the Branch is used in a transaction. In general, when the Override Item VAT setting is enabled in the Sales Tax Maintenance form for an Inc Tax Branch, the Branch tax setting is used to calculate the tax amount for Point of Sale transactions. However:
-
When either the Item or the Branch have an assigned tax code and the Overrides Item VAT option is enabled, the application allows changes to the tax code to a new override code only if the percent of the new tax code is less than the original tax setting.
-
When both the Branch and the Item have an Overrides Item VAT option enabled, the application applies the lower of the two tax percentages as the tax code for the transaction.
To see the Override Item VAT check box setting:
1. From the Main Menu, go to Point of Sale > Database > Sales Tax to display the Sale Tax Maintenance form.
2. Choose any tax code from the VAT or GST Code list.
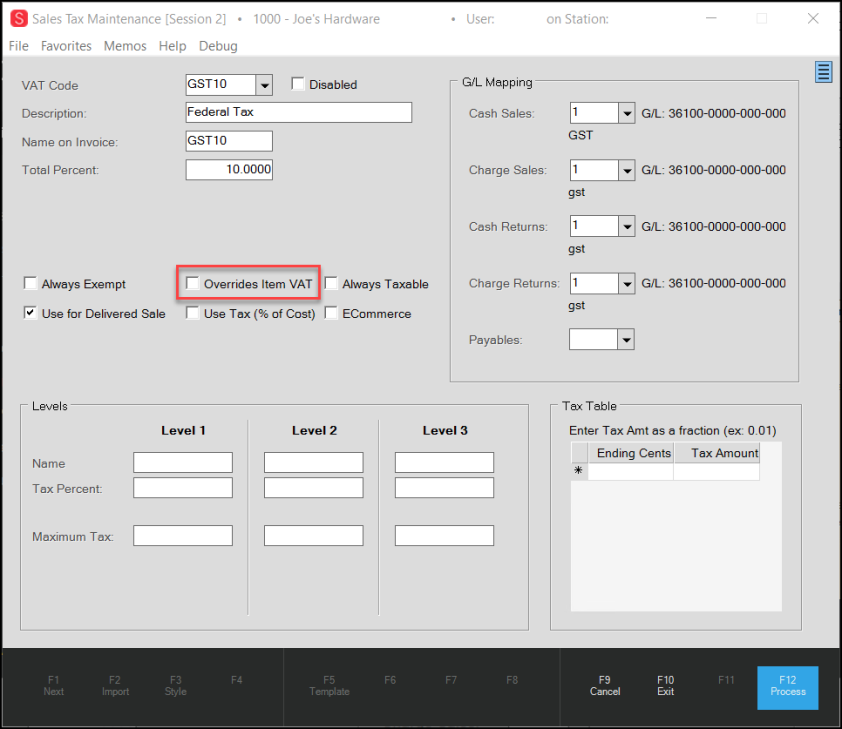
Sales Tax Maintenance Form with Overrides Item VAT/GST Highlighted
Note: If the user does not have the Allow change of item tax status option selected, they will still see the Item Tax field, but they will not be able to change the entry in it.
Reviewing and Including/Excluding Tax in Point of Sale
B-98629 – When you have permission to change the tax status of an entry in Point of Sale, you can change the item’s setting in the Point of Sale Entry Folder. The changes described in this section are also visible in Orders, Quotes, Tickets, Direct Shipments, and Charge Returns.
To review tax details in Point of Sale (VAT/GST regions only):
1. From the Main Menu, go to Point of Sale > Sales to display the Sale Entry form.
2. Add an item to the data grid.
3. Choose Folders (F4) and the Entry tab to see the Item Tax detail.
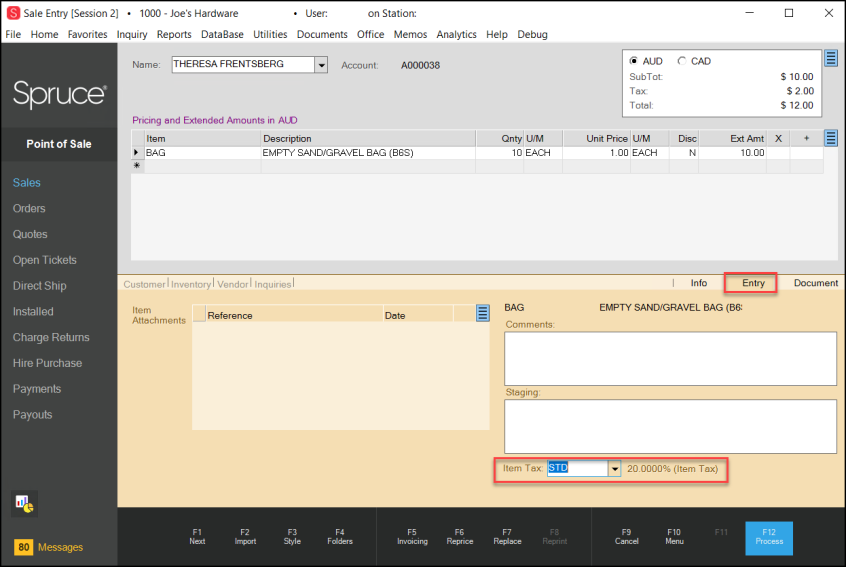
Sale Entry Form with Entry Folder and Item Tax Field Highlighted
Note: If the user does not have the Allow change of item tax status option selected, they will still see the Item Tax field, but they will not be able to change the entry in it.
4. To change the Item Tax used for this item, choose the down arrow beside the Item Tax field and enter the new applicable tax value.
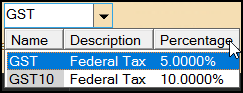
Item Tax Field with Alternate Tax Option
When you select the new tax code, the tax value updates to reflect the new tax calculation.

Sales Entry Form with Updated Tax Value Highlighted
When you select a new tax ID from the list, the application displays the new tax ID and percentage with the label User Override and the first tax ID and percentage with the label Original Item Tax. If the customer has an overriding transaction tax (as when their transactions are tax exempt), the label Transaction Override displays in place of User Override.
5. Choose Process (F12) to display the Process Document box with the updated tax entry in the appropriate currency. The transaction processes normally.
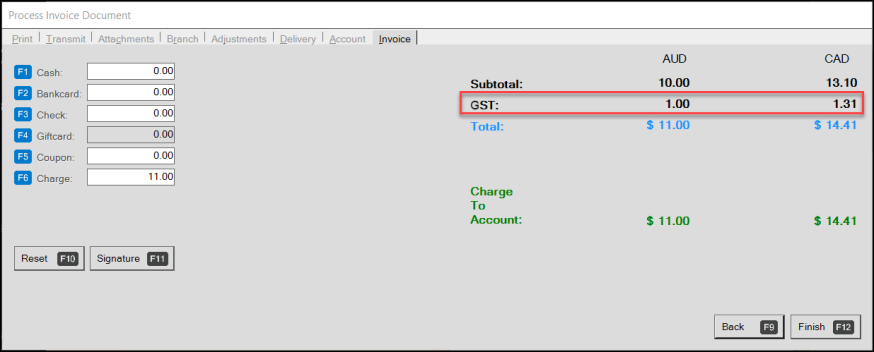
Process Invoice Document with Updated Tax Amount
6. Go to Documents > PS Sale Invoices and choose the last invoice to display the document associated with this transaction. The tax amount and rate display correctly.
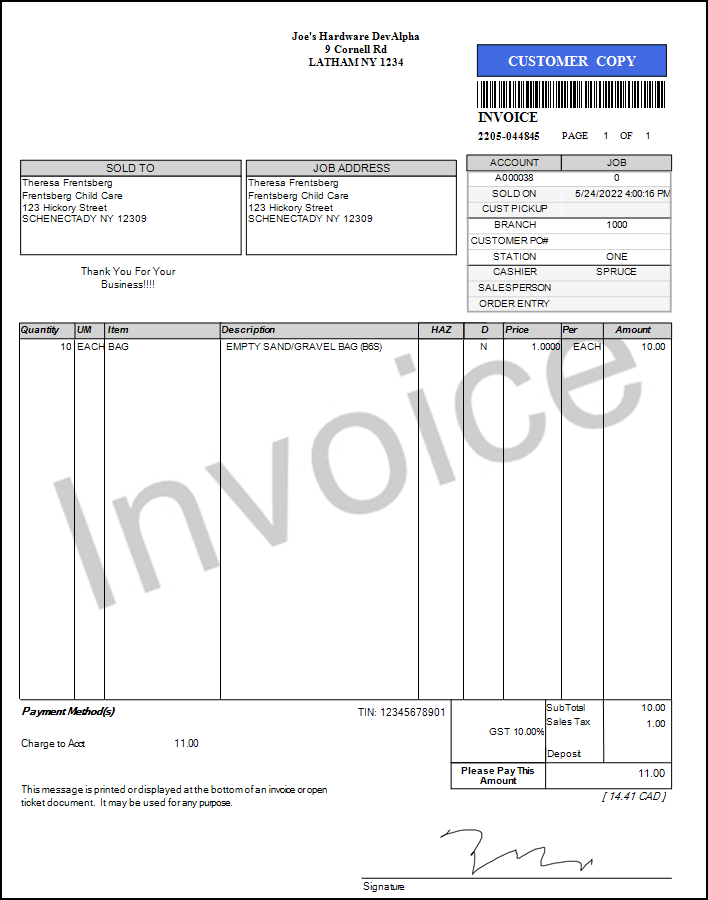
Inc Tax Document with Adjusted Tax Rate
Displaying Include/Exclude Tax for Inventory Items
B-98656 – For businesses in VAT and GST-tax regions, we have updated the Item Maintenance and Item Inquiry forms to display branch-specific item tax information on the Branch > Pricing tab. It was difficult to know whether the values in the Pricing tab included or excluded tax, so we have made this easier to see and reset.
Note: If the item’s VAT location is missing or invalid, the Tax Excluded amounts display and the Tax Included option is not available. These options will display if the VAT location is set for the item.
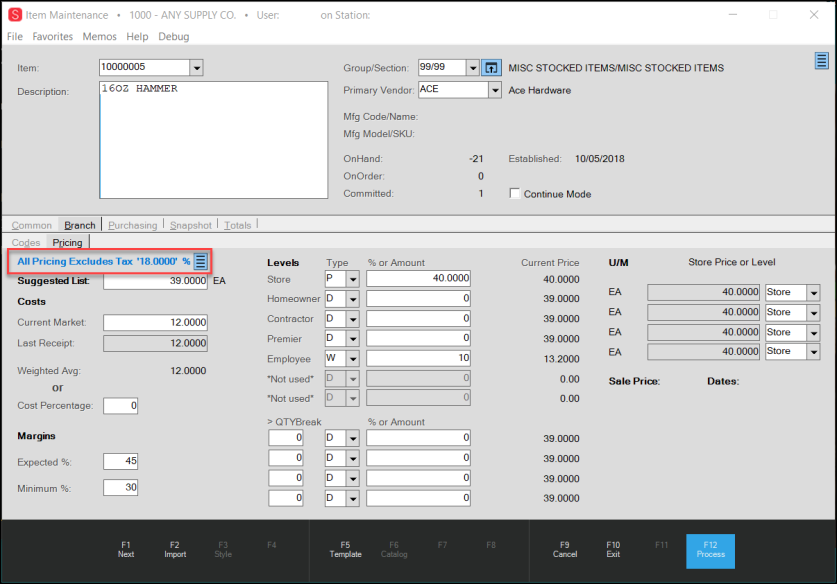
Item Maintenance Form > Branch > Pricing Tab with All Pricing Excludes Tax Highlighted
Note: These changes will not display for regions that do not use VAT or GST taxing methods.
For tax-excluded branches, this message displays:
-
All Pricing Excludes Tax <Tax Percentage>
For tax-included branches this message displays:
-
All Pricing Includes Tax <Tax Percentage>
The Snapshot tab displays the opposite values from the default Branch > Pricing values for the item. In this case, the Snapshot tab for a Tax Excluded branch and shows the Suggested List with the 18% tax:
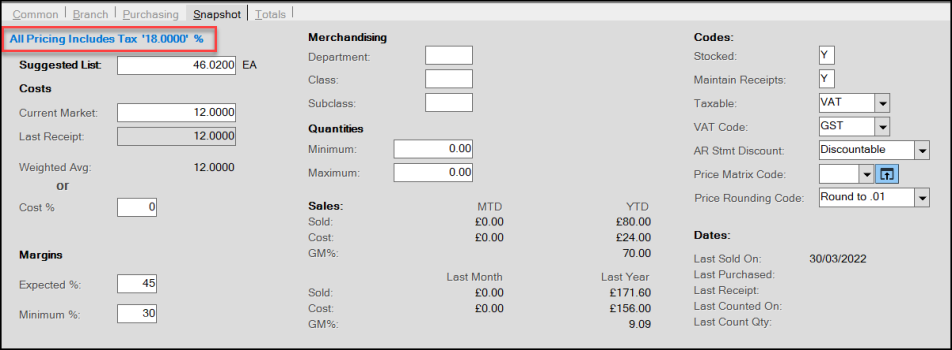
Snapshot Tab with Tax Included Values
Note: The Snapshot tab values do not change if you use the Pricing tab menu marker.
To view the Inc Tax values in the Pricing tab (in a Tax Excluded Branch), choose the Menu Marker and choose Include Taxes.

Branch > Pricing Tab – All Pricing Excludes Tax Menu Options
The price-based values for the item update to reflect the prices including the applicable tax, including the Suggested List, Current Price entries, Sale Prices, and Store Price or Level Entries.
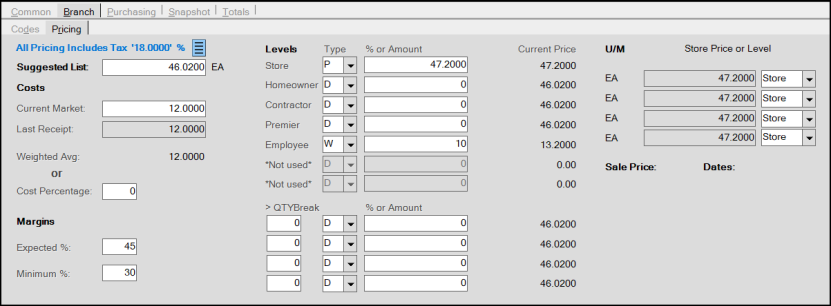
(Ex Tax) Branch > Pricing Tab with Tax Included Values Selected
Note: Cost and Margin percentage fields are not affected by tax changes. Level Prices are only affected for fixed price items.
After you make this change, if you select the Continue Mode check box and select Next (F1), the Branch > Pricing option you selected will be set for the next inventory item you go to.
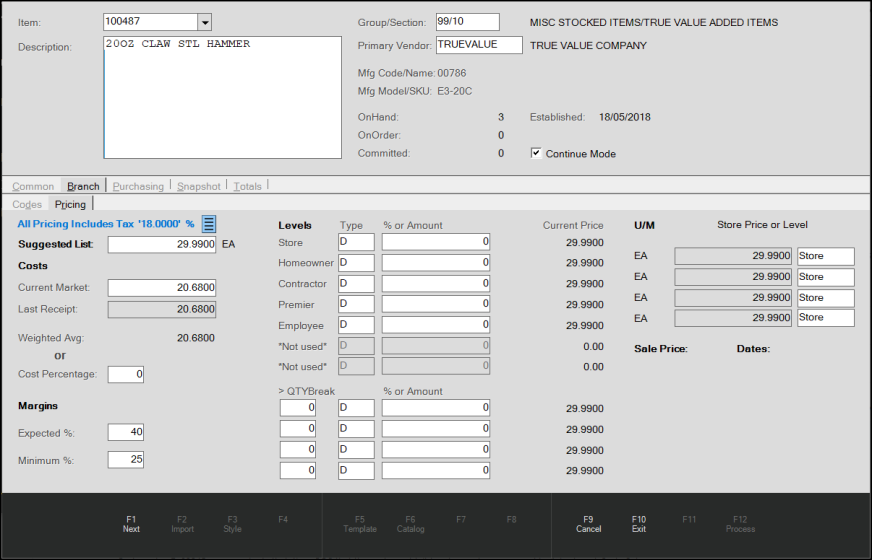
Item Maintenance for Next Item after Include Taxes Option is Set
If you change the pricing of an item and flip the tax values back and forth, the prices with tax will reflect the new calculation.
The application saves all pricing in the database without taxes, even in Inc Tax branches. We display the correct amount values based on the Item’s VAT settings and the branch the item is in.
Support for Zero-Decimal Currencies Complete
We have completed our work to ensure that regions that use zero-decimal currency values are reflected in all application areas. We have completed our testing in Point of Sale, Purchasing, Inventory, Accounts Payable, Accounts Receivable, General Ledger, Delivery, and each of the Maintenance and Utility areas.
Landscape Format Update for Tax Document Styles (VAT/GST)
Updates to the Landscape Document Styles for Point of Sale Documents (VAT/GST)
B-100118, B-100120, B-100122, B-100123, B-100126, B-100128 – We have redesigned the landscape document styles for Point of Sale documents in regions that use VAT/GST tax processing. We have reformatted the headers and footers of these documents to provide the same information more compressedly, to provide more space for the items list. These changes should minimize the number of pages you need to print when processing these transactions, which provides a better customer experience for businesses that use landscape A4 page formats. When needed, we shrink report elements and values (prices, tax amounts, extended amounts, and totals) to ensure the proper fit. These changes apply to Invoice Tax, Order Tax, Charge Returns, Direct Order, and Open Ticket/Advice Note documents. The correct display and creation of these updated document styles depend upon several settings:
-
The branch producing these documents must have the Tax Included setting in the Item Tax Entry Method field in the Branch Setup form
-
The Printer device settings for InvoiceTax, Customer Orders, Quotes, and Direct Orders, must be set to the appropriate Tax Style type in the Device Maintenance form
-
These changes assume that these documents are printed on A4 paper sizes in landscape mode
-
These documents can also accommodate delivery scheduling and instructions
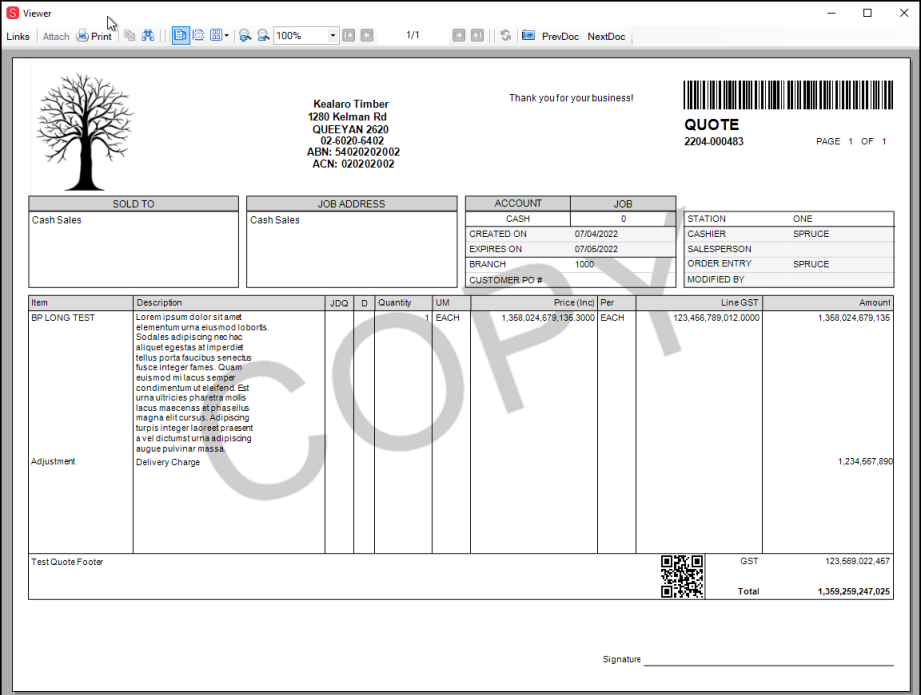
Document Viewer - Quote Sample
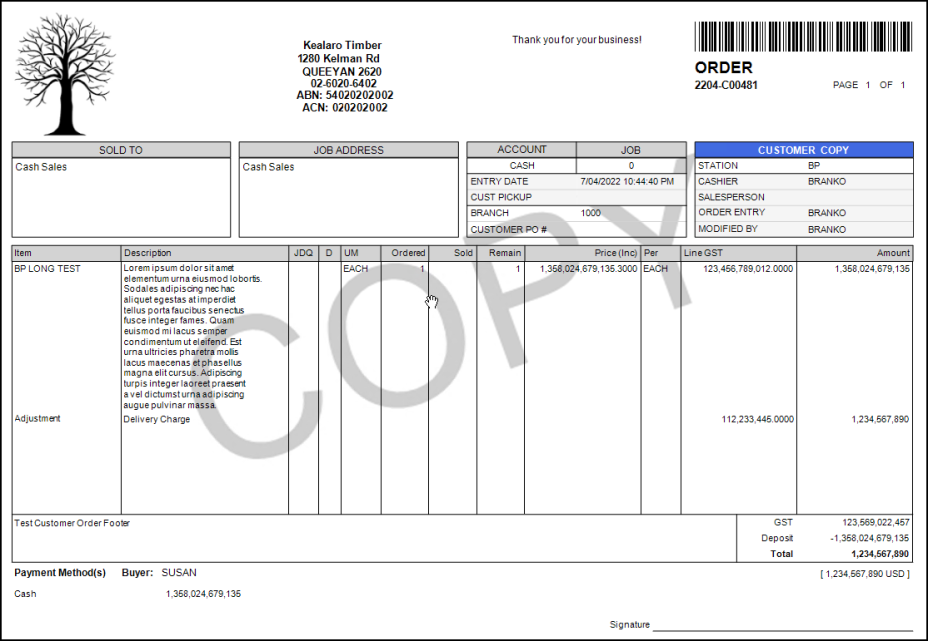
Document Viewer – Order Sample
Displaying a Watermark on your Inc Tax Point of Sale Documents
B-81311, B-100117 – You can display your branding watermark on your Inc Tax Point of Sale transaction documents (invoices, tickets, charge returns, quotes, direct shipments, etc.) in portrait or landscape styles for Inc Tax documents. There are no size requirements for this logo file, the application scales and fits your image in the background of the report detail section. You must have administrative rights to complete this work.
Before you start, the application requires your brand image file to have a specific file name. So please save the image file you want to use in the background of your Point of Sale documents with this name:
-
2x2sq.jpg
To add your branding image to your Inc Tax documents:
1. From the Main Menu, go to Maintenance > Database > Parameters to display the Parameter Settings form.
2. Select the Software subtab to display the Pathnames section.
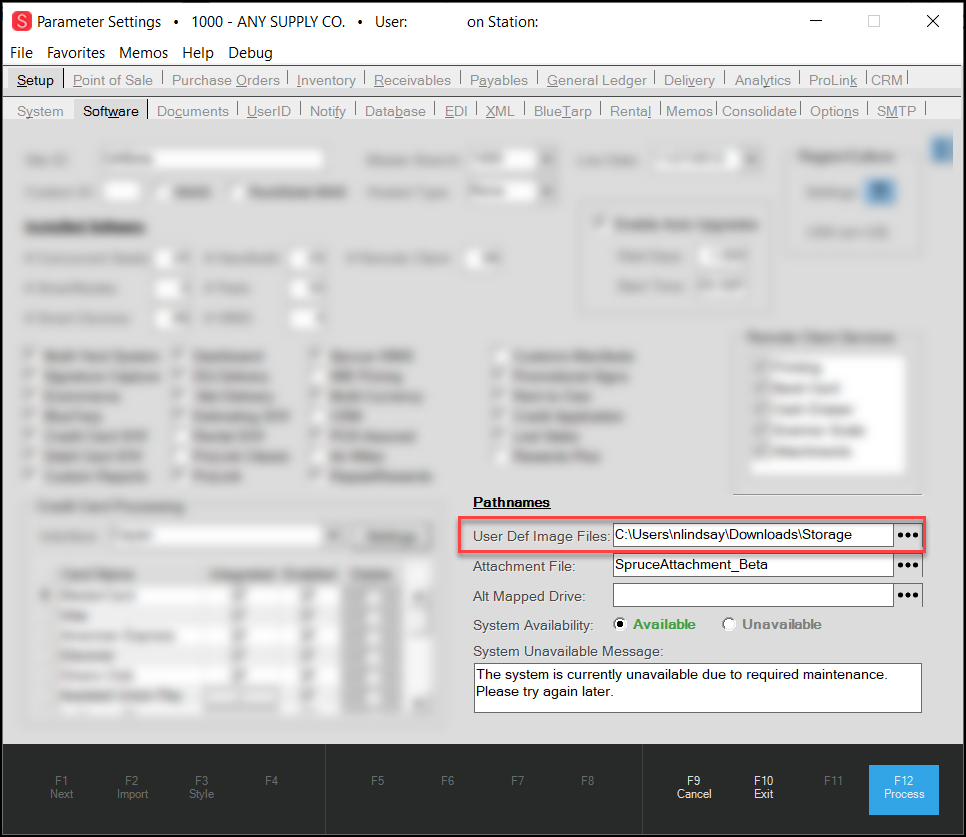
Parameter Settings > Setup > Software > Pathnames > User Def Image Files Field Highlighted
3. In the User Def Image Files field, choose the Ellipsis button and navigate to the folder you store your image files in. Choose the folder and select the OK button.
4. Choose Process (F12) to save this setting.
5. Save the 2x2sp.jpg file to the folder you specified in Step 3.
6. To see the new logo display in your Point of Sale documents, select Documents. The Documents form displays.
7. From the Document # list, choose a Point of Sale document (PS Sale Invoice, PS Customer Order, PS Quotes, PS Cash Payment, PS Open Tickets, PS Direct Order, or PS Charge Returns). The watermark you added should display in the background of each type of document.
Updated Setting for Customer Tax ID Labels in Point of Sale Documents
B-91759 – If you need to include the customer’s tax ID in your Point of Sale Invoice and other tax documents, you can enter the label for this Tax ID field in the Parameter Settings > Point of Sale > Regional tab. The default entry in the Prefix Characters field is TIN, but you can replace it with up to ten characters. For example, the Tax ID label needed in Australia is ABN/TFN. This field now accommodates this label and this label appears on all required customer documents.
To set the tax ID label for your region’s Point of Sale documents:
1. From the Main Menu, go to Maintenance > Database > Parameters to display the Parameters Settings form.
2. Select the Point of Sale tab and the Regional tab to display the Regional options.
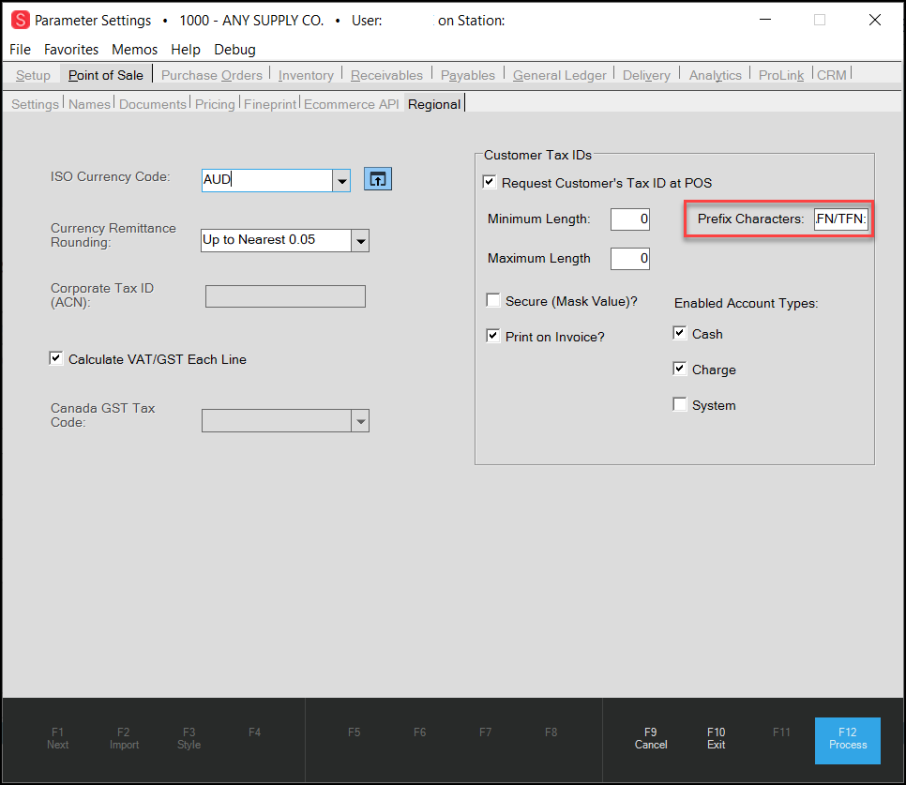
Parameter Settings > Point of Sale > Regional with Prefix Characters Field Highlighted
3. In the Customer Tax IDs section enter the Tax ID label you want to display on Point of Sale documents.
4. When you have completed your entry choose Process (F12).
When you create Point of Sale documents that require the customer’s Tax ID information, the label you selected displays.
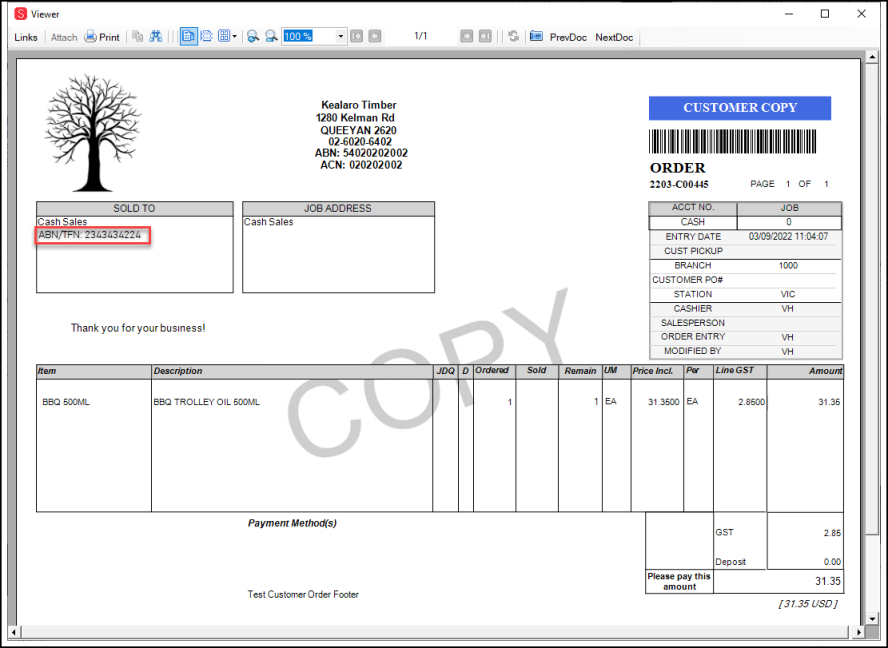
Customer Copy of Invoice with ABN/TFN Tax ID Label
Security Updates
We have made the following updates to ensure better security and functionality for the new release.
ProLink Libraries Updated
B-94048 – We have updated a number of ProLink libraries to ensure continued compatibility with the current application, including:
-
Updated to support the Windows .net Framework 4.8
-
Updated to ensure support for ActiveReports 15
-
Updated to the latest version of Newtonsoft JSON, XML and form URL encoded data
New: Cayan Genius 2.0 Alert Report
B-102495 – If you have experienced bankcard exceptions with your Genius 2.0 system, we have developed a new way to ensure you are on top of any transaction issues that may result. A new process can run every evening (at a time you determine) and report any bankcard exceptions. These exceptions can occur when there is a Cayan error or the cashier is presented with Cancel and Retry option in the previous day’s transactions. This report is sent via email to system administrators and will include:
-
the station used to complete the transaction,
-
the cashier ID,
-
the date,
-
the transaction amount,
-
the document ID associated with the transaction, and
-
the status of the transaction
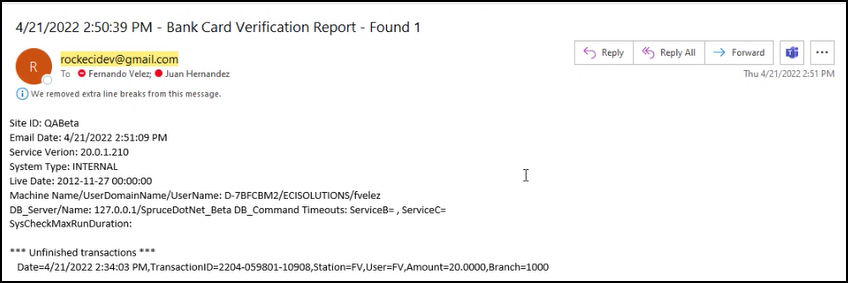
Bank Card Verification Report Sample
System administrators can use this information to review the transaction data and manage these resulting issues promptly.
Check the administrator’s email settings in the User ID Maintenance form to ensure the application can send these reports correctly; the email address must be entered, and the Get notifications and messages check box must be selected. Administrators receive notifications daily after this system check is enabled, even if there are no issues with the previous day’s transactions. The email description indicates whether any current issues exist (Found #).
Since not all customers use this device, this feature is not enabled by default. Please reach out to your ECI Implementation or Support Team to enable this feature.
Using Scaling to Manage Text Size in your Application (Updated)
B-101553 – We have updated Spruce Scaling to give you better control over the size of your text and labels in the application. You can use Windows Scaling, which is described below, if you only use the application all day in your work day.
To change your application's display scaling (to make the text bigger or smaller) using Windows Scaling:
1. Choose the Windows Start ![]() icon and select the Settings
icon and select the Settings ![]() icon. The Settings icons display.
icon. The Settings icons display.
2. Select the System option to show the Display settings.
Windows Settings: System Option
3. Scroll down to the Scale and layout field and choose the resolution you want to display the application in.
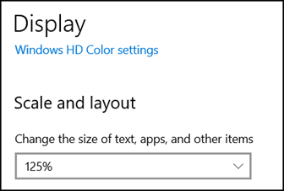
Windows Settings: Display - Scale and Layout Options
Note: Typically, 150% is the recommended scaling, but you can experiment to see what resolution is right for you.
4. When you make your selection, Windows saves the setting automatically. Then, log out of the application and log back in to see the change.
Understanding the Default Scaling Percentages
Scaling Percentages (100%, 110%, 120%, and 130%) refer to the size of the content (text and labels) relative to its normal 96 DPI (Dots Per Inch) appearance (100%). Increasing the size can potentially make the application window larger than your desktop. If you pick a non-standard scaling percentage, the application rounds up to the next largest scaling option. If you select Off, the system looks to the next level that takes precedence: 1st: User Scaling settings > 2nd: Station Scaling settings > 3rd: Windows Scaling settings.
Setting Scaling for the Station
If you are the only person who uses Spruce at your station, you can set the text scaling as it works best for you using these instructions. You must have administrative rights to set this option or have these settings changed for you.
To set text scaling for the station:
1. From the Main Menu, choose Maintenance > Database > Devices to display the Device Maintenance form.
2. From the Device Name list, choose your station ID.
3. From the Form Scaling list, choose the text scaling percentage that works for you. Options include the default scaling percentages discussed above.
Note: If you decide to use Windows Scaling settings for text scaling instead, in the Form Scaling list, choose Off.
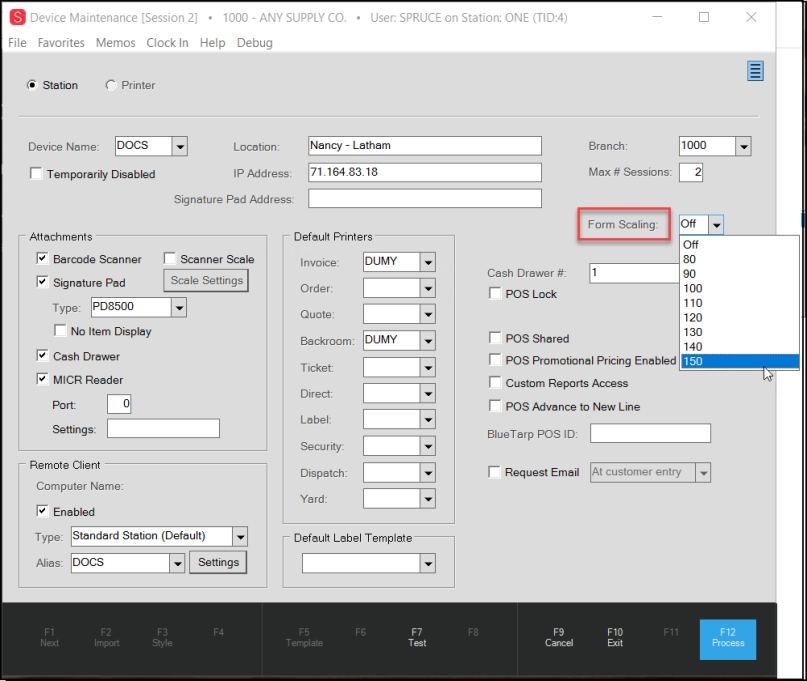
Device Maintenance Form with Form Scaling List Highlighted
4. After completing your default scaling selection, choose Process (F12) to save the change. Then, log out of the application and log back in to see the change.
Setting Scaling for a User
If you work on a station that other associates use, you can set text size scaling options that work best for you without affecting the scaling used by other station workers. You must have administrative rights to set this option or have these settings changed for you.
To set the text scaling in the application for a single user:
1. From the Main Menu, choose Maintenance > Database > User ID to display the User ID Maintenance form.
2. From the User ID list, choose the user ID.
3. Click the Appearance tab and from the Form Scaling list, choose the text scaling percentage that works for you. Options include the default scaling percentages discussed above.
Note: If you decide to use Station settings for text scaling instead, in the Form Scaling list, choose Off.
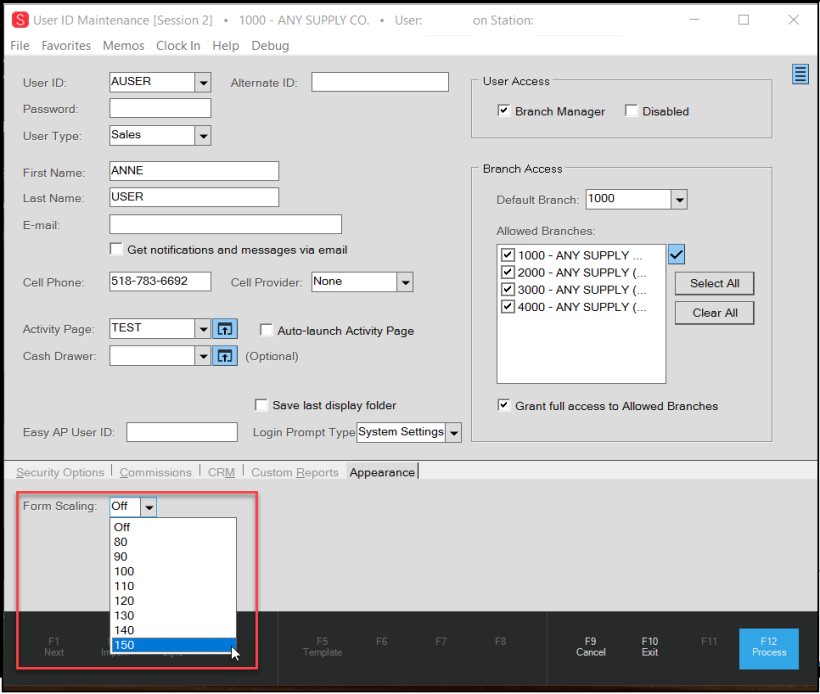
User ID Maintenance Form with Form Scaling List Highlighted
4. After completing your default scaling selection, choose Process (F12) to save the change. Then, log out of the application and log back in to see the change.
These changes may have some unintended consequences where text scaling is concerned, and we are still monitoring these results. However, these are the settings we will pursue at this time in response to our customer’s feedback.
What Do We Mean by Scaling?
When we talk about text and label scaling, how does it look different at different settings? This is the way the text and labels display at a setting of 150%:
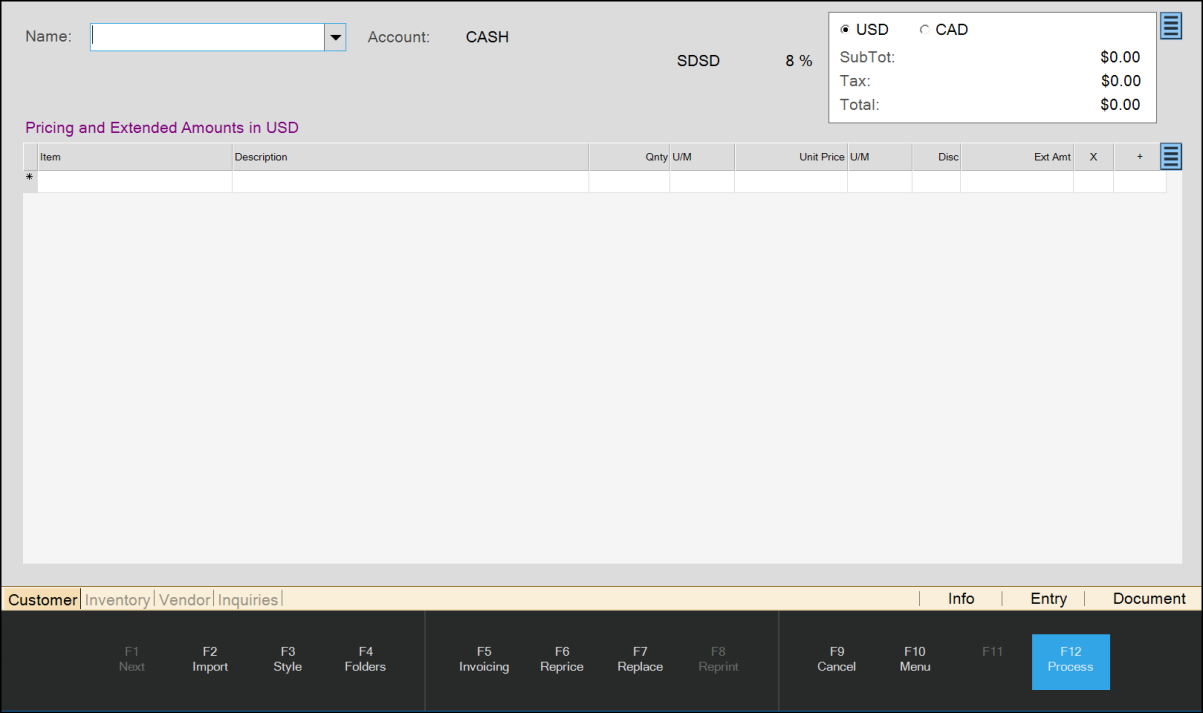
Sale Entry Form at 150% of Scaling
This is the way the text and labels display at a setting of 120%:
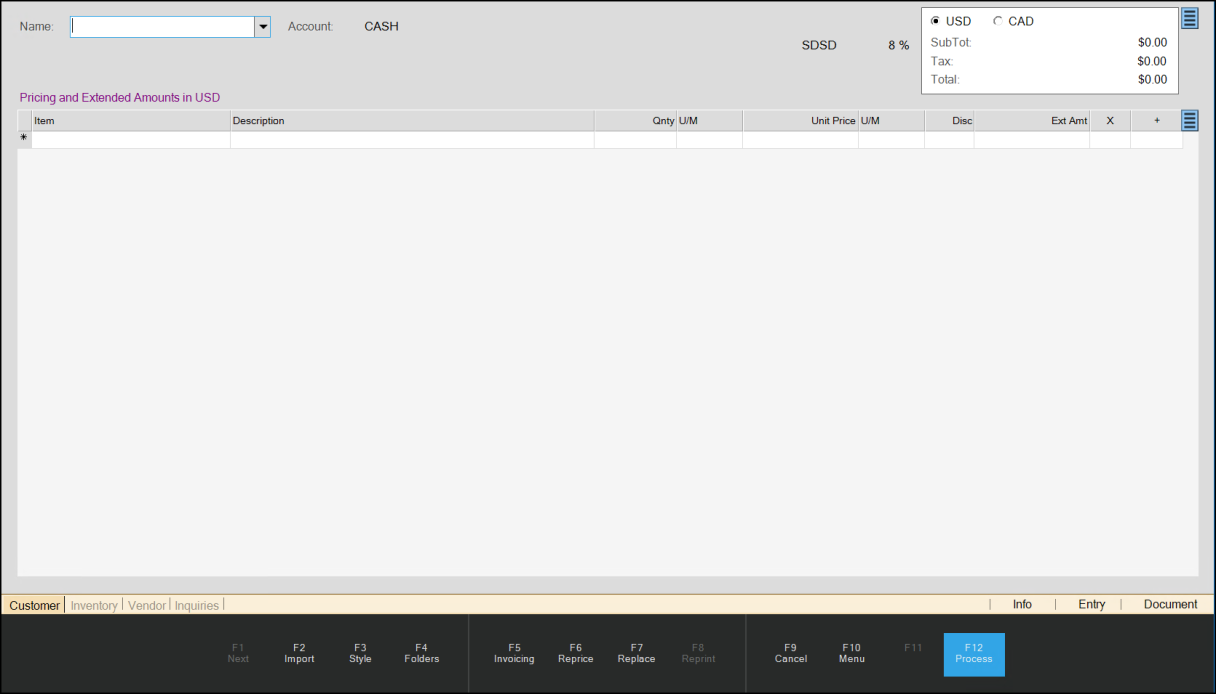
Sale Entry Form at 120% Scaling
TrueValue Test URLS Updated
B-103545 – TrueValue has updated its test URLs and we have updated them in the application to match. We have also updated their cardless enrollment test unit to include the store number in the test.
Corrections
B-94531 – Displaying Savings on Cash Tickets and Invoices Gets Better.
In the past, when you added an additional discount to a transaction during the Point of Sale process, the application would not provide a full picture of the total discount the customer was getting. This would be particularly true for premium customers. We have corrected this process to ensure that the application compares the price the customer is getting with the highest value in the item pricing record. By comparing entries in the Suggested List, Current Market, and other pricing fields, the You Saved field on the customer’s invoice, tickets, and other documents ensures that they know they are getting your best deal.
B-105434 – Refactoring the Spruce Scaling User and Station Text Features.
After working with some of our Beta customers, we returned some Spruce Scaling features to the User ID and Device Station forms. Customers we polled were more comfortable making changes that only affect their ECI application rather than relying on Windows Scaling. We have chosen what we think is a happy medium so that the software uses a hierarchy for handling text scaling:
-
By default, the Station Scaling setting (set in Maintenance > Database > Devices > Station > Form Scaling list) takes precedence if no Windows Scaling is set.
Note: This allows people who only use one station to set the station settings they need. -
If you add user-specific scaling settings (set in Maintenance > Database > User ID > Appearance Tab > Form Scaling list), this setting takes precedence over the Station scaling settings.
Note: This allows people who share the same station to have their own text size settings. The application rescales automatically when people log in.
These changes may have some unintended consequences where text scaling is concerned, and we are still monitoring these results. However, these are the settings we will pursue at this time in response to our customer’s feedback. If you have questions about changing these settings, see Setting Text Scaling for the Station and Setting Text Scaling for a User.
D-68316 – Quote and Order Acknowledgment Email Issue Resolved.
When processing an order or a quote, when someone added notes added to the Transmit > Email tab and then chose the Account tab, the application was not preserving the notes. We have corrected this issue to ensure that the application retains all notes entered in any of the Transmit tabs.
D-70428 – Logging Out While Defining a Unit Tally in Point of Sale Working Correctly Now.
A customer reported that if you logged out of the application while you were adding a new unit pack to the Point of Sale transaction, a serious error resulted, which locked up the unit tally item. We have corrected the issue that resulted in this error, so the item is no longer locked up under these circumstances and the error no longer occurs.
D-71198 – Invoice Reversal Handling Improved when Invoices are Paid by Check.
When a customer pays for a sale with a check and then changes their mind, it used to be a significant process to handle the payment reversal. The cash drawer amount was affected, the Cashier Report was off, and there was an AP Billing Credit record involved. We have improved this process to improve the handling of these processes. When you can return the check from the Cash Drawer, the application no longer creates an AP Billing Credit record. This is the updated process for handling an invoice reversal for check payments:
To see this change:
1. From the Main Menu, choose Point of Sale > Sales to display the Sale Entry form.
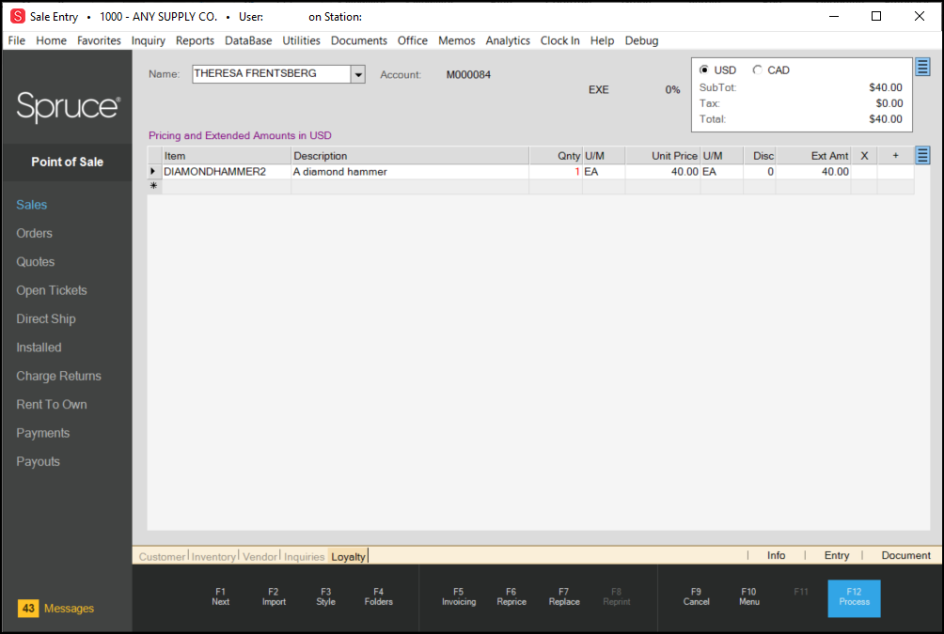
Sale Entry before Check Payment and Reversal
2. Enter a sale information and choose Process (F12).
3. Select Check (F3), enter the details, and process the payment by selecting Finish (F12).
The customer changes their mind (and you still have the check in the drawer).
4. Choose Utilities > Invoice Reversal to display the Invoice Reversal form and choose the invoice you want to reverse.
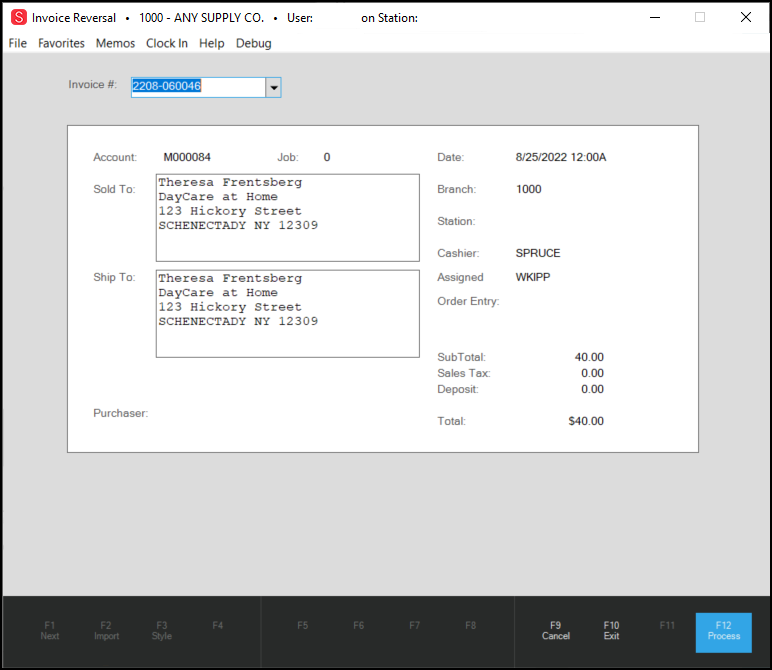
Invoice Reversal Form with Invoice Selected
5. Select Process (F12) to reverse the invoice. A message displays:
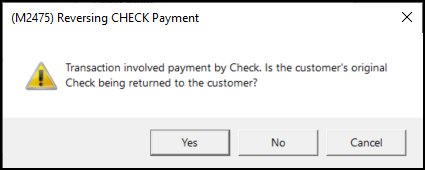
Reversing a Check Payment Prompt
6. Select Yes and hand the check back to the customer. A confirmation prompt displays showing you the confirmation:
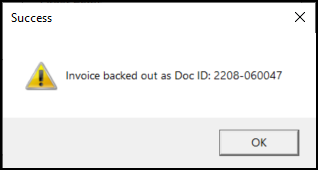
7. Click OK. Go to Utilities > Cash Drawer to display the Cash Drawer Handler form.
8. From the Drawer # list, choose the drawer ID and from the Session Activated list, choose the session date.
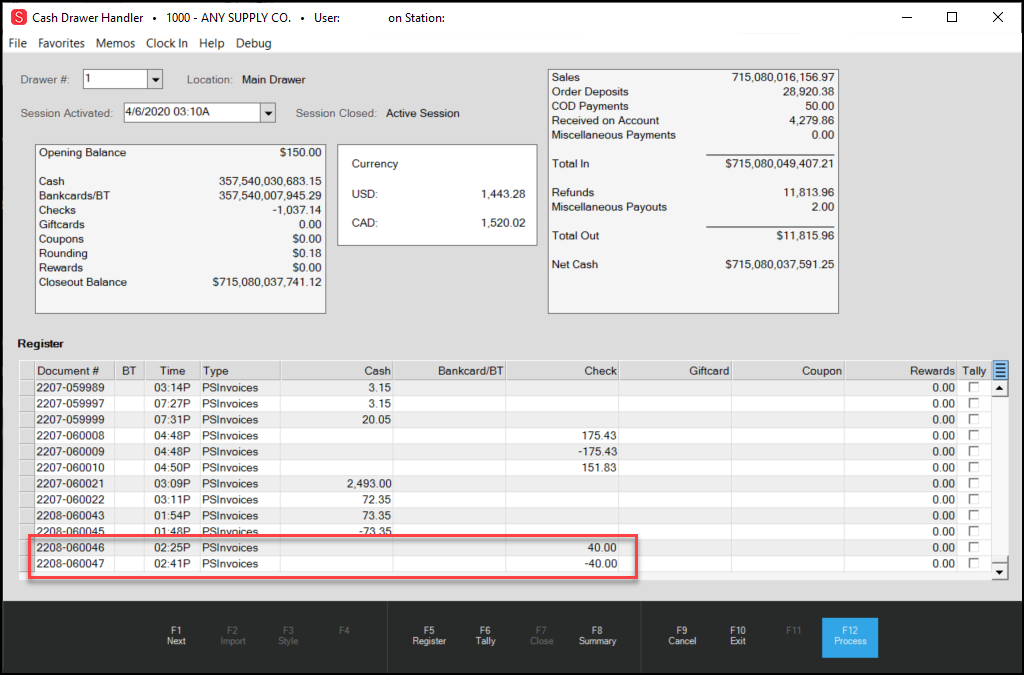
Cash Drawer Handler with Reversal Showing
The reversed transaction amount displays.
9. Choose Reports > Cashier to display the Cashiers Report page.
10. In the Date Range options, choose the current date and choose Check in the Filter options list.
11. Choose Preview (F8) to display the results.
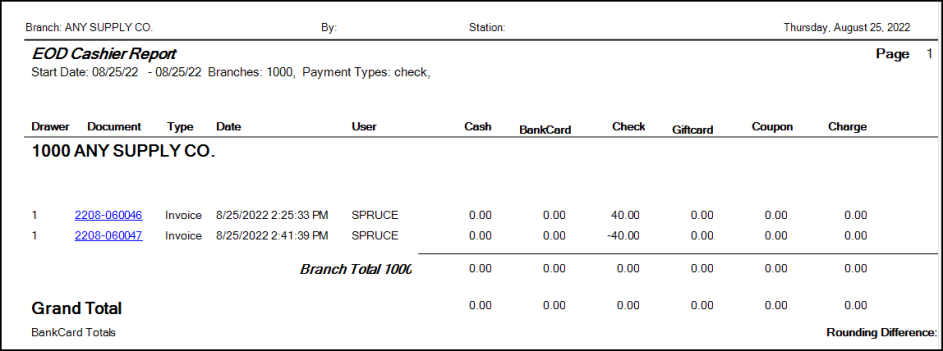
Cashier Report with Returned Check Entry
If you process the invoice reversal and select No at step 6, choose Payables > Billing Entry and from the Vendor Invoice list, choose the Point of Sale Document (POS# + Doc ID number). The application creates a POS Refund that you can track as an AP Billing Credit.
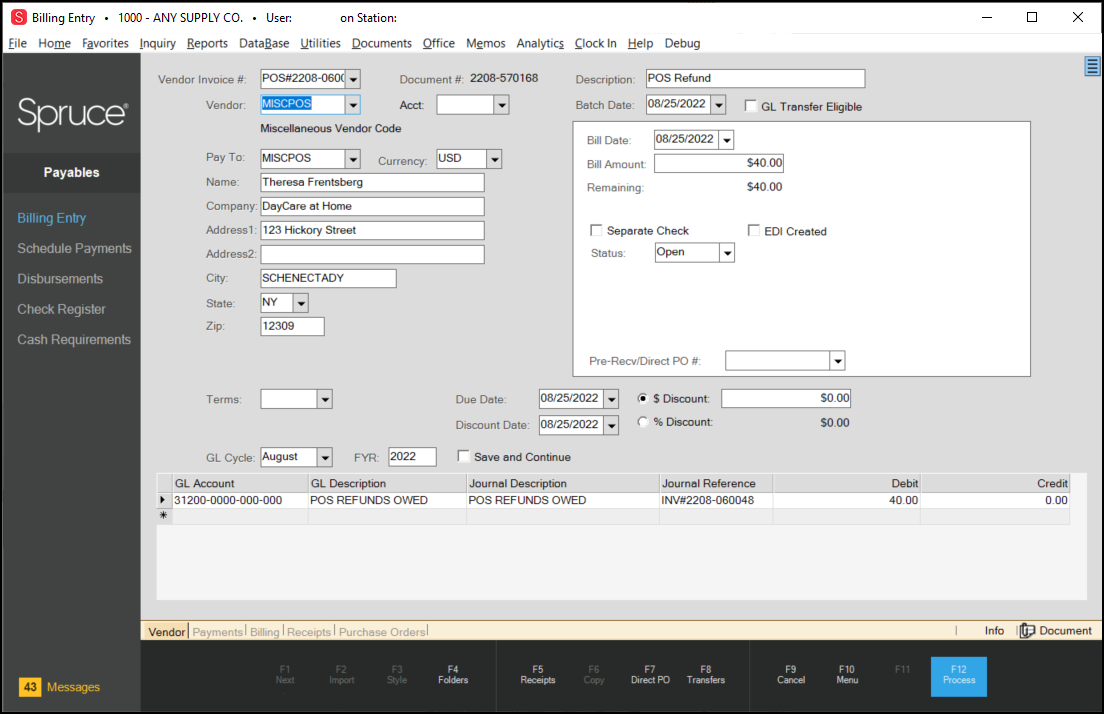
Billing Entry with POS Refund
D-71933 – Sales Tax Report Uses Local Date Settings to Generate Results.
A customer reported that they were getting inconsistent sales tax report results. Upon investigation, we found that we were using the incorrect date format to generate the sales tax report data, which caused this issue. The application now considers the local date format structure when presenting report calculation options.
D-72796 – Inventory Price Updates Improved Due to Customer Suggestion.
In the past, if you saved, but did not apply a price update, you could easily delete the update by mistake. We have added some new controls to prompt you before you delete a price update before it is applied.
To see this change:
1. From the Main Menu, go to Inventory > Price Updates to display the Price Updates form.
2. Choose the File Maintenance button.
3. In the Effective Date field, choose a date in the future and leave the Auto Apply check box unselected.
4. In the data grid, enter an item and specify a price.
5. Choose Process (F12). The Branch List displays.
6. Choose the branch(es) you want to apply this change to and select Accept.
The Print session report with process box displays.
7. Choose No. The application saves the update and reloads the form.
8. Choose the File Maintenance button again.
9. In the Effective Date box, choose the same date you chose in step 3 and this pop up box displays.
Price Updates Form with Copy in existing price update data Message
10. Consider these choices:
-
Select Yes to apply the previous update to the schedule.
After you select Yes, if you decide later that you want to delete the price update, access the context menu at the top of the form and select Delete Price Update to remove the update. When you do, another prompt displays.-
Are you sure you want to delete this scheduled item?
If you select Yes to this, the application deletes the previously scheduled item.
-
-
Select No to prevent the application from adding the previous update to the schedule.
D-73352 – In Item Global Modify, Ensuring that All Message Group Codes Update.
Before this release when you used Item Global Modify to update a Message Group setting for a selected group of items, not all items you selected updated message group code. We have corrected this issue to ensure that all message group changes display correctly in Item records, when you update them in the Item Global Modify form.
D-73435 – Orders and Quotes No Longer Displaying Warnings for Comment SKUs.
Typically, businesses use comment SKUs to add notes to an invoice, either for internal reasons or to alert the customer to something in the invoice. A customer reported that the application tried to check the stock for the content of comment SKUs and returned a warning message when the comment could not be found in the stock. We have updated the application to ignore these comment SKUs during the validation process to prevent these warning messages and prevent the extra time involved in performing the search.
D-74806 – Allocating Single Item Units Improved for Customer Orders.
A customer reported that they were having trouble allocating units for more than one SKU at the same time when they were creating new or modifying existing orders. We have corrected this issue so you can now add single item units to the data grid and select the units for each item independently from the other entries in the grid.
D-75468 – Merging/Renaming Items Retains More History Now.
We have seen how losing turns history and Gross Margin Return on Investment (GMROI) data when renaming items has impacted your business and we have improved this process to retain more information. When you rename an item, we append the records so when you access the Item Maintenance form for a renamed item and select the Totals > Performance tabs, the GMROI and turn history information for these items still display. For merged items, we cannot show the turn and GMROI data for both items, but we can show the combined year over year values for the merged item.
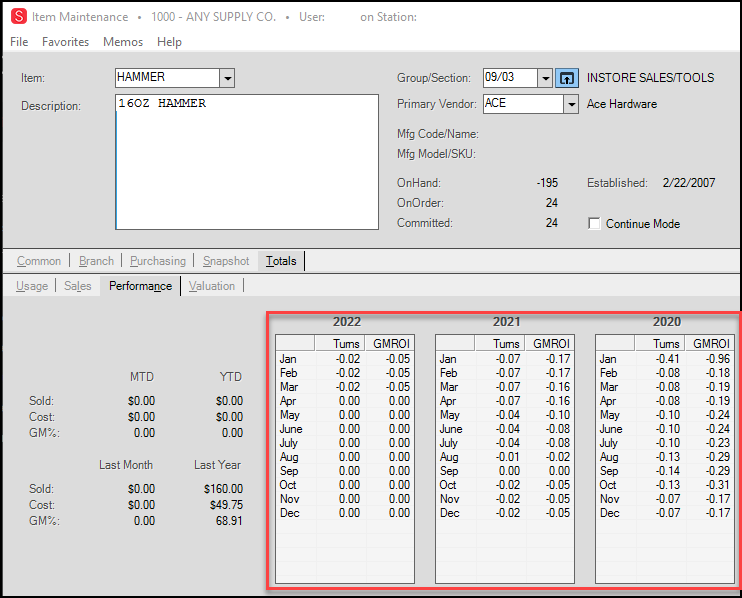
Item Maintenance Form with Original Performance Totals (Before Rename)
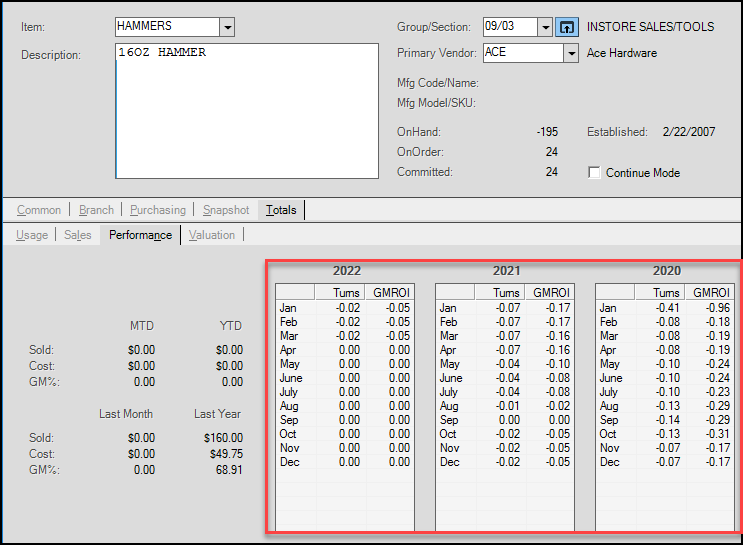
Item Maintenance Form with Original Performance Totals (After Rename)
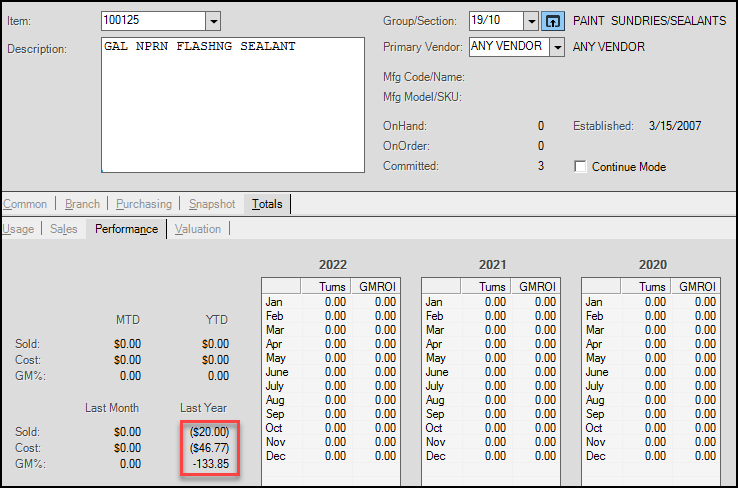
Item 1 Performance Totals (Before Merge)
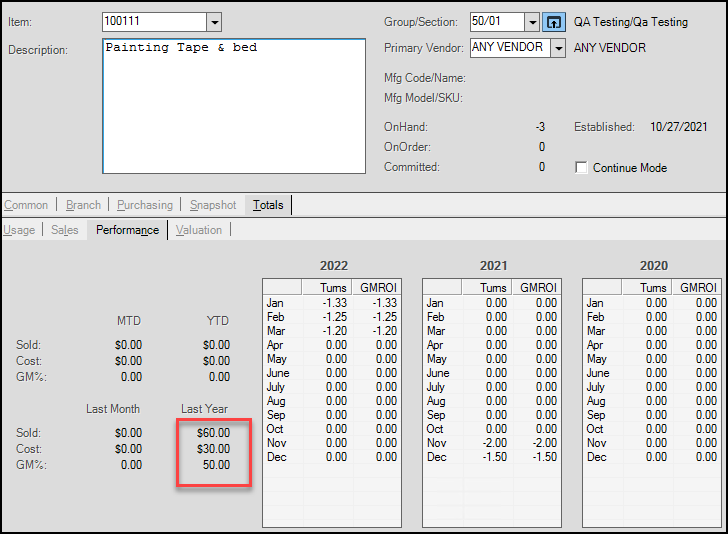
Item 2 Performance Totals (Before Merge)
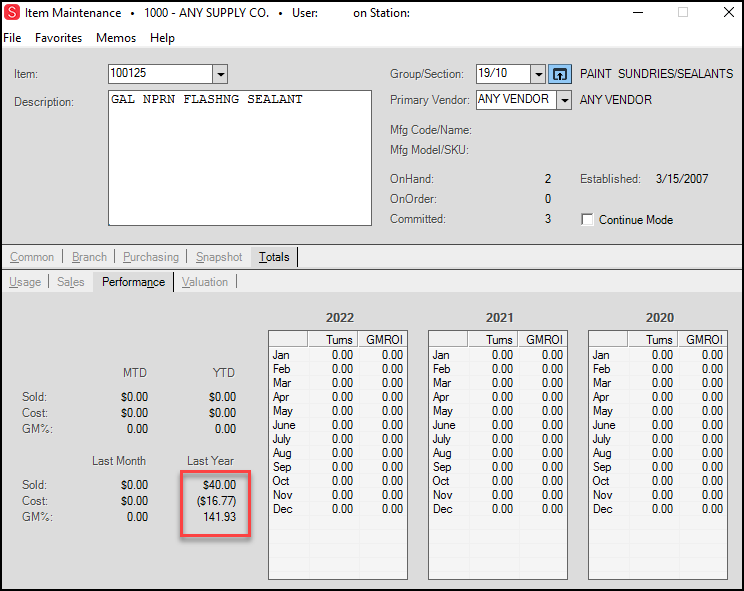
Item Maintenance Form with Merged Item Record
D-77002 – Contract Import Process No Longer Refers to the Time of the Import.
When importing global contracts (Point of Sale > Database > Contracts > Import (F2)) the import process included the time of the import with the start date, which sometimes affected when the pricing would be effective. For example, if you imported the contract in the evening, but an order was placed during the day, even though the date was right, the time would prevent the contract pricing from being effective. We have removed the time of day from this calculation to prevent this issue.
D-78861 – After Item Processing, You Can Now Add/Select New Item Quickly.
When adding or editing an item in the Item Maintenance form, after you choose Process (F12), the cursor now returns to the Item field right away so you can add or look for another item. We have made this change in response to business requests to improve the Item Maintenance form user experience. This was happening before but the form was hidden behind the Inventory Menu.
D-79563 – Open Docs Subtab Shows History of Open Point of Sale Transactions.
If you are looking for an account’s existing orders or you want to look up an account’s quote, you can easily find this using the Open Docs tab in the account folder. The Open Docs folder subtab shows open sales, orders, quotes, tickets, and direct shipments for the account you choose.
To review an account’s history of open transactions:
1. From the Main Menu, choose Point of Sale > Orders to display the Order Entry form.
2. Choose an account with existing transactions from the Name field.
3. Choose the Folders (F4) option and select the Open Docs subtab to display the list of existing open transactions for that account.
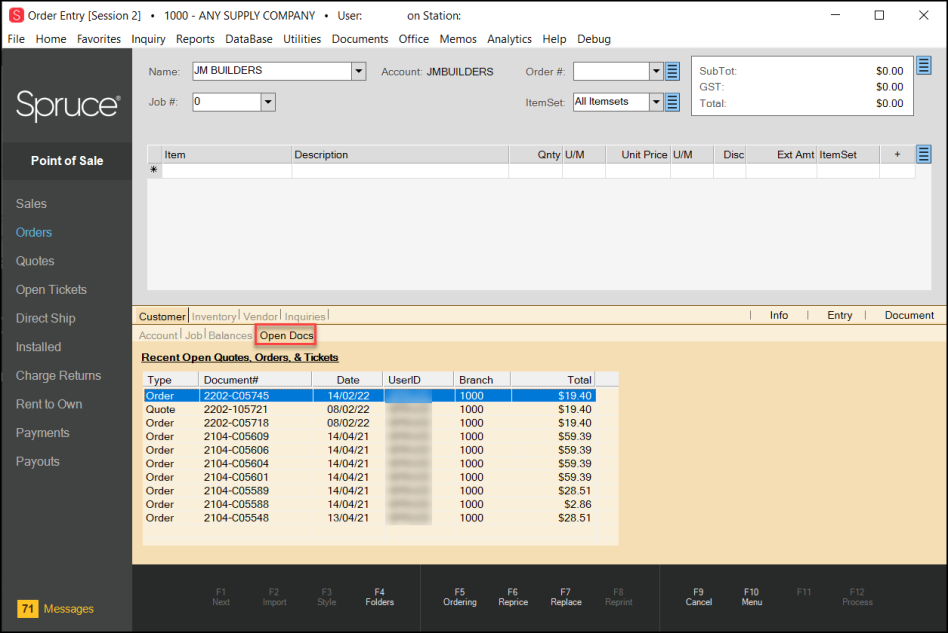
Order Entry Form with Open Docs Entries
D-80462 – Reprice Option in Purchase Order Entry Working Again.
When you attempted to reprice (F8) a purchase order after receiving new prices from a vendor, the application responded as if the price change was implemented. However, if you looked up the purchase order again in Purchase Order Entry, you would see that the prices had reverted to the original price. The adjusted subtotal would display in the Document version, but the item costs did not total the new price. We have corrected these issues to allow repricing in the Purchase Order Entry form to work correctly. We tested the update when all items in the Purchase Order are repriced and when some of the items in the PO were repriced. The fix worked in all cases.
D-80538 – Items with UM Conversions No Longer Skew Quantity on Hand Physical Counts.
In the past, when you performed a physical count of inventory and you used “set blank counts to QOH option, the application ignored the unit of measure conversions, which skewed some of the physical count results. We have updated this process so that it incorporates the unit of measure conversions and displays the correct amount during physical count inventories.
D-80588 – Sites No Longer using Integrated Card Processing Can Disable All Credit Card Settings Now.
If you decided to remove integrated credit card processing, you make this change in the application’s Parameter Settings form. A customer reported that they were unable to remove the Enabled setting from the MasterCard check box. We have corrected this issue.
D-80724 – Sites No Longer using Integrated Card Processing are Saving Manual Authorization Codes Correctly Again.
After a customer stopped using integrated card processing, the application stopped saving the manual authorization codes with the Point of Sale transaction information. We have corrected this issue to ensure this data does not have to be managed manually.
D-80781 – Special Order Dymo Labels (AR 15) Printing as of this Release.
We have upgraded our system to allow the Special Order Dymo labels to print correctly.
D-81197 – Disputed Amount Errors that occurred during AR Invoice Processing Corrected.
A customer reported that there were errors when they attempted to process a disputed, partial amount on an accounts receivable invoice. We have found the issue that caused this error and have corrected it. The disputed amount process works correctly now.
D-81289 – Sheet Metal Tally Data No Longer Missing from Sales Invoices in Edge Case.
In some cases, when special order sheet metal tally items were processed, the tally item details were missing from the sales invoice. We now include sheet metal tally details in special order items to correct this issue.
D-81311 – Improved Visibility of Watermarks in Point of Sale Documents.
When you add watermark text (such as Copy, COD, Paid, and Draft) to Point of Sale documents (including Invoices, Orders, Quotes, Direct Invoices, Direct Orders, Open Tickets, and Charge Returns), some customers were concerned that the watermark interfered with the headings at the top of the document. We have repositioned these watermarks so that they display in the background of these headings to preserve their clarity.
D-81632 – The Load Schedule Form Closes Correctly after Processing the Schedule.
A customer told us that when the Load Schedule form was full and you navigated away from the form, an error occurred that caused the application to close. We have corrected this issue to prevent this error.
D-81687 – Open Item Invoice List No Longer Including Cash Tendered Invoices.
When posting a credit or adding a credit adjustment to an open item account, the application included cash-paid invoices in the Open Item Invoice list, which it should not have. We now display charge to account invoices in this list only.
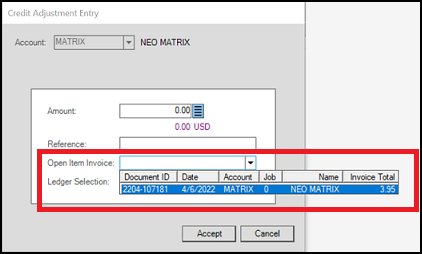
Credit Adjustment Entry with Open Item Invoice Field Highlighted
D-81734 – Errors when Opening Quotes and Orders in the Activities List Resolved.
Previously, when you attempted to open a quote or an order in the Activities list before the application completed opening an existing quote or order, the application displayed an error and closed unexpectedly. We have added additional instructions to handle multiple requests to open quotes and orders in the Activities list without these errors.
D-81807 – Displaying the Correct Foreign Currency Labels in Transaction Documents with Multiple Currencies.
We noticed that when processing transactions that included the tender of two different currencies that, while the multicurrency calculations in Point of Sale documents were correct, we were not displaying the appropriate currency labels for both currencies. We have corrected this issue to ensure that we are displaying both currencies on the Point of Sale documents (including tickets).
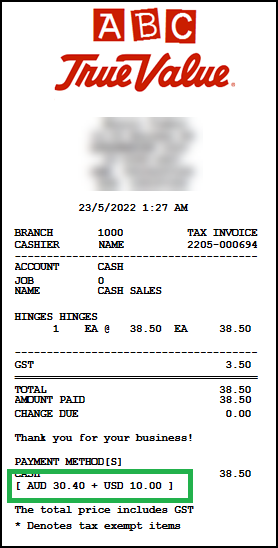
Ticket with Two Currencies Tendered
D-81855 – Using Multicurrency for Purchasing, Customs Manifest, and AP but not Point of Sale Enabled.
Customers have told us that they often use multicurrency to buy products (and need to keep track of those transactions internally), but do not need it for Point of Sale transactions. We have heard you and have now added a new way to prevent the multicurrency options from displaying in Point of Sale areas. We have made this change for Sales, Orders, Quotes, and Open Tickets.
Note: This is related to the fixes described in D-82573, D-82819, and D-82868.
To remove the multicurrency features from Point of Sale areas:
1. Log in using your manager credentials.
2. From the Main Menu, go to Maintenance > Database > Parameters > Point of Sale to display the Point of Sale settings.
3. In the Currency Exchange box, beside the Exchange Code field, click the Settings ![]() button to display the Currency Code Maintenance form.
button to display the Currency Code Maintenance form.
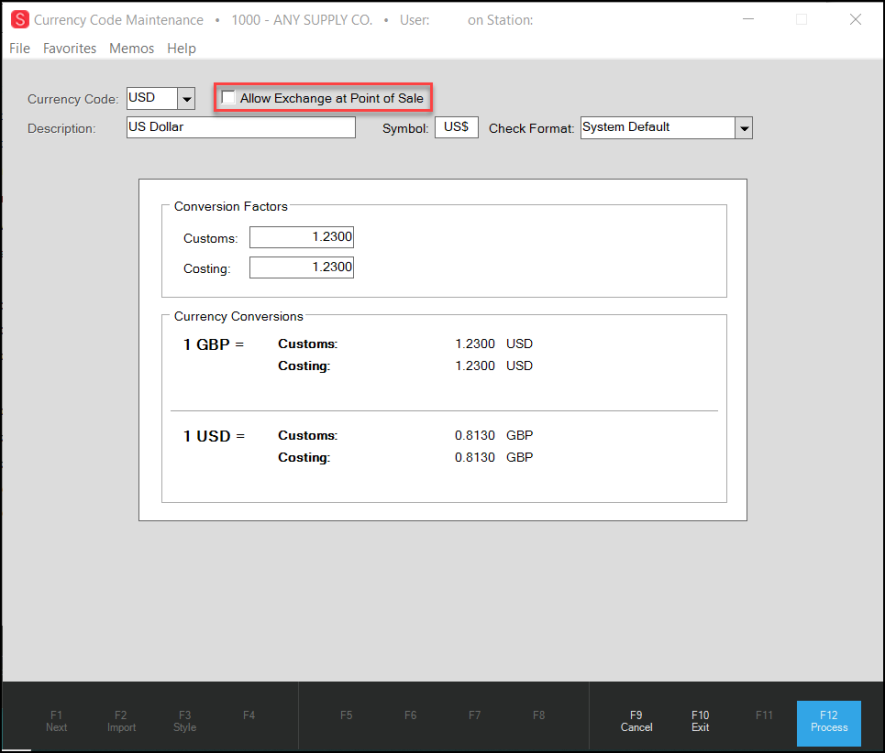
Currency Code Maintenance Form with Allow Exchange at Point of Sale Box Unchecked
4. Make sure that the Allow Exchange at Point of Sale check box is unchecked.
5. Choose Process (F12) to save this change.
D-81929 – Exporting Customer Lists to CSV File Format Added.
Customers have asked us to update the Customer List Report feature to allow them to export the report as a CSV file, so we have added this functionality. To export a Customer List Report to CSV format:
1. From the Main Menu, go to Point of Sale > Reports > Customer Lists to display the Customer Lists form.
2. Choose your report criteria and then go to the Print Options box.
3. Uncheck the Print Report check box.
4. Check the Output to File check box, choose the location and file name in the fields provided.
5. Select the Type field and choose CSV from the list.
6. Choose Process (F12) to create the report and save it in the CSV format to the location you selected.
D-82118 – Nested Material List Items Are Importing Correctly Now.
A customer asked us to correct an issue where, when importing a material list that contained another material list in it, the nested material list items were not being imported. We have updated our application to ensure that all material list items are imported correctly.
D-82173 – ACE Prices Remain Unchanged when Importing Quotes and Orders to Sales.
A customer reported that when they imported quotes and orders into the Sale Entry data grid, the application updated the pricing when it should not have. This turned out to be an issue where the application was not checking to see if the imported transaction was ACE-related. We have updated the application to perform this check before changing the reverting ACE item prices.
D-82535 – Payables Journal Report Billed Column Displays Date Only Now.
Due to changes in the Payables Journal Report, the Billed column was displaying the date and the time, which caused the field entries to wrap. We have reverted this change, so the Payables Journal Report displays only the Billed date.
D-82562 – File Copy of Customer Order Restored.
A customer found that the application was not printing the file copy of their customer orders for the store, only for the customer. We have updated the code to ensures that the File Copy prints as directed.
D-82562 – Customer and File Copies Print Again.
A customer reported that after upgrading to 19.4, the application would print two copies of the customer’s order rather than one copy of the customer’s order and one file copy. We have corrected this issue so that documents of both types print as expected.
D-82573 – Deposit Amount No Longer Converted to Foreign Currency when Allow Exchange at POS is Disabled.
If you have Multi-Currency enabled but have turned off the Allow Exchange at Point of Sale option (in the Currency Code Maintenance form), the application no longer converts the deposit amount to foreign currency when it is submitted in the Process Document page.
Note: This is related to the fixes described in D-81855, D-82819, and D-82868.
D-82593 – Point of Sale Error: Object Reference not Set to an Instance of an Object Corrected.
In this case, when you were processing an invoice and the application could not find the tax setting for the transaction, it would give you this message. This occurred in very specific cases that involved multi-currency settings. We have corrected the issue that caused this error.
D-82685 – End Of Day Reports Balance with Receiving Journals Now.
For many years, customers reported issues when balancing the End of Day (EOD) report with entries in the Receiving Journal, which may not be processed until the next day or so. To resolve this issue, when the transaction amount in the EOD report is not recorded the same day in the Receiving Journal, we have created a procedure that updates the EOD report with the posted date logged in the Receiving Journal. This ensures that both the report and the journal match.
D-82723 – Purchase Unit Tally Items with Maximum Name Length Without Errors Now.
In the last release, if you created a unit tally item with a 16-character name and tried to create a purchase order for that item, an error would occur when you selected Define Units. We have corrected this issue.
D-82819 – Disabled Allow Exchange at Point of Sale Prevents Multicurrency Options in Process Docs.
A customer found that when you did not select the Allow Exchange at Point of Sale check box in the Currency Code Maintenance form, the application still displayed two currencies in the Process Document. We have corrected this behavior. Now, when you have selected the Multi-Currency parameter but leave the Allow Exchange at Point of Sale check box unchecked, you can purchase and manage payments for foreign vendors without having those options display in Point of Sale transactions.
Note: This is related to the fix described in D-81855, D-82573, and D-82868.
D-82868 –Process Documents No Longer Display Foreign Amounts when Allow Exchange at POS is Disabled.
We have updated the application to prevent the display of foreign currency values when the Allow Exchange at Point of Sale option is disabled in the Currency Code Maintenance form.
Note: This is related to the fix described in D-81855, D-82573, and D-82819.
D-83033 – Deposits Applied to Partial Sales Now Includes Tax Amount.
We noticed in the last release that when you applied a deposit to a partial sale, the deposit amount was not applied to the taxes. We have corrected this to ensure that the deposit applies to the entire transaction, even it if is a partial payment.
D-82773 – Importing Selected Items from a Quote into a Contract Imports the Selected Items Only Now.
In the last release, when you tried to import selected items from a quote into a contract, the application would let you select the items you wanted to import, but it would import all the items anyway. We have corrected this issue so the application only imports the items you select into the Contract record.
D-83033 – Deposits Applied to Partial Sales Now Includes Tax Amount.
We noticed in the last release that when you applied a deposit to a partial sale, the deposit amount was not applied to the taxes. We have corrected this to ensure that the deposit applies to the entire transaction, even it if is a partial payment.
D-83483 – Manufacturing Work Order Summary Report Titles Updated.
Throughout the application we have been updating the words WorkOrder to read Work Order. We have updated the Work Orders Manufacturing form to display these titles correctly.
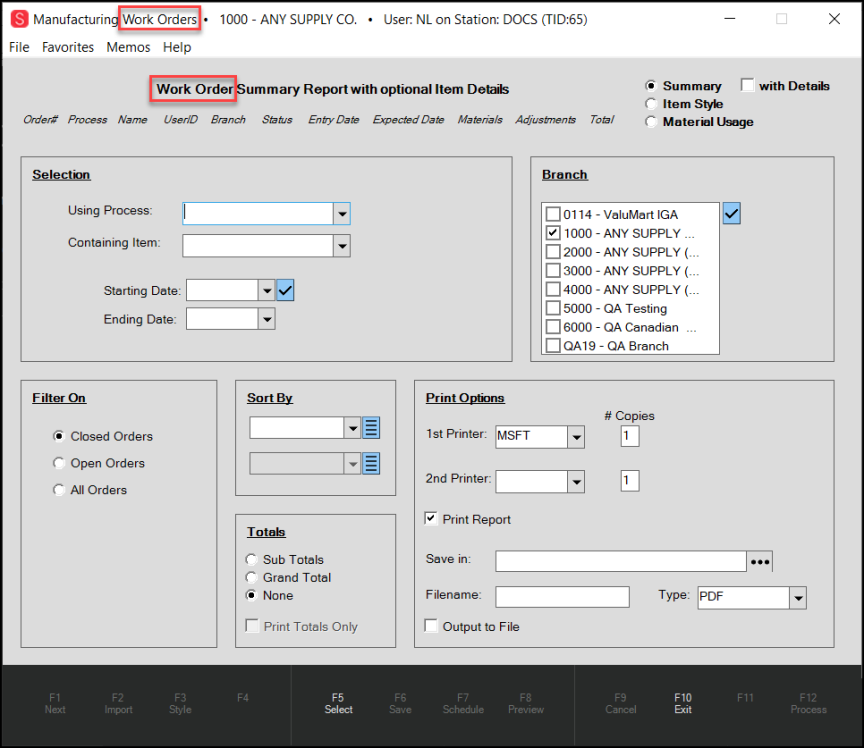
Manufacturing Work Orders Form with Titles Updated
D-83618 – Scroll Bar and Menu Marker Issues in Point of Sale and Other Areas Corrected.
A customer reported that when working in some Point of Sale data grids, the Menu Marker and the Scroll Bar did not display. This was also reported in the Physical Counts (Stock Check) and Price Updates forms in Inventory. These issues have been corrected.
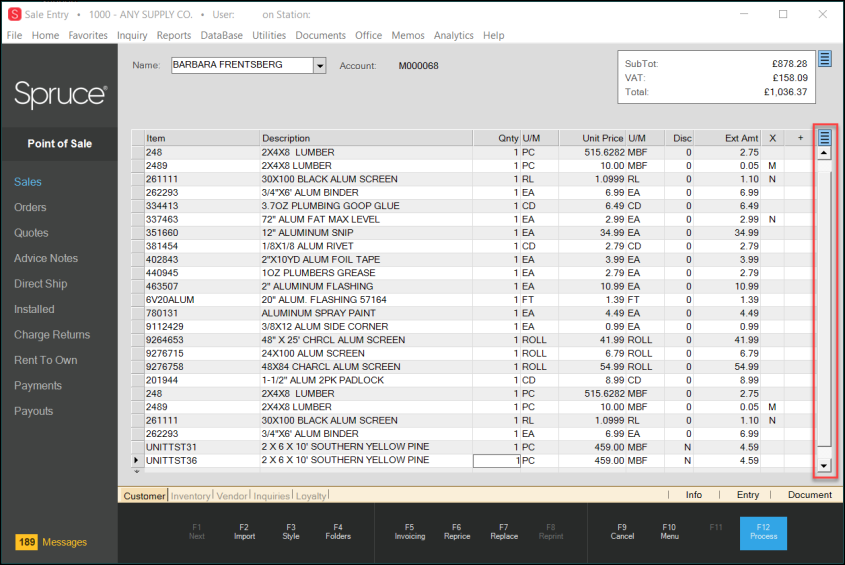
Sale Entry Form with Menu Marker and Scroll Bar Highlighted
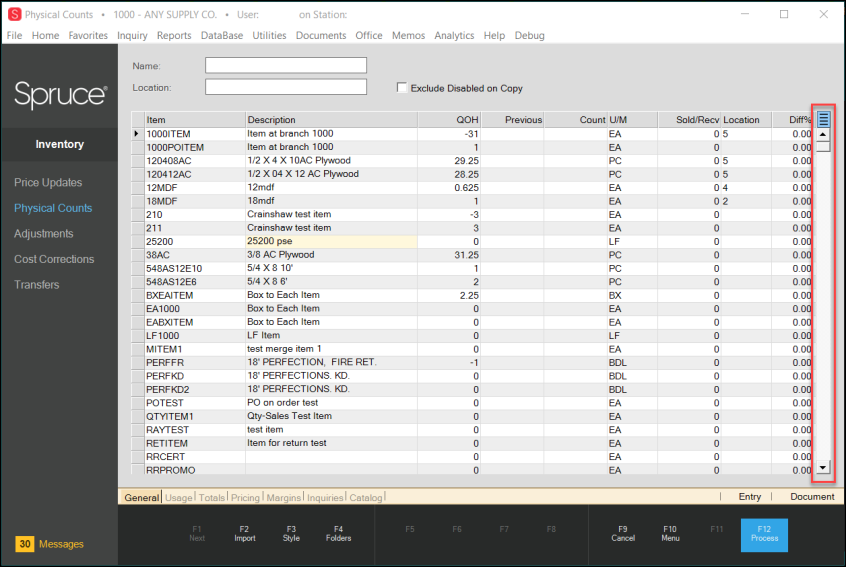
Physical Counts (Stock Check) Form with Menu Marker and Scroll Bar Highlighted
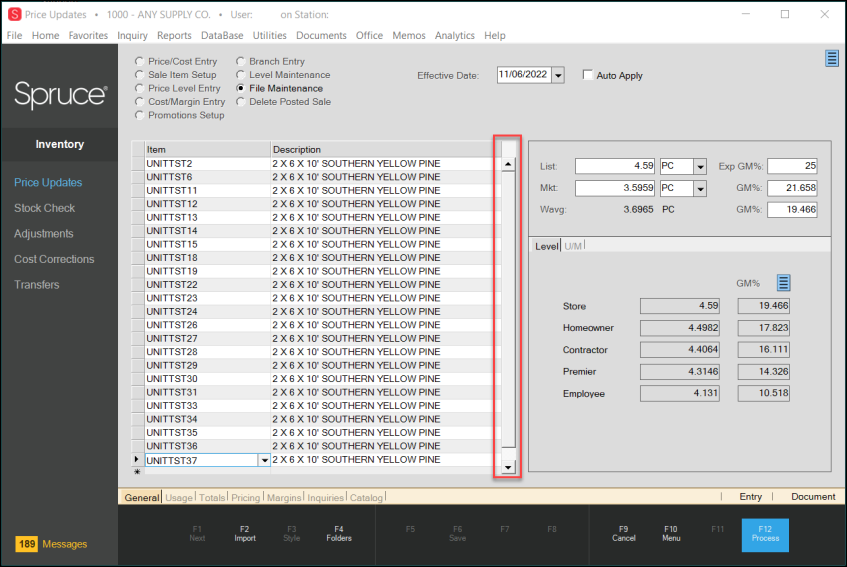
Price Updates Form with Scroll Bar Highlighted
D-83759, D-83761 – Using Add Card on File for Account Payments No Longer Causes Errors.
A customer reported a serious error when they tried to use the Add Card on File option for account payments. We have corrected the issues that prevent this from working correctly. Now you can also apply convenience fees, if allowed in your area, for these types of account payments. See Account Payment Convenience Fees Made Easy for more about this new feature.
D-83944 – Sending DIB BOPIS Inventory All for Branch 2000 Processes Normally.
In the past, when you attempted to send your BOPIS inventory via the EDI process for Branch 2000 to Do It Best, the send would fail because the API could not handle this amount of information all at once. We have added a pause that gives the API a way to handle the Send process correctly.
D-83995 – Keyboard Shortcut Restored on the Order Non-Stock Item Box.
A customer reported that we changed the Tab key behavior in the Order Non-Stock Item box, preventing users from selecting the Your Price shortcut from the drop-down list. We have restored this Tab key sequence so that when you get to the Your Price list, you can scroll through the list by clicking the Down Arrow key and pressing Enter when you get to the shortcut you want.
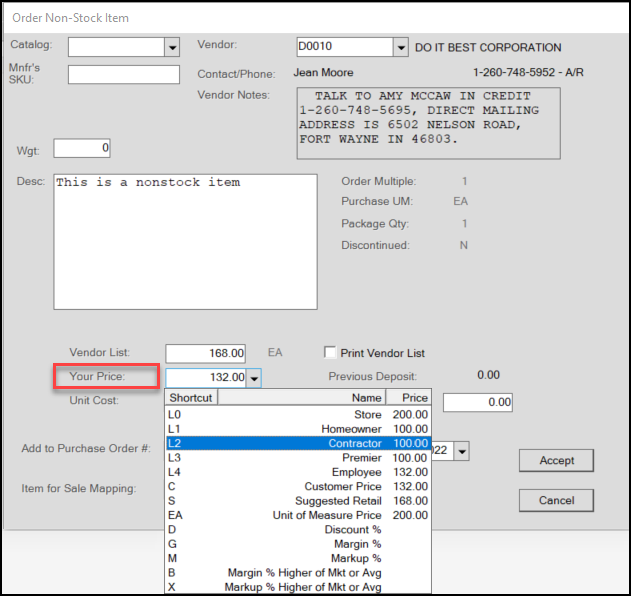
Order Non-Stock Item with Your Price Field Highlighted
D-84004 – Receivables Import Wizard Supports Records with Document IDs Now.
We have corrected an issue that a customer reported that prevented the application from importing payment entry data when it included the document ID. You can now import this information without error. We also confirmed that the credit is applied to the specified document ID accurately during the payment posting process.
D-84160 – Missing Radio Button Displays in Suggested Order Build Dialog Box.
In the last release, the Select Items radio button did not display in the Suggested Order Build box. This button now displays again as expected.
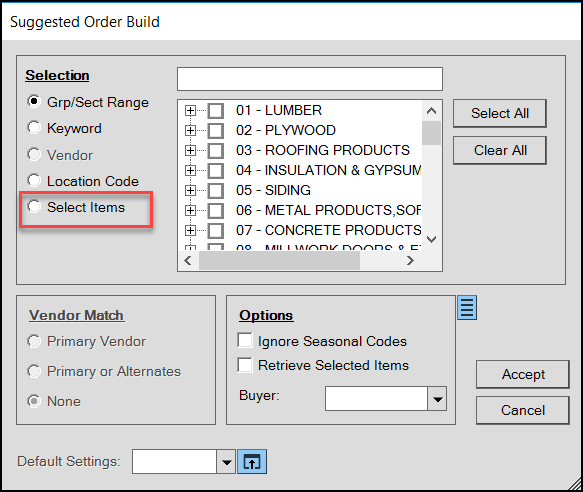
Suggested Order Build with Select Items Radio Button Highlighted
D-84221 – Posting Payments Issue Corrected.
During the beta testing process, a customer notified us that there were errors in the Posting Payments form after we added the Job Name column to the Balance Forward data grid. When trying to double-click a line with an open charge to apply a credit, a serious error occurred which forced the application to close. We have corrected this issue so you can apply credits as you did before.
D-84237 – Beta Issue: Clover Debit Card Errors Resolved.
During the beta review process, a customer tested a Clover device by importing an Order (from a Quote) into Sale Entry and attempted to pay using a debit card. When processing the cash back request, the application closed with an error. This has been corrected. You can process a sale with a cash back option and the application processes the request successfully. Note: There is extra set up required for Cash Back requests, which is discussed here.
D-84253 – Processing E-Commerce Payments from ProLink Works As Designed Now.
A customer reported that they were unable to add a Bankcard amount using an imported e-commerce payment from ProLink when processing an payment for a card on file account. We have corrected the problem that caused this issue.
D-84272 – Beta Issue: Freezing and Spontaneous Errors Resolved.
During the beta process, some customers reported that when switching between application areas or when entering lengthy lists, the application would freeze or generate serious errors. We have corrected the issues that caused this behavior.
D-84355 – Unit of Measure Importing Correctly Again in the Contract Pricing Form.
A customer reported an issue when importing spreadsheets into the Contract Pricing form that the UM entry was importing the same unit of measure as the first entry in the data list, regardless of the UM in the spreadsheet. We have corrected this issue to ensure that the unit of measure in the spreadsheet is imported correctly into the data grid.
D-84534 – Beta Issue: Attachments Working Correctly Again.
During the beta review, a customer reported that the Attach  icon in the Document Viewer did not display the Attachment Maintenance options as it did in the previous version. This issue was related to the ActiveReports upgrade. We have resolved the cause of this issue, so you can open the Attachment Maintenance dialog box in the Document Viewer as you did before.
D-84747 – Beta Issue: VAT Issue Related to Fixed Price Materials Lists Resolved.
In tax-excluded branches, the application was incorrectly calculating -100% tax for fixed price material lists due to an incorrect extended amount setting. We have repaired this issue so that the tax calculation for fixed price material list items in tax excluded branches works correctly again.
D-84793 – Beta Issue: Report Printing Delay Resolved by ActiveReports Upgrade.
After the upgrade of ActiveReports from version 3 to version 15, a customer noticed that printing daily process reports took longer. We reached out to the ActiveReports manufacturing team and they worked with us to create a fix. We have upgraded the ActiveReports infrastructure to include this correction.
D-84884 – DIB BOPIS “Account Not Found Error” Message Caused an Update.
When the application received a DIB BOPIS order, it assumed that the order was coming from the account’s home branch. Most of the time, this was true, but in the cases when the order was coming from a different branch, this error would display. We have modified the application to look for the submitted branch information instead so the error does not occur.
D-84947 – Document Viewer Link Pane Readable Again.
A customer reported that the Links pane in the Document Viewer was not resizing correctly. We have widened the Links pane and lengthened the window to make the links more visible.
D-85013 – Beta Issue Resolved: Logging into Hosting Issue Corrected.
Some beta customers reported problems logging into the Hosting environment to test the new version of the application. This issue was caused by canceled Cayan transactions for which the application could not find related documents. We repaired the source of this error, and these customers can now log in and cancel Cayan transactions properly without any issues.
D-85101 – Beta Issue Resolved: Job Charge Return Record Emailed when Processed Again.
We have restored the fax and email transmission of job-based charge return transactions processed in Point of Sale Orders, Quotes, Open Tickets, Direct Ships, Installed Sales, and Payments. Due to a change in the release, the email address and fax number fields were not being transmitted when the settings were specified in the account job. We have corrected this issue.
Note: We do not transmit these documents by default for these specific Point of Sale forms.
D-85197 – Foreign Currency Amounts No Longer Display on Customer Invoices for Some Invoices.
In this release we updated the multicurrency settings to ensure that customers who wanted to use these settings for purchasing and receiving but not for Point of Sale had that capability. Some customers reported that from time to time, and for some invoices, foreign currency amounts were still displaying below the Please Pay This Amount field. We have corrected this issue and tested it for all transaction and invoice types.
D-85203 – Beta Issue Resolved: Inventory Receipts Working As Expected Now.
A beta customer reported that after they upgraded, they were unable to process inventory receipt purchase orders. This was evident in very specific circumstances, such as when more items were sold than were in inventory and then more inventory was purchased to restock or not quite restock the needed quantity. This issue has been corrected so the error does not occur.
D-85253 – Beta Issue Resolved: Cayan Charge Sales No Longer Require Manual Processing.
After upgrading, a customer reported they were having trouble processing bank card charges for sales counter and some AR accounts. It turned out to be an issue due to a Sales Tax Maintenance setting, where the tax percentage was set to four digits plus the application of a sales tax surcharge. This issue also affected the customer’s End Of Day report. We have modified the application to prevent this issue from occurring in the future. We also tested this correction on invoice reversals and in the End of Day reports successfully.
D-85331 – Select Unit Definition Columns Displaying Correctly Again.
A customer reported that the unit tally-based Select Unit(s) box was not displaying the Depth, Width, Length, Base Qty, or Split Qty columns as it did before. Further the Unit Definitions box was not displaying the Tally column as it did before. We have corrected these display issues.
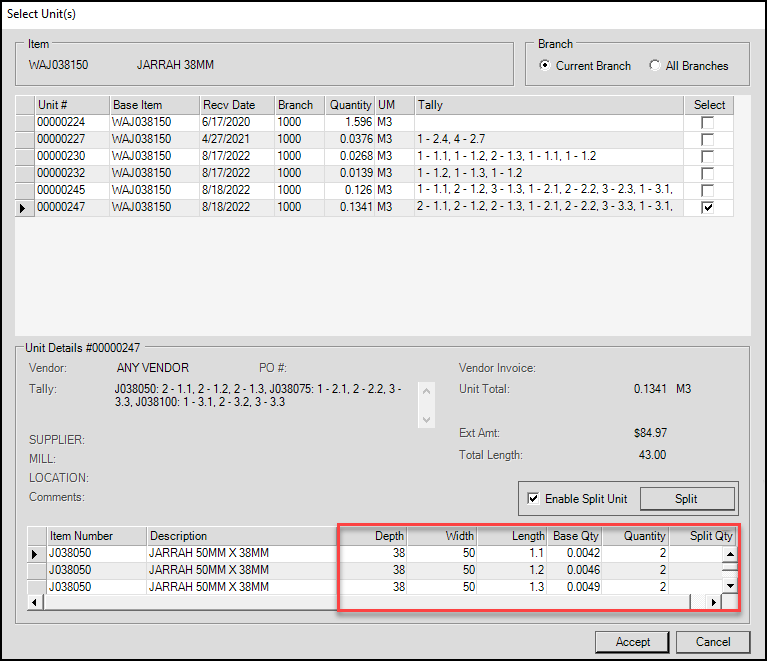
Select Units Box with Columns Restored
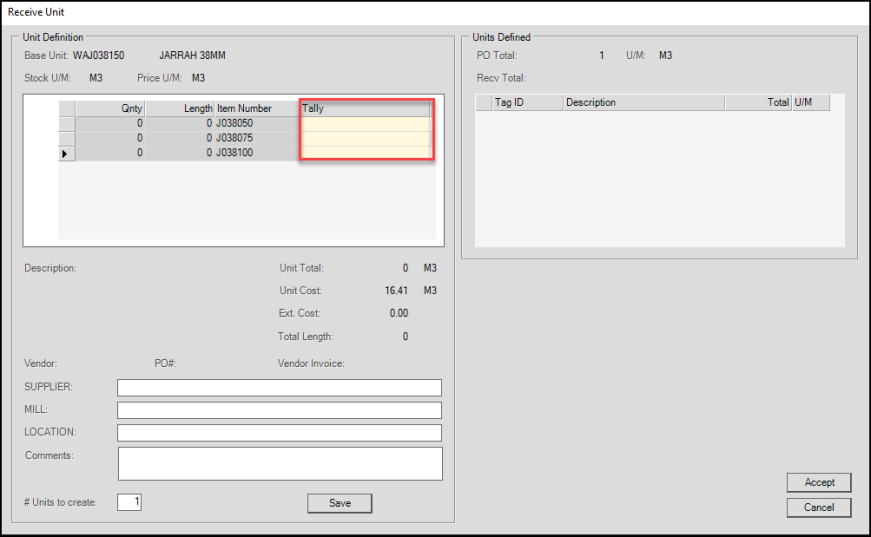
Receive Units Box with Tally Column Restored