General Ledger Inventory Reconciliation Report
Many customers have asked us to give them a way to see their inventory on hand reconciled with the stock’s GL value. We have created the General Ledger Inventory Reconciliation report to accomplish this request. This report shows the inventory activity for a date range that highlights potential discrepancies between the ledger asset value of the inventory and the real value of the inventory on hand. While using an average cost valuation does not provide an exact match between the ledger amount and inventory in stock, the differences between the two valuations should be small and remain relatively consistent over time.
In general, this report is broken down into three sections (as you choose):
-
The first section contains a comparison of the perpetual inventory value compared to the GL inventory value as of the close of business on the last day of the report (as selected).
-
The second section lists the transactions for the report period where there is a difference between the stock value and the GL inventory account balance change.
-
The third section contains a listing of any specific alerts the application has found based on the challenges associated with the inventory reconciliation itself. This section can provide coaching to your business about the specific reconciliation issues in their inventory calculation and reconciliation process
Note: It may be useful to produce this report outside of normal business operation times, as generating it will use many resources.
What GL Accounts are used to collect the data in this report?
The GL Inventory Reconciliation report is based on the following Debit and Credit, Asset-type journals (including any branch-specific journal entries):
| Category | Description | Debit/Credit |
|---|---|---|
| AdjustPhysIn | Inventory Adjustment | Debit |
| TransferOut | Inventory | Credit |
| Transfer In | Inventory | Debit |
| Manufacturing | Finished Goods | Debit |
| Manufacturing | Raw Materials | Credit |
| Sales | Inventory | Credit |
| Returns | Inventory | Debit |
| Purchases | Received Inventory | Debit |
Additionally, this report will include any accounts that have the following detailed mapping categories:
-
Inventory Transfers Out
-
Inventory Transfers In
-
Inventory Issues
-
Inventory Purchases
-
Inventory Costs
-
Inventory Physical Count Shrinkage
-
Inventory Adjustments
-
Inventory Manufactured Finished Goods
-
Inventory Manufactured Raw Materials
Understanding the General Ledger Inventory Reconciliation Report (Overview)
The General Ledger Inventory Reconciliation Report is designed to give you a snapshot of the valuation of your inventory. It is broken down into three sections. The first section is a summary of the current stock value at weighted average cost, based on the last physical inventory you performed and the current quantities on hand.
Section 1: Summary of Current Stock Value to GL at Weighted Cost Average
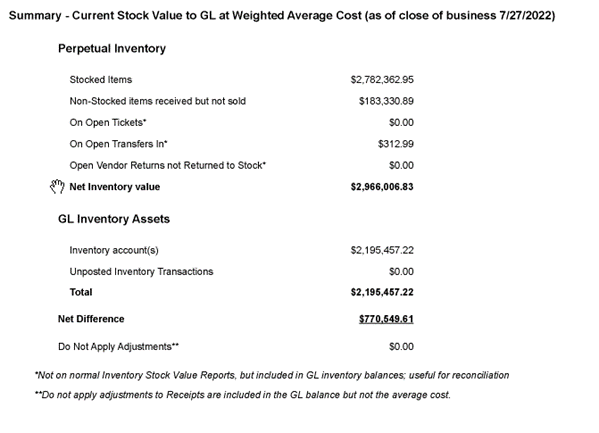
An Explanation of Perpetual Inventory
In the Perpetual Inventory section of the report, we include the following types of values:
-
Stocked Items
This amount reflects the current value of the items that you maintain a regular stock of. As you receive and sell these items, these stock values change. We store these values in a new table, which will allow you to track stocked items at any point in time.
-
Non-Stocked items that have been received but not yet sold.
The application also tracks the value of these items. -
On Open Tickets
This amount tracks the values of items on the open tickets. -
On Open Transfers In
This amount records the value of stock you have transferred in from another branch or division. We have the Entry and the Closed Dates on these documents. -
Open Vendor Returns not Returned to Stock
This is the amount of items that are to be returned to the vendor and have not been added to the stock. -
Inventory Accounts
This amount includes the unposted journals that affect inventory accounts. If there are branch accounts set up in the mapping, then the total will include the accounts that match the selected branches’ departments and the base account. This also includes the beginning balances of these accounts. -
Unposted Inventory Transactions
This amount includes the unposted journals that affect inventory accounts. If there are branch accounts set up in the mapping, then the total will only include the accounts that match the selected branches’ departments. -
Adjustment Expenses
This amount includes any adjustments to Purchasing Receipts that are mapped to an inventory account and are marked as Do Not Apply. This value appears in the General Ledger, but it does not affect the perpetual inventory amount, since they do not get put into the average cost.
What affects the Summary Values?
Stocked Items
The following activities increase the Stocked Items value:
-
Processing Purchasing Receipts,
-
Transfers In,
-
Quantity Adjustments,
-
Physical Counts, and
-
Point of Sale Returns.
The following activities decrease the Stocked Items value:
-
Process Negative Purchasing Receipts,
-
Transfers Out,
-
Quantity Adjustments,
-
Physical Counts, and
-
Sales
Note: Cost Corrections can either add value or reduce value, based on the type of Cost Correction change you make.
Non-Stocked items received but not sold
The value of this amount is affected when you create an order with non-stocked items on it. To minimize this amount, receive the non-stocked items in Purchasing Receipts.
On Open Tickets
The number and status of Point of Sale Tickets or Advice Notes affect this value. You can add items to a ticket, modify a ticket, or delete items from a ticket to affect this amount. You can also change this value when you invoice a ticket using the Invoice Now check box for a charge customer, or by using the Invoice Tickets Utility, or by selecting the Invoice Ticket (F8) function for a cash customer.
On Open Transfers In
Create a transfer from one branch to another without selecting the Mark as Received check box increases the receiving branch’s Open Transfers In values.
Open Vendor Returns not Returned to Stock
This value increases when you have Enhanced Returns turned on and you return merchandise but do not add it back in stock.
Inventory Accounts
The following events affect inventory account valuation:
-
Running transactions that affect stocked items and then running End of Day (with automatic posting turned on),
-
Doing a manual Journal to an inventory account and posting it, or
-
Posting unposted journals that include inventory accounts.
You can also run transactions to non-perpetual items with average costs. This affects the GL but not the perpetual inventory because these items always have zero on-hand.
Unposted Inventory Transactions
You can affect this number by running End of Day without turning on automatic posting. You can create Manual Journals and not post them.
Adjustment Expenses
You can affect this number by creating a purchasing adjustment that is marked as Do Not Apply and picking an Inventory GL account. Then create an Inventory Receipt with that adjustment on it.
Creating the GL Inventory Reconciliation Report
To run the General Ledger Inventory Reconciliation report:
1. From the Main Menu, go to General Ledger > Reports > GL Inventory Reconciliation to display the General Ledger Inventory Reconciliation Report form.
![]()
General Ledger Inventory Reconciliation Report (Empty)
2. As with all reports, we give you a variety of criteria to use to generate the report.
The Selection Options list allows you to begin by selecting the report’s overarching criteria:
-
Select the Date Range button and enter the beginning and ending dates of the report in the fields provided. The date or date range is required.
-
Select the Document Type button to select the type of GL-based records to use for evaluating the inventory stock. Options include existing reports available in the application: PS Sale Invoices, PS Charge Returns, IN Receipt Cost Corrections, IN Inventory Adjustments, IN Item Cost Corrections, IN Physical Counts, Yard Transfers In, Yard Transfers Out, and PO Inventory Receipts.
Choose Select All to include each of these report sources, or select the check box beside each source you want to include. The application does not select any options by default. -
Select the Inventory button to display the inventory options and choose Select Inventory to display the Inventory Selection list. Options include: All Inventory Items, particular inventory groups and sections, a particular vendor or group of vendors, inventory at a particular location, inventory classification (by Product ID, Range, Department, Class, and /or Subclass), or even a particular item.
3. In the Filter On section, you can choose None (for no filter) or you can filter on Discrepancies.
If you choose Discrepancies, you can specify a discrepancy threshold amount. The report would then highlight discrepancies above that threshold.
Note: In the Discrepancies Threshold field, the application defaults to the local currency set for the region.
4. In the Sort By section, you can sort in ascending or descending order by Branch, Transaction Type, Date/Time, Discrepancy Amount, or Group Section.
5. In the Totals section, you can organize the results of the report using Sub Totals, Grand Total, or None, and you can choose Print Totals Only to display the totals in the print version of the report alone.
6. In the Branch section, choose the branches you want to include in the report by selecting the check box beside each branch you want to include.
7. In the Print Options section, you can choose to print or save the report locally, based on your preferences. You can save the report in various formats as a document or a spreadsheet. These settings are no different from any other report.
8. In the upper right hand corner, there is an Include Sections list. These are the sections of the GL Inventory Reconciliation report, which you can include (by checking the option check box) or exclude (by leaving the check box unchecked).
-
Check the Ending Date Summary check box to summarize the value of the inventory stock based on the weighted average cost as of the last date of the report.
-
Check the Reconciliation check box to document the date/time/user ID, type description, and GL debits and credits showing the stock value changes in the discrepancy cost and correction notes.
-
Check the Setup Alerts check box to notify you of anything the application thinks you left out of the report that may be useful before you execute the report.
9. When you have completed your selections, you have several options:
-
Select Save (F6) to save the report. When you choose Save, the Save Report Settings box displays.
Enter the Report name, a description, and indicate whether the report is Public or Private. Then, select Accept. -
Select Preview (F8) to display the results of the report visually, but not print or save yet.
-
Select Process (F12) to display and process (print or save) the report locally.
The option to schedule the report also displays and that is covered in the next section.
Note: As with any report of this size and scope, this will take some time to generate.
Scheduling the GL Inventory Reconciliation Report
After you have crafted this report the way you want it, you can schedule it so that it runs at a specific time each day, week, month, or yearly. You can schedule it to run off hours, so it does not interfere with other application or business processes.
To schedule the GL Inventory Reconciliation Report:
1. Before you get started, you need to know the Schedule Report Directory path, which authorized users can find in Maintenance > Database > Parameters on the Setup > System tab. Copy and paste the path listed in the Scheduled Report Directory field somewhere nearby, because you will need it later.
2. Follow the instructions in Creating the GL Inventory Reconciliation Report to create the report parameters you want. In the Print Options section, choose the Output to File check box and choose a file location, a report name, and format type for the new report in the fields provided.
3. Select the Save (F6) option in step 9.
4. Select Cancel (F9). The application resets the page.
5. Choose Select (F5). The Select Report Settings box displays.
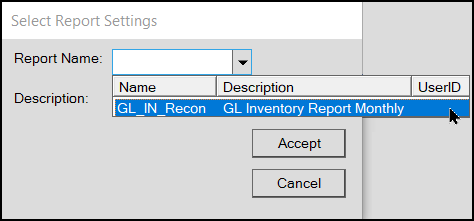
GL Inventory Reconciliation Report > Select Report Settings
6. From the Report Name list, choose the name of the report you want to run and select Accept.
The application updates the report fields with the choices you saved in the report.
7. Select Schedule (F7) to display the Schedule this Task list.
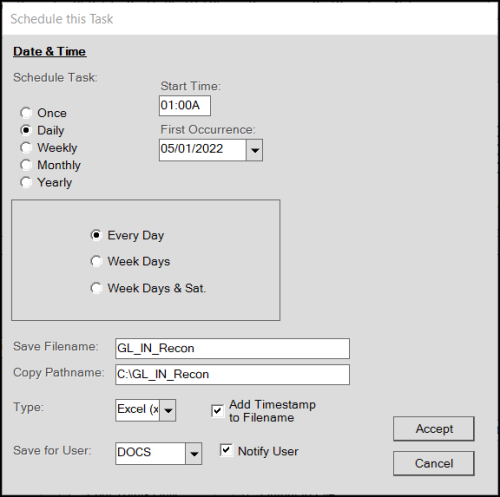
General Ledger Inventory Reconciliation Report > Schedule this Task Box
8. Consider when you want to run this report, how frequently, the time of day, and the file-specific settings in this box:
-
Schedule Task: Choose one of the following: Once, Daily, Weekly, Monthly, or Yearly.
-
Start Time: Enter the hour you want the report to run.
Note: Typically, you may want to schedule this report when the location is closed, so it doesn’t interrupt other normal business operations. -
First Occurrence: Choose the date of the first report from this list. The entries in the box are specific to the Daily, Weekly, Monthly, Yearly selection you made above.
-
Select Year/Month/Weeks/Days details: Use these fields and buttons to specify the recurring details for running the report. When you select Monthly, make sure you specify all of the months you want the report to run.
-
Save Filename: Choose the filename for the report.
-
Copy Pathname: Enter/paste the path to the Scheduled Report Directory folder, which you found in step 1.
-
Type: Select the report type (PDF, Excel, etc.) and check the Add Timestamp to Filename box to put the date and time stamp on the file after it has been generated. This will help you keep track of the reports by date in the same folder.
-
Save for User: To restrict access to this report, choose the user ID of the person for whom the application is generating the report. Select the Notify User check box to send an email message to this user after the report is complete. The application uses the email address stored in the user’s User ID Maintenance form.
9. When you have completed these entries and selections, select Accept to save them.
After you schedule this report, you can view it in the Task Scheduler.
Go to Maintenance > Task Scheduler and look up the day the report is scheduled.
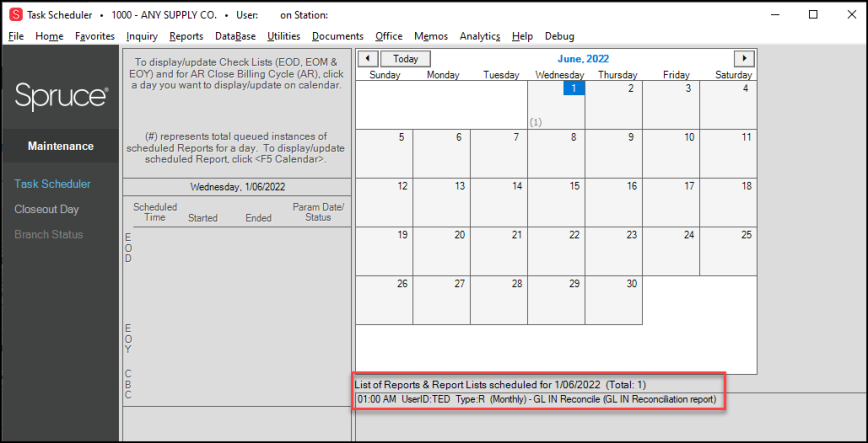
Task Scheduler with GL Inventory Reconciliation Report Scheduled