Managing Deliveries with Spruce Mobile Delivery
In this section, we cover managing a standard delivery, updating a delivery load, and handling other delivery scenarios that may occur while Dispatchers use JumpTrack.
Managing a Standard Delivery
For Dispatchers, setting up the delivery for JumpTrack is not that different from the current delivery process. Now, when you open the Load Schedule form, the application refreshes the load status and retrieves a token for sending the delivery data to JumpTrack. These tokens are valid for 30 minutes at a time.
Note: We consider full and partial deliveries standard. Rejected deliveries are covered separately in this document.
The Send to JumpTrack button is disabled by default as you do not want to send delivery data to the Driver until all data and materials are loaded. The following settings must be complete to enable the Send to JumpTrack button:
-
The staging of the delivery must be complete before you start (we don’t verify this before enabling Send to JumpTrack)
-
The load must have one or more deliveries (documents) assigned to it
-
The truck and driver must be assigned to the delivery
To set up a delivery load, add them to a truck, and deliver them to JumpTrack:
1. From the Main Menu, choose Delivery > Load Schedule.
The Load Schedule form displays.
2. In the Clipboard fields, search for the scheduled deliveries you want to assign to trucks and routes.
-
Starting Date / Ending Date
From these lists, choose the date range for the deliveries to be scheduled. -
Scheduled
Click this check box to collect the scheduled deliveries for the date range. -
To Be Delivered
Click this check box to collect deliveries that have not yet been completed within the date range. -
Pickups
Click this check box to collect these deliveries for the selected date range. -
Transfers
Click this check box to collect the inventory transfers scheduled for the selected date range.
3. When you have completed these selections, choose View.
The deliveries that meet the criteria you selected display.
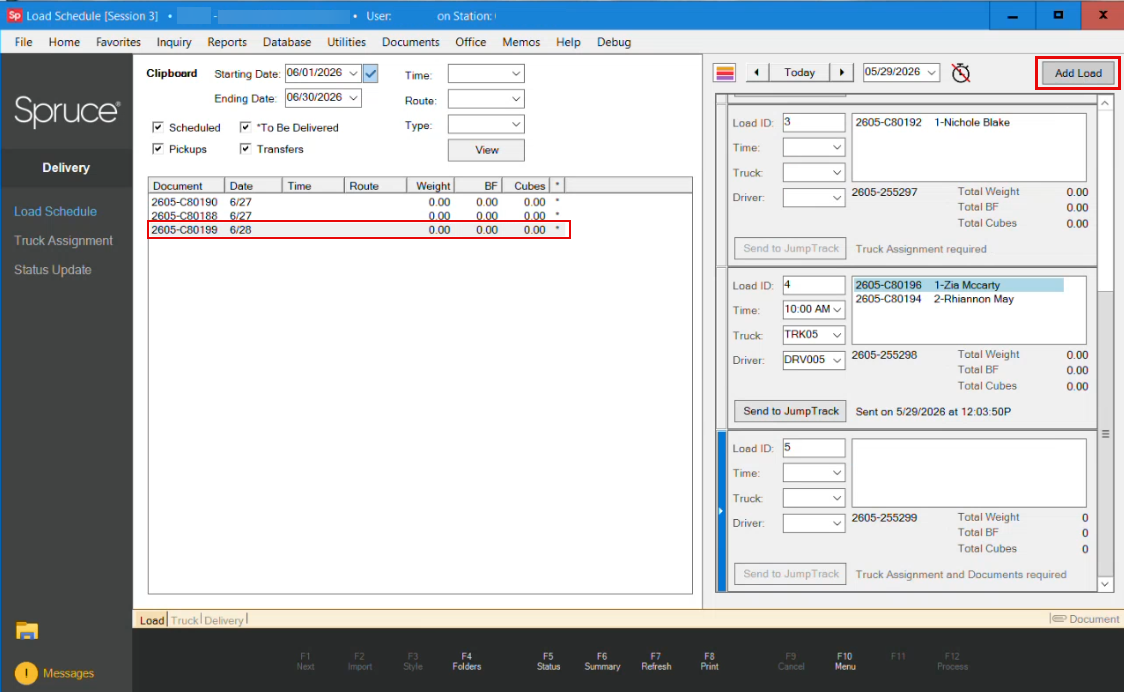
Load Schedule > Deliveries Collected
Note: Make sure the items are staged (have a yellow background) before you add them to the delivery load. This process is described in detail in this help topic. The Stage status does not affect the JumpTrack process.
4. In the right column, choose the delivery date from the list and click the Add Load button. A new Load displays in the list.
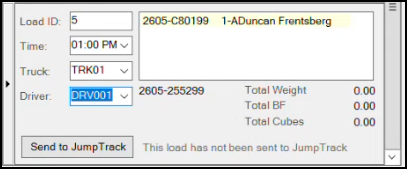
5. Update the Time, Truck, and Driver entries to begin the delivery schedule for the selected day’s scheduled deliveries.
Note: JumpTrack does not use or track the Time entry in the delivery load; Spruce uses it internally to help you keep track of your delivery schedule.
Delivery > Load Schedule > Adding Deliveries to a Truck Record
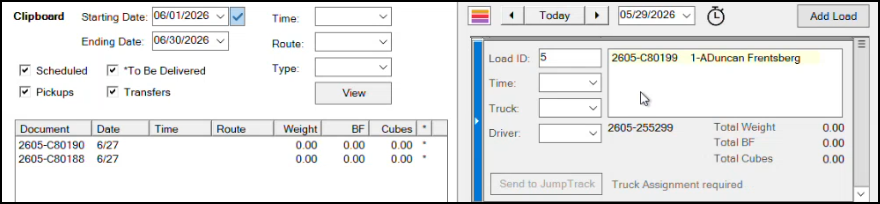
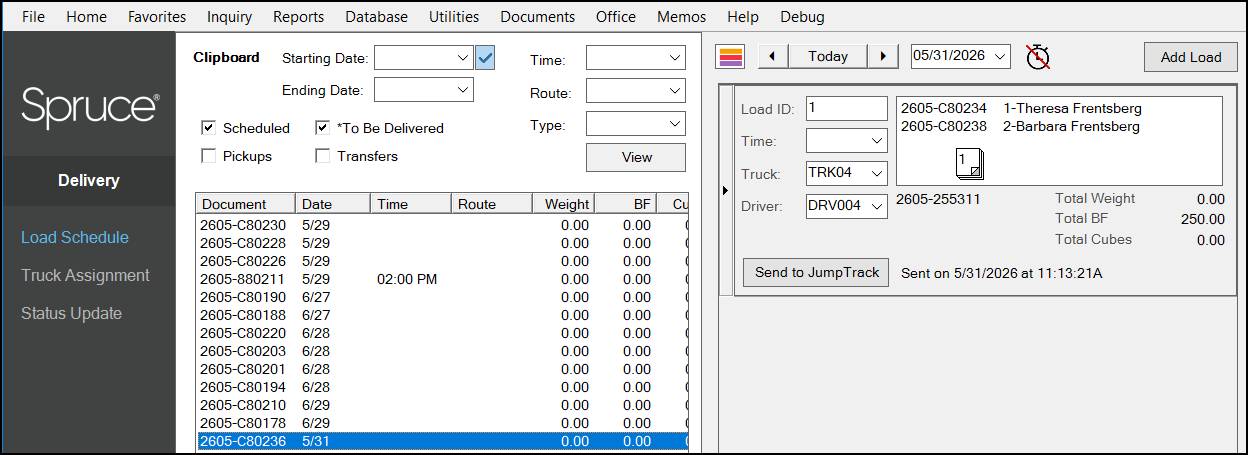
6. Drag the document from the left column to the delivery schedule to add it to the truck’s load. You can drag additional deliveries to the truck record to update the truck’s delivery load. For this example, we are including only one.
Delivery > Load Schedule > Ready to Send to JumpTrack
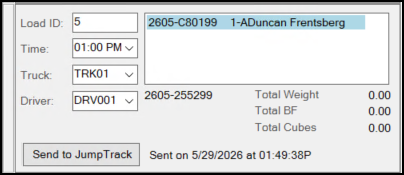
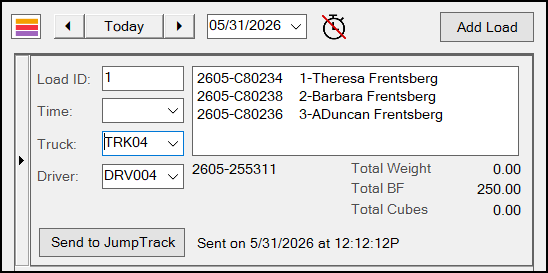
7. When the truck is fully loaded and scheduled, click Send to JumpTrack to send the load data to the Driver through JumpTrack.
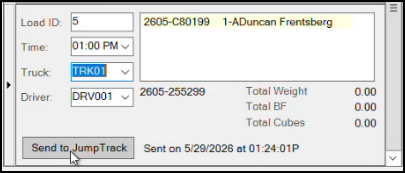
Delivery > Load Schedule > Sent to JumpTrack
The application adds the transmission date and time to the load record and stores these details until the load is updated with the delivery details. After you click Send to JumpTrack and the transmission is successful, you see the message: 201 Created: Load Details Sent.
Reviewing the JumpTrack Driver Delivery Process
The Driver opens JumpTrack on their phone, chooses their truck ID from the list, and clicks the delivery load entry in the list.

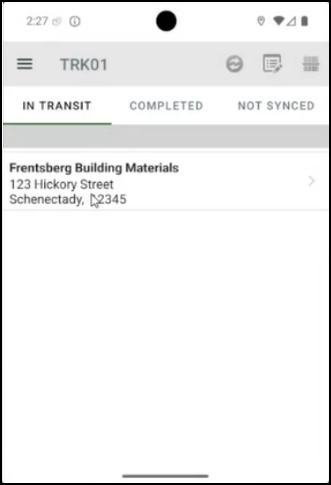
Driver: JumpTrack > In Transit Entry
Details of the delivery display.
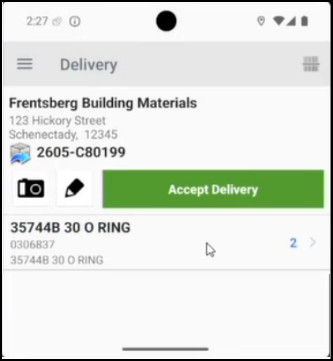
Driver: JumpTrack > Delivery Details
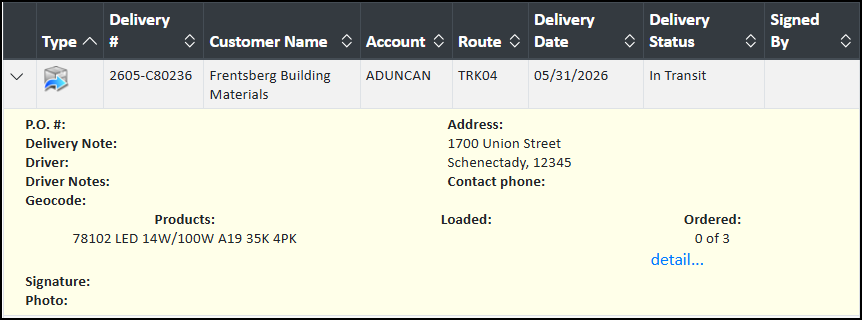
To review the status of this delivery in near real time, log in to the MyJumpTrack website and search by Customer or Route. The In Transit delivery details display.
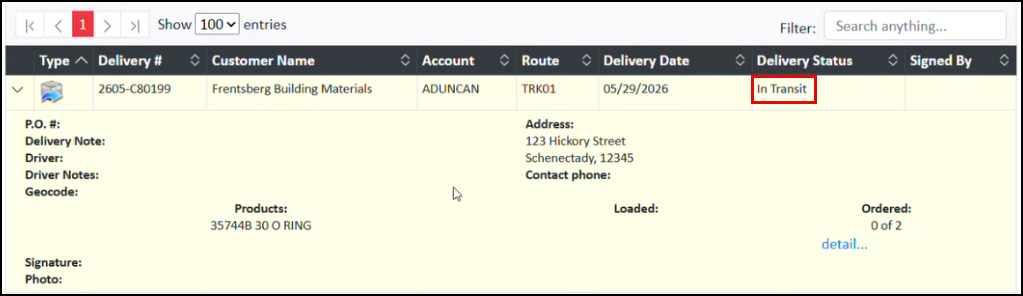
MyJumpTrack > Delivery In Transit
When the Driver arrives at the delivery site, they click the Camera icon to take photos of the delivered materials and store them in JumpTrack.

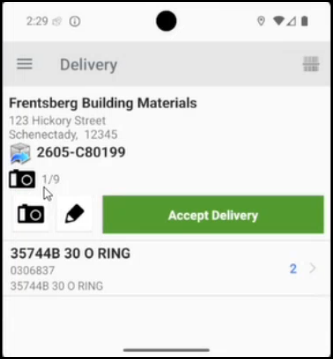
JumpTrack > Delivery Photo and Photo Entry in JumpTrack
When the Driver clicks the Notes icon, they can add a note:

JumpTrack > Add Delivery Note
When the Driver clicks the item quantity, they can record the number of delivered items. If the Customer requests a partial delivery, the Driver changes the item quantity and chooses a reason:
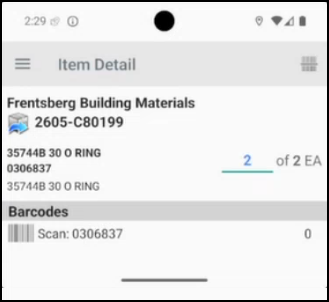
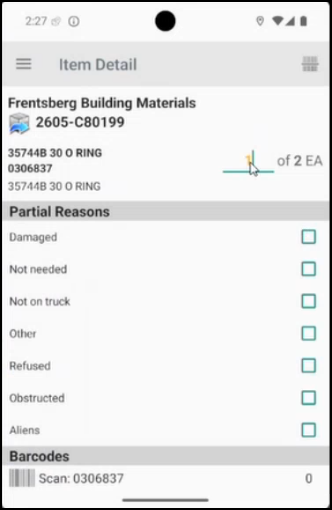
JumpTrack > Item Quantity Delivered or Partial Delivery Quantity Delivered
Partial Deliveries have a different delivery status, but they follow the same process. When the Customer is ready to sign for the delivery, the Driver clicks the Accept Delivery button to display the Signature page:

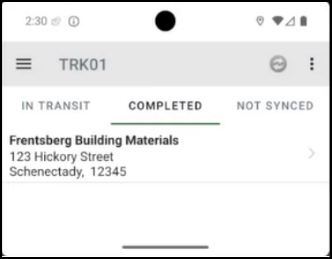
JumpTrack > Accept Signature and Completed Delivery Record
The Customer representative signs their name on the phone, and the Driver adds the name or initials to the delivery. When the Driver clicks Done, the delivery is complete. At this point, JumpTrack is ready to transmit the delivery data to the MyJumpTrack website. This transmission depends on the Driver’s internet connectivity.
-
If the internet is not available, transmission occurs when connectivity is restored.
-
If the internet connection is available, the transmission to the MyJumpTrack website occurs immediately and takes about five minutes.
Note: If a Dispatcher updates the Driver’s delivery load during the delivery process, this message displays in the Driver’s JumpTrack app: Route has been updated on the server. The entry also disappears from the MyJumpTrack website when this occurs.
Customer’s Email of the Completed Delivery
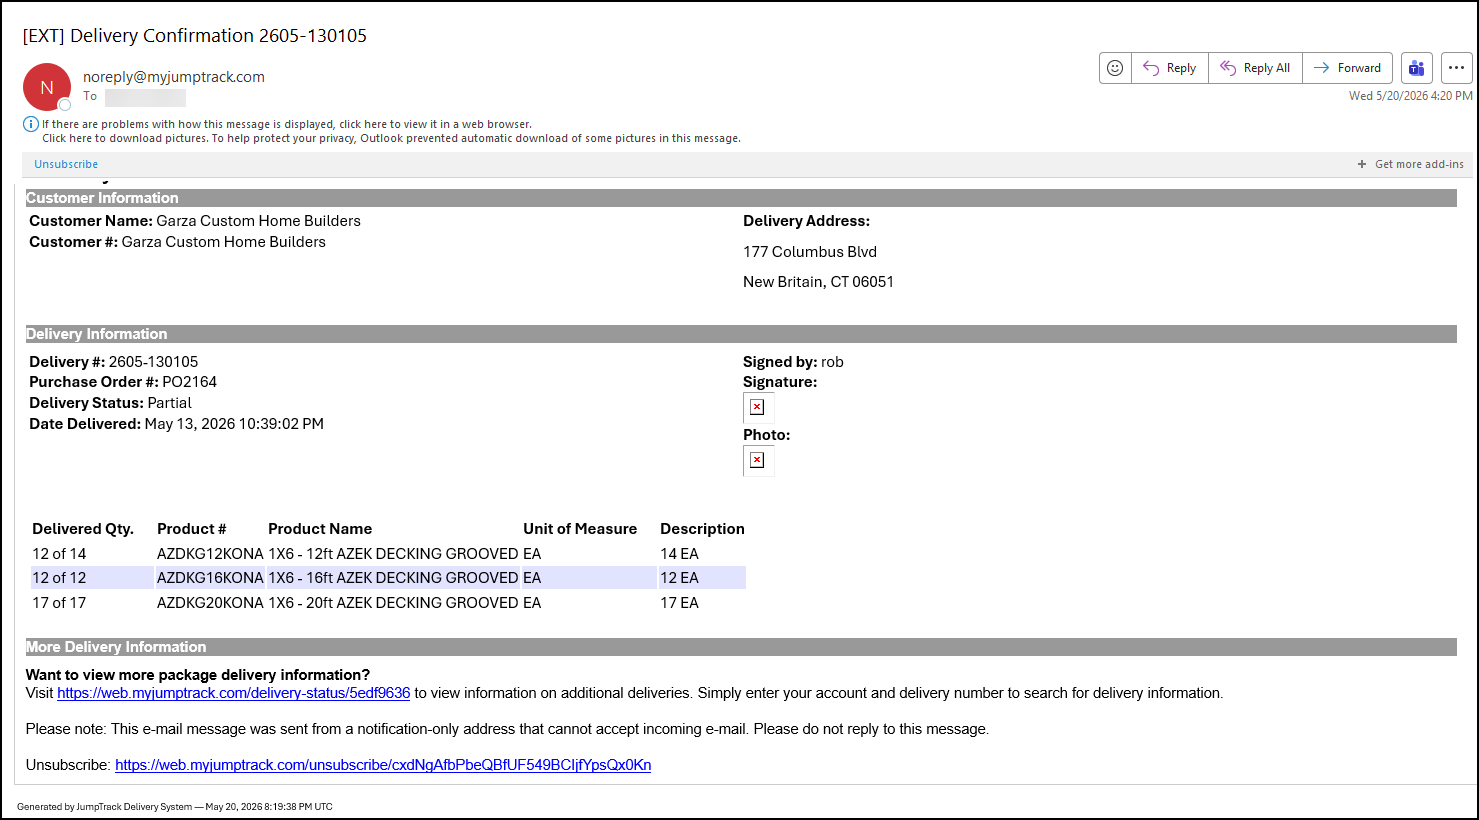
When the transmission to the MyJumpTrack website is complete, the Customer receives a noreply email with delivery details, including the signature and photos, within five minutes. The Delivery API uses the email address associated with the account (in the Account Maintenance > Contacts tab) to send this information. If no email address is associated with the transaction, no notification email can be sent.

Customer Delivery Confirmation Email Sample
Note: If there are multiple transactions for the same customer and the delivery occurs on the same day, JumpTrack sends the notification to the email address of the last processed document only. For transfers between branch locations, the process retrieves the email address from the account number lookup.
Dispatcher’s View of the Delivery Data (JumpTrack / Spruce)
When the Driver’s phone has internet access, JumpTrack sends this data to the MyJumpTrack website. There, the Dispatcher and other authorized users can review the delivery status with the photo, signature, notes, and item quantity details.
IMPORTANT NOTE: There are many delivery tasks that Dispatchers, Drivers, and Salespeople could initiate in MyJumpTrack, but we do not recommend that you use those tools. To stay the “source of truth” for deliveries, the data must come from Spruce and return to Spruce. MyJumpTrack is the fast-access, action-oriented layer on top, but Spruce is the system of record. Any delivery changes, such as adding a stop, updating an order quantity, or modifying an address — must still be done in Spruce and pushed through to JumpTrack and MyJumpTrack.
MyJumpTrack > Completed Delivery
When the Customer asks for a partial delivery, the Driver collects the same signature, photo, and delivery details, but MyJumpTrack reflects the Partial delivery status:
MyJumpTrack > Partial Delivery
The Deliver API adds the delivery details to Spruce, including the Customer’s signature and photos, which are stored with the document transaction record.

Documents > Viewer > Customer Order After Delivery
When you click the Attach setting, you can review the delivery photos (Drivers can capture up to 9). When you click View, you can choose the application you want to display the photo in, and then choose OK to display the photos.

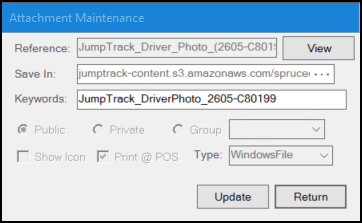
Attachment Maintenance Selection Options
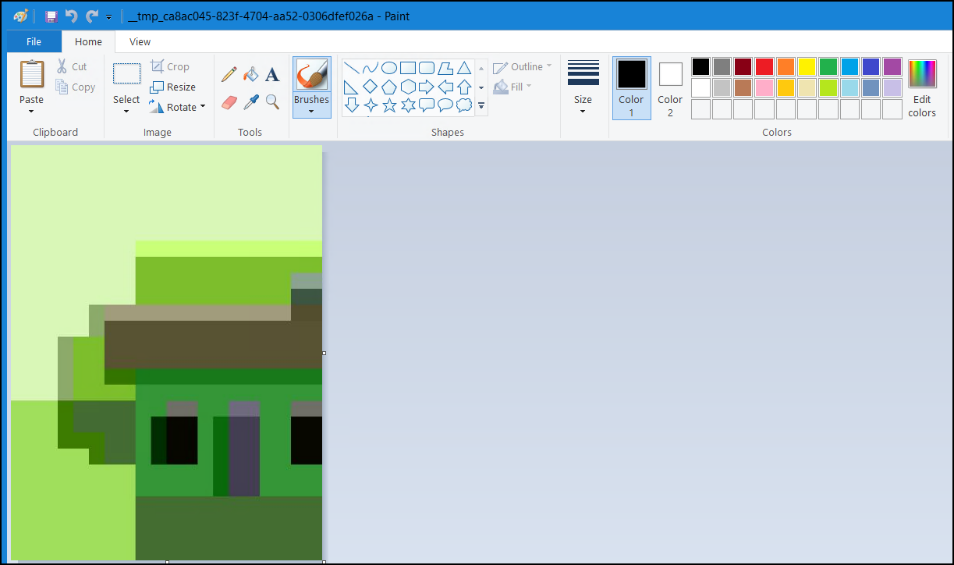
Paint > Image from Order Delivery
In the Load Schedule form, when a delivery is complete, the background of the delivery row turns blue:
Load Schedule > Delivery Complete
For a complete overview of the Dispatcher’s options for reviewing delivery data in MyJumpTrack, see the Dispatcher's Review of Delivery Status on MyJumpTrack section.
A Note about Pickups when Grouped with Deliveries
Customers often ask us to pick up items that they don’t need/want to return, which you can also set up in Spruce. We recommend you organize this as a separate transaction, specifically, as a Charge Return, because then you can handle the return of the items to inventory, when appropriate, and charge the customer a separate adjustment for the cost of the pickup. Dispatchers can initiate a pickup from the MyJumpTrack website, but you must then perform cost corrections and other more complicated transactions to account for the return of the products. For more about this process, see Pickup associated with Charge Returns.
A Note about Delivery Documents
The Delivery process is based on several types of transaction documents, including invoices, orders, transfers, charge returns, open tickets (for tracking item load statuses), and loads. Each of these document types can have delivery data tied to them as part of this process, which is accessible in Spruce.
Updating a Load and Sending it to JumpTrack
After you send a delivery load to a Driver, circumstances can change; a customer’s call can alter the delivery in an instant. Using the process described below, you can make changes to a delivery load and update the Driver’s schedule as needed:
-
Changing the order of the truck/lorry’s scheduled deliveries
-
Changing to a delivery address
-
Displaying decimal values in JumpTrack
-
Changing the delivery date
-
Changing the Driver to another Truck
-
Move one or more deliveries from one truck to another
-
Deleting a delivery from a load
As you make the necessary changes to a load, the Send to JumpTrack button re-enables, allowing you to send the changes to the Driver and replace the original data. We describe these processes below. You can change the truck that is handling a particular load in Spruce, and it will automatically update the JumpTrack and MyJumpTrack records.
Changing the Order of Deliveries in a Load
Changing the order of deliveries in a load works the same way in the Send to JumpTrack process as it does today. You can reorder the deliveries in the list and click Send to JumpTrack to update the load and send the updated list to the Driver.
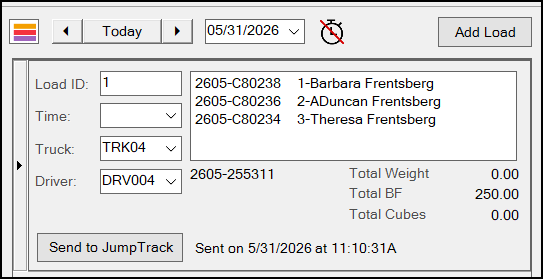
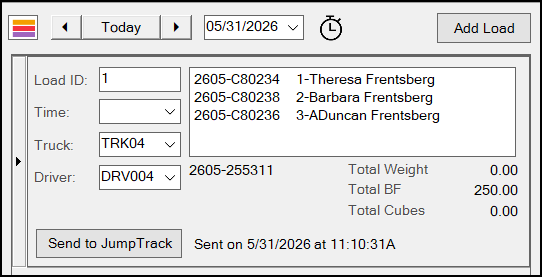
Delivery > Load Schedule > Change the Order of Deliveries in the List
This change even updates the delivery order in the MyJumpTrack Route Status form:
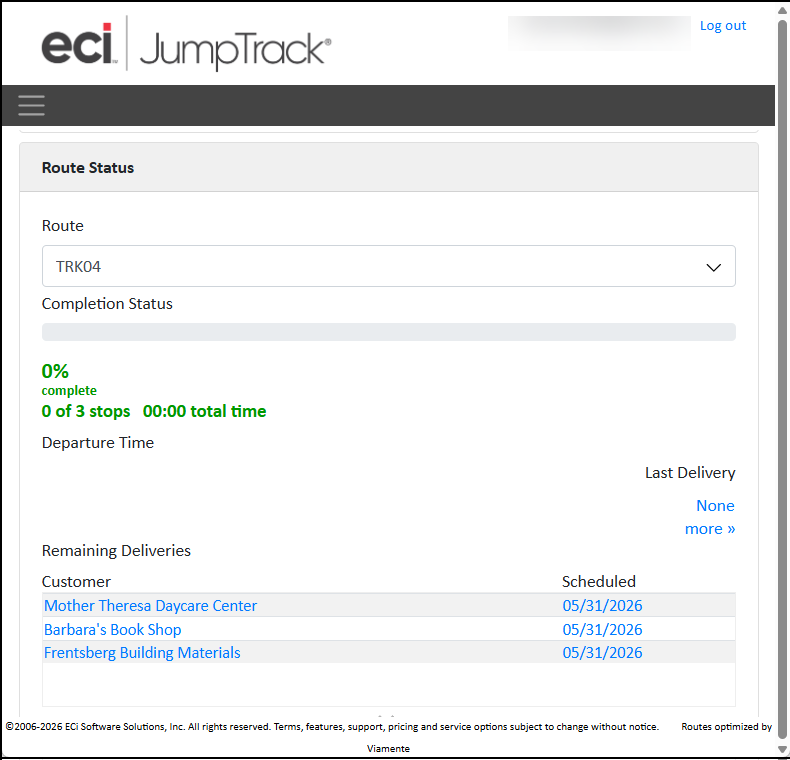
MyJumpTrack > Order of Delivery List
Changing the Address of a Delivery in a Load
Changing the address of a delivery requires that you return to the original transaction document, make the change in the address in the Delivery tab of the process document (which updates the delivery load), process the document, and then return to the Load Schedule to send the updated record using the Send to JumpTrack process. Begin in the Load Schedule form by removing the delivery entry from the load.
To change the address of a delivery in a load and resend it to the driver:
1. From the Main Menu, choose Delivery > Load Schedule. The Load Schedule form displays.
2. Find the delivery that contains the stop that requires the address change and drag the stop back to the Clipboard.
3. From the Main Menu, choose Point of Sale > (transaction type for which the address change is required). In this example, we use Orders.
4. In the Name field, choose the account for the transaction that needs to be changed and then re-select the transaction that needs the address change.
5. Choose the transaction for the address that needs to be changed.
6. Choose Process (F12) to display the transaction details.
7. Choose the Delivery tab and modify the address fields as needed.

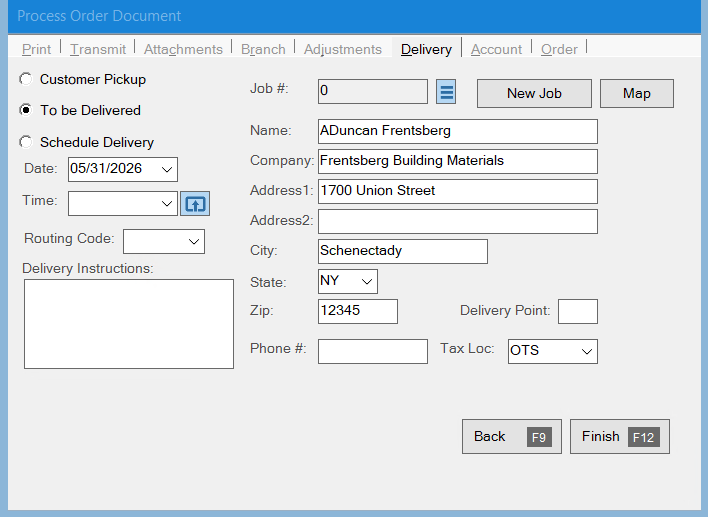
Process Order Document > Delivery Tabs with Address Change
8. Choose Process (F12).
Note: You will need to remove the transaction amount from the account’s General Ledger manually to ensure the transaction amount is not added again.
9. Return to the Delivery > Load Schedule form and double-click the same transaction ID in the Clipboard list to verify the address has changed in the Ship to field.
Delivery > Load Schedule > Address Verification
10. Re-add the transaction to the original load.
Delivery > Load Schedule > Drag Stop to Load
11. Choose Send to JumpTrack to update the Driver’s load.
Delivery > Load Schedule > Updated Load
The updated address appears immediately in the Driver’s JumpTrack record and in the MyJumpTrack system.
MyJumpTrack with Updated Delivery Address Entry
Displaying Decimal Values in JumpTrack
JumpTrack was not designed with building materials in mind, so it does not natively support decimal values in item quantities. To handle this display in the MyJumpTrack platform, the application stores the integer value in the Quantity field and adds the decimal value to the unit-of-measure label.
For example, 2.5 Linear Feet as a quantity in Spruce would display as 2 of 2.5 FT in JumpTrack. In Spruce, this value displays as:
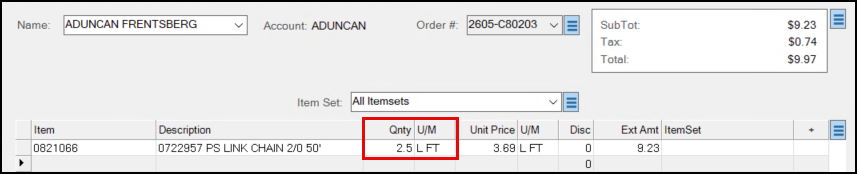
Order Entry > Quantity and Unit of Measure
In the Driver’s JumpTrack app, this value displays as:
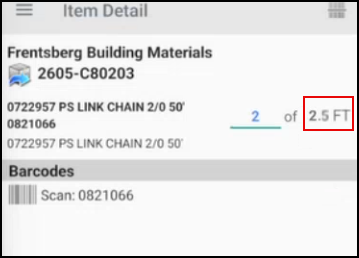
JumpTrack > Quantity and Unit of Measure
Changing the Delivery Date on a Load
To change the delivery date of a scheduled delivery on a load, remove the delivery from the current load and choose Send to JumpTrack. Then create a new load with a new delivery date and add the delivery to the new load.
Changing the Driver on a Truck
When the Driver assigned to a delivery load changes, there is no notification in JumpTrack, because the notifications are based on the Truck record, not the Driver. You may want to call the Driver on their phone to notify them if this occurs.
Moving Deliveries from one Truck to Another
If a truck breaks down, you may have to change the truck that is managing the deliveries by updating the Truck and Driver settings on the delivery load. You can do this by:
-
In the Load Scheduler form, find the existing delivery load and change the Truck and Driver entries to the new vehicle.
-
Choose the Send to JumpTrack button again.
When you change the truck that is handling a particular load in Spruce and click Send to JumpTrack, it sends an update to the original Driver’s JumpTrack app, and the delivery entries disappear from the list. When the new Driver selects their Truck entry in JumpTrack, the new list of deliveries display. This Send to JumpTrack action also updates the delivery records on the MyJumpTrack website.
Deleting a Delivery from a Load
Dispatchers can delete a delivery from a load in Spruce using the steps below. After this change is set to JumpTrack, the Driver is notified of the change and JumpTrack removes the address from the Driver’s delivery list.
To delete a delivery from a load:
To change the address of a delivery in a load and resend it to the driver:
-
From the Main Menu, choose Delivery > Load Schedule. The Load Schedule form displays.
-
Find the load that contains the delivery you need to remove.
-
Drag the delivery you want to remove from the load back to the Clipboard. The Send to JumpTrack button enables.
-
Click Send to JumpTrack to transmit the updated delivery information to the Driver.
Dispatcher Review Delivery Status on MyJumpTrack
As a Dispatcher, you can look up the status of a JumpTrack delivery using the MyJumpTrack website. The credentials are provided to you during the Implementation setup process. When everything goes as expected, you can follow this process to review the status of the scheduled deliveries.
To look up the status of a delivery on MyJumpTrack.
1. Log in to the MyJumpTrack website using the credentials provided to you by the Implementation Team. The Home page displays.
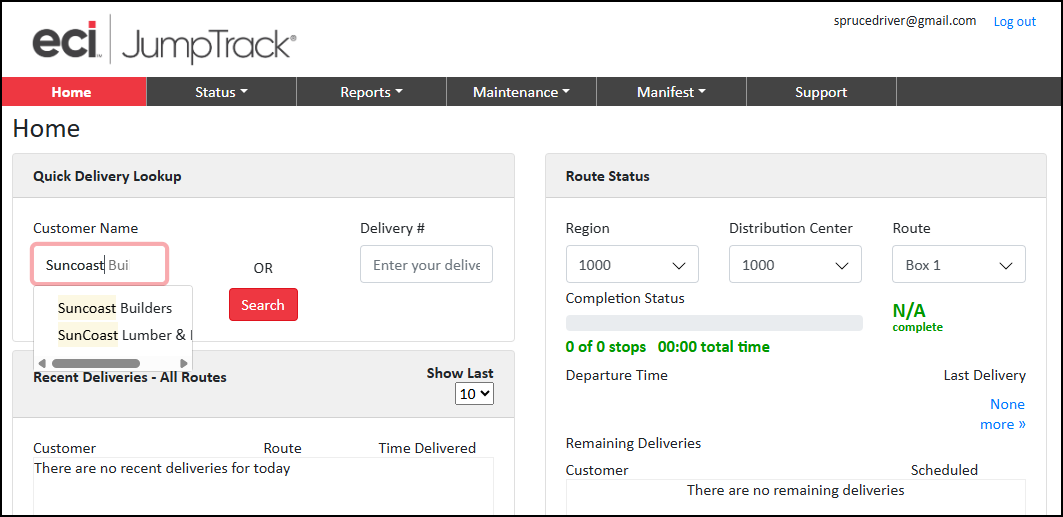
MyJumpTrack > Home Page > Customer Name Entry
2. In the Customer Name field, enter the name of the business whose delivery you are looking for and click Search. The results display in the Status tab.
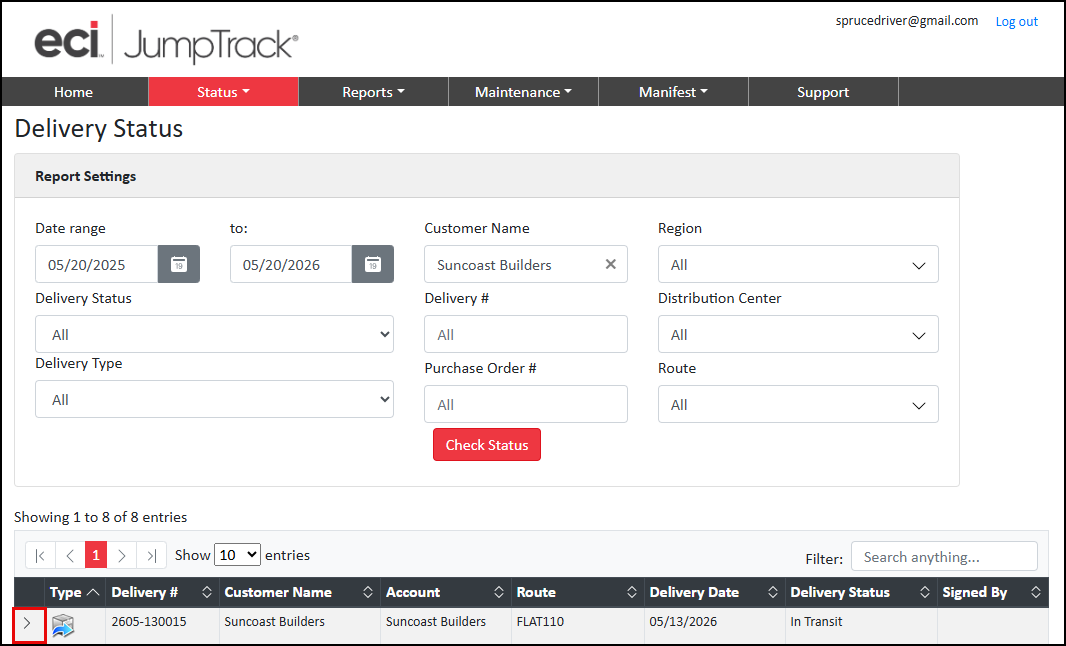 MyJumpTrack > Delivery Status > Entry
3. Beside the delivery entry, click the arrow to display the details.
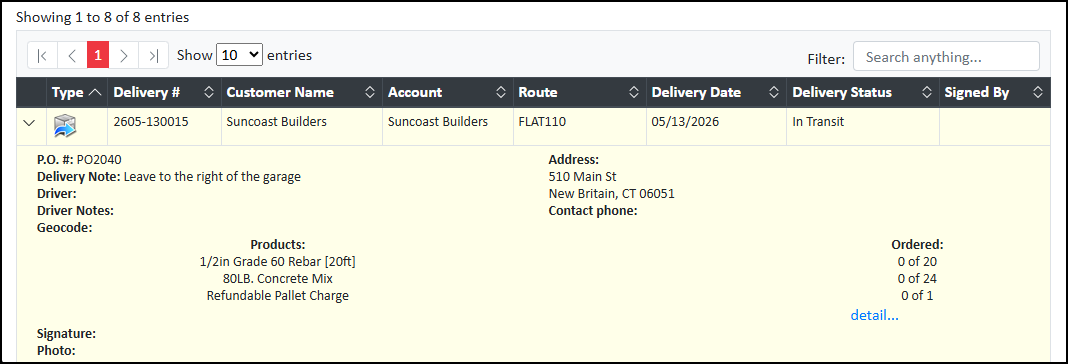 MyJumpTrack > Delivery Status > Delivery Status Details (In Transit)
4. Click the detail link to display the items to be delivered:
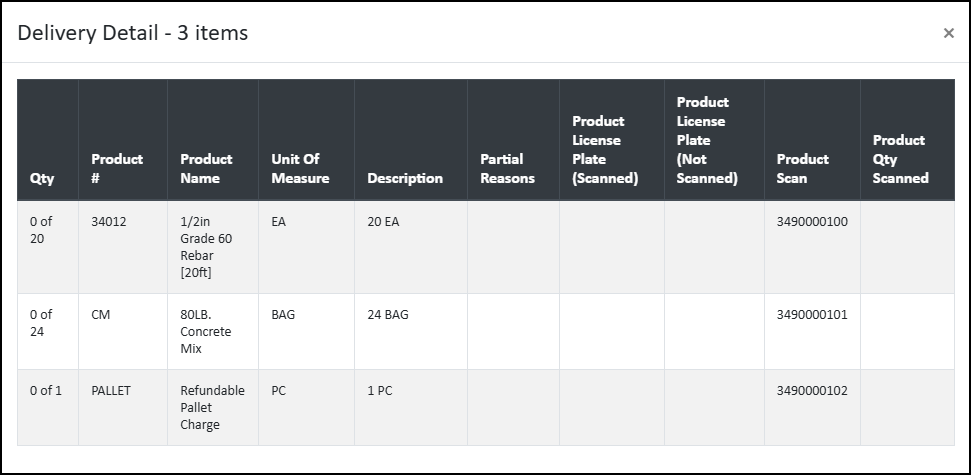
MyJumpTrack > Delivery Status > Delivery Items List
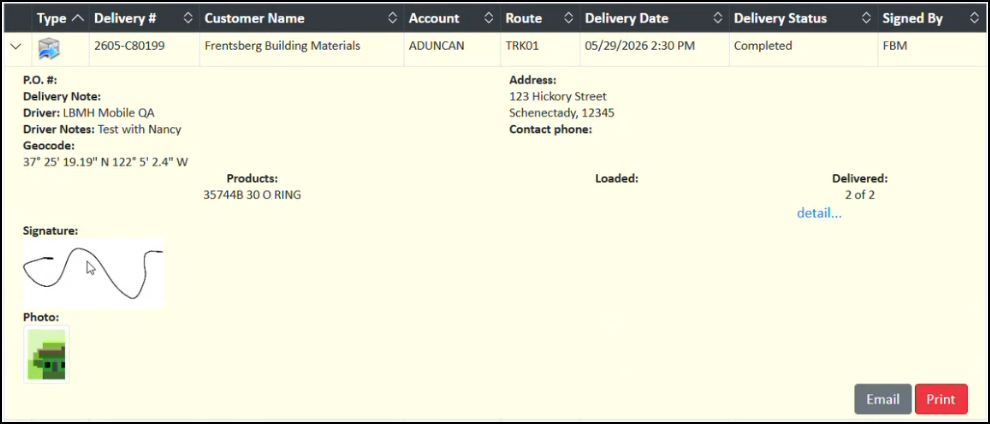
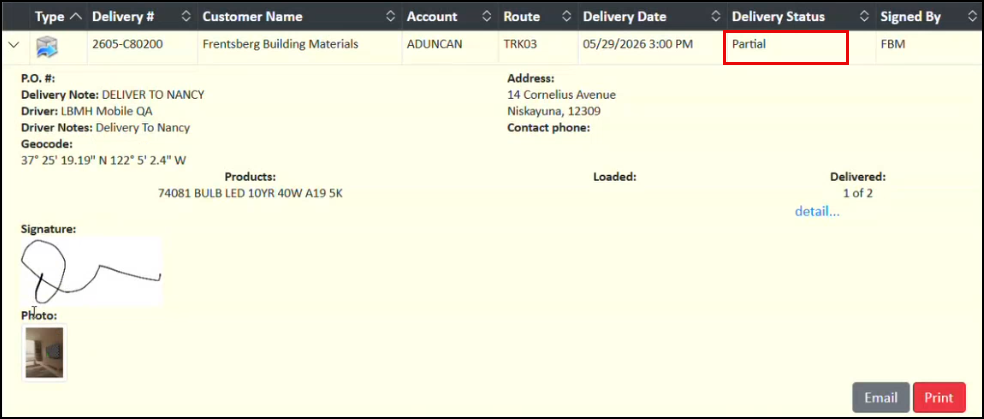
When you select a delivery with the status of Completed, JumpTrack Delivery Status Details show the receiving customer’s signature, the photos taken by the driver of the delivered materials, and any notes the driver completed pertaining to the delivery.
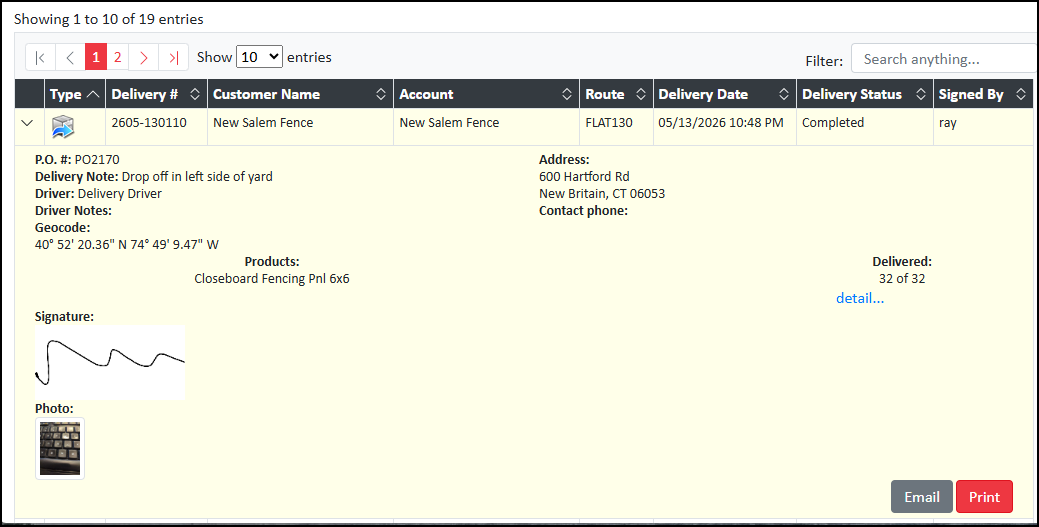
MyJumpTrack > Delivery Status > Delivery Status Details (Completed)
When the status is Partial, JumpTrack displays the signature for the items that were delivered, pictures of the delivery, and any notes submitted by the driver.
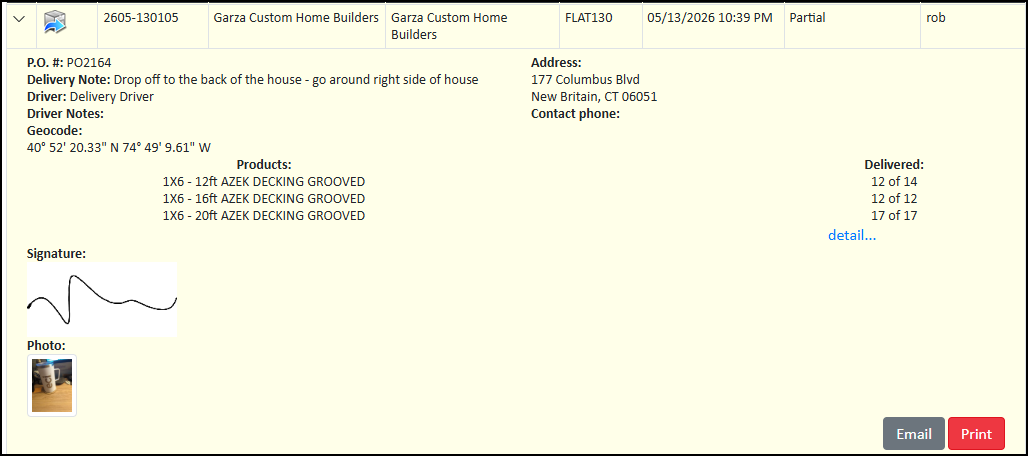
MyJumpTrack > Delivery Status > Delivery Status Details (Partial)
When you click the details list, you can see the items that were delivered and the items that were not:

MyJumpTrack > Delivery Status > Delivery Status Details (Partial Details)
5. For delivered or partially delivered loads, you have two options for sharing the delivery information:
-
Print > You can save the delivery information as a PDF document (to your Download directory) or print it using a secure printer.
-
Email > You can share the results of any delivery with team members internally via email.
Note: JumpTrack sends email notifications to customers after the delivery; see Customer's Email of the Completed Delivery to learn more about this.
To email a Salesperson or other internal staff member about a delivery's details, click the Email button.
The Email Delivery Detail box displays.
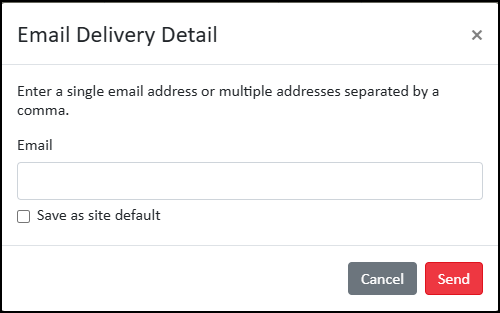
MyJumpTrack > Delivery Status > Email Delivery Detail
Note: Sending the delivery email with the images attached is particularly useful when a customer disputes the delivery details. This will only be needed if the customer does not have an email address associated with their account.
6. Enter the email address you want to transmit the delivery information to and click Send. MyJumpTrack sends the email a few minutes later containing an overview of the delivery details.
Email Delivered
To review the images associated with the delivery you received by email, you can click the photos to open them or click the provided Visit link. MyJumpTrack validates the user’s permissions and displays the Delivery Status form:
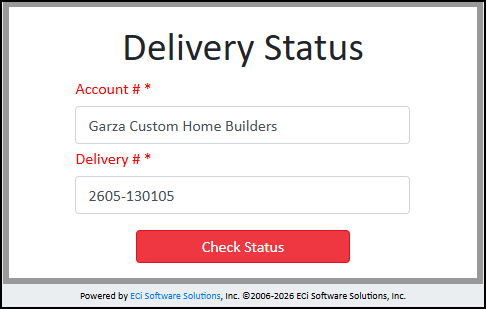
MyJumpTrack > Delivery Status > Email Search
7. The email recipient enters the Account # and Delivery # entries from the email and clicks Check Status to display the results.

MyJumpTrack > Delivery Status > Delivery Status Detail (Email Results)
From here, you can close the page or print it to preserve a record of the delivery details.
Delivery Reports
There are two delivery reports available in the application. These reports will only work after the settings below are complete, and there is delivery data to mine:
-
The .Net Delivery option has been enabled in the Delivery parameters, and
-
Transactions have been queued for delivery after the feature has been enabled
The Deliveries Report lists the transactions (invoices, orders, and tickets) designated for delivery during the report's date range. You can include item details, if needed. The report filters are based on the delivery status of the transactions. Only transactions that have been added to the delivery queue are included on the report, regardless of status choices (None means "no filters" and not "no delivery status"). To learn more about this report, see the Deliveries Report topic.
The Delivery Loads Report lists manifest documents and related information for the specified time period and/or route. The details of the delivery documents assigned to the load may also be included. Filters allow reporting only on completed loads, loads in progress, and all delivery loads. To learn more about the Delivery Loads Report, see the Loads Report topic.