Check Register
The check register updates automatically when payments are disbursed (application generated checks) or invoices are marked paid manually (by updating their status in Billing Entry). Most other entries are manually added, such as deposits, adjustments, bank fees/charges, and interest (using the Add/Modify (F8) function). Register records are sorted by date with the newest entries appearing at the top of the grid. Companies may have one or more check registers defined. A check register is required for processing payments; however, it does not have to be maintained unless you choose to do so.
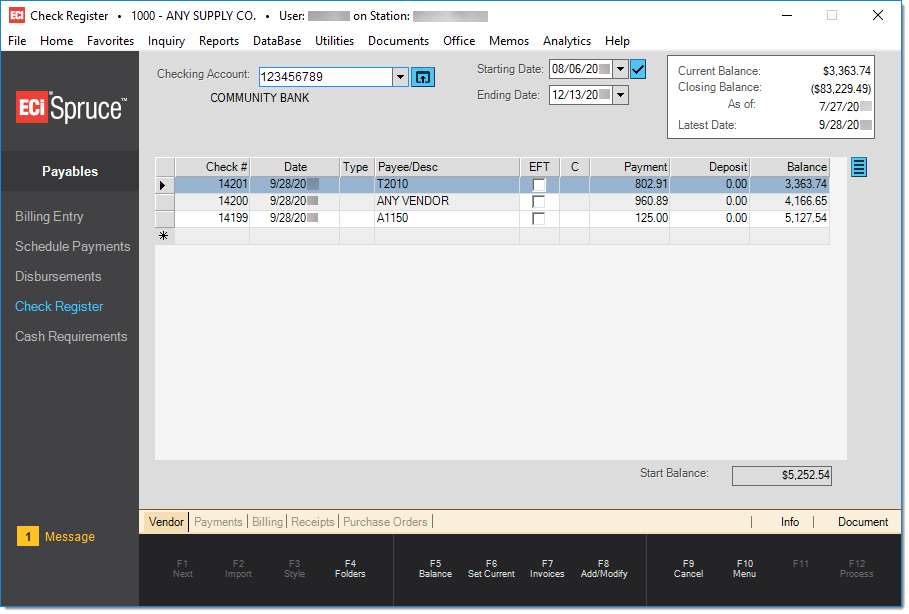
If your company has more than one check register, select the appropriate register from the drop down.
Select a date range using the calendar option or click on the date tool ![]() to pick from selection of presets. When selected using a preset, dates display in green text. The default date range is always the "Last 30 Days."
to pick from selection of presets. When selected using a preset, dates display in green text. The default date range is always the "Last 30 Days."

Understanding the Check Register Grid
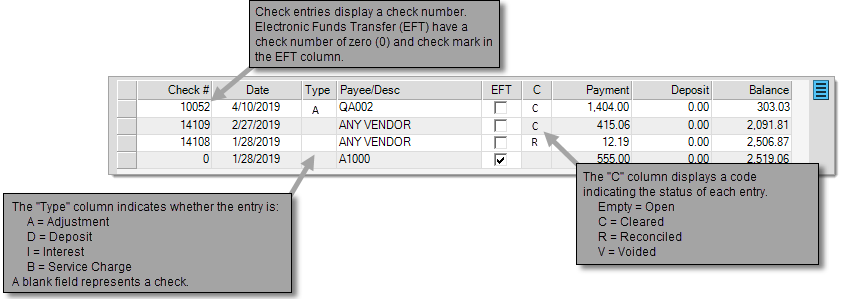
The Check Register grid lists all entries made in the check register. The check # (when applicable), date, type, payee (or description), EFT (Electronic Funds Transfer flag), status, payment amount, deposit amount, and running balance are shown.
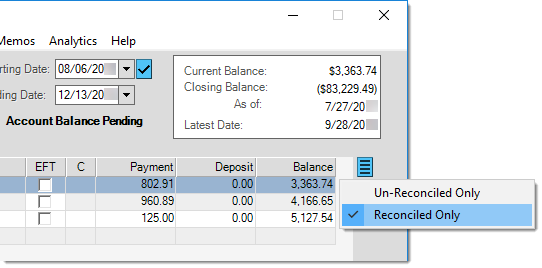
Filtering based on Status
The context menu associated with the menu marker icon ![]() found to the right of the check listing (data grid) offers options for filtering the records displayed based on the reconciled status of those items. No selection displays both reconciled and non-reconciled (open) items. The "un-reconciled" option includes cleared (C) and open items, but not reconciled (R) or voided (V) records. Reconciled only includes "R" (reconciled) items.
found to the right of the check listing (data grid) offers options for filtering the records displayed based on the reconciled status of those items. No selection displays both reconciled and non-reconciled (open) items. The "un-reconciled" option includes cleared (C) and open items, but not reconciled (R) or voided (V) records. Reconciled only includes "R" (reconciled) items.
Deposits and Other Adjustments
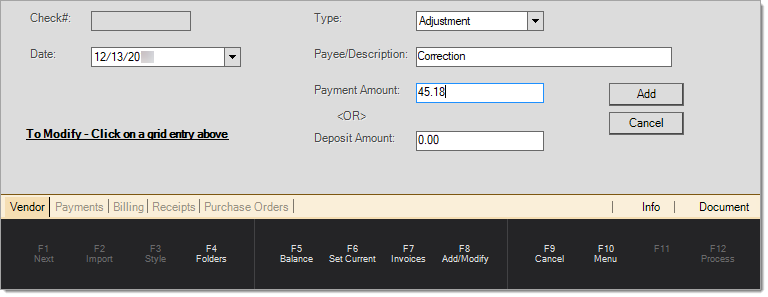
Deposits, interest, bank fees (charges), and adjustments may all be made by adding an entry in the grid area. Choose the Add/Modify (F8) function to either add a new manual entry or to modify a prior one.
Deposits and other manual entries made from the Check Register area do not create ledger entries. To reflect a deposit (or other adjustment) in the ledger, it's necessary to post either a manual or standard journal. Manual journal entries can affect the register if (1) the register is mapped to a ledger account used in the transaction and (b) if the same account is only assigned to one register.
Previous adjustments can be modified later until they have been marked as either canceled or reconciled. Check entries cannot be modified.
Balancing the Register
To balance the register to your actual bank statement, begin by selecting the Balance (F5) function. A window will open displaying the beginning balance (the balance from the last time the register was balanced). Enter any interest or bank charges that were not previously entered as adjustments. If used, the interest or bank charges on the form create new entries in the check register. Enter the ending balance including the new amounts entered in this form (if any) from the bank statement.
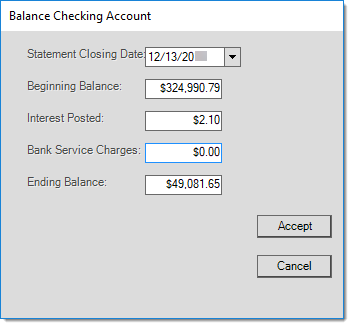
At this time, the check register screen will change to a reconcile display. This allows the user to select those checks (payments) and other entries (deposits, interest, etc.) that appear both on the bank statement and in the check register. For each entry on the bank statement, find the corresponding payment, etc. and click in the check box under the "C" (cleared) column. As entries are marked canceled, the reconciled total will change accordingly (displayed to the left of the grid). The reconciled total begins with the entered "beginning balance" and cleared items are either added or subtracted from that figure (based on the type of entry).

Once all items on the bank statement have been located and marked as cleared, the "difference" between the Reconciled Total and Statement Balance should be zero. When this is the case and all entries have been compared, click on the Next button to complete the reconciliation. The "next" button is only available when the difference between the ending statement balance and the reconciled total are zero. Otherwise, users may only postpone the reconcile, not complete it.
")
If the bank statement and reconciled total do not match, there is a discrepancy that must be addressed before the register may be reconciled. Find the problem, correct it, and repeat this process until the 2 amounts match and the difference is zero. Use the Postpone button to return to the regular check register display. Users may choose to resume the same reconcile session using the previous balances and adjustments entered or they can cancel the previous session and start over. If a reconcile is currently postponed for a selected checking account, the form will display the message "Account Balance Pending" below the starting and ending date fields.
Note: When resuming a postponed session, users should be aware that the "beginning balance" will reset automatically to the last reconciled balance for the register. In cases when the beginning balance was modified prior to postponing the session, changes to the beginning balance are not retained and will have to be adjusted manually again if appropriate. Modifications to the beginning balance should not be necessary as long as reconciles are being done properly and on a regular basis; however, it may be required the first time the register is being reconciled.
Reconciling a Checking Account for the 1st Time
When first using Payables with the
Adding and Modifying a Checking Account
To add a new bank account, or modify a current account, use the process form that appears to the right of the Checking Account selection ![]() . The menu marker
. The menu marker ![]() (if enabled) on the Checking Account Maintenance form can be used to delete an inactive checking account or to disable an existing checking account with past activity.
(if enabled) on the Checking Account Maintenance form can be used to delete an inactive checking account or to disable an existing checking account with past activity.
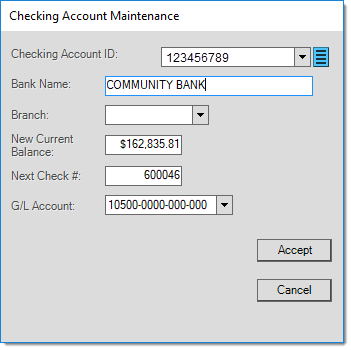
Checking Account ID
Check account ID is a numeric (integer) field. No spaces, alpha, or symbol characters are therefore allowed. Leading zeros are not maint links
ained if entered. Additionally, because the field is maintained as an integer, there is an upper limit to the value it can hold (2,147,483,647 is the largest number). If your bank account number is greater than 9-digits in length and higher numerically than the maximum integer, you won't be able to use the same number as your register ID. In this case, consider using the last 4-digits of the account number or just assign a sequential or other number to each account you add (1, 2, 3, etc.). For security reasons, it may not be best to use your actual account number.
In selection listings, the account number is always listed along with the bank name, so this is typically more useful in identifying the account. The application does not print the checking account ID on checks, so it doesn't have to match your actual account number as any processing requirement (routing and account numbers on checks must be pre-printed on your forms using special magnetic ink).
Checking accounts are listed in selection lists numerically by the ID number you choose. For this reason, you may want to base your numbering decision upon the order that you want your checking accounts to appear. If you are starting with just one register, but may consider adding additional one's in the future, consider numbering your registers in increments of 10 or 100 so that you can insert future registers above or below an existing one in the listing.
Bank Name
Enter a name to describe the account in selection listings. This name is not printed on check documents but may appear on reports.
Branch
This is an optional selection. If this check register should be limited to only allow selection from a single branch or branch list, enter the branch ID or choose the list from this field (branch lists must be selected after choosing the "Branch List" option from the alternate menu).
New Current Balance
This is used to set the balance of the register when adding a new register. If an existing register is being modified, changes to the "new current balance" will produce an adjustment (see the note below). Instead of entering a starting balance, you could begin with a zero balance and then enter a deposit or adjustment to set the balance. Once set, the initial balance is marked as "reconciled" and cannot be modified using the Add/Modify (F8) function.
|
Important! The "New Current Balance" amount on the Checking Account Maintenance form is only a true opening balance when adding a new check register. If the "new" balance is modified on an existing checking account, the check register will show a "balance adjustment" for the current date. If any future dated items exist in the register, the "new balance" entered is not going to properly adjust the "current balance" which would have included future items. |
Next Check Number
The "Next Check Number" is used to initially set or modify the numbering sequence for the selected checking account. This number will be used for the next check processed via the Disbursements activity in Payables.
G/L Account
If a G/L (General Ledger) account is mapped with the Checking Account and the same ledger account is not mapped to any other check register, manual journals which are processed with debits or credits to that account can automatically create check register entries (a prompt is provided when processing, so this is optional). This does not work in the opposite direction, however. Deposits, interest, and other adjustments done directly from the Payables Check Register area don't affect the ledger.
Check Listing (Grid)
The grid area lists checks for the specified date range. Check date, check number, and payee (or adjustment type) are listed for reference. A running balance is provided (Balance) as well as a payment and deposit column. The EFT column is used to indicate if the payment was made by an electronic transfer of funds (EFT). If so, a check mark will appear in the box (this is not user modifiable). The "C" column indicates the status of the entry ("c" for cleared). Letter codes indicate the status of the item. Statuses are set manually using either the Balance (F5) function or the Check Back out utility. Checks that have been reconciled against the bank statement appear with an "R" in the C column. Voided (backed out) checks appear with a "V" and will show a zero dollar amount.
Invoice Reference Details
Use the Invoice (F7) function to display a separate grid that lists all of the invoices associated with the currently selected check (upper grid). If no details appear, a payment (check) might not be selected, click on the check entry in the upper grid to display that check's invoice references (these would also be printed on the check voucher).